Grid control ... continued 1
In the first post we have broken the grid functionality into several classes. Let's quickly describe them again:
We also described models and view for text data (ModelText, ModelTextCallback. ViewText). Let's try to create a grid and attach text data to it. New functionality that is needed for the standard grid will be added in the form of special Model / View / Controller.
For brevity, I will omit pointers, shared_ptr, etc. in the code. So let's go ...
Not bad, I just want to somehow isolate the cells: draw either through the stripes or the grid. Let's implement one, and then another option. Hope the code speaks for itself.
It remains to add a call to the new function in main
Now we implement the grid.
')
The next common place for all grids is the notion of selected cells. Previous views did not store any data, so we did not create models for them. Here the situation is a bit more complicated. What should be included in the ModelSelection? First, a set of selected cells, and, secondly, the coordinates of the active cell (this is the cell that is usually marked with a frame, and using the keyboard we work with this cell). Write the code:
I omit the implementation of the controller to save space. Believe me, everything is also simple there: by pressing the left mouse button, we change the active cell to the one under the arm. When moving the mouse and releasing the left key, we create a special Range, which describes a rectangular block of cells from the active (where we pressed the button) to the current one. We set this Range in selection. You also need to consider the state of the Shift and Ctrl keys, but these are details. As a result, we get the following picture.
To enable the user to change the size of rows and columns, we need to implement a special controller that, by pressing the mouse button near the edge of the cell, will remember the position of the mouse, and when the mouse is pressed, it will change the width of the column by the difference between the initial and the current ones. I hope the idea is clear. It is worth noting that our controllers “live” in views (views), so we need to create a dummy View, which draws nothing, but only defines a rectangle in which the controller will be activated.
Quite often, grids have a title — the part of the grid that always remains at the top of the window. Sometimes there is a similar construction on the left (usually they write the line number there). When scrolling these areas remain in place. Let's see how the headline might look like:
Very similar to a grid consisting of one line and the same number of columns as the original grid. Then we can say that the title is a grid, the columns of which are synchronized with the columns of the original grid (in fact, the same grid Lines instance is used in two grids). This grid is located at the top of the window and scrolls horizontally only. A similar statement can be said about the left fixed part, only there the lines are synchronized. Thus, in our GridWindow class, live four CacheGrid instead of one.
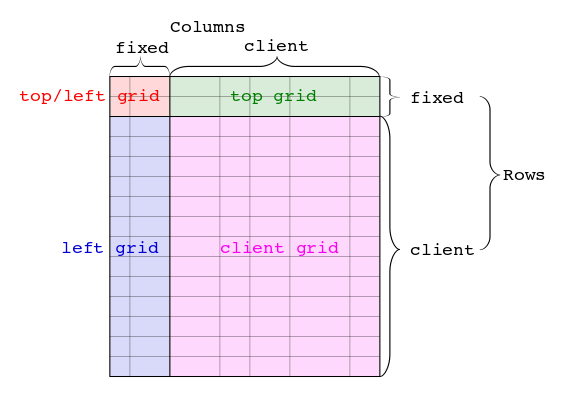
Let's go even further and say that fixed areas can be from any side.
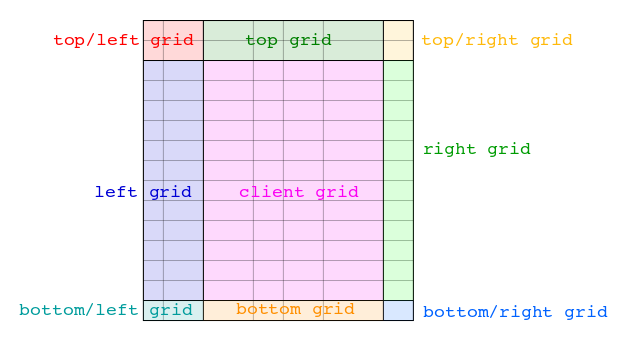
So, the GridWindow class has become more complicated - instead of one CacheGrid, we have nine of them. The functions of drawing, scrolling, handling mouse events should also become more complicated. I propose here to stop and take a close look at the last drawing. From a distance, it looks like an area divided into nine sub-areas in three lines and three columns. It looks like a grid with three rows and columns, in the cells of which other grids are displayed. By definition, our View is so universal that it can display any entity. So let's create a View, which displays a grid in the cell. For our case with nine grids, we get about the following classes:
Here we will stop again and see what kind of maneuver we have just made? In the beginning, we had a statement - a grid is a set of cells, and a cell is a place where anything is displayed. Now it turns out that a cell can display anything, including a grid. The chain is closed - the grid draws cells, the cells draw a grid. This raises the philosophical question of chicken and egg. What comes first? A grid that consists of cells, or a cell that can represent anything, including a grid. It seems that the concept of a cell is more universal. Remember the CellCache class from the first article - the first thing the three <Range, View, Layout> triples were filtered by Range, that is, in fact, the cell should then store not triples, but <View, Layout> twos - which describe what and where in the cell paint. CellCache is able to draw itself and handle mouse events (transferring them to the necessary controller), while the Grid is not mentioned anywhere.
But what if we create a window class that will not draw a CacheGrid, but a CacheCell? Then we’ll get not a grid window class, but a more versatile control, in which we simply, in the form of <View, Layout> twos, ask what and where to draw. For example, the combination {<ViewCheck, LayoutLeft>, <ViewText, LayoutAll>} gives us the standard control of the checkbox. Other combinations will give other types of controls, and different Layouts give us the opportunity to have Views in any configuration. For example checkbox to the right of the text, below, above - as you like.
Let's call this window the ItemWindow (a cell is a concept closely related to the grid, item is more neutral). I have a hierarchy of three classes:
As a rule, when developing a library of visual components, they first define simple types of windows, then move to more complex (item based). At this point, the basic concepts of the window are already fixed and do not take into account the specifics of item-based windows. Therefore, they come up with some other abstractions that are not related to the basic concepts of the window. As a result, it is impossible to organically use simple and complex controls together. We went from a complex control and we ended up with simple windows. But their structure is a bit more complicated than in ordinary window frameworks. But we get universality - Views and Layouts are used in both simple (ItemWindow) and more complex controls. It turns out once implementing ViewCheck, we can use it as a simple control and as a sub-element of the grid.
The article turned out to be rather long and complicated, so for now I’ll finish it. If something seems incomprehensible or incorrect to you, please write comments, I will edit the article. Thus, the article for all will be easier and more understandable.
In the next article I will describe how you can make an introspection for our window. Any tool capable of sending messages to the window and interpreting a sequence of bytes will be able to “communicate” with the grid. This will allow us to make a binding to the grid on python and do automatic testing of our control. I will also tell you how all sorts of “sweets” from devexpress are implemented in my scheme. As I said, a working prototype of this architecture already exists, so it will not be difficult to implement it in open source.
- Lines - represents a set of columns or lines.
- Range - describes any collection of cells.
- Layout - allows you to place data inside the cell.
- Model - defines the data access interface for View and Controller.
- View - shows information in the cell.
- Controller - allows the user to change data.
- CacheCell - caches data for a visible cell.
- CacheGrid - caches data for the visible part of the grid.
- GridWindow is a special control.
We also described models and view for text data (ModelText, ModelTextCallback. ViewText). Let's try to create a grid and attach text data to it. New functionality that is needed for the standard grid will be added in the form of special Model / View / Controller.
For brevity, I will omit pointers, shared_ptr, etc. in the code. So let's go ...
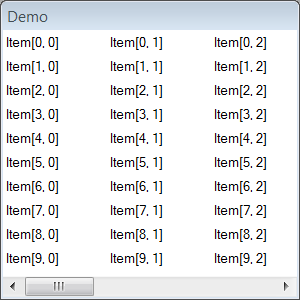
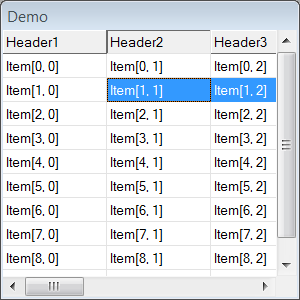
int main() { Application app; // GridWindow grid_window("Demo"); // ModelTextCallback m; m.getCallback = [](CellID cell)->String { return String.Format("Item[%d, %d]", cell.row, cell.column); }; // , grid_window.AddData(RangeAll(), ViewText(m), LayoutAll()); // grid_window.SetRows(10); grid_window.SetColumns(10); // grid_window.Show(100, 100, 300, 300); app.run(); } Not bad, I just want to somehow isolate the cells: draw either through the stripes or the grid. Let's implement one, and then another option. Hope the code speaks for itself.
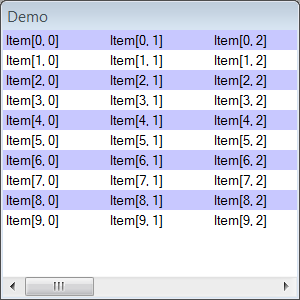
class ViewOddRowBackground: public View { public: void Draw(DrawContext& dc, Rect rect, CellID cell) const override { // , if (cell.row%2 == 0) dc.FillRect(rect, ColorRGB(200, 200, 255)); } }; void plugOddRowBackgroud(Grid& grid) { grid.AddData(RangeAll(), ViewOddRowBackground(), LayoutAll(Transparent)); } Notice, we passed the parameter Transparent in LayoutAll, it says that this layout will not modify the rectangle of the cell. Remember that by default, LayoutAll "takes" the entire free area of the cell and zeros it. In Transparent mode, it will not do this and the next ViewText will get the same original rectangle.It remains to add a call to the new function in main
GridWindow grid_window("Demo"); plugOddRowBackgroud(grid_window.GetGrid()); Now we implement the grid.
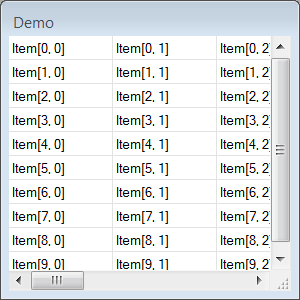
class ViewCellBounds: public View { public: void Draw(DrawContext& dc, Rect rect, CellID cell) const override { // dc.Line(rect.BottomLeft(), rect.BottomRight()); // dc.Line(rect.TopRight(), rect.BottomRight()); } }; void plugCellBounds(Grid& grid) { grid.AddData(RangeAll(), ViewCellBounds(), LayoutAll(Transparent)); } ... GridWindow grid_window("Demo"); plugCellBounds(grid_window.GetGrid()); ')
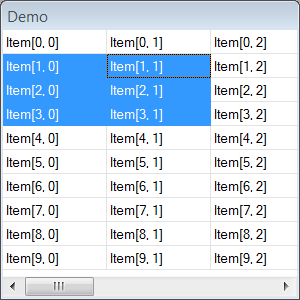
The next common place for all grids is the notion of selected cells. Previous views did not store any data, so we did not create models for them. Here the situation is a bit more complicated. What should be included in the ModelSelection? First, a set of selected cells, and, secondly, the coordinates of the active cell (this is the cell that is usually marked with a frame, and using the keyboard we work with this cell). Write the code:
class ModelSelection: public Model { public: Range GetSelectedRange() const { return m_selected_range; } void SetSelectedRange(Range new_selected_range) { m_selected_range = new_selected_range; changed.invoke(*this); } CellID GetActiveCell() const { return m_active_cell; } void SetActiveCell(CellID new_active_cell) { m_active_cell = new_active_cell; changed.invoke(*this); } private: Range m_selected_range; CellID m_active_cell; }; class ViewSelection: public View { public: ViewSelection(ModelSelection selection) : m_selection(selection) {} void Draw(DrawContext& dc, Rect rect, CellID cell) const override { // -> if (m_selection.GetActiveCell() == cell) dc.DrawFrame(rect); // -> // if (m_selection.GetSelectedRange().HasCell(cell)) { dc.FillRect(rect, ColorSelectedBackground); dc.SetTextColor(ColorSelectedText); } } private: ModelSelection m_selection; }; ModelSelection plugSelection(Grid& grid) { ModelSelection selection; grid.AddData(RangeAll(), ViewSelection(selection), LayoutAll(Transparent)); return selection; } ... GridWindow grid_window("Demo"); plugCellBounds(grid_window.GetGrid()); plugSelection(grid_window.GetGrid()); I omit the implementation of the controller to save space. Believe me, everything is also simple there: by pressing the left mouse button, we change the active cell to the one under the arm. When moving the mouse and releasing the left key, we create a special Range, which describes a rectangular block of cells from the active (where we pressed the button) to the current one. We set this Range in selection. You also need to consider the state of the Shift and Ctrl keys, but these are details. As a result, we get the following picture.
To enable the user to change the size of rows and columns, we need to implement a special controller that, by pressing the mouse button near the edge of the cell, will remember the position of the mouse, and when the mouse is pressed, it will change the width of the column by the difference between the initial and the current ones. I hope the idea is clear. It is worth noting that our controllers “live” in views (views), so we need to create a dummy View, which draws nothing, but only defines a rectangle in which the controller will be activated.
Quite often, grids have a title — the part of the grid that always remains at the top of the window. Sometimes there is a similar construction on the left (usually they write the line number there). When scrolling these areas remain in place. Let's see how the headline might look like:
Very similar to a grid consisting of one line and the same number of columns as the original grid. Then we can say that the title is a grid, the columns of which are synchronized with the columns of the original grid (in fact, the same grid Lines instance is used in two grids). This grid is located at the top of the window and scrolls horizontally only. A similar statement can be said about the left fixed part, only there the lines are synchronized. Thus, in our GridWindow class, live four CacheGrid instead of one.
Let's go even further and say that fixed areas can be from any side.
So, the GridWindow class has become more complicated - instead of one CacheGrid, we have nine of them. The functions of drawing, scrolling, handling mouse events should also become more complicated. I propose here to stop and take a close look at the last drawing. From a distance, it looks like an area divided into nine sub-areas in three lines and three columns. It looks like a grid with three rows and columns, in the cells of which other grids are displayed. By definition, our View is so universal that it can display any entity. So let's create a View, which displays a grid in the cell. For our case with nine grids, we get about the following classes:
class ModelGrid: public Model { public: ModelGrid(); CacheGrid GetGrid(CellID cell) const { return m_grids[cell.row][cell.column]; } private: CacheGrid m_grids[3][3]; }; class ViewGrid: public View { public: ViewGrid(ModelGrid model) :m_model(model) {} void Draw(DrawContext& dc, Rect rect, CellID cell) const override { CacheGrid cacheGrid = m_model.GetGrid(cell); cacheGrid.Draw(dc); } }; In the ModelGrid constructor, nine CacheGrid objects are created and the rows and columns are synchronized. It is also not difficult to implement the controller. If we add a ViewGrid to our old GridWindow class, which had only one CacheGrid object, then we do not need to create a new type of GridWindow. The only difference is that we need to pass the position of the scrollbars to subgroups: the angle grids will ignore the scrolling position (Top / Left, Top / Right, Botton / Right, Bottom / Left), the Top and Bottom grids will scroll horizontally, the Left and Right will be scrolled horizontally . Well, the central Client grid will be scrolled on all sides. At the same time, the code for rendering and interaction with the mouse will remain the same.Here we will stop again and see what kind of maneuver we have just made? In the beginning, we had a statement - a grid is a set of cells, and a cell is a place where anything is displayed. Now it turns out that a cell can display anything, including a grid. The chain is closed - the grid draws cells, the cells draw a grid. This raises the philosophical question of chicken and egg. What comes first? A grid that consists of cells, or a cell that can represent anything, including a grid. It seems that the concept of a cell is more universal. Remember the CellCache class from the first article - the first thing the three <Range, View, Layout> triples were filtered by Range, that is, in fact, the cell should then store not triples, but <View, Layout> twos - which describe what and where in the cell paint. CellCache is able to draw itself and handle mouse events (transferring them to the necessary controller), while the Grid is not mentioned anywhere.
But what if we create a window class that will not draw a CacheGrid, but a CacheCell? Then we’ll get not a grid window class, but a more versatile control, in which we simply, in the form of <View, Layout> twos, ask what and where to draw. For example, the combination {<ViewCheck, LayoutLeft>, <ViewText, LayoutAll>} gives us the standard control of the checkbox. Other combinations will give other types of controls, and different Layouts give us the opportunity to have Views in any configuration. For example checkbox to the right of the text, below, above - as you like.
Let's call this window the ItemWindow (a cell is a concept closely related to the grid, item is more neutral). I have a hierarchy of three classes:
- ItemWindow is a universal control that contains one instance of CacheCell. In fact, the whole window is a single cell.
- ListWindow is the heir of ItemWindow. Adds a ViewGrid to the CacheCell instance, which will draw one grid in the cell. This option is good for simple lists without fixed areas (title, etc.)
- GridWindow is a heir of ListWindow. Makes a grid, declared in ListWindow, with three rows and columns. It sets another ViewGrid on this grid, which draws nine sub-grids. This is a control for those who need headlines.
As a rule, when developing a library of visual components, they first define simple types of windows, then move to more complex (item based). At this point, the basic concepts of the window are already fixed and do not take into account the specifics of item-based windows. Therefore, they come up with some other abstractions that are not related to the basic concepts of the window. As a result, it is impossible to organically use simple and complex controls together. We went from a complex control and we ended up with simple windows. But their structure is a bit more complicated than in ordinary window frameworks. But we get universality - Views and Layouts are used in both simple (ItemWindow) and more complex controls. It turns out once implementing ViewCheck, we can use it as a simple control and as a sub-element of the grid.
The article turned out to be rather long and complicated, so for now I’ll finish it. If something seems incomprehensible or incorrect to you, please write comments, I will edit the article. Thus, the article for all will be easier and more understandable.
In the next article I will describe how you can make an introspection for our window. Any tool capable of sending messages to the window and interpreting a sequence of bytes will be able to “communicate” with the grid. This will allow us to make a binding to the grid on python and do automatic testing of our control. I will also tell you how all sorts of “sweets” from devexpress are implemented in my scheme. As I said, a working prototype of this architecture already exists, so it will not be difficult to implement it in open source.
Source: https://habr.com/ru/post/204374/
All Articles