Dynamic Access Control: Resource Property Lists and File Classification
 Already during the three articles of this series, we are discussing an interesting and relatively new technology called Dynamic Access Control , or, as it sounds in the original, Dynamic Access Control , DAC. In other words, if you remember exactly what you could learn earlier, the very first article dealt with the very purpose of this technology, as well as its advantages over the methods of managing permissions for data in previous operating systems from Microsoft. The second article in this series was devoted to such an integral part of this technology as statements, types of statements, and conditional expressions. The third part was relatively small, and from it you could learn about such a concept as the properties of resources. Today we will continue to combine theory with practical examples and, first of all, as is clear from the title of this article, we will continue the topic of resource properties, and I will tell you in a few words about such a concept as lists of resource properties.
Moreover, a lot of attention in this, fourth, article of this interesting cycle will be devoted to such a topic as file classification, and for the implementation of which you will learn about such a tool as “ File Server Resource Manager ” or, more simply, FSRM. Consequently, you will learn about the very purpose of this tool, about some general principles of working with the FSRM, as well as what the manual classification is and the classification rules. That is, as you can see, there will be a lot of material in this article, and, as I hope, you will learn a lot of new and interesting information. In this case, let's get started.
Resource Property Lists
You learned more about the properties of resources from the previous article. In short, a property of a resource is a certain entity that describes a characteristic feature of a resource, which can be objects such as, for example, files or folders. Let's look at the properties of resources even deeper and try to determine what these lists are, which are discussed in this section of this article. Lists of resource properties to some extent can be compared with security groups in Active Directory Domain Services. Why so, you ask. And here everything is simple. Similar to security groups, resource property lists allow you to logically group resource property objects that were previously created. In other words, according to the official definition, logically grouped objects of resource properties using these same lists of resource properties provide the simplest and most effective method used to assign a set of resource property objects that you choose to be used for use with certain file servers.
Even before you start creating resource property objects in your company or on a test bench, you can find in Active Directory Administration Center of Windows Server 2012 and Windows Server 2012 R2 operating systems that the first object created by default has been created for you Global Resource Property List . Such a list of resource properties is created for the entire Active Directory forest and, since this list is used for all file servers of the company, the resource properties included in this object will be applied in all cases. It is for this reason that Windows Server 2012/2012 R2 file servers can contain several lists of resource properties that you will already create manually.
It turns out that it is thanks to these lists of resource properties that additional security properties property objects that you added to resource property lists, in particular the Global Resource Property List, will be displayed in the advanced security settings and conditional editors. And for this reason, if you think that you will need to use some kind of resource property object for authorization, you will have to add such an object to the Global Resource Property List. Well, such property lists of resources on file servers are configured, as you most likely have already guessed, directly using the functionality of a technology such as group policy.
Creating and Configuring Resource Property Lists
Actually, in this part of the article there is simply no way for a lot of theoretical material, so perhaps we move on to the practice itself and see how it is possible to create and configure such lists of resource properties. As in the previous cases, such tasks can be performed using either the Active Directory Administrative Center or Windows PowerShell. Of course, then we will consider both methods.
Creating and Configuring Resource Property Lists Using Active Directory Central Administration
Since the most common task performed with lists of resource properties is to add existing resource property objects to the main Global Resource Property List, now you will learn about:
- How can I add a new object to the Global Resource Property List;
- How you can create your own list of resource properties and add a resource property object to it;
- You will also learn about searching for resource properties among your objects in resource property lists.
Let's start in order, that is, by adding a new resource property object to the standard Global Resource Property List . For this you will need:
- On the domain controller, open the Active Directory Administration Center snap-in, where in the list area you need to select the Dynamic Access Control node, and then select the Resource Properties Lists node ( Dynamic Access Control> Resource Properties Lists );
- Now you can step through the “Resource Properties Lists” area in this step , or select the Global Resource Property List object and open its properties dialog box, where you need to click on the “Add” button in the Resource Properties group. , or, you can select this object, follow the link “Add Resource Properties” ( Add Resource Property ) from the “Tasks” area . Now I will use the second method, since the properties dialog box for the list of resource properties will be discussed in more detail below:

Fig. 1. Adding a resource property from the task pane to an existing list of resource properties - Now, being in the dialog box for selecting resource properties, you should select the desired resource property object from the left list, and then you need to click on the corresponding button, which will allow you to add such an object to the “Add the following resource properties” area. ) . Naturally, in case you need to add several resource property objects, you can select them while holding down the CTRL key. After your objects are added, you should click on the “OK” button to save your changes. For example, in this case, the Region object that was created in the previous article will be added:
')
Fig. 2. Selecting the resource property object to add to the list
As you can see, the procedure is extremely simple.
Now we will try to create a new list of resource properties and immediately when we create it we will add several resource property objects there. What it looks like:
- When you are in the same Active Directory Administrative Center node, that is, in the Resource Properties Lists node, you must select New , and then New> Resource Properties List , as shown in the following illustration:
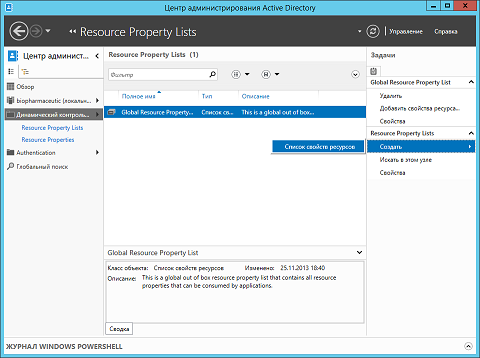
Fig. 3. Creating a new list of resource properties - The “ Create a List of Resource Properties ” dialog box that appeared before you, in fact, even looks much simpler than all the previous dialog boxes that we have encountered in previous articles in this series. Here, as can be seen in the illustration below, you can find only four subject to changes to the control, namely:
- Name Of course, this is the very first and, in fact, the only text field that you need to fill out to successfully create such a list. This name must be unique, and it will be displayed in the Resource Properties Lists node, in the classification user interface, as well as in other elements of the Active Directory Administrative Center console and various system components. As in the case of resource properties, you can name your resource properties in alphanumeric format. For example, our list of resource properties will be called “ First RPL ”;
- Description (Description) . As with almost all objects that you can create in the Windows Server operating system, you can add a description for the property property lists. It will certainly come in handy when you have created many such lists. As in most cases, the maximum allowable number of characters in this text field is 1024. For example, in our case, let “First test list of resource properties” be written as a description;
- Protection from accidental deletion (Protect from accidental deletion) . As usual, this is a checkbox that can now be detected with almost every object that is being created, which, naturally, greatly simplifies the life of many administrators by protecting the object being created from unintentional or malicious deletion;
- Resource Properties . This is a whole group in which you can specify all resource property objects that can be associated with the list you are creating. By default, no objects have been added to this group, and this means that you can even create the list itself without a single resource property, and you can add them as you create them. Such objects are added to this group very simply. To do this, you need to click on the Add button, and then, using the Select Resource Properties dialog box you already know from the previous part of this section, you should follow the required steps to add the necessary resource properties . This has already been discussed above, and in this example, the property of the resource “ Region ” will also be added.
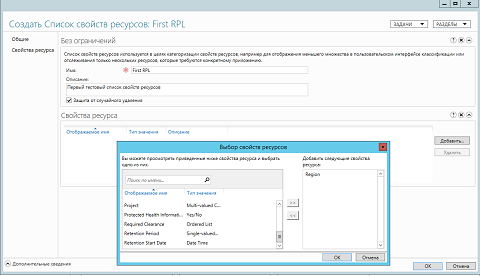
Fig. 4. Creating a new list of resource properties - We save the changes in both dialog boxes, and after that your new list of resource properties will be created.
Deleting resource property objects from lists or changing the properties of the lists themselves is performed by analogy with creating a new list, so you should not stop at this stage in detail.
It would be much more interesting to consider the possibilities of searching for objects in the lists of resource properties directly in the Active Directory Administrative Center. As it would be simply impossible not to notice, in the Resource Property Lists node there is also such an option, as “Search in this node” . With this feature, you can localize the required resource property objects, resource property lists, and other objects. By clicking on the “ Search this site ” button from the task pane, you are taken to the global search .
Here, being on the global search page, you should select Transition nodes> Dynamic Access Control from the drop-down list " Region ", and then enter the name of the search list in the search text box. For example, you can type “First” and then click on the search button, as shown in the following illustration:
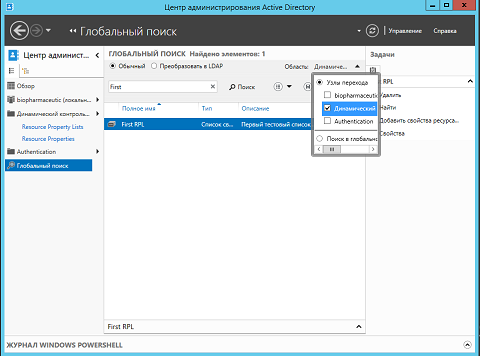
Fig. 5. Performing a search for a list of properties of resources.
Creating and Configuring Resource Property Lists Using Windows PowerShell
As I said a little higher, the exact same operations that we performed with the help of a graphical interface can still be performed using such a wonderful tool as Windows PowerShell, which many system administrators have almost fully replaced the good old command line. Therefore, you can use cmdlets such as New-ADResourcePropertyList (which is responsible for creating a new list of resource properties), Set-ADResourcePropertyList (respectively, changing the existing list of resource properties), and Remove-ADResourcePropertyList , to control the objects themselves. intended, of course, to remove the object itself. Moreover, in order to add existing resource property objects to an already existing resource property list, you can use the Add-ADResourcePropertyListMember cmdlet (in turn, use the Remove-ADResourcePropertyListMember cmdlet to delete resource properties).
Now let's see how you can use two cmdlets: to create the object itself of the list of resource properties, and also to add a resource property to an existing list.
Creating a new list of resource properties
In this case, using the above cmdlet, we can only create the object itself, without adding new members. In other words, the following command will be executed:
New-ADResourcePropertyList -Name "Second TEST RPL" -Description " " -ProtectedFromAccidentalDeletion $trueIn principle, here the Name parameter is responsible for the name of the object being created, Description is its description, and the ProtectedFromAccidentalDeletion parameter, as you already know from previous articles, is designed to protect the object from being deleted. The command output is very simple, that is, if you do not see any error, the object will be created successfully.
Adding an existing resource property to the created resource property list object
When performing this task, the cmdlet used with its parameters may at first glance seem more complicated, but in fact it is not. Here, you first need to correctly specify the LDAP path to the object itself in the list of resource properties, and then correctly specify the member to be added. In fact, that's all. What an example will look like with the addition of the Region object to the resource property list object:
Add-ADResourcePropertyListMember -Identity:"CN=Second TEST RPL,CN=Resource Property Lists,CN=Claims Configuration,CN=Services,CN=Configuration,DC=biopharmaceutic,DC=local" -Members:"CN=Region_88d0b81428dcc599,CN=Resource Properties,CN=Claims Configuration,CN=Services,CN=Configuration,DC=biopharmaceutic,DC=local"where the Identity parameter allows you to specify the resource property list object for which you are actually adding or deleting a member, and the Member s parameter allows you to specify the resource property object that you will add or delete.
As you can see in the following illustration, these two cmdlets will work as follows:

Fig. 6. Outputting cmdlets to create and add a resource property to the object's list of resource properties
File classification and introduction to File Server Resource Manager
Very often, administrators in servicing their file storage encounter various problems related to the fact that an increase in the amount of stored data can affect the cost of storing and managing such data, so that on file servers, users are increasingly beginning to save their data along with company data. personal files and documents, as well as the worst, namely the leakage of information.
Microsoft realized this problem and with the help of a survey of partner companies came to the conclusion that they should incorporate into their server operating systems a specific mechanism that allows localizing, based on the content among thousands of files stored on file servers, such files that directly relevant to the business needs of the company. Based on the problems I described above, even in Windows Server 2008 R2, for the first time, such an innovation appeared as file classification infrastructure , which allows organizations to classify their files by assigning specific properties, and then, using specific mechanisms of Windows operating systems, perform certain actions with such files based on the finished classification.
The file classification infrastructure includes the ability to define classification properties, automatic file classification, classification based on scenarios, location or content, as well as, as implemented in the original version, the use of file management tasks, which include defining file expiration user commands based on the performed classification, as well as the generation of various reports that show the distribution of classified files on the actual file server.
File classification is an optional, but recommended process with the full implementation of a technology such as dynamic access control. As we have already figured out with you in the very first article of this cycle, file classification is responsible for tracking the use of your corporate resources only as intended and in the most efficient way. In other words, at this stage you are required to determine the information to be classified and the appropriate classification method for your particular case. In principle, this is exactly the process during which you practically do not need to use the functionality of the Active Directory Administrative Center, or the capabilities of Windows PowerShell. Why is that? You will learn about this in just a few minutes.
It may also be quite logical to ask what kind of connection can be between objects such as resource properties, as well as file classification. In fact, the properties of the resources themselves allow you to set verification statements for your corporate files and folders. Such verification statements, as you know, are some of the values that you yourself specified when creating resource properties. By the way, resource properties have a remarkable feature that the configured verification statements for a particular file will be tied to it even if it is copied or moved altogether from one NTFS file system to another, since the property values themselves resources will be stored in the alternative data of the target file.
It turns out that the resource properties are used to configure specific metadata files for your target files, which in turn are directly related to the file classification infrastructure. And already classified files you can manage as you see fit, including you can easily use for them all the possibilities of dynamic access control.
Preliminary actions
One of the preliminary stages for classification is the correct and complete setting of resource property lists with the resource properties objects themselves, since, as I have already mentioned above, they will be involved in the file classification process itself. And it turns out that it is at this stage that you will definitely need to use the Active Directory Administrative Center console or Windows PowerShell, since you will have to create or enable disabled resource properties and add them to the lists you created.
To enable a predefined resource property, you need to go to the Resource Properties node in Central Administration, select the required resource property object, and also, as can be seen in the following illustration, call the context menu for it, and then select the Enable command:
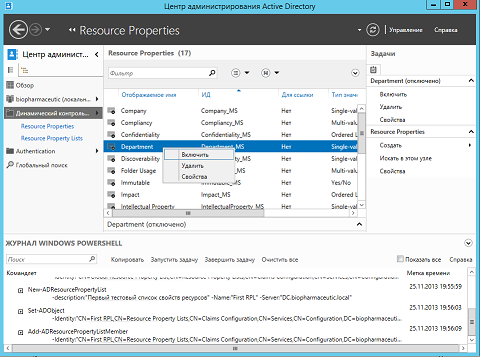
Fig. 7. Enable Disabled Resource Properties
Further in this example, it will be assumed that such resource property objects as Company and Department were included in the list of resource properties.
Let's go to the functionality of Windows PowerShell. As I mentioned earlier, now a tool like Windows PowerShell already allows you to use all the same functions that you can perform directly using Active Directory Administrative Center. In other words, to enable a particular object of a resource's properties, say, Personal Use , you should run the following command:
Set-ADResourceProperty -Enabled:$true -Identity:"CN=PersonalUse_MS,CN=Resource Properties,CN=Claims Configuration,CN=Services,CN=Configuration,DC=biopharmaceutic,DC=local" -Server:"DC.biopharmaceutic.local"Here, as you can see, you can pay attention to the fact that the Enabled parameter allows you to enable the object itself, which is already defined using the Identity parameter.
File classification process
Even in the very first article, I managed to mention that there are several different ways by which you can carry out this very classification. These methods include:
- Manual classification. In other words, this is the simplest method by which you are given the opportunity to classify your corporate files manually using the Classification tab of the properties dialog box for the file being classified. You will dwell on this method with you;
- Classification based on location. The current method of classifying files, in turn, can be used, like classifying files manually using the appropriate tab of the properties dialog box of your file, or using the folder classifier in the classification rule you create;
- As well as content based classification . In turn, it represents the most interesting and centrally distributed method, which is adopted to be deployed using the content classifier in the classification rule itself. The file classification toolkit contains some built-in rules for defining personal data that you can discover and configure using a tool such as the file server resource manager, which we will definitely discuss in more detail.
Moving on to the file classification process itself. And we will begin now with
Manual file classification
The process of manual classification is quite simple. To begin, you should allow all computers to classify files manually, then, depending on physical or logical divisions, you can define a specific list of resource properties that the required computers can use, and in the end either you or authorized persons will have to manually classify specific resources. files or folders. It looks all very simple. Let's see step by step what to do in this case:
- First of all, you will need to open the Group Policy Management snap-in and create a group policy object for the required unit that will define two parameters that are directly related to the manual classification of files. For example, in this case, the object will be the “ File Classification ” group policy object that will be associated with the entire domain. After such a GPO is created, select it and open the Group Policy Management Editor;
- In the displayed GPME snap-in, you will need to go to the node " Computer Configuration \ Policies \ Administrative Templates \ System \ File Classification Infrastructure " ( Computer Configuration \ Policies \ Administrative Templates \ System \ File Classification Infrastructure ) and, as here you can find only two Group Policy setting, configure each one. What are they:
- File Classification Infrastructure : Displaying the Classification tab in the File Explorer ( File Classification Infrastructure: Display Classification tab in File Explorer ) . This policy setting allows you to enable for target computers the option of forcing the Classification tab in the properties dialog box of the files you select. This parameter has almost no options, so to set it up, you only need to set the switch to the “ Enabled ” option. As you can see in the following illustration, the configured policy setting looks like this:
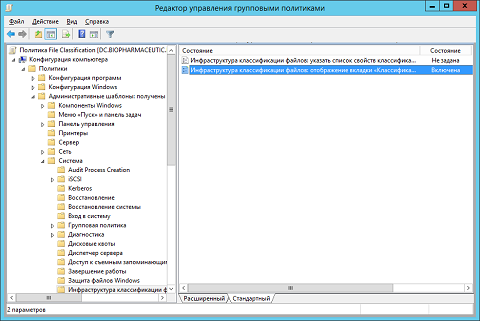
Fig. 8. Configured classification tab display policy setting - File Classification Infrastructure: Specify a classification property list ( File Classification Infrastructure: Specify classification properties list ) . In turn, this policy setting allows you to define a specific list of resource properties that will be applied to the unit you selected with the appropriate computers. By enabling this parameter, you will still need to specify in the corresponding text field the name of the list of resource properties of interest to you. For example, as seen in the following illustration, this example indicates the object of the resource property list that was created in several sections above:

Fig. 9. Defining a list of file classification properties
- File Classification Infrastructure : Displaying the Classification tab in the File Explorer ( File Classification Infrastructure: Display Classification tab in File Explorer ) . This policy setting allows you to enable for target computers the option of forcing the Classification tab in the properties dialog box of the files you select. This parameter has almost no options, so to set it up, you only need to set the switch to the “ Enabled ” option. As you can see in the following illustration, the configured policy setting looks like this:
- After the Group Policy settings are configured, close the Group Policy Management Editor snap-in and update Group Policy settings on target computers either using the command line (or Windows PowerShell), or by using the Update Group Policy command from the context menu of a specific organizational unit. in the Group Policy Management snap-in itself;
- Go to the target computer to Windows Explorer and select the file you want to classify. After that, you should call the context menu for it and open the file properties dialog box. Now you need to go to the "Classification" tab and here, as you see in the following illustration, the same resource properties that were configured for the First RPL object created earlier will be available to you. For example, you can configure a value for the Region or Department property:

Fig. 10. File classification
File server resource manager and file classification based on content
In a situation of ever-increasing storage resource requirements, as organizations increasingly depend on data, IT administrators have to keep track of the increasingly large and complex storage infrastructure while keeping track of the data they have. Unlike manual file classification, where you will need to iterate through each file, using the file-based classification method gives you the ability to automate most of the process. To reduce the costs and risks associated with this type of data management, the file classification infrastructure uses a specific platform that allows administrators to classify files and apply policies based on this classification. Using this method, data management requirements will not have any impact on the structure of the repository, and organizations can easily adapt to changing economic and regulatory environments. Administrators can at any time configure special file management policies based on file classification, and then just automatically apply corporate data management requirements in accordance with the requirements of their business. Moreover, they can easily change policies and use classification management tools for file management. It is at this stage that you will need to use such a tool as a file server resource manager . Let's take a quick look at what it is.
File Server Resource Manager
At present, resource management consists not only in managing the volume and availability of data, but also in implementing company policies and a very good understanding of how the existing repositories are used. File Server Resource Manager refers to one of the roles of the Windows Server 2012/2012 R2 server operating system, which helps you to monitor and control your network storage. Such a dispatcher includes reports that can be used to determine the growth of network storage, as well as other indicators that may be related to network storage. Reports, of course, can be generated automatically according to a schedule or on demand. In other words, a file server resource manager is a set of tools that allow administrators to deal with the number and types of data stored on their servers, control and manage this data. Using the File Server Resource Manager, administrators can assign quotas to volumes, actively lock files and folders, and create comprehensive storage reports. This powerful toolkit not only allows administrators to efficiently control existing storage resources, but also helps to plan and implement changes in organization policy.
Later in this article, you will learn only about using FSRM to classify files, but if you are interested in this topic, you can consider topics such as quota management, quota templates, locking and file groups with filter exceptions in separate articles that are not dependent on this cycle. file locking, file expiration tasks with custom file management tasks, as well as various reporting options and report generation processes.
Today we will talk exclusively about installing the file server resource manager itself and about working with file classification.
Installing this tool is extremely simple. FSRM , , , , , , , « » ( File and Storage Services ), « iSCSI » ( File and iSCSI Services ) « » ( File Server Resource Manager ). .
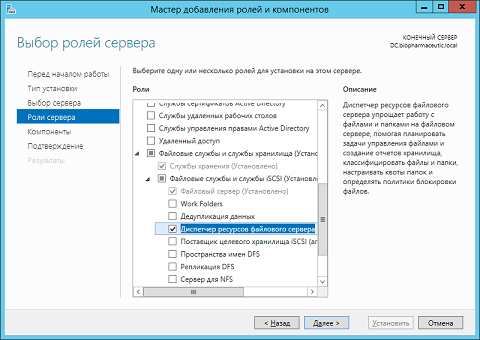
Fig. 11.
FSRM , : , .
. . , , Resource Properties Active Directory . , , . , , . , , , / , - , , , , , . , . , « » FSRM , . , Region :

Fig. 12. FSRM
, . , , , , , . , , .
: . , , , . , , , .
, . , , :
- FSRM « » ( Classification Rules ), , « » ( Create Classification Rule ), :
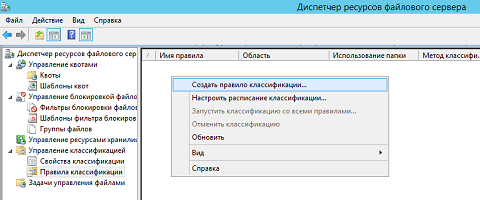
Fig. 13. - « » ( Create Classification Rule ) , . :
- «» (General) . , , , , , . :
- ( Rule name ) . . , «First rule» ;
- (Enabled) . , , . , .
- (Description) . , , . , , , « , ».
:

Fig. 14. «» - «» (Scope) . , . , « » « » ( Add Remove ). . , , , , , , .
« » ( Set Folder Management Properties ), . , , , , , , , . , , , , , . , , F:\Photo :
Fig. 15. «» - «» (Classification) . . :
- « » ( Choose a method to assign a property to files ). , , Windows Server 2012/2012 R2. :
- Windows PowerShell ( Windows PowerShell classifier ). Windows PowerShell, , , . , Windows PowerShell . , , . , , ;
- (Folder classifier) . , . , , , , , Los Angeles Region ;
- (Content classifier) . , , , . , , . , , «» ( Configure ). , ;
- «» « » ( Choose a property to assign to files ). , . « Region »;
- « » ( Specify a value ). , , , . « Los Angeles », , , Windows PpowerShell, , ;
- « » ( Configure ) « » ( Classification Parameters ). , , . :
- (RegularExpression) . , . , , , . .NET. , , , . , «\d\d\d» . , , http://msdn.microsoft.com/en-us/library/ae5bf541.aspx , . , \d :. , , : 111-22-3333. , \d , 111 \d{3} 111, , : \d{3}-\d{2}-\d{4} . ;
- (StringCaseSensitive) . . , Top Secret! , ;
- (String) . , , . , Top Secret .
. , , , , «» «», .
( Minimum Maximum Occurrences ) . , . , 1.
:
Fig. 16.
- « » ( Choose a method to assign a property to files ). , , Windows Server 2012/2012 R2. :
- « » ( Evaluation Type ). « » ( Re-evaluate existing property values ), . , ? , , , . , , - , . , :
- ( Overwrite the existing value ). , , , , . , , . , , , , , . – « » « », , .
- (Aggregate the values) . , , , . , , . , , , , , . .
, , , :
Fig. 17. « »
- «» (General) . , , , , , . :
- «» FSRM « » ( Run Classification With All Rules Now ) . « » , « » ( Wait for classification to complete ), :
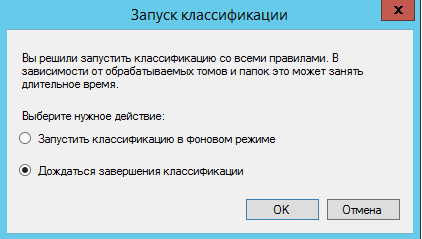
Fig. 18. - , , . , , 1 :
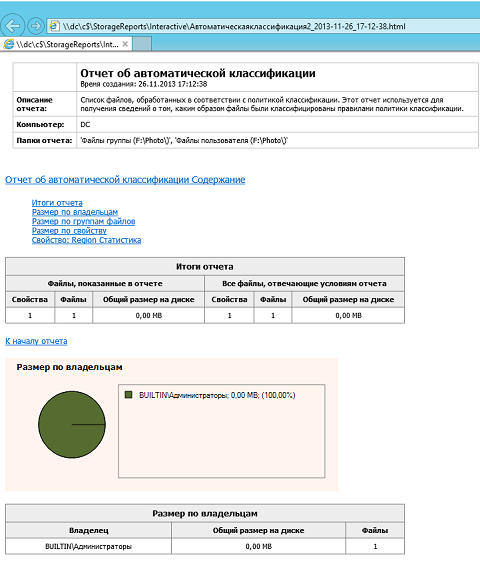
Fig. 19.
, , . .
, . Windows, F:\Photo. . «» . , , 111-22-3333, Region Los Angeles . , .
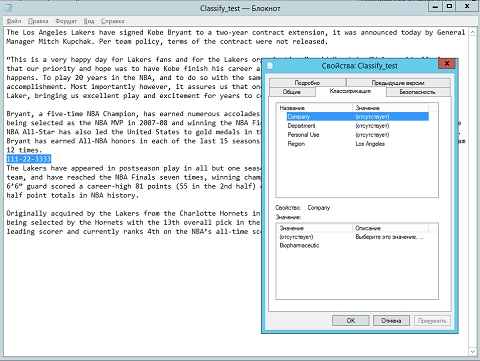
Fig. 20.
Conclusion
, , , . , . Active Directory , Windows PowerShell, , .
, . , , . , , , , , , FSRM.
, FSRM ( , , , , , ), ( , , , , Windows PowerShell, ) , . , - , – (-) , .
, .
Source: https://habr.com/ru/post/204212/
All Articles