Grid control
Table controls (usually the words Table or Grid are in their names) are widely used in GUI development. It so happened that at work we use C ++ and MFC to develop the user interface. In the beginning, we used CGridCtrl , an open- source and fairly well-known grid implementation. But for some time he stopped arranging us and his own development came into being. The ideas underlying our implementation, I want to share with you here. There is an idea to make an open source project (most likely under Qt). Therefore, this note can be considered as “Proof Of Concept”. Constructive criticism and comments are welcome.
The reasons for which I am not satisfied with the existing implementation, I omit (this is a topic for a separate note).
Our projects are engineering-scientific, with rich graphics, and lists and tables are used everywhere. Therefore, the new grid had to provide flexible customization, good speed and minimal memory consumption when displaying large amounts of information. When developing, I tried to adhere to the following rule: implement the functionality as generalized and abstract as possible, but not to the detriment of ease of use and optimal performance. Of course, this rule is contradictory, but as far as I managed to keep the balance - to judge you.
To start somewhere, let's try to define the grid control. To preserve the commonality, we can say that the grid is a visual element that breaks space into rows and columns. The result is a grid of cells (the intersection of rows and columns) within which some information is displayed. Thus, two components can be distinguished in the grid: structure and data. The grid structure determines how we will break the space into rows and columns, and the data describes, in fact, what we want to see in the resulting cells.
As we defined above, the grid structure (topology can be said) is described by rows and columns. Rows and columns are very similar objects. You can say indistinguishable, only some break the plane horizontally, and others vertically. But they do it the same way. Here we are approaching a rather small and self-sufficient entity, which can be arranged in the C ++ class. I called this class Lines (in Russian it can be defined as Lines or Stripes). This class will define a set of lines (rows or columns). Deepen and define a class for a separate line is not necessary. The class will be small and non-functional. Thus, Lines will define the properties of a rowset or column set and operations that can be performed on them:
Comments and some utility functions and fields omitted for clarity.
You can see that the class has the functions
You also need to make an explanation about the line
')
Thus, the grid structure is represented by two copies of Lines:
Go to the data. How to give the grid information about what data it will display and how to display it? Here everything is already invented before us - I used the MVC (Model-View-Controller) triad. Let's start with the View element. Just as the Lines class defines not one line, but a whole set, we define the View class as something that displays some kind of homogeneous data in some subset of grid cells. For example, we will display text in the first column. This means that we have to create an object that can display text data and who can say that this data should be displayed in the first column. Since the data we can display is different and in different places, it is better to implement these functions in different classes. Let's call a class that can display data, actually View, and a class that can say where the data should display Range (a set of cells). Passing two instances of these classes to the grid, we just indicate what and where to display.
Let's take a closer look at the Range class. This is an amazingly small and powerful class. Its main task is to quickly answer the question of whether a particular cell is in it or not. In essence, this is an interface with one function:
In this way, any set of cells can be defined. The most useful of course will be the following two:
For the View class, there is only one function left - draw the data in the cell. In fact, for full-fledged work, View should be able to answer a couple more questions:
But what if we want to draw different data types in the same cell? For example, draw an icon and next to text or draw a checkbox and next to text. It would not be desirable for these combinations to implement a separate type of View. Let's allow in a single cell to show several View, only need a class that tells how to place a specific View in a cell.
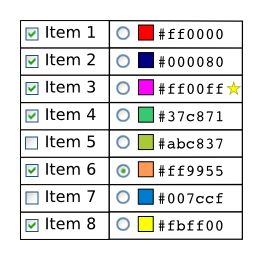
For clarity, we consider an example in which the checkboxes and text are displayed in the first column. The second column presents the radio buttons, the squares with color and the textual representation of the color. And in one cell there is an asterisk.
For example, for the checkbox, we will use LayoutLeft, which will ask View its size and bite the rectangle of the desired size from the rectangle of the cell. For the text, we will use LayoutAll, to which, in the cellRect parameter, the already truncated cell rectangle will go. LayoutAll will not ask for the size of its View, but simply “take away” all the available cell space. You can come up with many different useful layouts that will be combined with any View.
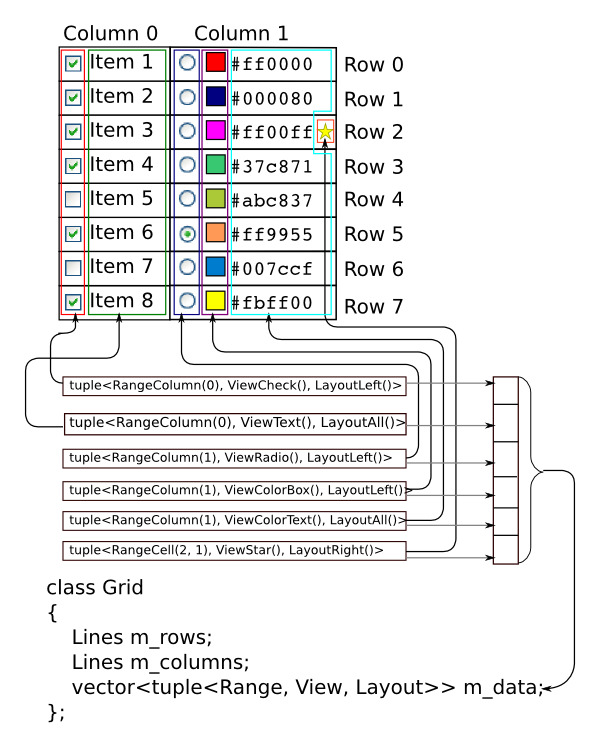
Let's return to the Grid class for which we wanted to set the data. It turns out that we can store triples <Range, View, Layout>, which determine in which cells, how to display data, plus how this data should be located inside the cell. So our Grid class looks like this:
Here is what m_data looks like for our example.
In essence, this is enough to render the grid. But the information is not organized in an optimal way - just a list of records that determine the display of data.
Let's think about how we can draw some kind of cell using our Grid class.
As you can see, the drawing takes place at the last step and all you need is a list of filtered View and a list of rectangles where this View will draw data. You can come up with a small class that caches this data and its drawing function would consist of a single item 4.
This class in the constructor executes the first three items and stores the result in m_cache. At the same time, the Draw function turned out to be quite lightweight. We had to pay for this lightness in the form of m_cache. Therefore, it will be costly to create an instance of such a class for each cell (after all, we agreed not to have data depending on the total number of cells). But we don’t need to have CellCache instances for all cells, only visible enough. As a rule, a small part of all cells is visible in the grid and their number does not depend on the total number of cells.
Thus, we have another class that manages the visible area of the grid, stores CellCache for each visible cell and is able to quickly draw them.
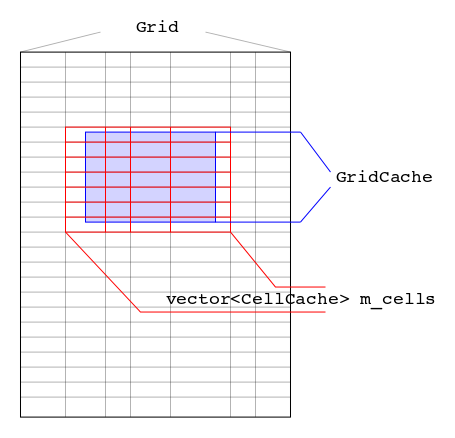
When the user resizes the grid or scrolls the content, we simply set a new visibleRect in this object. In this case, m_cells will be reformed to contain only visible cells. GridCache functionality is enough to implement a read-only grid.
Separating the Grid and GridCache classes is very useful. It allows, for example, to create multiple GridCache for a single Grid instance. This can be used to implement page printing of the contents of a grid or export the grid to a file as an image. At the same time, the GridWindow object is not modified in any way - just a GridCache is created aside, referring to the same Grid instance, in a new GridCache loop, the visibleRect is set for the current page and printed.
How to add interactivity? This is where Controller comes to the fore. Unlike other classes, this class defines an interface with many functions. But only because there are a lot of mouse events themselves.
Just like for drawing, we only need visible cells to work with the mouse. Add a mouse handling function to the GridCache class. According to the position of the mouse cursor, we will determine which cell (CacheCell) is under it. Then in the cell for all the View whose mouse got into the rectangle, pick up the Controller and call the corresponding method from it. If the method returns true, stop the Views traversal. This scheme works fairly quickly. At the same time, we had to add a link to the Controller to the View class.
It remains to deal with the class Model. It is needed as a template adapter. Its main goal is to provide data for the View in a “convenient” form. Let's take an example. We have a ViewText that can draw text. To draw it in a specific cell, this text should be requested for the cell from the ModelText object, which, in turn, is only an interface, and its concrete implementation knows how to get the text. Here is an example implementation of the ViewText class:
Thus, it is easy to guess which interface ModelText should have:
Please note that we have added a setter for using the controller. In practice, the most commonly used implementation is ModelTextCallback.
This model allows for the initialization of the grid to assign lambda functions to access this data.
Well, what is common between models for different data: ModelText, ModelInt, ModelBool ...? In general, nothing, the only thing that can be said about all of them is that they should inform all those interested in the facility that the data has changed. Thus, the base class Model with us will take the following form:
As a result, our grid has broken down into many small classes, each of which performs a well-defined small task. On the one hand, it may seem that there are too many classes to implement the grid. But, on the other hand, the classes turned out to be small and simple, with clear interconnections, which simplifies the understanding of the code and reduces its complexity. At the same time, various combinations of the heirs of the Range, Layout, View, Controller and Model classes give a very large variation. Using lambda functions for ModelCallback allows you to easily and quickly associate a grid with data.
In the next article I will describe how to implement the standard grid functionality: selection, sorting, column / row resize, printing, how to add a header (fixed upper rows and left columns).
I will reveal a small secret - all that is described in this article is already enough to implement the above. If I missed some functionality, please write in the comments and I will describe their implementation in the next article.
The reasons for which I am not satisfied with the existing implementation, I omit (this is a topic for a separate note).
Our projects are engineering-scientific, with rich graphics, and lists and tables are used everywhere. Therefore, the new grid had to provide flexible customization, good speed and minimal memory consumption when displaying large amounts of information. When developing, I tried to adhere to the following rule: implement the functionality as generalized and abstract as possible, but not to the detriment of ease of use and optimal performance. Of course, this rule is contradictory, but as far as I managed to keep the balance - to judge you.
To start somewhere, let's try to define the grid control. To preserve the commonality, we can say that the grid is a visual element that breaks space into rows and columns. The result is a grid of cells (the intersection of rows and columns) within which some information is displayed. Thus, two components can be distinguished in the grid: structure and data. The grid structure determines how we will break the space into rows and columns, and the data describes, in fact, what we want to see in the resulting cells.
As we defined above, the grid structure (topology can be said) is described by rows and columns. Rows and columns are very similar objects. You can say indistinguishable, only some break the plane horizontally, and others vertically. But they do it the same way. Here we are approaching a rather small and self-sufficient entity, which can be arranged in the C ++ class. I called this class Lines (in Russian it can be defined as Lines or Stripes). This class will define a set of lines (rows or columns). Deepen and define a class for a separate line is not necessary. The class will be small and non-functional. Thus, Lines will define the properties of a rowset or column set and operations that can be performed on them:
- The main property of Count is the number of lines that make up Lines.
- Each line can change its size (row height, and column - width)
- Lines can be reordered (sort rows, reorder columns)
- Lines can be hidden (made invisible to the user)
class Lines { public: Lines(UINT_t count = 0); UINT_t GetCount() const { return m_count; } void SetCount(UINT_t count); UINT_t GetLineSize(UINT_t line) const; void SetLineSize(UINT_t line, UINT_t size); bool IsLineVisible(UINT_t line) const; void SetLineVisible(UINT_t line, bool visible); template <typename Pred> void Sort(const Pred& pred); const vector<UINT_t>& GetPermutation() const; void SetPermutation(const vector<UINT_t>& permutation); UINT_t GetAbsoluteLineID(UINT_t visibleLine) const; UINT_t GetVisibleLineID(UINT_t absoluteLine) const; Event_t<void(const Lines&, unsigned)> changed; private: UINT_t m_count; vector<UINT_t> m_linesSize; vector<bool> m_linesVisible; }; Comments and some utility functions and fields omitted for clarity.
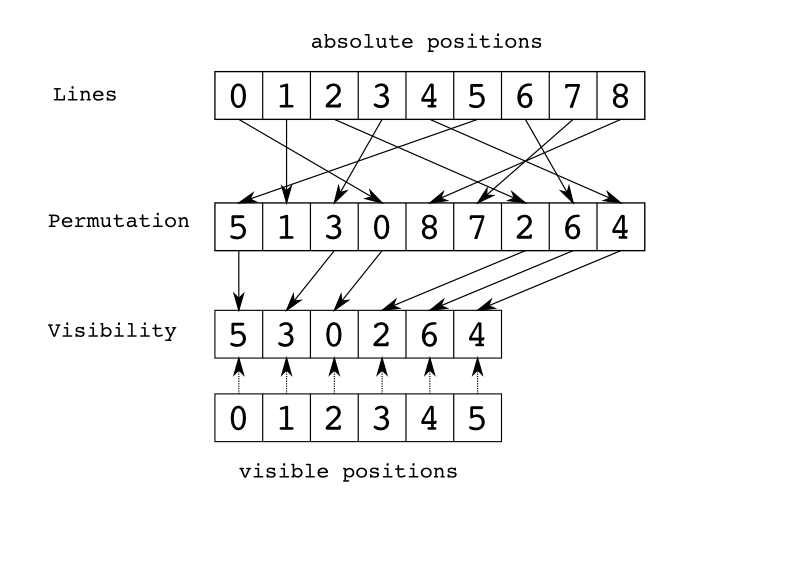
You can see that the class has the functions
GetAbsoluteLineID and GetVisibleLineID . Since we allow the lines to be shuffled and hidden, the absolute and visible index of the line are different. I hope the picture clearly shows this situation.You also need to make an explanation about the line
Event_t<void(const Lines&, unsigned)> changed; Here a signal is defined (as it is called in Qt or boost). With the advent of C ++ 11 and std :: function, you can easily write a simple implementation of signals / slots so as not to depend on external libraries. In this case, we defined an event in the Lines class, and any function or functor can be connected to it. For example, the grid connects to this event and receives an alert when the Lines instance changes.')
Thus, the grid structure is represented by two copies of Lines:
private: Lines m_rows; Lines m_columns; Go to the data. How to give the grid information about what data it will display and how to display it? Here everything is already invented before us - I used the MVC (Model-View-Controller) triad. Let's start with the View element. Just as the Lines class defines not one line, but a whole set, we define the View class as something that displays some kind of homogeneous data in some subset of grid cells. For example, we will display text in the first column. This means that we have to create an object that can display text data and who can say that this data should be displayed in the first column. Since the data we can display is different and in different places, it is better to implement these functions in different classes. Let's call a class that can display data, actually View, and a class that can say where the data should display Range (a set of cells). Passing two instances of these classes to the grid, we just indicate what and where to display.
Let's take a closer look at the Range class. This is an amazingly small and powerful class. Its main task is to quickly answer the question of whether a particular cell is in it or not. In essence, this is an interface with one function:
class Range { public: virtual bool HasCell(CellID cell) const = 0; }; In this way, any set of cells can be defined. The most useful of course will be the following two:
class RangeAll { public: bool HasCell(CellID cell) const override { return true; } }; class RangeColumn { public: RangeColumn(UINT_t column): m_column(column) {} bool HasCell(CellID cell) const override { return cell.column == m_column; } private: UINT_t m_column; }; The first class defines a set of all cells, and the second defines a set of one specific column.For the View class, there is only one function left - draw the data in the cell. In fact, for full-fledged work, View should be able to answer a couple more questions:
- How much space is needed to display the data (for example, to set columns sufficient for displaying text - Fit mode)
- Give a textual representation of the data (to copy to the clipboard as text or display in a tooltip)
class View { public: virtual void Draw(DrawContext& dc, Rect rect, CellID cell) const = 0; virtual Size GetSize(DrawContext& dc, CellID cell) const = 0; virtual bool GetText(CellID cell, INTENT intent, String& text) const = 0; }; But what if we want to draw different data types in the same cell? For example, draw an icon and next to text or draw a checkbox and next to text. It would not be desirable for these combinations to implement a separate type of View. Let's allow in a single cell to show several View, only need a class that tells how to place a specific View in a cell.
class Layout { public: virtual void LayoutView(DrawContext& dc, const View* view, Rect& cellRect, Rect& viewRect) const = 0; }; For clarity, we consider an example in which the checkboxes and text are displayed in the first column. The second column presents the radio buttons, the squares with color and the textual representation of the color. And in one cell there is an asterisk.
For example, for the checkbox, we will use LayoutLeft, which will ask View its size and bite the rectangle of the desired size from the rectangle of the cell. For the text, we will use LayoutAll, to which, in the cellRect parameter, the already truncated cell rectangle will go. LayoutAll will not ask for the size of its View, but simply “take away” all the available cell space. You can come up with many different useful layouts that will be combined with any View.
Let's return to the Grid class for which we wanted to set the data. It turns out that we can store triples <Range, View, Layout>, which determine in which cells, how to display data, plus how this data should be located inside the cell. So our Grid class looks like this:
class Grid { private: Lines m_rows; Lines m_columns; vector<tuple<Range, View, Layout>> m_data; }; Here is what m_data looks like for our example.
In essence, this is enough to render the grid. But the information is not organized in an optimal way - just a list of records that determine the display of data.
Let's think about how we can draw some kind of cell using our Grid class.
- We need to filter m_data and leave only those triples for which our cell falls into the Range.
for (auto d: grid.m_data) if (d.range->HasCell(cell)) cell_data.push_back(d); - Define a rectangle for a cell
Rect cellRect = CalculateCellRect(grid.m_rows, grid.m_columns, cell); - Define rectangles for all views.
vector<Rect> view_rects(cell_data.size()); auto view_rect_it = view_rects.begin(); for (auto d: cell_data) d.layout->LayoutView(grid.GetDC(), d.view, cellRect, *view_rect_it++); - Draw all View into rectangles calculated for them
auto view_rect_it = view_rects.begin(); for (auto d: cell_data) d.view->Draw(grid.GetDC(), *view_rect_it++, cell);
As you can see, the drawing takes place at the last step and all you need is a list of filtered View and a list of rectangles where this View will draw data. You can come up with a small class that caches this data and its drawing function would consist of a single item 4.
class CellCache { public: CellCache(Grid grid, CellID cell); void Draw(DrawContext& dc); private: CellID m_cell; Rect m_cellRect; vector<pair<View, Rect>> m_cache; }; This class in the constructor executes the first three items and stores the result in m_cache. At the same time, the Draw function turned out to be quite lightweight. We had to pay for this lightness in the form of m_cache. Therefore, it will be costly to create an instance of such a class for each cell (after all, we agreed not to have data depending on the total number of cells). But we don’t need to have CellCache instances for all cells, only visible enough. As a rule, a small part of all cells is visible in the grid and their number does not depend on the total number of cells.
Thus, we have another class that manages the visible area of the grid, stores CellCache for each visible cell and is able to quickly draw them.
class GridCache { public: GridCache(Grid grid); void SetVisibleRect(Rect visibleRect); void Draw(DrawContext& dc); private: Grid m_grid; Rect m_visibleRect; vector<CellCache> m_cells; }; When the user resizes the grid or scrolls the content, we simply set a new visibleRect in this object. In this case, m_cells will be reformed to contain only visible cells. GridCache functionality is enough to implement a read-only grid.
class GridWindow { public: Grid GetGrid() { return m_gridCache.GetGrid(); } void OnPaint() { m_gridCache.Draw(GetDrawContext()); } void OnScroll() { m_gridCache.SetVisibleRect(GetVisibleRect()); } void OnSize() { m_gridCache.SetVisibleRect(GetVisibleRect()); } private: GridCache m_gridCache; }; Separating the Grid and GridCache classes is very useful. It allows, for example, to create multiple GridCache for a single Grid instance. This can be used to implement page printing of the contents of a grid or export the grid to a file as an image. At the same time, the GridWindow object is not modified in any way - just a GridCache is created aside, referring to the same Grid instance, in a new GridCache loop, the visibleRect is set for the current page and printed.
How to add interactivity? This is where Controller comes to the fore. Unlike other classes, this class defines an interface with many functions. But only because there are a lot of mouse events themselves.
class Controller { public: virtual bool OnLBttnDown(CellID cell, Point p) = 0; virtual bool OnLBttnUp(CellID cell, Point p) = 0; ... }; Just like for drawing, we only need visible cells to work with the mouse. Add a mouse handling function to the GridCache class. According to the position of the mouse cursor, we will determine which cell (CacheCell) is under it. Then in the cell for all the View whose mouse got into the rectangle, pick up the Controller and call the corresponding method from it. If the method returns true, stop the Views traversal. This scheme works fairly quickly. At the same time, we had to add a link to the Controller to the View class.
It remains to deal with the class Model. It is needed as a template adapter. Its main goal is to provide data for the View in a “convenient” form. Let's take an example. We have a ViewText that can draw text. To draw it in a specific cell, this text should be requested for the cell from the ModelText object, which, in turn, is only an interface, and its concrete implementation knows how to get the text. Here is an example implementation of the ViewText class:
class ViewText: public View { public: ViewText(ModelText model): m_model(model) {} void Draw(DrawContext& dc, Rect rect, CellID cell) const override { const String& text = model->GetText(cell); dc.DrawText(text, rect); } private: ModelText m_model; }; Thus, it is easy to guess which interface ModelText should have:
class ModelText: public Model { public: virtual const String& GetText(CellID cell) const = 0; virtual void SetText(CellID cell, const String& text) = 0; }; Please note that we have added a setter for using the controller. In practice, the most commonly used implementation is ModelTextCallback.
class ModelTextCallback: public ModelText { public: function<const String&(CellID)> getCallback; function<void(CellID, const String&)> setCallback; const String& GetText(CellID cell) const override { return getCallback(cell); } void SetText(CellID cell, const String& text) override { if (setCallback) setCallback(cell, text); } }; This model allows for the initialization of the grid to assign lambda functions to access this data.
Well, what is common between models for different data: ModelText, ModelInt, ModelBool ...? In general, nothing, the only thing that can be said about all of them is that they should inform all those interested in the facility that the data has changed. Thus, the base class Model with us will take the following form:
class Model { public: virtual ~Model() {} Event_t<void(Model)> changed; }; As a result, our grid has broken down into many small classes, each of which performs a well-defined small task. On the one hand, it may seem that there are too many classes to implement the grid. But, on the other hand, the classes turned out to be small and simple, with clear interconnections, which simplifies the understanding of the code and reduces its complexity. At the same time, various combinations of the heirs of the Range, Layout, View, Controller and Model classes give a very large variation. Using lambda functions for ModelCallback allows you to easily and quickly associate a grid with data.
In the next article I will describe how to implement the standard grid functionality: selection, sorting, column / row resize, printing, how to add a header (fixed upper rows and left columns).
I will reveal a small secret - all that is described in this article is already enough to implement the above. If I missed some functionality, please write in the comments and I will describe their implementation in the next article.
Source: https://habr.com/ru/post/203968/
All Articles