School geometry and Unity3D
In a previous article, we talked about Planoplan , our online planner and apartment designer. With a small margin in the survey, the topic of school geometry in Planoplan and Unity3D won, and we are happy to talk about it.
If we briefly sum up our experience, it turns out that the appropriate use of fairly simple algorithms improves the product significantly. In the article we decided to do without formulas and pieces of code, because simple algorithms are used. If some of them are still needed - write in the comments.
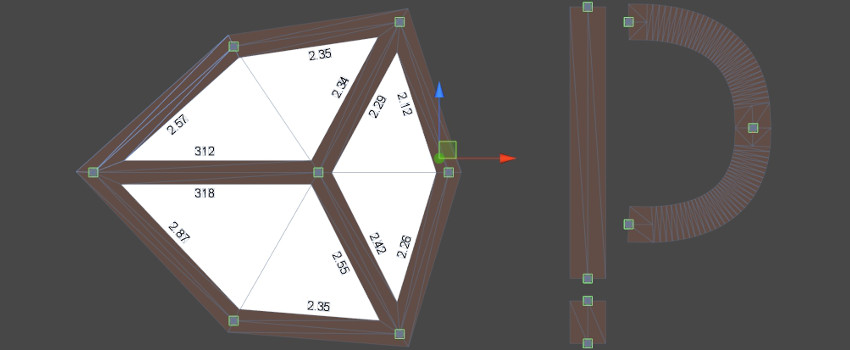
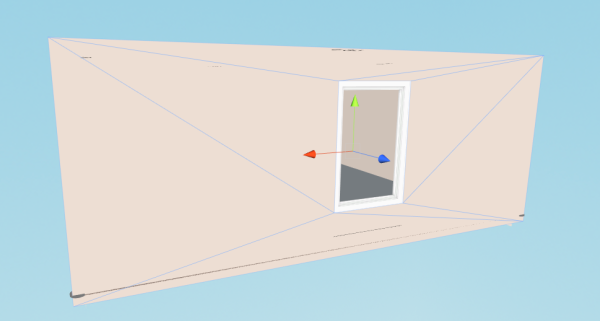
Crossing the walls are very easy to find. Each wall has two lines, roughly speaking, external and internal. By solving a system of two equations, one can find the points of intersection of each pair of straight lines on the plane (except for boundary cases when the straight lines are parallel or the angle between them is small). Course algebra for grade 7.
')

On the left you can see a good intersection of the walls. On the right is the boundary case when the point of intersection of the walls is in an unacceptable place. Wall intersections are determined dynamically in Unity3D if the position or thickness of the walls changes.
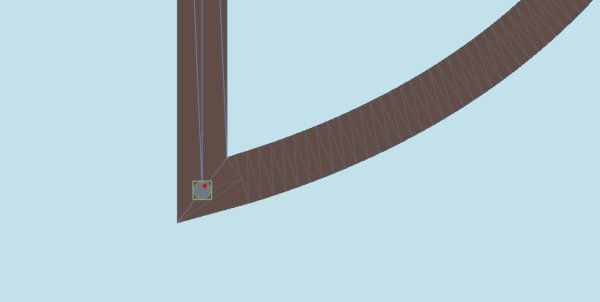
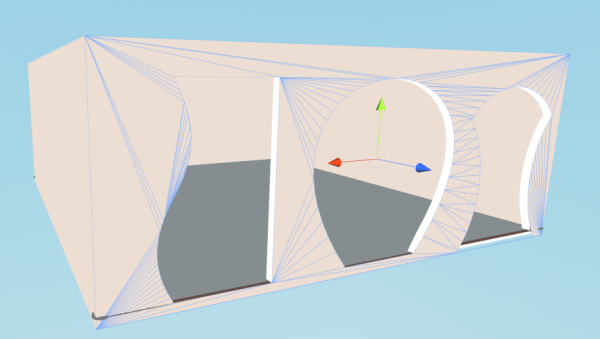
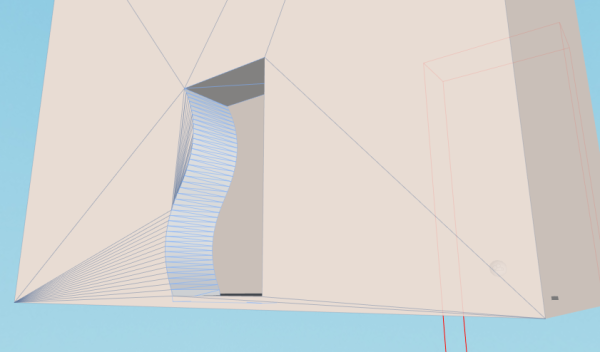
The next step to realism after calculating the correct intersections of straight walls is the construction and intersection of curved walls.
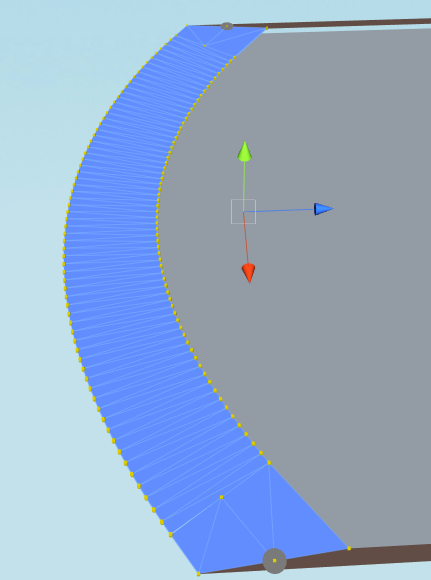
Curved walls are constructed using quadratic Bezier curves . The algorithm is simple: when we have two points (the beginning and the end of the wall), we manually select the third point. Along these three points, the algorithm can find any point on the curve. Curved walls consist of a set of blocks the center of each of which lies on this curve. Approximately 10 blocks fall per running meter of the wall - the number is chosen empirically.
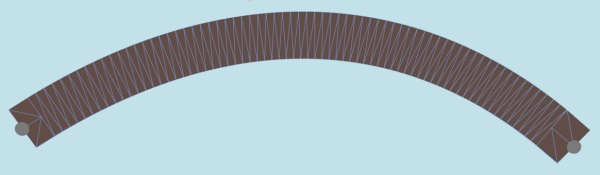
The ends of the walls triangulate a little differently to ensure the correct joints with other walls.
It turns out quite simple mesh, which does not greatly affect the performance.
The complexity of such walls is created in the fact that we have not yet figured out how to build windows, doors, and openings into them. Curving windows and doors in the program can be, but it does not happen in real life. But for the construction of balconies, various projections (often in modern homes) curved walls fit perfectly.
The use of Boolean operations (see below) will solve this problem. If there are other real-life ideas or stories about openings, windows, and doors in curved walls, welcome to comments.
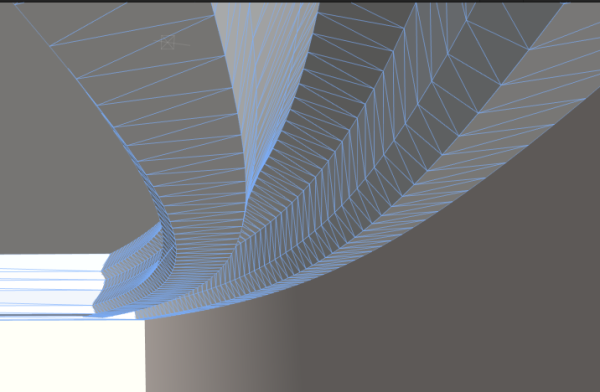
The intersection of curved walls is calculated a little smarter - and here we must deal with the Delaunay triangulation and the generation of meshes.
It is widely known that 3D graphics deal with the approximation of real-world objects using triangles. In addition, it is intuitively clear that any surface can be approximated by triangles in an infinite number of ways. Even a polygon with a large number of vertices can be divided into triangles in a very large number of ways.
One of the most well-known methods (geometry course for grade 9) is the Delaunay triangulation (named not in honor of any Frenchman, but by the name of the Russian mathematician Boris Nikolayevich Delone).
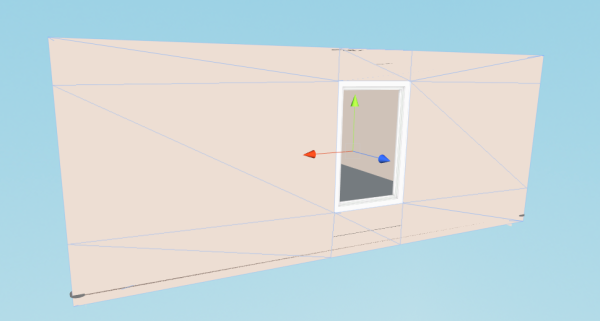
Before using triangulation, meshes were generated from rectangular parts. On the example of a window opening, a rectangle was generated before the window, above and below the window and after the window. This imposes certain restrictions on the shape of the window itself - for such a method the window can only be square.
It was
It became
In the case of a rectangular window, the effect is not obvious, but the Delaunay triangulation allowed us to use different shapes, sizes and positions of the holes in the wall.
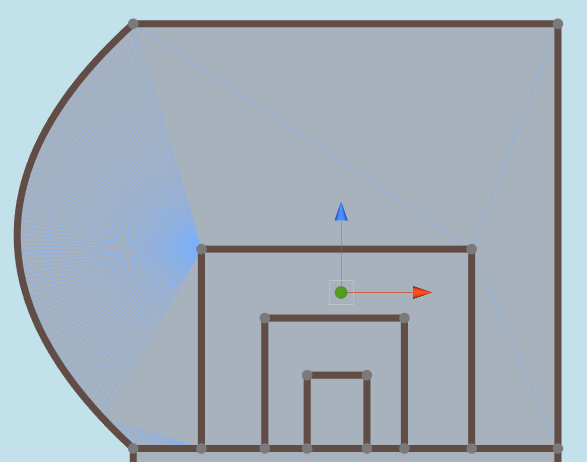
We use triangulation with restrictions. In this case, the surface is defined by two types of contours: external - specifying external boundaries, and internal - specifying constraints (or, more simply, holes). There may be several internal circuits.
As an inquisitive reader managed to understand this section, all the elements in the project, with the exception of the prepared furniture, are generated in the Planoplan on the fly.
Straight walls in 2D-mode are generated by six points (two ends of the middle line of the wall and four vertices of a quadrilateral), have a width, length and height.
Curved walls in 2D-mode (as we have already described above) are generated by an array of points lying on a quadratic Bezier curve, have width, length and height.
3D walls are generated based on 2D wall data and wall height.

Holes for windows and doors are generated in the walls and stitched up by the slopes generated along the contour of the hole. There can be almost any form.
The floor and ceiling are automatically created by the points describing the given room (see further about the search for rooms). Delaunay triangulation is used.
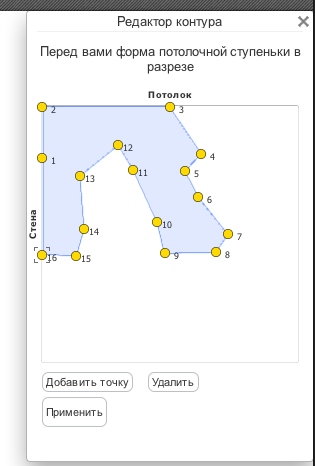
For generating contour elements (for example, baseboards), two contours are used - section and path.

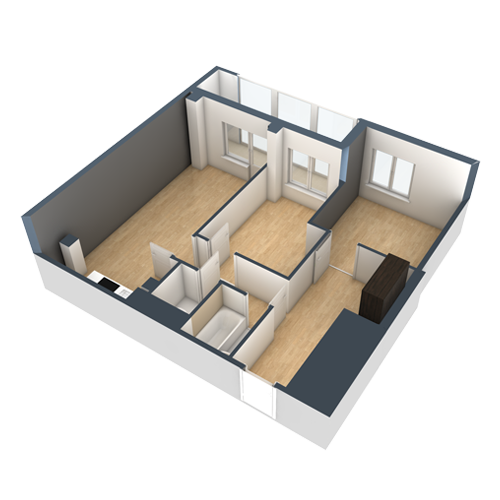
The task of our Jedi from school geometry today is the implementation of Boolean operations for calculating the intersection of surfaces in three-dimensional space (for example, for curved zoning of curved walls). At the moment, Boolean operations are used only to create a render of an apartment with cut walls, like this.
Here’s how it looks in theory:
And here is the current development in practice.
In the future, it is planned to introduce boolean operations everywhere, which will allow us to place windows and doors without any restrictions (for example, you can easily place a window above the window, or a window above the door, take out the window to the edge of the wall, arrange the window at the junction of walls, etc.) . It will also allow us to create holes in the floor and ceiling for the realization of stairways or to embed elements such as a sink into absolutely any worktop, simply cutting a hole in it.
In the future, it is planned to implement the placement of windows and doors directly in 3D-mode.
For a snack, from simple algorithms, in Planoplan, an automatic search for rooms is implemented, which allows the user to remove the job of manually setting them. For example, if the user creates a closed loop of the walls, the floor and ceiling are created in Planoplan automatically. This allows the user to build an apartment “wall by wall” rather than modify the base square of the room.
The search is implemented recursively, based on connections between points (walls) using the right-by-round method.
Our management and Unity-fighters in the person of Anton Jagahee Karpuntsova will perform a story about Planoplan at the CG Event on December 1 at 14:30 (Moscow, Holiday Inn Sokolniki, Chistye Prudy hall). Come see, ask questions, chat with developers and twist in the hands of Oculus Rift.
On the basis of a speech at the CG Event, in the next article in the series we will tell you how server-side rendering of user images is arranged in Planoplan.
If we briefly sum up our experience, it turns out that the appropriate use of fairly simple algorithms improves the product significantly. In the article we decided to do without formulas and pieces of code, because simple algorithms are used. If some of them are still needed - write in the comments.
Correct intersections of walls, baseboards and other surfaces
Crossing the walls are very easy to find. Each wall has two lines, roughly speaking, external and internal. By solving a system of two equations, one can find the points of intersection of each pair of straight lines on the plane (except for boundary cases when the straight lines are parallel or the angle between them is small). Course algebra for grade 7.
')
On the left you can see a good intersection of the walls. On the right is the boundary case when the point of intersection of the walls is in an unacceptable place. Wall intersections are determined dynamically in Unity3D if the position or thickness of the walls changes.
Curved walls and openings
The next step to realism after calculating the correct intersections of straight walls is the construction and intersection of curved walls.
Curved walls are constructed using quadratic Bezier curves . The algorithm is simple: when we have two points (the beginning and the end of the wall), we manually select the third point. Along these three points, the algorithm can find any point on the curve. Curved walls consist of a set of blocks the center of each of which lies on this curve. Approximately 10 blocks fall per running meter of the wall - the number is chosen empirically.
The ends of the walls triangulate a little differently to ensure the correct joints with other walls.
It turns out quite simple mesh, which does not greatly affect the performance.
The complexity of such walls is created in the fact that we have not yet figured out how to build windows, doors, and openings into them. Curving windows and doors in the program can be, but it does not happen in real life. But for the construction of balconies, various projections (often in modern homes) curved walls fit perfectly.
The use of Boolean operations (see below) will solve this problem. If there are other real-life ideas or stories about openings, windows, and doors in curved walls, welcome to comments.
The intersection of curved walls is calculated a little smarter - and here we must deal with the Delaunay triangulation and the generation of meshes.
Delaunay triangulation and figured openings
It is widely known that 3D graphics deal with the approximation of real-world objects using triangles. In addition, it is intuitively clear that any surface can be approximated by triangles in an infinite number of ways. Even a polygon with a large number of vertices can be divided into triangles in a very large number of ways.
One of the most well-known methods (geometry course for grade 9) is the Delaunay triangulation (named not in honor of any Frenchman, but by the name of the Russian mathematician Boris Nikolayevich Delone).
Before using triangulation, meshes were generated from rectangular parts. On the example of a window opening, a rectangle was generated before the window, above and below the window and after the window. This imposes certain restrictions on the shape of the window itself - for such a method the window can only be square.
It was
It became
In the case of a rectangular window, the effect is not obvious, but the Delaunay triangulation allowed us to use different shapes, sizes and positions of the holes in the wall.
We use triangulation with restrictions. In this case, the surface is defined by two types of contours: external - specifying external boundaries, and internal - specifying constraints (or, more simply, holes). There may be several internal circuits.
Procedural generation of meshes
As an inquisitive reader managed to understand this section, all the elements in the project, with the exception of the prepared furniture, are generated in the Planoplan on the fly.
Straight walls in 2D-mode are generated by six points (two ends of the middle line of the wall and four vertices of a quadrilateral), have a width, length and height.
Curved walls in 2D-mode (as we have already described above) are generated by an array of points lying on a quadratic Bezier curve, have width, length and height.
3D walls are generated based on 2D wall data and wall height.
Holes for windows and doors are generated in the walls and stitched up by the slopes generated along the contour of the hole. There can be almost any form.
The floor and ceiling are automatically created by the points describing the given room (see further about the search for rooms). Delaunay triangulation is used.
For generating contour elements (for example, baseboards), two contours are used - section and path.
Meshing (boolean)
The task of our Jedi from school geometry today is the implementation of Boolean operations for calculating the intersection of surfaces in three-dimensional space (for example, for curved zoning of curved walls). At the moment, Boolean operations are used only to create a render of an apartment with cut walls, like this.
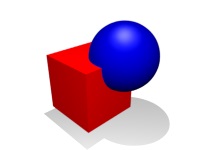
Here’s how it looks in theory:
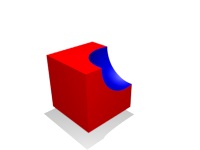
And here is the current development in practice.
In the future, it is planned to introduce boolean operations everywhere, which will allow us to place windows and doors without any restrictions (for example, you can easily place a window above the window, or a window above the door, take out the window to the edge of the wall, arrange the window at the junction of walls, etc.) . It will also allow us to create holes in the floor and ceiling for the realization of stairways or to embed elements such as a sink into absolutely any worktop, simply cutting a hole in it.
In the future, it is planned to implement the placement of windows and doors directly in 3D-mode.
Search for rooms
For a snack, from simple algorithms, in Planoplan, an automatic search for rooms is implemented, which allows the user to remove the job of manually setting them. For example, if the user creates a closed loop of the walls, the floor and ceiling are created in Planoplan automatically. This allows the user to build an apartment “wall by wall” rather than modify the base square of the room.
The search is implemented recursively, based on connections between points (walls) using the right-by-round method.
8 steps with pictures
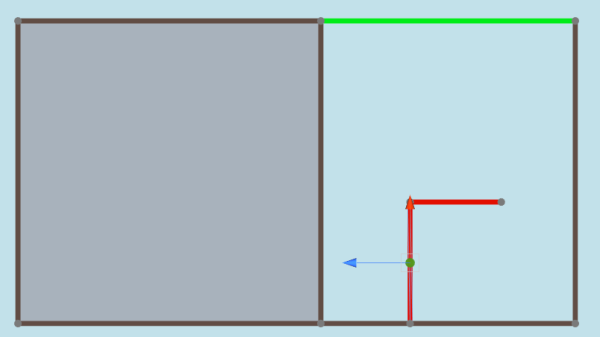
1. Build walls and points.
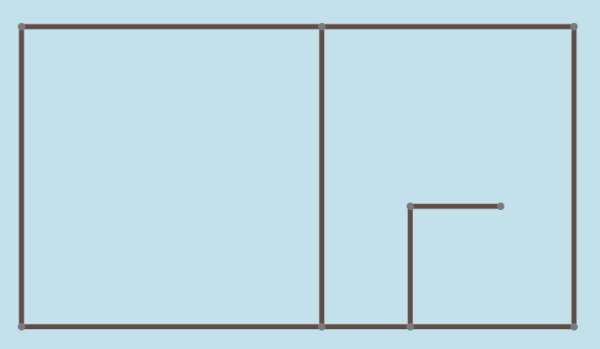
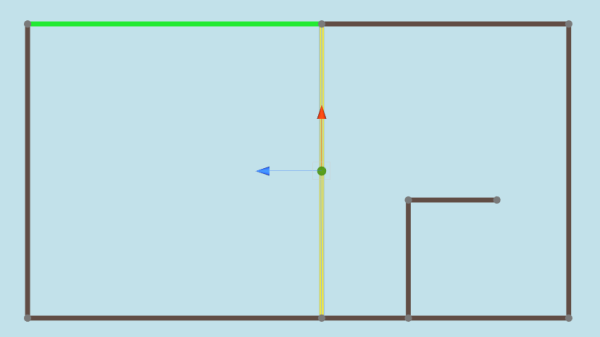
2. We begin the search for a closed loop with one of the walls.

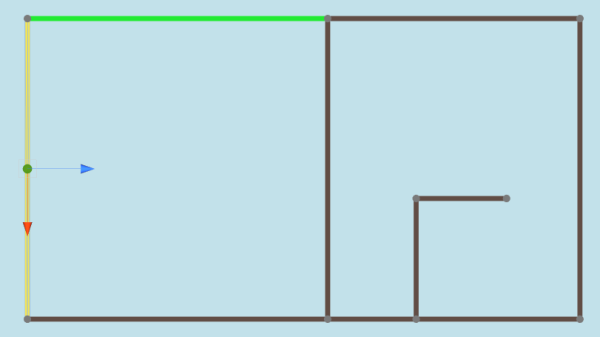
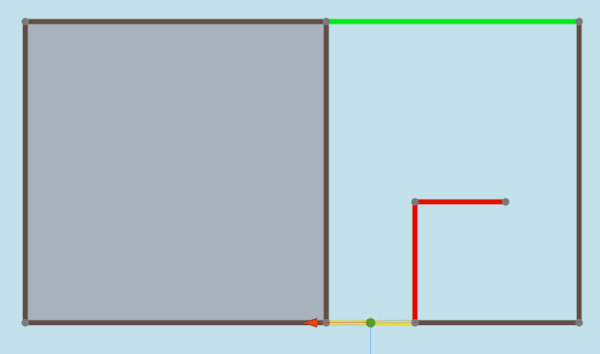
3. Proceeding from the connections between the points, we proceed to the rightmost (in the corners) wall at the second point of the selected wall.
4. Then we go on until we stop at the initial wall.
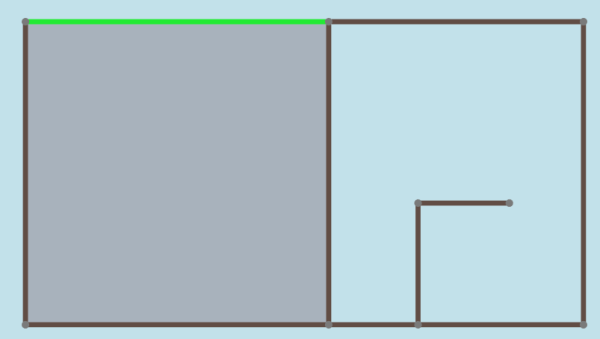
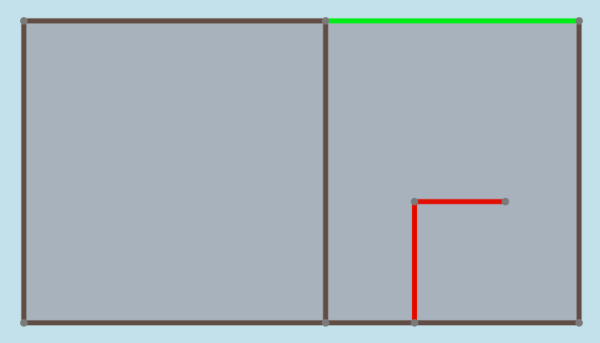
5. Create a room.
6. Go to the search for the next room. There, as you can see, there is a trick with dead-end walls. We simply find a wall that has no continuation, and mark it with a dead end. Go back a step and look for the next right wall, excluding dead ends.

One more step back.
7. Go ahead ...
... until we close the loop again.
8. This completes the search. All contours found.
It should be said about a couple of nuances.
2. We begin the search for a closed loop with one of the walls.
3. Proceeding from the connections between the points, we proceed to the rightmost (in the corners) wall at the second point of the selected wall.
4. Then we go on until we stop at the initial wall.
5. Create a room.
6. Go to the search for the next room. There, as you can see, there is a trick with dead-end walls. We simply find a wall that has no continuation, and mark it with a dead end. Go back a step and look for the next right wall, excluding dead ends.
One more step back.
7. Go ahead ...
... until we close the loop again.
8. This completes the search. All contours found.
It should be said about a couple of nuances.
- We go through the walls and exclude from the further search those that are dead-end, as well as those that already consist in two closed contours.
- In the course of the search, we find the external circuit, which includes all the rooms. We also exclude it.
I want to know more!
Our management and Unity-fighters in the person of Anton Jagahee Karpuntsova will perform a story about Planoplan at the CG Event on December 1 at 14:30 (Moscow, Holiday Inn Sokolniki, Chistye Prudy hall). Come see, ask questions, chat with developers and twist in the hands of Oculus Rift.
On the basis of a speech at the CG Event, in the next article in the series we will tell you how server-side rendering of user images is arranged in Planoplan.
Source: https://habr.com/ru/post/203866/
All Articles