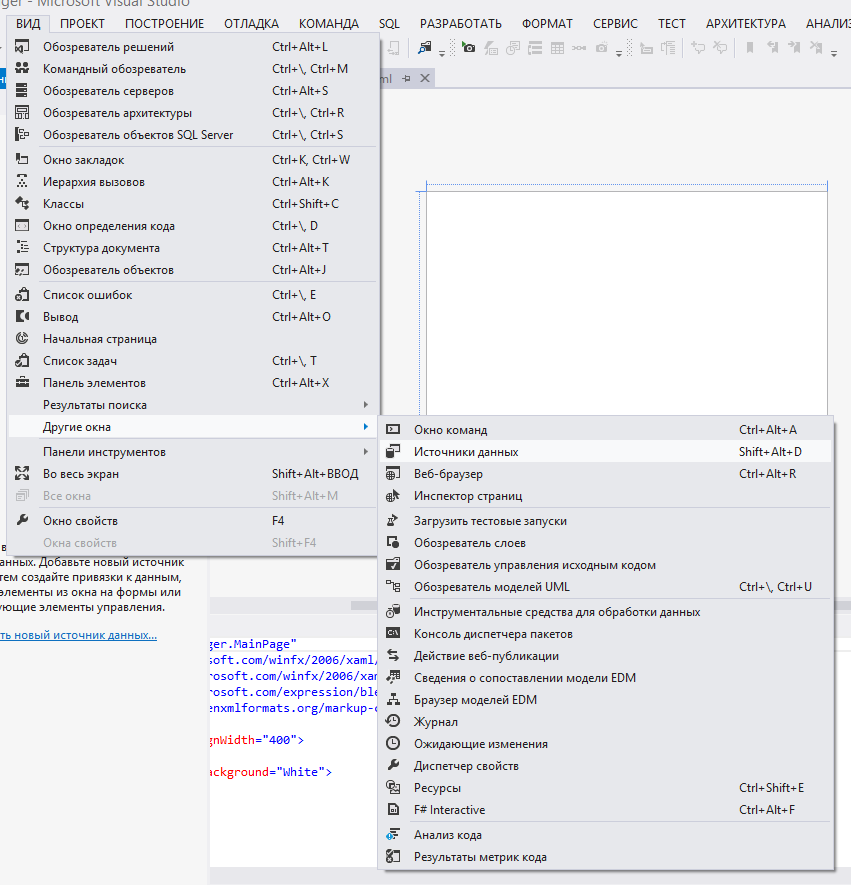
WCF RIA Services. Start. Part 1
WCF RIA Services. Start. Part 1
WCF RIA Services. Receiving data. Part 2
WCF RIA Services. Update data. Part 3
WCF RIA Services. Implement the Model-View-ViewModel (MVVM) pattern. Part 4
In this translation cycle, there is a good share, added by me personally, since the original uses the outdated VS, and some important, in my opinion important points are also missing, without which the assimilation of the material is very complicated. Go.
Caution. A lot of pictures!
')
Imagine that you need to create a serious business application, the client of which operates with a multitude of data distributed in various places and which should be collected in some way. To accomplish such a task, you will need to explore a number of new technologies and approaches, write a bunch of code, debug. What is the result? If roughly - then just sending data from the server side of the application to the client and back. Well, work with the database. What would you like to focus on first? On the implementation of data transfer? Or on the logic of processing, manipulating, presenting this data? I think you will choose the second.
WCF RIA Services offers automation of data transfer and creation of multi-level Silverlight-based applications, focusing the developer’s attention on the logic of work. You write only once a copy of the server code, and it is automatically transferred and becomes available on the client side, without the need for manual duplication or the use of other tweaks from the developer. Also, all server features, such as validation, access rights, and many others, remain available on the client.
In this series of articles you will learn about the basic features of WCF RIA Services, see in practice what advantages the use of this approach provides. The diagram below shows what exactly WCF RIA Services is responsible for:

today we will use the standard, simplest Silverlight template. In the following parts we will increase our knowledge by refining the application and using new methods, tactics and technologies, one of which will be the Model-View-ViewModel (MVVM) pattern and unit testing.
Just an electronic notebook in which you can enter an event, give it a name, artist, project, start and end date. In general, nothing complicated or unusual, but a good understanding of what should be done will only make it easier to understand HOW to do it in the framework of the technology being studied.
We will use a simple database that will save the job, as well as all related information. To do this, you will need to run the TaskManager.sql script, which is in the project project, create a database and a schema, fill the database with initial values.
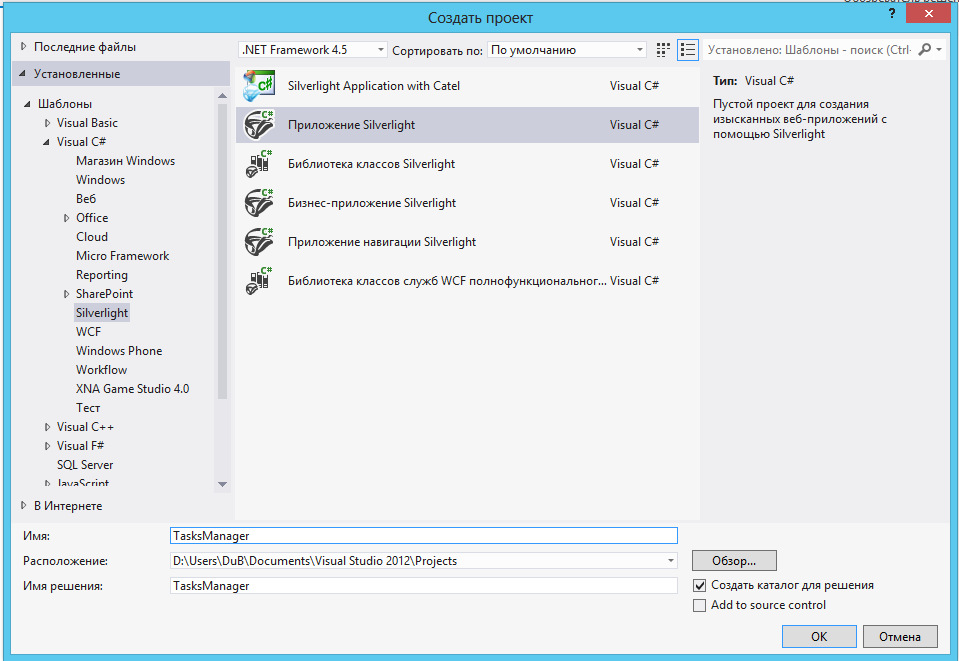
Create a new project named “TasksManager” . The ability to use WCF RIA Services is inherent in any type of Silverlight applications. However, let's start with the simplest and select the Silverlight Application template.
After clicking on the OK button, the following dialog box opens in which you need to add a checkbox to “Enable WCF RIA services”.
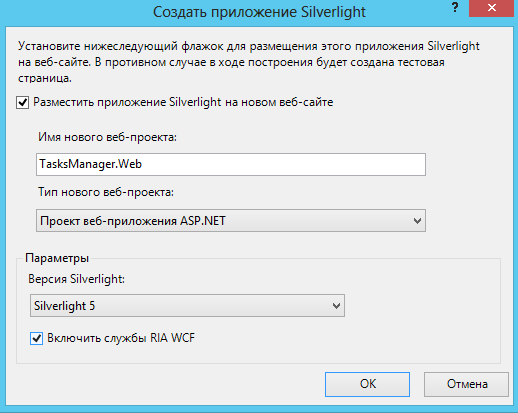
Thanks to it, the necessary references to the server project will be created, code generation and other functions described earlier will appear.
Click OK and wait for the creation of the project.
Since WCF RIA Services is mainly intended for moving data back and forth from client to server and back, you need some data model data. Out of the box is supported Entity Framework. However, it is possible to use the LINQ to SQL in WCF RIA Services Toolkit. If you create your domain service, you can work with POCO. Now we will use standard Entity Framework.
But before you create a Domain Model Entities, you must create a database and fill it.
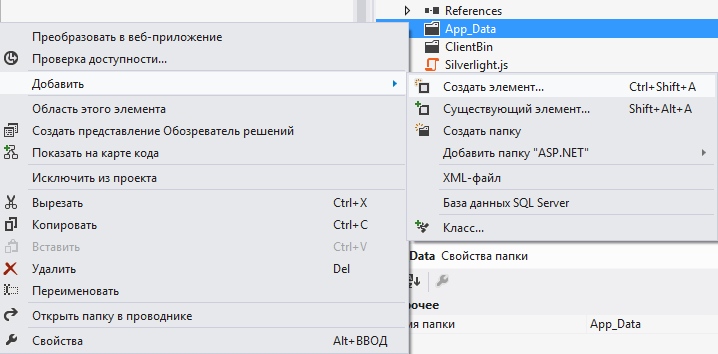
To do this, add the folder “App_Data” in the server part (with the prefix .Web):


Double click on the created database “Database * .mdf”. A window will open. We select in it again “Database * .mdf”, with the right button - “New request”. The query editor opens. Open TasksModel.sql, about which we have already mentioned and copy everything from there, with the exception of the first such lines:
Click on the "Run" button. Everything. The database is filled with tables, and the Tasks table is filled with data.
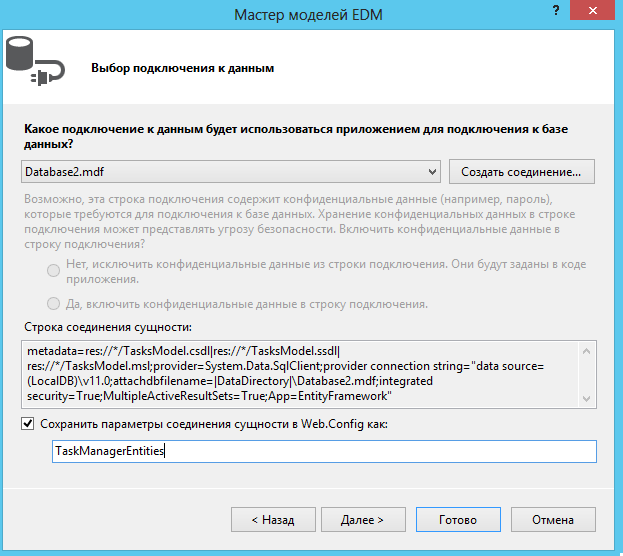
Click the right mouse button on TaskManager.Web and select "Add" - "Create item". Select the "Data" tab in the left window, and in the right select "Model ADO.NET EDM". Give the name " TasksModel.edmx ".

Add. The EDM Model Wizard opens. Select the desired database, give the name of the entity “ TaskManagerEntities ” and click Next.
In the next step, select the tick table. Give the model name “ TaskManagerMode l”, as well as tick the “ Generate object names in the plural or singular”

Voila Now you have the Entity Framework data model for all tables in the database. However, in this lesson you will only work with the “Task” table, but further tables will be added.
Build a solution to make sure everything is done correctly.
After creating the EDM, the designer window should open. If it didn’t open automatically, then double-click in the TasksModel.edmx Solution Browser. Next, click on an empty area. And go to the properties window. Change the “Code Generation Strategy” parameter from “No” to “Default”. Rebuild.

Now it's time to create a domain service.
Now we will create the core RIA Services - domain service. Right-click on the server side: TaskManager.Web - “Add” - “Create item”. We select the category "Web" in the left window, and on the right the "DomainService Class". Give the name " TasksDomainService ".

After clicking on the Add button, go to the service settings window. Since now we will work only with the Tasks table, we select it. In the "Enable Editing" column, a check mark is not needed. Until. If you put it then get a set of CRUD. If not, then only Get (read). Click OK.
The generated code, without comments will look like this:
The LinqToEntitiesDomainService class provides communication between the EDM model and WCF RIA services. The attribute “EnableClientAccess” indicates that this method must be added to the client part during automatic code generation. In this case, we received only the method of reading data from the table, but you can implement a full-fledged CRUD or any other actions on the data that you need and which will eventually also be available in the client project. How to do this will be discussed in more detail in the following articles.
Also remember that conventions are used that relate to the type of the return value (Queryable) and the naming rules (GetName). In this case, we have the delegated entity of the ObjectContext data model, which is created as part of the base class and used to retrieve the entire Tasks table. You can also improve this query by adding sorting, filters, etc., but while the return value is of type IQueryable, WCF RIA Services understands this and forms the corresponding methods that will allow the use of this functionality on the client side.
Rebuild the project to make sure everything is done correctly. In the client project, when you click on the icon for two leaves “Show all files”, a file should appear with the name TaskManager.Web.g.cs, which contains the generated code for the client.
Today we will use the opportunity to WCF RIA Services, as “drag and drop”, using the DomainDataSource directly in the UI. In the following parts, we will also look at the MVVM pattern, how to use it in the WCF RIA, and how to use the DomainDataSource with this approach.
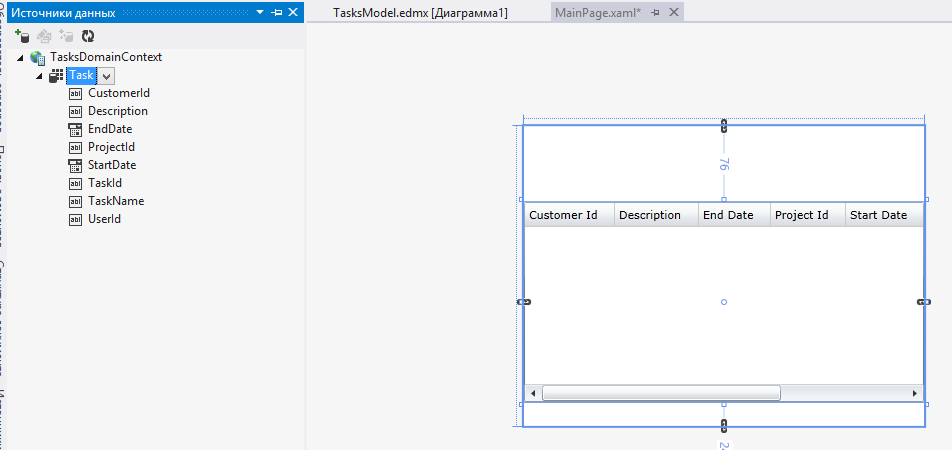
So, open MainPage.xaml. Next, open the Data Sources window. Now drag the Tasks into the image editor on the white box. Correct the placement. Everything. In the XAML section, you will see the generated code for the Grid element.
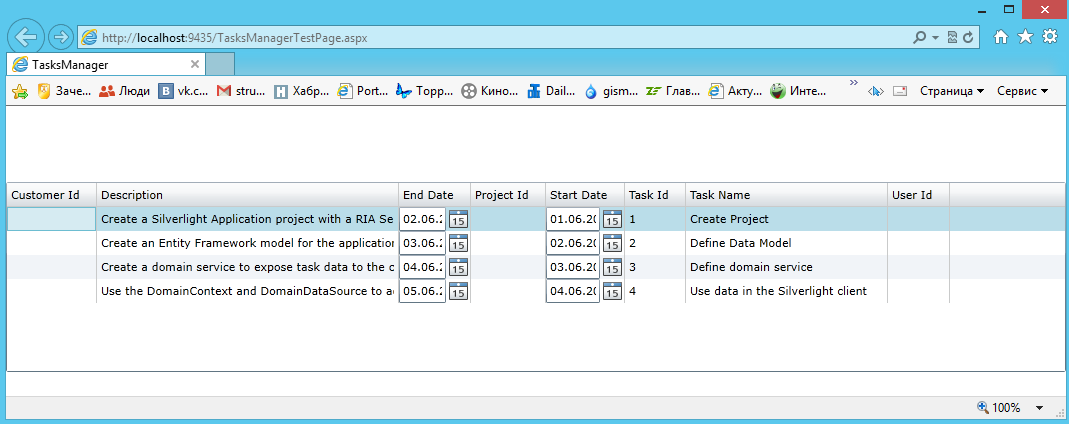
We build and run the application. And enjoy a similar view:
On github
WCF RIA Services. Receiving data. Part 2
WCF RIA Services. Update data. Part 3
WCF RIA Services. Implement the Model-View-ViewModel (MVVM) pattern. Part 4
From translator
In this translation cycle, there is a good share, added by me personally, since the original uses the outdated VS, and some important, in my opinion important points are also missing, without which the assimilation of the material is very complicated. Go.
Caution. A lot of pictures!
')
Introduction
Imagine that you need to create a serious business application, the client of which operates with a multitude of data distributed in various places and which should be collected in some way. To accomplish such a task, you will need to explore a number of new technologies and approaches, write a bunch of code, debug. What is the result? If roughly - then just sending data from the server side of the application to the client and back. Well, work with the database. What would you like to focus on first? On the implementation of data transfer? Or on the logic of processing, manipulating, presenting this data? I think you will choose the second.
WCF RIA Services offers automation of data transfer and creation of multi-level Silverlight-based applications, focusing the developer’s attention on the logic of work. You write only once a copy of the server code, and it is automatically transferred and becomes available on the client side, without the need for manual duplication or the use of other tweaks from the developer. Also, all server features, such as validation, access rights, and many others, remain available on the client.
In this series of articles you will learn about the basic features of WCF RIA Services, see in practice what advantages the use of this approach provides. The diagram below shows what exactly WCF RIA Services is responsible for:
today we will use the standard, simplest Silverlight template. In the following parts we will increase our knowledge by refining the application and using new methods, tactics and technologies, one of which will be the Model-View-ViewModel (MVVM) pattern and unit testing.
Tasks solved by the created application
Just an electronic notebook in which you can enter an event, give it a name, artist, project, start and end date. In general, nothing complicated or unusual, but a good understanding of what should be done will only make it easier to understand HOW to do it in the framework of the technology being studied.
Studied aspects of WCF RIA Services:
- Project Links (links between projects) - a link between a Silverlight client project and a server-side web application or library class. The server project defines or creates links to domain services, entities, metadata, and also provides a mechanism by which the code defined on the server is available to the client. Thanks to the link, all the necessary client code is generated dynamically at compile time.
- Domain Services (Domain Services) - the core of WCF RIA Services. They determine the operations available on the server. Basically, they come down to CRUD (write, read, update, delete), but they can be any others that you consider necessary. All these operations are available automatically on the client side thanks to WCF, and the client does not need to know about the server side anything.
- Entities - You need to define the types of entities on the server side, and the client part will operate on them due to automatic code generation. It is also possible to use validation and other metadata. Entity types on the server side and client are used for serialization / deserialization operations, when transferring data between them. Entities can be created using the Entity Framework, LINQ to SQL, or Plain Old CLR Objects (POCO).
- Domain Context (domain context) is the client equivalent of domain services. Autogenerate code, thanks to which you get access to the functionality of the server part. It contains a WCF proxy inside of itself, which provides the ability to call the service, as well as manages requests that must be executed on the server side, tracks changes to entities and much more.
- DomainDataSource is a data source object that is used to make requests and notify the server of changes. Facilitates direct binding in XAML and more.
Step 1: Create a Silverlight application and link to the server side.
We will use a simple database that will save the job, as well as all related information. To do this, you will need to run the TaskManager.sql script, which is in the project project, create a database and a schema, fill the database with initial values.
Create a new project named “TasksManager” . The ability to use WCF RIA Services is inherent in any type of Silverlight applications. However, let's start with the simplest and select the Silverlight Application template.
After clicking on the OK button, the following dialog box opens in which you need to add a checkbox to “Enable WCF RIA services”.
Thanks to it, the necessary references to the server project will be created, code generation and other functions described earlier will appear.
Click OK and wait for the creation of the project.
Step 2: Create the Domain Model Entities
Since WCF RIA Services is mainly intended for moving data back and forth from client to server and back, you need some data model data. Out of the box is supported Entity Framework. However, it is possible to use the LINQ to SQL in WCF RIA Services Toolkit. If you create your domain service, you can work with POCO. Now we will use standard Entity Framework.
Original TaskManager.sql
USE [master] GO /****** Object: Database [TaskManager] Script Date: 06/06/2010 18:01:49 ******/ IF EXISTS (SELECT name FROM sys.databases WHERE name = N'TaskManager.mdf') DROP DATABASE [TaskManager.mdf] GO CREATE DATABASE [TaskManager.mdf] GO USE [TaskManager.mdf] GO SET ANSI_NULLS ON GO SET QUOTED_IDENTIFIER ON GO CREATE TABLE [dbo].[User]( [UserId] [int] IDENTITY(1,1) NOT NULL, [Username] [nvarchar](250) NOT NULL, [Password] [nvarchar](250) NOT NULL, CONSTRAINT [PK_User] PRIMARY KEY CLUSTERED ( [UserId] ASC )WITH (PAD_INDEX = OFF, STATISTICS_NORECOMPUTE = OFF, IGNORE_DUP_KEY = OFF, ALLOW_ROW_LOCKS = ON, ALLOW_PAGE_LOCKS = ON) ON [PRIMARY] ) ON [PRIMARY] GO SET ANSI_NULLS ON GO SET QUOTED_IDENTIFIER ON GO CREATE TABLE [dbo].[Customer]( [CustomerId] [int] IDENTITY(1,1) NOT NULL, [CustomerName] [nvarchar](250) NOT NULL, CONSTRAINT [PK_Customer] PRIMARY KEY CLUSTERED ( [CustomerId] ASC )WITH (PAD_INDEX = OFF, STATISTICS_NORECOMPUTE = OFF, IGNORE_DUP_KEY = OFF, ALLOW_ROW_LOCKS = ON, ALLOW_PAGE_LOCKS = ON) ON [PRIMARY] ) ON [PRIMARY] GO SET ANSI_NULLS ON GO SET QUOTED_IDENTIFIER ON GO CREATE TABLE [dbo].[Project]( [ProjectId] [int] IDENTITY(1,1) NOT NULL, [ProjectName] [nvarchar](250) NOT NULL, [Description] [nvarchar](max) NULL, [CustomerId] [int] NULL, CONSTRAINT [PK_Project] PRIMARY KEY CLUSTERED ( [ProjectId] ASC )WITH (PAD_INDEX = OFF, STATISTICS_NORECOMPUTE = OFF, IGNORE_DUP_KEY = OFF, ALLOW_ROW_LOCKS = ON, ALLOW_PAGE_LOCKS = ON) ON [PRIMARY] ) ON [PRIMARY] GO SET ANSI_NULLS ON GO SET QUOTED_IDENTIFIER ON GO CREATE TABLE [dbo].[Task]( [TaskId] [int] IDENTITY(1,1) NOT NULL, [TaskName] [nvarchar](250) NOT NULL, [Description] [nvarchar](max) NULL, [StartDate] [datetime] NULL, [EndDate] [datetime] NULL, [CustomerId] [int] NULL, [ProjectId] [int] NULL, [UserId] [int] NULL, CONSTRAINT [PK_Task] PRIMARY KEY CLUSTERED ( [TaskId] ASC )WITH (PAD_INDEX = OFF, STATISTICS_NORECOMPUTE = OFF, IGNORE_DUP_KEY = OFF, ALLOW_ROW_LOCKS = ON, ALLOW_PAGE_LOCKS = ON) ON [PRIMARY] ) ON [PRIMARY] GO SET ANSI_NULLS ON GO SET QUOTED_IDENTIFIER ON GO CREATE TABLE [dbo].[UsersTasks]( [TaskId] [int] NOT NULL, [UserId] [int] NOT NULL, CONSTRAINT [PK_UsersTasks] PRIMARY KEY CLUSTERED ( [TaskId] ASC, [UserId] ASC )WITH (PAD_INDEX = OFF, STATISTICS_NORECOMPUTE = OFF, IGNORE_DUP_KEY = OFF, ALLOW_ROW_LOCKS = ON, ALLOW_PAGE_LOCKS = ON) ON [PRIMARY] ) ON [PRIMARY] GO SET ANSI_NULLS ON GO SET QUOTED_IDENTIFIER ON GO CREATE TABLE [dbo].[TimeEntry]( [TimeEntryId] [int] IDENTITY(1,1) NOT NULL, [StartTime] [datetime] NOT NULL, [EndTime] [datetime] NOT NULL, [TaskId] [int] NOT NULL, [Description] [nvarchar](max) NOT NULL, CONSTRAINT [PK_TimeEntry] PRIMARY KEY CLUSTERED ( [TimeEntryId] ASC )WITH (PAD_INDEX = OFF, STATISTICS_NORECOMPUTE = OFF, IGNORE_DUP_KEY = OFF, ALLOW_ROW_LOCKS = ON, ALLOW_PAGE_LOCKS = ON) ON [PRIMARY] ) ON [PRIMARY] GO ALTER TABLE [dbo].[Project] WITH CHECK ADD CONSTRAINT [FK_Project_Customer] FOREIGN KEY([CustomerId]) REFERENCES [dbo].[Customer] ([CustomerId]) GO ALTER TABLE [dbo].[Project] CHECK CONSTRAINT [FK_Project_Customer] GO ALTER TABLE [dbo].[Task] WITH CHECK ADD CONSTRAINT [FK_Task_Customer] FOREIGN KEY([CustomerId]) REFERENCES [dbo].[Customer] ([CustomerId]) GO ALTER TABLE [dbo].[Task] CHECK CONSTRAINT [FK_Task_Customer] GO ALTER TABLE [dbo].[Task] WITH CHECK ADD CONSTRAINT [FK_Task_Project] FOREIGN KEY([ProjectId]) REFERENCES [dbo].[Project] ([ProjectId]) GO ALTER TABLE [dbo].[Task] CHECK CONSTRAINT [FK_Task_Project] GO ALTER TABLE [dbo].[UsersTasks] WITH CHECK ADD CONSTRAINT [FK_UsersTasks_Task] FOREIGN KEY([TaskId]) REFERENCES [dbo].[Task] ([TaskId]) GO ALTER TABLE [dbo].[UsersTasks] CHECK CONSTRAINT [FK_UsersTasks_Task] GO ALTER TABLE [dbo].[UsersTasks] WITH CHECK ADD CONSTRAINT [FK_UsersTasks_User] FOREIGN KEY([UserId]) REFERENCES [dbo].[User] ([UserId]) GO ALTER TABLE [dbo].[UsersTasks] CHECK CONSTRAINT [FK_UsersTasks_User] GO ALTER TABLE [dbo].[TimeEntry] WITH CHECK ADD CONSTRAINT [FK_TimeEntry_Task] FOREIGN KEY([TaskId]) REFERENCES [dbo].[Task] ([TaskId]) GO ALTER TABLE [dbo].[TimeEntry] CHECK CONSTRAINT [FK_TimeEntry_Task] GO SET NUMERIC_ROUNDABORT OFF GO SET XACT_ABORT, ANSI_PADDING, ANSI_WARNINGS, CONCAT_NULL_YIELDS_NULL, ARITHABORT, QUOTED_IDENTIFIER, ANSI_NULLS ON GO /*Pointer used for text / image updates. This might not be needed, but is declared here just in case*/ DECLARE @pv binary(16) BEGIN TRANSACTION SET IDENTITY_INSERT [dbo].[Task] OFF SET IDENTITY_INSERT [dbo].[Task] ON INSERT INTO [dbo].[Task] ([TaskId], [TaskName], [Description], [StartDate], [EndDate], [CustomerId], [ProjectId]) VALUES (1, N'Create Project', N'Create a Silverlight Application project with a RIA Services link', '20100601 00:00:00.000', '20100602 00:00:00.000', NULL, NULL) INSERT INTO [dbo].[Task] ([TaskId], [TaskName], [Description], [StartDate], [EndDate], [CustomerId], [ProjectId]) VALUES (2, N'Define Data Model', N'Create an Entity Framework model for the application data', '20100602 00:00:00.000', '20100603 00:00:00.000', NULL, NULL) INSERT INTO [dbo].[Task] ([TaskId], [TaskName], [Description], [StartDate], [EndDate], [CustomerId], [ProjectId]) VALUES (3, N'Define domain service', N'Create a domain service to expose task data to the client', '20100603 00:00:00.000', '20100604 00:00:00.000', NULL, NULL) INSERT INTO [dbo].[Task] ([TaskId], [TaskName], [Description], [StartDate], [EndDate], [CustomerId], [ProjectId]) VALUES (4, N'Use data in the Silverlight client', N'Use the DomainContext and DomainDataSource to access and manipulate the data in the client', '20100604 00:00:00.000', '20100605 00:00:00.000', NULL, NULL) SET IDENTITY_INSERT [dbo].[Task] OFF COMMIT TRANSACTION But before you create a Domain Model Entities, you must create a database and fill it.
To do this, add the folder “App_Data” in the server part (with the prefix .Web):
Double click on the created database “Database * .mdf”. A window will open. We select in it again “Database * .mdf”, with the right button - “New request”. The query editor opens. Open TasksModel.sql, about which we have already mentioned and copy everything from there, with the exception of the first such lines:
USE [master] GO /****** Object: Database [TaskManager] Script Date: 06/06/2010 18:01:49 ******/ IF EXISTS (SELECT name FROM sys.databases WHERE name = N'TaskManager.mdf') DROP DATABASE [TaskManager.mdf] GO CREATE DATABASE [TaskManager.mdf] GO USE [TaskManager.mdf] GO Click on the "Run" button. Everything. The database is filled with tables, and the Tasks table is filled with data.
Click the right mouse button on TaskManager.Web and select "Add" - "Create item". Select the "Data" tab in the left window, and in the right select "Model ADO.NET EDM". Give the name " TasksModel.edmx ".
Add. The EDM Model Wizard opens. Select the desired database, give the name of the entity “ TaskManagerEntities ” and click Next.
In the next step, select the tick table. Give the model name “ TaskManagerMode l”, as well as tick the “ Generate object names in the plural or singular”
Voila Now you have the Entity Framework data model for all tables in the database. However, in this lesson you will only work with the “Task” table, but further tables will be added.
Build a solution to make sure everything is done correctly.
After creating the EDM, the designer window should open. If it didn’t open automatically, then double-click in the TasksModel.edmx Solution Browser. Next, click on an empty area. And go to the properties window. Change the “Code Generation Strategy” parameter from “No” to “Default”. Rebuild.
Now it's time to create a domain service.
Step 3: Create Domain Service
Now we will create the core RIA Services - domain service. Right-click on the server side: TaskManager.Web - “Add” - “Create item”. We select the category "Web" in the left window, and on the right the "DomainService Class". Give the name " TasksDomainService ".
After clicking on the Add button, go to the service settings window. Since now we will work only with the Tasks table, we select it. In the "Enable Editing" column, a check mark is not needed. Until. If you put it then get a set of CRUD. If not, then only Get (read). Click OK.
The generated code, without comments will look like this:
[EnableClientAccess()] public class TasksDomainService : LinqToEntitiesDomainService<TasksModelEntities> { public IQueryable<Task> GetTasks() { return this.ObjectContext.Tasks; } } The LinqToEntitiesDomainService class provides communication between the EDM model and WCF RIA services. The attribute “EnableClientAccess” indicates that this method must be added to the client part during automatic code generation. In this case, we received only the method of reading data from the table, but you can implement a full-fledged CRUD or any other actions on the data that you need and which will eventually also be available in the client project. How to do this will be discussed in more detail in the following articles.
Also remember that conventions are used that relate to the type of the return value (Queryable) and the naming rules (GetName). In this case, we have the delegated entity of the ObjectContext data model, which is created as part of the base class and used to retrieve the entire Tasks table. You can also improve this query by adding sorting, filters, etc., but while the return value is of type IQueryable, WCF RIA Services understands this and forms the corresponding methods that will allow the use of this functionality on the client side.
Rebuild the project to make sure everything is done correctly. In the client project, when you click on the icon for two leaves “Show all files”, a file should appear with the name TaskManager.Web.g.cs, which contains the generated code for the client.
Step 4: Retrieving data to the UI using the DomainDataSource
Today we will use the opportunity to WCF RIA Services, as “drag and drop”, using the DomainDataSource directly in the UI. In the following parts, we will also look at the MVVM pattern, how to use it in the WCF RIA, and how to use the DomainDataSource with this approach.
So, open MainPage.xaml. Next, open the Data Sources window. Now drag the Tasks into the image editor on the white box. Correct the placement. Everything. In the XAML section, you will see the generated code for the Grid element.
We build and run the application. And enjoy a similar view:
Video for this lesson
Sources
On github
Source: https://habr.com/ru/post/203820/
All Articles