Using the OpenVAS Vulnerability Scanner
Vulnerability scanners are software or hardware tools used to diagnose and monitor networked computers, allowing you to scan networks, computers and applications to detect possible security problems, assess and fix vulnerabilities. (Wikipedia)
Famous commercial scanners are Nessus, GFI LANguard, XSpider.
Unlike others, OpenVAS is free, works without any restrictions and can be useful to both network administrators and information security specialists to identify current problems of its infrastructure.

At the core of OpenVAS is a constantly updated collection of NVT security tests (of which there are already more than 30,000), as well as a connection to the CVE database, which describes known vulnerabilities. Executing NVT tests reveals a vulnerability, and CVE provides a description of the problem and how to solve it.
')
Let's get started
1. The choice of iron.
Everything is simple, if you have to scan frequently and large address ranges, the more powerful the iron, the better. You can increase the number of parallel streams processing network addresses, and the scan itself on each host will be faster.
2. Installation.
Here I choose the least problematic way for me to install from packages.
We go to the address.
www.openvas.org/install-packages.html
Select the desired distribution and install.
In my case, this is CentOS and the atomicorp repository. The script itself will download all the dependencies, conduct the initial update of the vulnerability database and prescribe the necessary settings. In the process, ask for a login and password to access Openvas.
3. Usage.
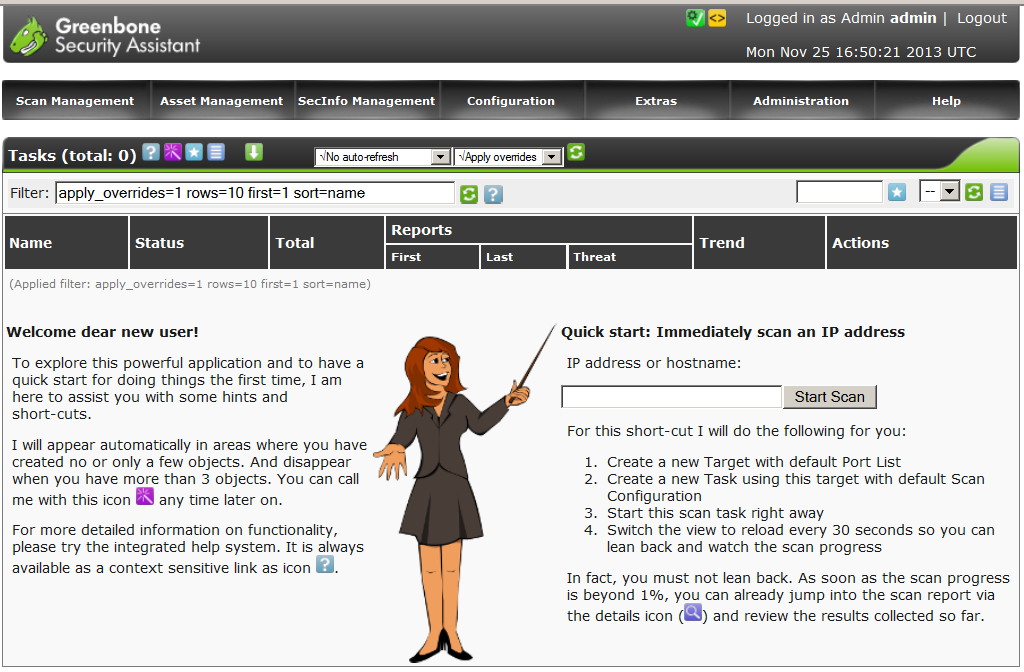
Go to the address localhost : 9392 enter the username and password and we are in the management console Greenbone Security Assistant.
The following is an example of working with Openvas to scan the internal network range The basic settings are sharpened for the optimal scan speed of each host.
3.1 Select the scan configuration.
Go to the section Configuration - Scan Configs.
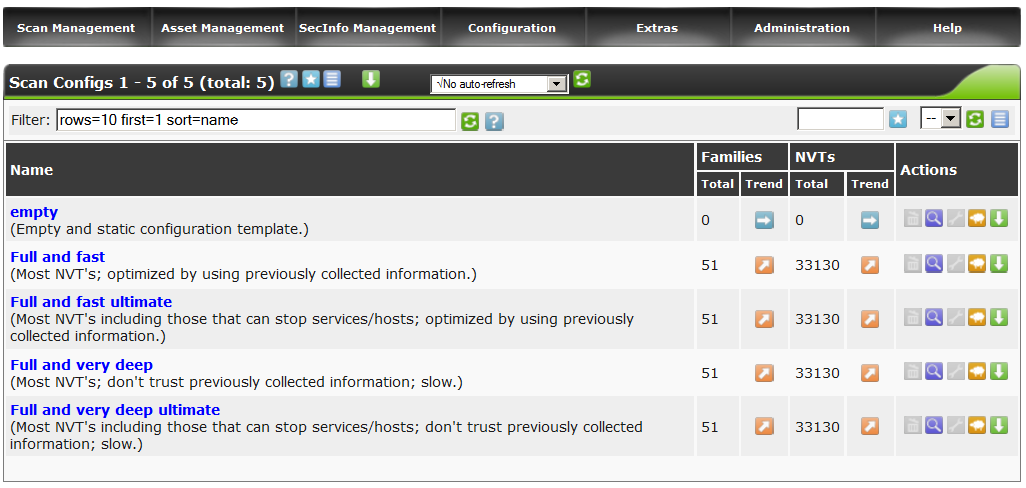
We see 4 standard policies and 1 empty.
Politicians are divided into 2 groups - fast and deep.
The principal difference is that deep does not take into account the work of each previous verification script and the collection of information begins anew.
According to my tests, this significantly increased the scan time of each host, in the absence of a meaningful result. Therefore, for greater speed, we select the Full and fast ultimate policy and clone it by clicking on the lamb icon .
.
Now, for the clone, editing options are available to us and clicking on the wrench icon , look inside.
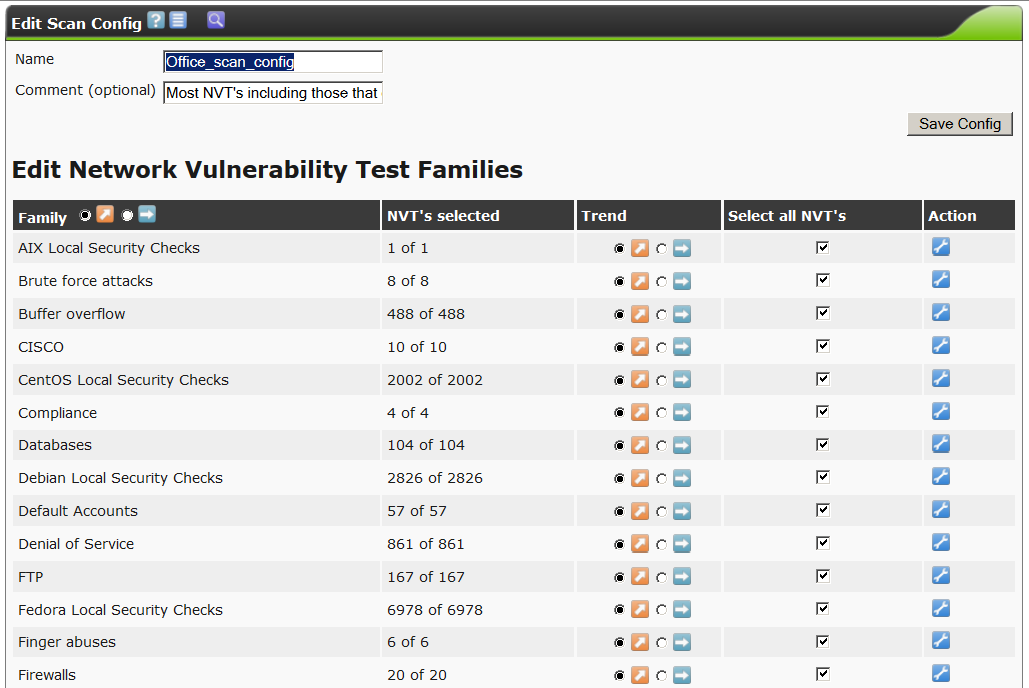
There are a lot of options, a few hundred, on the screen, only the very beginning. All options are grouped by subsection of NVT tests by various types of operating systems and network equipment, by the settings of various connected utilities such as nmap, nikto, etc.
We call our new policy Office_scan_config.
Go down below.

I draw attention to the following points.
safe_check – disable will allow potentially dangerous NVT tests to be run, the execution of which may cause the tested host to drop. Use carefully.
optimize_test– a switch that tells you to use fast or deep scan.
Next we go down to the PingHost points and set the switches as in the screenshot.
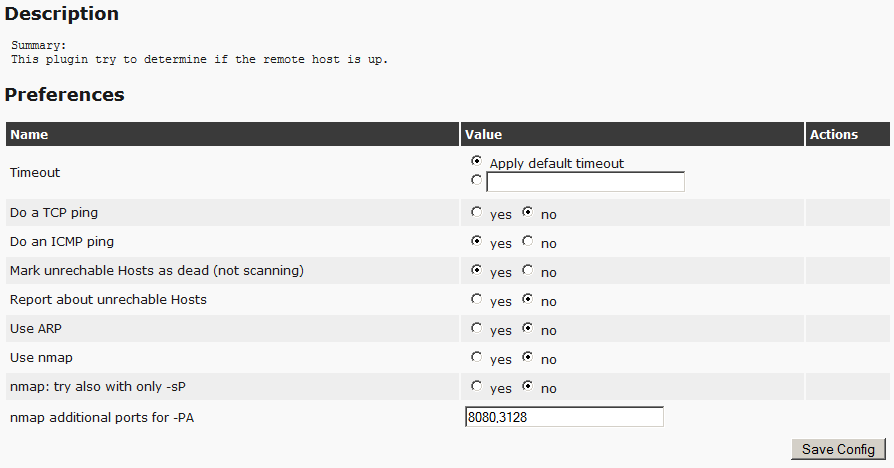
This will allow you to immediately exclude empty addresses and not to spend on them the time of the scanner. The remaining items do not touch.
Do not forget to save the accepted changes.
3.2 Register an account for local checks.
If this item is configured, Openvas will log on to each machine, scan the installed software, local security settings and throw out alerts if problems are detected.
Naturally this will increase the scan time.
If not configured, Openvas will limit itself to remote checks.
Go to the section Configuration –Credentials.
Create a new entry by clicking on the star icon .
.
Suppose we have a windows network in the domain, there is a user sec_check, with local administrator rights on the necessary machines, then it will look like this.
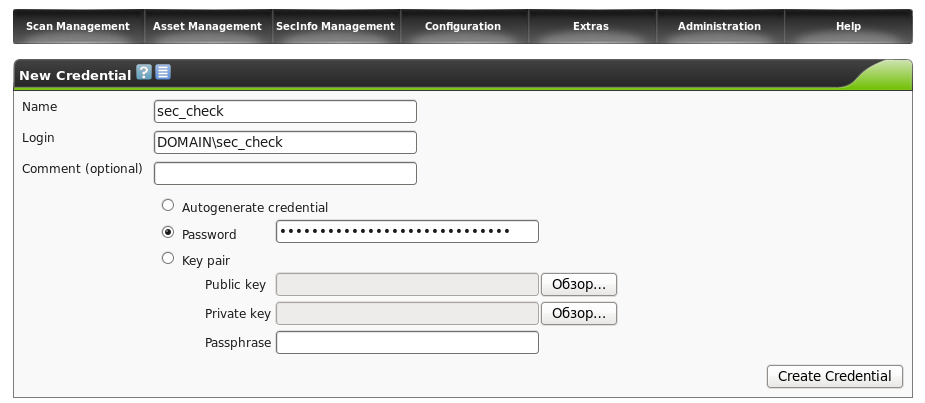
Save and move on.
3.3 Set scan targets.
Next, we need to score a range of addresses for scanning and decide on a set of ports that Openvas will check.
Go to the section Configuration –Target. Create a new goal by clicking on the star icon. We give her the name office.

Here, in principle, everything is clear, in the SMB section, we connected a previously created user to conduct local checks.
In the PortList section, the necessary port range is connected, in this case the set of popular ports offered by Nmap. The choice in favor of this range, made again in favor of optimization, so as not to shovel all 65 thousand.
In the Hosts section, specify the ip range.
3.4 Running!
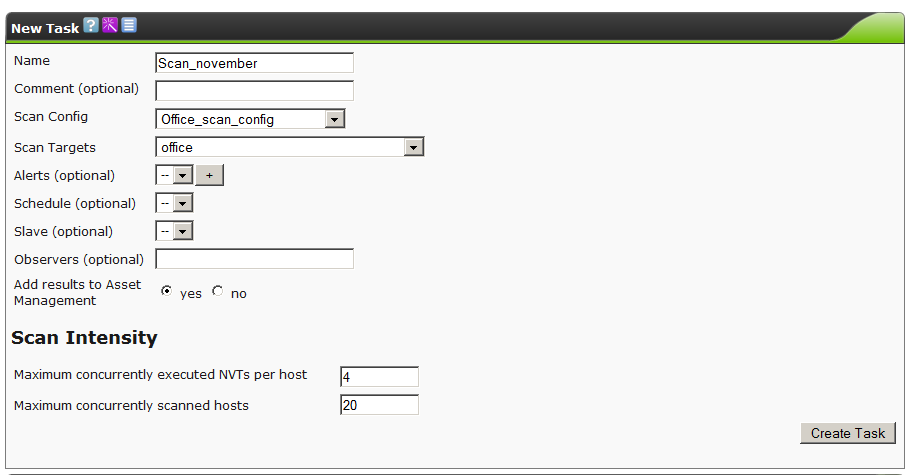
Go to the section ScanManagement - Task. Create a new task by clicking on the star icon.
Sequentially select the previously created configurations and click on the CreateTask button.
We start.
We go to drink tea. Depending on the saturation of the network and server capacity, the process can take up to several hours.
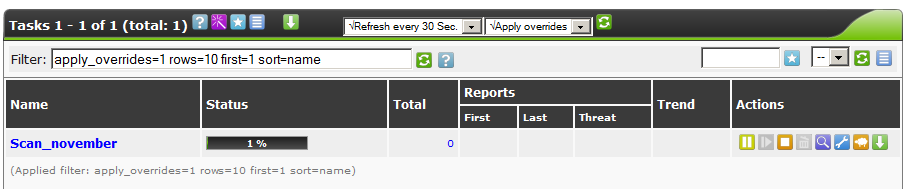
At the end of the process, we can click on the magnifying glass icon and view all the problems found.

Typical alert.

4. Updates.
Periodically it is necessary to pump up the current information about vulnerabilities and tests that reveal them.
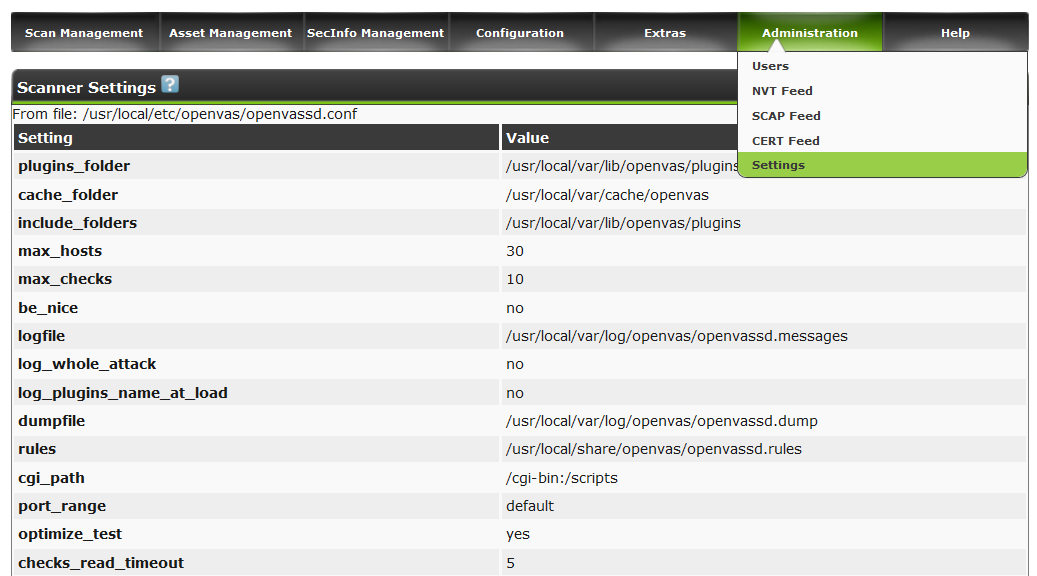
This is done either from the browser in the Administration section. (alternately in all 3 sections: nvt, scap, cert)

Or from the command line, sequential commands.
openvas-nvt-sync
openvassd
openvasmd --rebuild
openvas-scapdata-sync
openvas-certdata-sync
killall openvassd
/etc/init.d/openvas-scanner restart
/etc/init.d/openvas-manager restart
/etc/init.d/openvas-administrator restart
/etc/init.d/greenbone-security-assistant restart
Owners of powerful iron, can glance in the section Settings and expose a greater number of parallel streams.
Useful techniques for working in Greenbone Security Assistant. can be found here
www.greenbone.net/learningcenter/index.html
Successes in use.
Famous commercial scanners are Nessus, GFI LANguard, XSpider.
Unlike others, OpenVAS is free, works without any restrictions and can be useful to both network administrators and information security specialists to identify current problems of its infrastructure.
At the core of OpenVAS is a constantly updated collection of NVT security tests (of which there are already more than 30,000), as well as a connection to the CVE database, which describes known vulnerabilities. Executing NVT tests reveals a vulnerability, and CVE provides a description of the problem and how to solve it.
')
Let's get started
1. The choice of iron.
Everything is simple, if you have to scan frequently and large address ranges, the more powerful the iron, the better. You can increase the number of parallel streams processing network addresses, and the scan itself on each host will be faster.
2. Installation.
Here I choose the least problematic way for me to install from packages.
We go to the address.
www.openvas.org/install-packages.html
Select the desired distribution and install.
In my case, this is CentOS and the atomicorp repository. The script itself will download all the dependencies, conduct the initial update of the vulnerability database and prescribe the necessary settings. In the process, ask for a login and password to access Openvas.
3. Usage.
Go to the address localhost : 9392 enter the username and password and we are in the management console Greenbone Security Assistant.
The following is an example of working with Openvas to scan the internal network range The basic settings are sharpened for the optimal scan speed of each host.
3.1 Select the scan configuration.
Go to the section Configuration - Scan Configs.
We see 4 standard policies and 1 empty.
Politicians are divided into 2 groups - fast and deep.
The principal difference is that deep does not take into account the work of each previous verification script and the collection of information begins anew.
According to my tests, this significantly increased the scan time of each host, in the absence of a meaningful result. Therefore, for greater speed, we select the Full and fast ultimate policy and clone it by clicking on the lamb icon
.Now, for the clone, editing options are available to us and clicking on the wrench icon
, look inside.There are a lot of options, a few hundred, on the screen, only the very beginning. All options are grouped by subsection of NVT tests by various types of operating systems and network equipment, by the settings of various connected utilities such as nmap, nikto, etc.
We call our new policy Office_scan_config.
Go down below.
I draw attention to the following points.
safe_check – disable will allow potentially dangerous NVT tests to be run, the execution of which may cause the tested host to drop. Use carefully.
optimize_test– a switch that tells you to use fast or deep scan.
Next we go down to the PingHost points and set the switches as in the screenshot.
This will allow you to immediately exclude empty addresses and not to spend on them the time of the scanner. The remaining items do not touch.
Do not forget to save the accepted changes.
3.2 Register an account for local checks.
If this item is configured, Openvas will log on to each machine, scan the installed software, local security settings and throw out alerts if problems are detected.
Naturally this will increase the scan time.
If not configured, Openvas will limit itself to remote checks.
Go to the section Configuration –Credentials.
Create a new entry by clicking on the star icon
.Suppose we have a windows network in the domain, there is a user sec_check, with local administrator rights on the necessary machines, then it will look like this.
Save and move on.
3.3 Set scan targets.
Next, we need to score a range of addresses for scanning and decide on a set of ports that Openvas will check.
Go to the section Configuration –Target. Create a new goal by clicking on the star icon. We give her the name office.
Here, in principle, everything is clear, in the SMB section, we connected a previously created user to conduct local checks.
In the PortList section, the necessary port range is connected, in this case the set of popular ports offered by Nmap. The choice in favor of this range, made again in favor of optimization, so as not to shovel all 65 thousand.
In the Hosts section, specify the ip range.
3.4 Running!
Go to the section ScanManagement - Task. Create a new task by clicking on the star icon.
Sequentially select the previously created configurations and click on the CreateTask button.
We start.
We go to drink tea. Depending on the saturation of the network and server capacity, the process can take up to several hours.
At the end of the process, we can click on the magnifying glass icon and view all the problems found.
Typical alert.
4. Updates.
Periodically it is necessary to pump up the current information about vulnerabilities and tests that reveal them.
This is done either from the browser in the Administration section. (alternately in all 3 sections: nvt, scap, cert)
Or from the command line, sequential commands.
openvas-nvt-sync
openvassd
openvasmd --rebuild
openvas-scapdata-sync
openvas-certdata-sync
killall openvassd
/etc/init.d/openvas-scanner restart
/etc/init.d/openvas-manager restart
/etc/init.d/openvas-administrator restart
/etc/init.d/greenbone-security-assistant restart
Owners of powerful iron, can glance in the section Settings and expose a greater number of parallel streams.
Useful techniques for working in Greenbone Security Assistant. can be found here
www.greenbone.net/learningcenter/index.html
Successes in use.
Source: https://habr.com/ru/post/203766/
All Articles