Android google maps: create infowindow any form

Recently, I needed to make an infowindow for google maps, in which the background was set by a picture, respectively, the form too. At first, I thought that I would have to use some third-party libraries, but I didn’t really want to do this, so I decided to try the task using standard tools. As it turned out, it is solved quite simply.
Style
To begin with, we explicitly set the style of our window (to be honest, using the Theme.Light style, without expanding it, we will achieve the same effect, but who knows whether it will work correctly everywhere and always, therefore it is better to explicitly specify the parameters). To do this, add the following style to the values / styles :
<style name="TransparentBackground" parent="android:Theme.Light"> <item name="android:windowIsTranslucent">true</item> <!-- --> <item name="android:windowBackground">@android:color/transparent</item> <!-- --> <item name="android:windowContentOverlay">@null</item> <!-- --> <item name="android:windowNoTitle">true</item> <!-- --> <item name="android:windowIsFloating">true</item> <!-- --> <item name="android:backgroundDimEnabled">false</item> <!-- --> </style> Background
Now we need a picture for the background, for example, I took a “fuzzy” star (check for transparency in Paint.NET):

')
Great, now put star.png in the res / drawable folder of our project.
Description directly infowindow
First, we will describe the layout of our window, for which we will create the custom_infowindow.xml file, in the res / layout folder, below its contents:
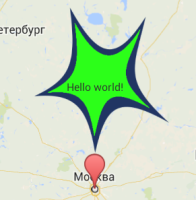
<?xml version="1.0" encoding="utf-8"?> <RelativeLayout xmlns:android="http://schemas.android.com/apk/res/android" android:layout_width="wrap_content" android:layout_height="wrap_content" > <ImageView android:layout_height="162dp" android:layout_width="150dp" android:layout_marginLeft="15dp" android:src="@drawable/star" /> <TextView android:layout_height="wrap_content" android:layout_width="wrap_content" android:layout_marginTop="80dp" android:layout_marginLeft="51dp" android:textSize="12sp" android:text="@string/hello_world" /> </RelativeLayout> In the layout we have the image as an ImageView . As an example of information in the infowindow, we also set a TextView with the text “Hello world!”. Indents are used to align the display elements of the layout as we need. In addition, if in the middle a star would be filled with color, the text will be displayed on top of the image, due to the description order. For example:
We draw our layout
Now we define the InfoWindowAdapter :
@Override public View getInfoWindow(Marker marker) { ContextThemeWrapper wrapper = new ContextThemeWrapper(getApplicationContext(), R.style.TransparentBackground); LayoutInflater inflater = (LayoutInflater) wrapper.getSystemService(LAYOUT_INFLATER_SERVICE); View layout = inflater.inflate(R.layout.custom_infowindow, null); return layout; } @Override public View getInfoContents(Marker marker) { return null; } Here we use ContextThemeWrapper to set the theme for the layout, then create a view with the inflater, which will be our window (it's important to describe the draw in getInfoWindow , not getInfoContents , because if we use getInfoContents we will describe the window's content, so the standard will be used ).
Things are easy
In principle, everything, now we set the adapter to our GoogleMap using the setInfoWindowAdapter (...) method, and we admire the result =).
Source: https://habr.com/ru/post/203750/
All Articles