How I hung up hotkeys on the Unity sound indicator
I, like many, who could be interested in this post, love the Unity shell for convenient hot keys and various buns for integration with the most diverse software.
One of these advantages is the integration of players supporting the mpris2 interface into the sound indicator.
Remarkably, web applications that can act like a player also fall into this wonderful list. And everything would be cool, but this beauty, by the strange whim of the developers, does not support any hotkeys, except for changes in the volume level.
Those who do not want to read how it all works, can proceed closer to the end of the article, or straight to github . The rest I ask for me.
For a start, of course, it’s worthwhile to google, which, oddly enough, will not give any intelligible results - a couple of solutions for specific players, and a link to the bug that hot keys do not work when the indicator is open.
The next, obvious step is to search for the source of this component, in order to file a missing functionality with a file. As it turned out, the official unity website has everything you need to get these sources very quickly. To do this, go to the section "Get involved" , since we decided that we would have to be involved in all this. Next, it is worth proceeding to the “Development” section, since if we want the source code itself, well, since we want to finish the standard component, then our path lies in the section “Common components” . Where we actually find our long-awaited indicator, although it is here that for some reason it appears under the name “Sound Menu” , although in the rest of the system it is referred to exclusively as the indicator, but oh well.
Downloading source ...
The part is done a little less than completely on vala. The first impulse is to install a quick installation of hot keys, recompile and use the results of the work of the righteous. However, the boredom, inspired by the thought that you would have to write a config for these keys, invent its format, figure out how to handle hot keys globally, resolve conflicts with hot keys set by the system and invent how to write it on vala, stopped me, and made me read the source a little more intently and consistently.
')
All sources that can interest us, as expected, are in the src directory. Let's start as usual with main.vala:
Here we will see that this is not some kind of classic UI application that provides a tray icon, but some kind of service:
Once it is a service, it means that everything necessary for drawing and management is available on a certain interface, let's take a look deeply, namely in service.vala. Lines of the form:
undoubtedly, they suggest that there is a tire involved, namely the D-Bus . Quickly googling, you can understand that this is quite an object-oriented interface, which, which is nice, can be pulled from the console and, moreover, you can monitor how different services interact . There are also GUI utilities, for example qdbusviewer , which can be installed with the command:
Next, it is worth examining the insides of the run method, which is called in main:
In the documentation about the own_name method, something intelligible is said, but it looks like a registration on that bus itself.
The gdbus command has an excellent and introspect generic method:
Since we are going to manage this service, then, most likely, the most interesting for us is the org.gtk.Actions interface. I suggest experimenting with the vkcom player, although, in theory, any other one will fit. Let's run something like this:
And let's interact a bit with our player, namely press Play, Pause, Next and Previous.
And where is the Pause you ask? Hmm, but no, there is only Play / Pause, depending on the current state, which we, of course, think of how to find out. Assumptions about org.gtk.Actions fully justified themselves, let's now try to reproduce our actions through a different interface than the one we used when poking into the indicator, namely via the console:
A complete list of actions can be found by running the command:
I think on what basis they are formed, you have already caught.
Cool, it works! Yes, indeed, in this form it can already be used - for some specific player ... But, this is not our method.
I do not know about you, but I usually have more than one player installed, and I would like to manage them all. To do this, you will have to come up with some kind of mechanism for switching the “current” player, as several players can play at the same time. For this, it would not hurt to have a way to get a complete list of players that are controlled by the indicator sound service. A little googling, it's easy to understand that this list is in a certain “dconf databse”, which can be manipulated with the help of the dconf utility. Let's try?
Is not it very readable? And so:
Sed our all . So what, but now how to choose the "current"? Well, I solved this problem like this:
What no, and the interface for switching players we received. But I would like it to also look decent, and preferably as it manifested itself on the UI:
As you may have noticed, I used the notify-send command to display data about the list of players in the form of a notification. This is me to the fact that the default "-t" flag does not work for this command in Ubuntu, indicating the timeout during which the notification will be displayed, so the notifications are shown indecently long. You can fix this if you use these instructions . Someone might say - this is not a unix way, I will agree to mix data acquisition and its output on the UI, but in order not to complicate the use of the script, I did everything that way.
Using the skills of working with gdbus obtained above, you can easily implement the rest of the player management functionality, so I won’t dwell on this in detail, so what happened can be found on github . Separately, I just want to mention the implementation of collecting information on the current track. Information about the state of the player, as it turned out, is stored in a state of action (gtk.Action), which is responsible for starting the player. You can get this information using the org.gtk.Actions.Describe method, and do it this way:
The output of this command contains the minimum necessary information about the current state of the player and the current track, if any.
After the work done, all that remains is to add hotkeys to the invoking actions from the resulting script. I used CompizConfig for this, because I didn’t manage to do this with standard tools (Ubuntu 13.10), I don’t know why it doesn’t work, but I hope it will be fixed soon.
You can install CompizConfig using the following command:
It looks like this:
That's all, thank you for your attention.
One of these advantages is the integration of players supporting the mpris2 interface into the sound indicator.
For those who do not know what this sound indicator
This is the icon with the speaker in the indicator panel, immediately to the left of the clock:

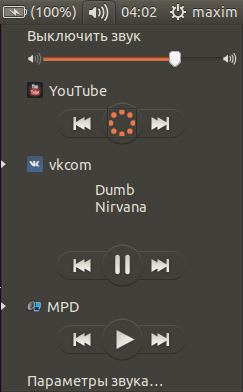
Remarkably, web applications that can act like a player also fall into this wonderful list. And everything would be cool, but this beauty, by the strange whim of the developers, does not support any hotkeys, except for changes in the volume level.
Those who do not want to read how it all works, can proceed closer to the end of the article, or straight to github . The rest I ask for me.
How can you start such an enterprise?
For a start, of course, it’s worthwhile to google, which, oddly enough, will not give any intelligible results - a couple of solutions for specific players, and a link to the bug that hot keys do not work when the indicator is open.
The next, obvious step is to search for the source of this component, in order to file a missing functionality with a file. As it turned out, the official unity website has everything you need to get these sources very quickly. To do this, go to the section "Get involved" , since we decided that we would have to be involved in all this. Next, it is worth proceeding to the “Development” section, since if we want the source code itself, well, since we want to finish the standard component, then our path lies in the section “Common components” . Where we actually find our long-awaited indicator, although it is here that for some reason it appears under the name “Sound Menu” , although in the rest of the system it is referred to exclusively as the indicator, but oh well.
Gash, gash immediately
Downloading source ...
bzr branch lp:indicator-sound The part is done a little less than completely on vala. The first impulse is to install a quick installation of hot keys, recompile and use the results of the work of the righteous. However, the boredom, inspired by the thought that you would have to write a config for these keys, invent its format, figure out how to handle hot keys globally, resolve conflicts with hot keys set by the system and invent how to write it on vala, stopped me, and made me read the source a little more intently and consistently.
')
What we have
All sources that can interest us, as expected, are in the src directory. Let's start as usual with main.vala:
main.vala
[CCode (cheader_filename="libintl.h", type="char *")] extern unowned string bind_textdomain_codeset (string domainname, string codeset); static int main (string[] args) { bind_textdomain_codeset (Config.GETTEXT_PACKAGE, "UTF-8"); Intl.setlocale (LocaleCategory.ALL, ""); Intl.bindtextdomain (Config.GETTEXT_PACKAGE, Config.GNOMELOCALEDIR); Notify.init ("indicator-sound"); var service = new IndicatorSound.Service (); return service.run (); } Here we will see that this is not some kind of classic UI application that provides a tray icon, but some kind of service:
var service = new IndicatorSound.Service (); Once it is a service, it means that everything necessary for drawing and management is available on a certain interface, let's take a look deeply, namely in service.vala. Lines of the form:
//... void bus_acquired (DBusConnection connection, string name) {//...} //... void name_lost (DBusConnection connection, string name) {//...} //... undoubtedly, they suggest that there is a tire involved, namely the D-Bus . Quickly googling, you can understand that this is quite an object-oriented interface, which, which is nice, can be pulled from the console and, moreover, you can monitor how different services interact . There are also GUI utilities, for example qdbusviewer , which can be installed with the command:
sudo apt-get install qdbus-qt5 Next, it is worth examining the insides of the run method, which is called in main:
public int run () { if (this.loop != null) { warning ("service is already running"); return 1; } Bus.own_name (BusType.SESSION, "com.canonical.indicator.sound", BusNameOwnerFlags.NONE, this.bus_acquired, null, this.name_lost); this.loop = new MainLoop (null, false); this.loop.run (); return 0; } In the documentation about the own_name method, something intelligible is said, but it looks like a registration on that bus itself.
It's time to experiment
The gdbus command has an excellent and introspect generic method:
Let's look at our service through the eyes of the system.
$ gdbus introspect --session --dest com.canonical.indicator.sound --object-path \ /com/canonical/indicator/sound node /com/canonical/indicator/sound { interface org.freedesktop.DBus.Properties { methods: Get(in s interface_name, in s property_name, out v value); GetAll(in s interface_name, out a{sv} properties); Set(in s interface_name, in s property_name, in v value); signals: PropertiesChanged(s interface_name, a{sv} changed_properties, as invalidated_properties); properties: }; interface org.freedesktop.DBus.Introspectable { methods: Introspect(out s xml_data); signals: properties: }; interface org.freedesktop.DBus.Peer { methods: Ping(); GetMachineId(out s machine_uuid); signals: properties: }; interface org.gtk.Actions { methods: List(out as list); Describe(in s action_name, out (bgav) description); DescribeAll(out a{s(bgav)} descriptions); Activate(in s action_name, in av parameter, in a{sv} platform_data); SetState(in s action_name, in v value, in a{sv} platform_data); signals: Changed(as removals, a{sb} enable_changes, a{sv} state_changes, a{s(bgav)} additions); properties: }; node desktop_greeter { }; node phone { }; node desktop { }; }; Since we are going to manage this service, then, most likely, the most interesting for us is the org.gtk.Actions interface. I suggest experimenting with the vkcom player, although, in theory, any other one will fit. Let's run something like this:
dbus-monitor > monitor.log And let's interact a bit with our player, namely press Play, Pause, Next and Previous.
And now we find the result of our actions in the log:
.... # , , , method call sender=:1.9 -> dest=:1.19 serial=27912 path=/com/canonical/indicator/sound; interface=org.gtk.Actions; member=Activate string "play.vkcomvkcom.desktop" array [ ] array [ ] ... # : ... #Next method call sender=:1.9 -> dest=:1.19 serial=27918 path=/com/canonical/indicator/sound; interface=org.gtk.Actions; member=Activate string "next.vkcomvkcom.desktop" array [ ] array [ ] ... #Previous method call sender=:1.9 -> dest=:1.19 serial=27918 path=/com/canonical/indicator/sound; interface=org.gtk.Actions; member=Activate string "previous.vkcomvkcom.desktop" array [ ] array [ ] ... And where is the Pause you ask? Hmm, but no, there is only Play / Pause, depending on the current state, which we, of course, think of how to find out. Assumptions about org.gtk.Actions fully justified themselves, let's now try to reproduce our actions through a different interface than the one we used when poking into the indicator, namely via the console:
#Play/Pause gdbus call --session --dest com.canonical.indicator.sound --object-path /com/canonical/indicator/sound \ --method org.gtk.Actions.Activate 'play.vkcomvkcom.desktop' [] {} #Next gdbus call --session --dest com.canonical.indicator.sound --object-path /com/canonical/indicator/sound \ --method org.gtk.Actions.Activate 'next.vkcomvkcom.desktop' [] {} #Previous . .. ... A complete list of actions can be found by running the command:
gdbus call --session --dest com.canonical.indicator.sound --object-path /com/canonical/indicator/sound --method org.gtk.Actions.List I think on what basis they are formed, you have already caught.
Implementation
Cool, it works! Yes, indeed, in this form it can already be used - for some specific player ... But, this is not our method.
I do not know about you, but I usually have more than one player installed, and I would like to manage them all. To do this, you will have to come up with some kind of mechanism for switching the “current” player, as several players can play at the same time. For this, it would not hurt to have a way to get a complete list of players that are controlled by the indicator sound service. A little googling, it's easy to understand that this list is in a certain “dconf databse”, which can be manipulated with the help of the dconf utility. Let's try?
dconf read /com/canonical/indicator/sound/interested-media-players Is not it very readable? And so:
dconf read /com/canonical/indicator/sound/interested-media-players | sed -e "s:[],'\[]::g" -e "s:\s:\n:g" Sed our all . So what, but now how to choose the "current"? Well, I solved this problem like this:
Code
# UCS_CACHE=~/.cache/unity-control-sound UCS_CURRENT_PLAYER_FILE=$UCS_CACHE/current-player # UCS_INTERESTED_PLAYERS=`dconf read \ /com/canonical/indicator/sound/interested-media-players \ | sed -e"s:[],'\[]::g" ` # UCS_PREFFERED_PLAYERS=`dconf read /com/canonical/indicator/sound/preferred-media-players \ | sed -e "s:[],'\[]::g"` mkdir -p $UCS_CACHE touch $UCS_CURRENT_PLAYER_FILE UCS_CURRENT_PLAYER=`cat $UCS_CURRENT_PLAYER_FILE` function initialize-current-player { # if ! echo $UCS_INTERESTED_PLAYERS | grep -q $UCS_CURRENT_PLAYER ; then # UCS_CURRENT_PLAYER=`echo $UCS_PREFFERED_PLAYERS | grep -o "^\S*[^.]"` UCS_CURRENT_PLAYER=`echo $UCS_CURRENT_PLAYER | sed "s/\s//g"` echo Current player now is '"'$UCS_CURRENT_PLAYER'"' fi } # function player-next { initial_player=$UCS_CURRENT_PLAYER for player in $UCS_INTERESTED_PLAYERS do if [ -z "$first_player" ]; then first_player=$player fi if [ "$previous_player" == "$UCS_CURRENT_PLAYER" ]; then UCS_CURRENT_PLAYER=$player break fi previous_player=$player done if [ "$initial_player" == "$UCS_CURRENT_PLAYER" ]; then UCS_CURRENT_PLAYER=$first_player fi echo $UCS_CURRENT_PLAYER > $UCS_CURRENT_PLAYER_FILE } # function player-previous { initial_player=$UCS_CURRENT_PLAYER for player in $UCS_INTERESTED_PLAYERS do if [ -z "$first_player" ]; then first_player=$player fi if [ "$player" == "$UCS_CURRENT_PLAYER" ]; then UCS_CURRENT_PLAYER=$previous_player fi previous_player=$player done if [ -z "$UCS_CURRENT_PLAYER" ]; then UCS_CURRENT_PLAYER=$previous_player fi echo $UCS_CURRENT_PLAYER > $UCS_CURRENT_PLAYER_FILE } What no, and the interface for switching players we received. But I would like it to also look decent, and preferably as it manifested itself on the UI:
Code
#, , , #, : UCS_SYSTEM_WIDE_LAUNCHERS_PATH=/usr/share/applications UCS_LAUNCHERS_PATH=~/.local/share/applications # function player-launcher { name=$1 launcher=$UCS_LAUNCHERS_PATH/$name system_wide_launcher=$UCS_SYSTEM_WIDE_LAUNCHERS_PATH/$name if [ -f "$launcher" ]; then echo $launcher else echo $system_wide_launcher fi } # function player-display-name { name=$1 launcher=`player-launcher $name` if [ -f "$launcher" ]; then cat $launcher | grep -m 1 "^Name=" \ | sed "s/Name=//" else echo $player | sed "s/.desktop//" fi } # , function current-player-icon { launcher=`player-launcher $UCS_CURRENT_PLAYER` if [ -f "$launcher" ]; then cat $launcher | grep "Icon=" \ | sed "s/Icon=//" fi } # function show-current-player { echo Curent player '"'$UCS_CURRENT_PLAYER'"' for player in $UCS_INTERESTED_PLAYERS do if [ $player == $UCS_CURRENT_PLAYER ]; then players=$players* fi player_name=`player-display-name $player` players=$players$player_name\\n done icon=`current-player-icon` if ! [ -z $icon ]; then icon="-i $icon" fi echo Icon is "$icon" notify-send "Players:" "$players" $icon -t 1 } As you may have noticed, I used the notify-send command to display data about the list of players in the form of a notification. This is me to the fact that the default "-t" flag does not work for this command in Ubuntu, indicating the timeout during which the notification will be displayed, so the notifications are shown indecently long. You can fix this if you use these instructions . Someone might say - this is not a unix way, I will agree to mix data acquisition and its output on the UI, but in order not to complicate the use of the script, I did everything that way.
Using the skills of working with gdbus obtained above, you can easily implement the rest of the player management functionality, so I won’t dwell on this in detail, so what happened can be found on github . Separately, I just want to mention the implementation of collecting information on the current track. Information about the state of the player, as it turned out, is stored in a state of action (gtk.Action), which is responsible for starting the player. You can get this information using the org.gtk.Actions.Describe method, and do it this way:
gdbus call --session --dest com.canonical.indicator.sound --object-path /com/canonical/indicator/sound \ --method org.gtk.Actions.Describe vkcomvkcom.desktop The output of this command contains the minimum necessary information about the current state of the player and the current track, if any.
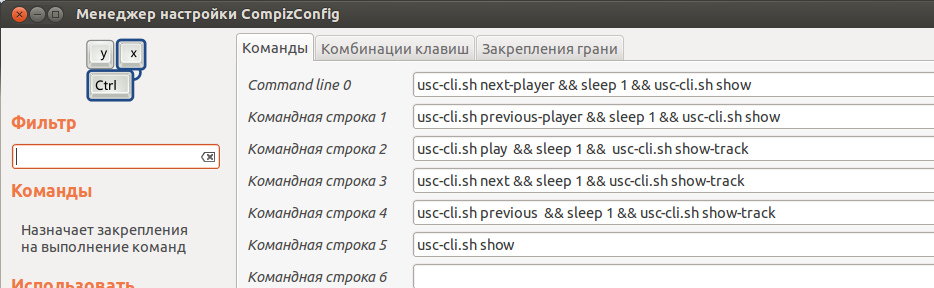
After the work done, all that remains is to add hotkeys to the invoking actions from the resulting script. I used CompizConfig for this, because I didn’t manage to do this with standard tools (Ubuntu 13.10), I don’t know why it doesn’t work, but I hope it will be fixed soon.
You can install CompizConfig using the following command:
sudo apt-get install compizconfig-settings-manager It looks like this:
Screenshots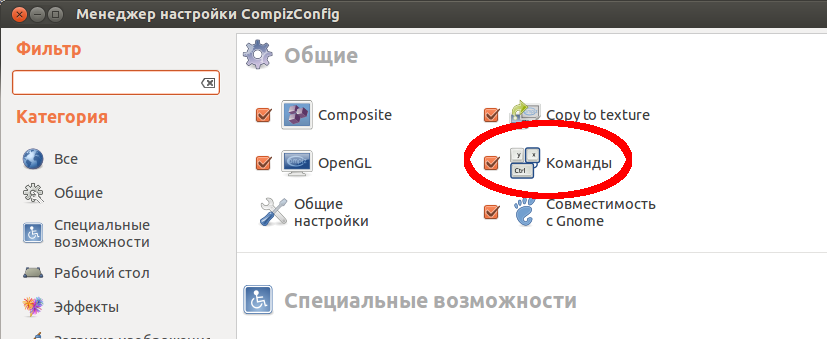

That's all, thank you for your attention.
Source: https://habr.com/ru/post/203504/
All Articles