Star system map on Three.js / WebGL
Good day or night, Habr!
In our area, as always, winter came unexpectedly, but there are no seasons in space, so again we will talk about various space things on the webgl. The previous article on the galaxy map can be read here . Today we will talk about the map of the star system.
As always, the story goes in steps. So…
Step 0 - What do we want to do?
Map of the star system - what information should it be in? Well, the first is a star. The second is the planets, the third is the moon.
Add a fantastic element - Jumpgate, or Jumping Gates, or among space-spacers, their names are simply gates. The classic element of cosmic fiction, which exists to quickly move over long distances.
Also make a marker of our position in the star system.
A few more conventions: we will not color anything, let almost everything be black and white. Second, we will not complicate and add the rotation of the planets and moons. This can be done very easily, but in my opinion is not the topic.
Step 1 - Star and Background
Again draw the Malevich Rectangle:
renderer.setClearColor(0x000000); Let's also draw a schematic star, just a white circle.
Drawing a circle is easy, but more difficult to place. I usually do not describe the details of the work with Three.js, but here I need to mention this detail, suddenly someone else will come across.
The fact is that when the camera approaches, the objects do not increase visually (since when you approach, you get daub from pixelart), but the distances between the points are more visual (for example, there is a very close cluster of objects and we need to look at each one separately). The THREE.Mesh object does not allow this; here, in my opinion, it is better to use THREE.ParticleSystem.
I will give a full listing of the function with comments:
this.addStar = function(pos) { // var radius = 50; // var canvas = document.createElement('canvas'); canvas.width = radius*2; canvas.height = radius*2; // - var ctx = canvas.getContext('2d'); ctx.fillStyle = "#fff"; ctx.beginPath(); ctx.arc(radius,radius,radius,0,2*Math.PI); ctx.fill(); // var texture = new THREE.Texture(canvas) texture.needsUpdate = true; // var vertex = new THREE.Vector3(); vertex.x = pos.x; vertex.y = pos.y; vertex.z = 0; // var geometry = new THREE.Geometry(); // geometry.vertices.push( vertex ); // material = new THREE.ParticleBasicMaterial( { size: 215, map: texture, transparent: true } ); // particles = new THREE.ParticleSystem( geometry, material ); particles.sortParticles = true; this.scene.add(particles); } All other objects of the star system are added in the same way.

Step 2 - Planets
We draw the markers of the planets, we will not invent anything special, we will make a simple circle with a stroke.
var radius = 15; // - var ctx = canvas.getContext('2d'); ctx.strokeStyle = "#666"; ctx.fillStyle = "#444"; ctx.lineWidth = 3; ctx.beginPath(); ctx.arc(radius,radius,radius-2,0,2*Math.PI); ctx.fill(); ctx.stroke(); 
Just the point is not interesting, we need more orbits. We construct them with the hands of an ordinary algorithm for constructing circles; we only need to slightly recall the geometry with trigonometry.
this.addOrbit = function(pos, radius) { // . var resolution = 170; var size = 360 / resolution; // var geometry = new THREE.Geometry(); var material = new THREE.LineBasicMaterial( { color: 0x777777} ); for(var i = 0; i <= resolution; i++) { // , .. * * 1 . var segment = ( i * size ) * Math.PI / 180; // \ , \y , , .. . geometry.vertices.push( new THREE.Vertex( new THREE.Vector3( Math.cos( segment ) * radius, Math.sin( segment ) * radius ), 0 ) ); } // var line = new THREE.Line( geometry, material ); line.position.x = pos.x; line.position.y = pos.y; this.scene.add(line); return line; } 
Already better, but still better. Add the names of the planets in the format "<name of the star system> Planet <the number of the planet from the star>". I do not cite the function of adding text, it is not interesting. The same particle systems and canvas in which the text is drawn.

Step 3 - The Moon
Everything is simple here, the drawing code is similar, just put the position not on the center, but on a certain planet + offset from the planet:
var vertex = new THREE.Vector3(); vertex.x = planetPos.x + pos.x; vertex.y = planetPos.y + pos.y; vertex.z = 0; Plus we also hang the orbit:
// , moon.orbit = this.addOrbit(planetPos, vectorLength(pos)); 
Step 4 - Jumpgates

In the picture for example Jumpgate from the TV series Babylon 5.
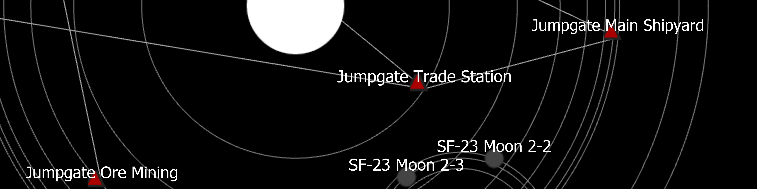
For now, we will not draw our own gate, but simply make a red triangle marker and hang the name.
// - var ctx = canvas.getContext('2d'); ctx.strokeStyle = "#333"; ctx.fillStyle = "#f00"; ctx.lineWidth = 7; ctx.beginPath(); ctx.moveTo(len/2, 0); ctx.lineTo(0, len); ctx.lineTo(len, len); ctx.closePath(); ctx.stroke(); ctx.fill(); But just because a triangle is not needed, we have a map, i.e. Need to draw the connection between the gates. Jumped into one - in what place of the space we find ourselves? That card is useful.
It is not difficult to build connections, but we will complicate a little.
Let's make the following structure:
jgs:{ 0: {type:"jg", names: [ "Jumpgate Main Shipyard", ], id: 0, pos: {x:500, y:-50}, link: 1}, 1: {type:"jg", names: [ "Jumpgate Solar Plants" ], id: 1, pos: {x:-440, y:400}, link: 2}, 2: {type:"jg", names: [ "Jumpgate Trade Station" ], id: 2, pos: {x:200, y:-130}, link: 0}, 3: {type:"jg", names: [ "Jumpgate Ore Mining" ], id: 3, pos: {x:-300, y:-280}, link: 1}, 4: {type:"jg", names: [ "Jumpgate Cross" ], id: 4, pos: {x:-640, y:10}, link: 2} }, We have the link field everywhere - it indicates the id to which the link is going.
// for (var v in list) { // ( ) list[data.jgs[v].id].link.push(this.addLine(data.jgs[v].pos, data.jgs[data.jgs[v].link].pos)); list[data.jgs[v].link].link.push(this.addLine(data.jgs[v].pos, data.jgs[data.jgs[v].link].pos)); } Those. add lines starting from the position of one gate to the position of another. And in the opposite direction, too, it is useful to us.
The result of the effort:

Step 5 - Adding Interactivity
Add in the function of adding planets, moons, gates like lines:
Jumpgate:
this.domEvent.bind(particles, "mouseover", function(e){ e.target.material.color.setHex(0xffffff); // for (var i = 0; i < e.target.link.length; i++) { e.target.link[i].material.color.setHex(0xffffff); } for (var i = 0; i < e.target.link2.length; i++) { e.target.link2[i].material.color.setHex(0xffffff); } // e.target.orbit.hover(); }); this.domEvent.bind(particles, "mouseout", function(e){ e.target.material.color.setHex(0xaaaaaa); // for (var i = 0; i < e.target.link.length; i++) { e.target.link[i].material.color.setHex(0xaaaaaa); } for (var i = 0; i < e.target.link2.length; i++) { e.target.link2[i].material.color.setHex(0xaaaaaa); } // e.target.orbit.unhover(); }); Moons:
this.domEvent.bind(particles, "mouseover", function(e){ e.target.material.color.setHex(0xffffff); e.target.orbit.hover(); }); this.domEvent.bind(particles, "mouseout", function(e){ e.target.material.color.setHex(0xaaaaaa); e.target.orbit.unhover(); }); Planets:
this.domEvent.bind(particles, "mouseover", function(e){ e.target.material.color.setHex(0xffffff); e.target.orbit.hover(); }); this.domEvent.bind(particles, "mouseout", function(e){ e.target.material.color.setHex(0xaaaaaa); e.target.orbit.unhover(); }); Here we add handlers mouseover, mouseout, and we highlight for planets and moons - orbits, for gates - communications and orbits.
Three.js out of the box does not support checking for intersections with a particle system, so I googled, thought and screwed into the file three.js, into the function of checking for intersections with the vertices of the particle system:
Looks like that:

Step 6 - Where are we?
Add a marker of our position in the system. Let's not invent something supernatural, and just add a square and an inscription.

Conclusion
Well, sort of like they all did. Of course, you can add a lot more, for example, double stars, asteroid belts, gas clouds, but, as they say, the best enemy is good. As always, all the code on the githaba, a link to the demo right there. Works in Chrome, Firefox, should work in Safari, Opera, and a whole heap of Chrome-shaped browsers. IE11 is not supported.
Demo: magistravsh.imtqy.com/starsystemmap
Code: github.com/MagistrAVSH/starsystemmap
Next time I hope to write about the generation of various objects, ships, stations, something else :)
')
Source: https://habr.com/ru/post/203378/
All Articles