Ghosts in the clouds or installing Ghost in Windows Azure
Today, many bloggers believe that Wordpress has become too overloaded with unnecessary functionality and is turning from a platform for blogs into a full-fledged and complex CMS. This is not at all bad - the variety of plug-ins, modules and themes currently available on the network allows you to use the capabilities of the platform for almost any purpose. However, this diversity has a downside. The clutter of modules negatively affects the performance of the site, despite the fact that even “clean” WordPress cannot boast of high-speed operation.
Some time ago a project called Ghost was launched on the Kickstarter start-ups site, the slogan of which was “just a blogging platform” (a blog-only platform). The idea came to many to taste and the project raised almost $ 200,000, instead of the original $ 25,000. Now the project is actively developing and version 0.3.3 is already available for download on the official website .
I, like many others, were very interested in this project. First, I like the minimal design. Secondly, Wordpress is really a bit redundant for my needs and slightly dull at work. And thirdly, I was enticed by the fact that Ghost is being developed on Node.js , a technology that has been talked about a lot lately. I decided to try it in action, what is this “just a blogging platform” , and install it in Windows Azure as a supplement to the main blog.
Before going directly to work with Ghost, we first need to create a Web Sites service, where we will be hosted. This is done as usual through the Windows Azure management portal . In the New menu (the plus sign at the bottom of the page), select Compute -> Web Site -> Quick Create. At the current stage, we need an empty site with no pre-installed components. All that we need, we will deliver further.

')
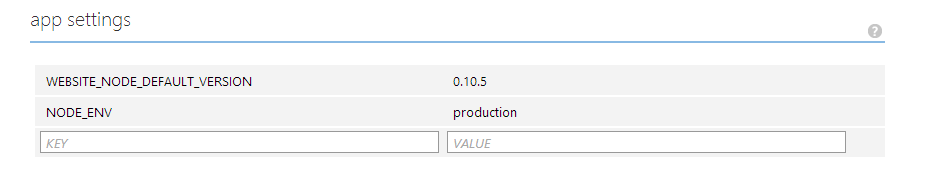
After the site is created, we need to make a couple of settings. First, you need to make a certain feint with your ears in order for Ghost to work properly (for more details, see below). Go to the Configure tab and find the app settings section there. You need to create such a line in it: KEY = NODE_ENV, VALUE = production.
Secondly, we need to set up a way to transfer data from a work computer to the cloud. For this, Windows Azure has support for version control systems such as TFS or Git. Since the Ghost project is Open Source and is delivered via GitHub itself, we will also set up a Git repository on our website and work with it. This is done simply: on the Quick Access tab (which is with a little cloud and lightning) there is an Integrate source control item:
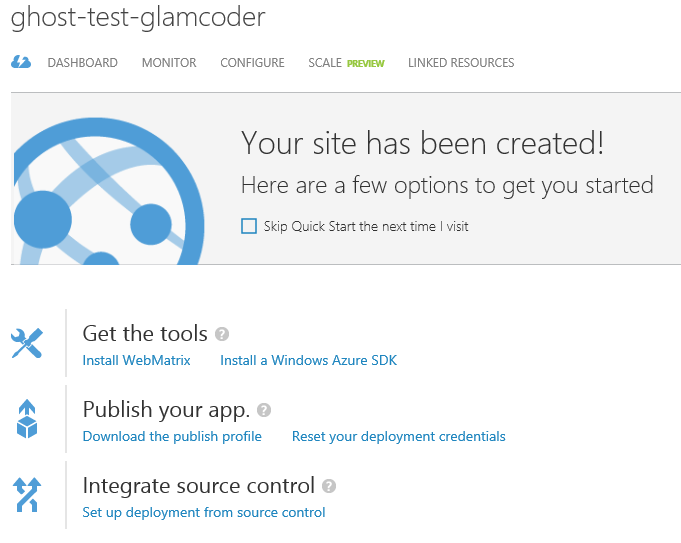
Click on Set up deployment from source control and select Local Git repository :

It is worth mentioning that among the available options there is also TFS and other version control systems (even Dropbox), but for our case we will choose Git.
This completes the configuration of the Windows Azure cloud and you can proceed to the most interesting part - installing and configuring Ghost.
Install Ghost in two ways. The first and easiest is to download already compiled files directly from the official project site . This method is good because it does not require any additional actions by the user. However, since the project is in the active development phase, you have the risk that you will download not the most recent version of the project, which will not contain important fixes. So it was in my case. After downloading the archive from the project site, I received a set of files that was perfectly installed and run locally, but did not want to work in the cloud at all.
Therefore, I believe that at the moment it is better to go a longer way first so as not to have problems in the future. The long way is to self-assemble the finished package from the Ghost source. And it just sounds too difficult at first, but in fact you will need to spend an extra 10-15 minutes on everything.
So, what we ultimately need to do:
This completes the working environment setting.
Preparation Ghost is divided into two stages. The first is to get files from the official repository on GitHub and then compile them. The second is the final configuration of configs and other things to start a blog in Windows Azure. Let's get started!
The Ghost repository on github is located at this address . To get project files to your computer, open Git Bash (you installed it in the previous step in step 2), go to the folder where you want to save this project and run the command:
After some time, a local copy of the Ghost repository will appear on your machine with all the files you need. Further, our actions are as follows (the fact that the idea after # is considered a comment and cannot be performed):
Now you need to make another trick. The fact is that by default, the Node.js site running in Azure considers the file server.js to be the start page. In Ghost, the start page is index.js, so we need to remove these differences on our own. This is done very simply. Create a server.js file in the Ghost root directory in Notepad and write one single line there:
Save the changes. That's it, now Windows Azure will correctly find the Ghost startup file that is configured.
So, we are almost ready to publish our new blog in Azure. It remains only to configure the configs. It's all pretty simple. In the root directory of Ghost there is a file called config.example.js. Rename it to config.js and open it for editing.
Further we look for such block:
Notice that we are looking for the production block. This is the configuration for which we set the value of the DEV_ENV parameter at the very beginning of the post. Here we are interested in two things, namely the url parameter at the very beginning of the block and the port parameter at the very end. The first must be changed to the url on which your blog will live. In the case of Windows Azure, by default, this URL looks like this: <YOUR-SITE> .azurewebsites.net. You can change it if you manually register the domain for the website, but this is a topic for a separate story. Well, the port value is changed to the string process.env.PORT (without quotes). Total, should get the following:
Well, the last step is to open the .gitignore file in the root folder of the project, find the lines below and comment on them:
If we had not done this, then when installing the blog in Windows Azure, Git simply would not copy them, ignoring them.
Now we are all ready for the final action - the publication of the site. To do this, you need to run several commands in Git Bash:
First we saved all the changes with the repository that we made. Then we commit them with a specific comment. On the third line, we created a link to a remote Git repository. The address of this repository is created specifically for each Web Site in Windows Azure (we did this at the very beginning) and can be found on the Deployments tab. The last command will send all the files on the Windows Azure server. You can see how, during the publishing process, various commands are executed on the server. After it's all over, you’ll have to see your site running in the cloud, and on the Deployments tab you’ll have something like this:

To set up a blog for the first time, follow the link <YOUR-PATH-TO-BLOG> / ghost, where you will be asked to enter the administrator's username and password. After that, you will fully finish installing and setting up your new blog and will be able to start creating!
Good luck!
I installed Ghost as a second blog in parallel with the main blog ( http://ghost.glamcoder.ru/ ) and I want to share my impressions of the work.
I'll start with the pros. First, I really like markdown as a markup language for writing posts. It is very clean, easily edited and intuitive. And he is more geeky, which adds charm to him. This is something like LaTeX compared to MS Word.
Secondly, Ghost works smartly. Much faster than Wordpress, not even strangled by plugins. It is clear that this is probably not so much the merit of Node.js (although probably it is also his), as the youth of the project is just and he has not yet had time to become a multi-combine type Nero. But the developers assure that he will never become like this and will always remain clean and simple. Let's shake.
Thirdly, I like its design. Everything is simple, of course, nothing superfluous. Minimalism at its best.
This, perhaps, is not all the advantages of Ghost, but at least the most noticeable.
With the cons is not so simple. My biggest complaint is that the blog is practically not customized by the interface. Those. Of all the settings, only the title and description of the blog and the background image on the main page are available. Anything more there is nothing. No you menus, no widgets, no publication in the social. network. There is not even a comment under the posts. In other words, the blog is really devoid of everything that does not apply to the writing of the text. Nevertheless, I can not call it a minus. This is a feature of the platform, which must be reconciled. Any modifications that you need, you can write yourself. In the literal sense - open the source code and add the necessary modules there. For example, I inserted the code for Yandex.Metrics by editing the standard view template. The same is proposed to do to connect comments from Disqus. Full freedom of creativity!
What I want to say in the end. If you are a geek, a programmer, a techie (underline the necessary) and you like minimalism, then you probably will like Ghost. If you like everything to work immediately and out of the box with minimal effort - then pass by. Soon, the guys from Ghost promise to run their own hosting with blogs, and then, perhaps, it will seem convenient to you. But now Ghost requires a lot of manual work.
PS The article was prepared using materials from Scott Hanselman's blog . Everything is the same there, only more technically.
PPS Post is largely written for those who are not familiar with Git and Windows Azure. So I apologize for the unnecessary details and simplicity. Your comments, suggestions and advice are always welcome :)
Ghost
Some time ago a project called Ghost was launched on the Kickstarter start-ups site, the slogan of which was “just a blogging platform” (a blog-only platform). The idea came to many to taste and the project raised almost $ 200,000, instead of the original $ 25,000. Now the project is actively developing and version 0.3.3 is already available for download on the official website .
I, like many others, were very interested in this project. First, I like the minimal design. Secondly, Wordpress is really a bit redundant for my needs and slightly dull at work. And thirdly, I was enticed by the fact that Ghost is being developed on Node.js , a technology that has been talked about a lot lately. I decided to try it in action, what is this “just a blogging platform” , and install it in Windows Azure as a supplement to the main blog.
Creating a site in Windows Azure
Before going directly to work with Ghost, we first need to create a Web Sites service, where we will be hosted. This is done as usual through the Windows Azure management portal . In the New menu (the plus sign at the bottom of the page), select Compute -> Web Site -> Quick Create. At the current stage, we need an empty site with no pre-installed components. All that we need, we will deliver further.
')
After the site is created, we need to make a couple of settings. First, you need to make a certain feint with your ears in order for Ghost to work properly (for more details, see below). Go to the Configure tab and find the app settings section there. You need to create such a line in it: KEY = NODE_ENV, VALUE = production.
Secondly, we need to set up a way to transfer data from a work computer to the cloud. For this, Windows Azure has support for version control systems such as TFS or Git. Since the Ghost project is Open Source and is delivered via GitHub itself, we will also set up a Git repository on our website and work with it. This is done simply: on the Quick Access tab (which is with a little cloud and lightning) there is an Integrate source control item:
Click on Set up deployment from source control and select Local Git repository :
It is worth mentioning that among the available options there is also TFS and other version control systems (even Dropbox), but for our case we will choose Git.
This completes the configuration of the Windows Azure cloud and you can proceed to the most interesting part - installing and configuring Ghost.
Setting up the working environment
Install Ghost in two ways. The first and easiest is to download already compiled files directly from the official project site . This method is good because it does not require any additional actions by the user. However, since the project is in the active development phase, you have the risk that you will download not the most recent version of the project, which will not contain important fixes. So it was in my case. After downloading the archive from the project site, I received a set of files that was perfectly installed and run locally, but did not want to work in the cloud at all.
Therefore, I believe that at the moment it is better to go a longer way first so as not to have problems in the future. The long way is to self-assemble the finished package from the Ghost source. And it just sounds too difficult at first, but in fact you will need to spend an extra 10-15 minutes on everything.
So, what we ultimately need to do:
- Install Node.js. The distribution is taken on the official Node.js website. It is installed as a regular Windows program. The main thing is to ensure that it is registered in the PATH, so that later you can use the node commands without specifying their full path in the system.
- Install the client for git. Console client for Windows can be downloaded at the office. site . Also look for him to write out the necessary paths in the PATH, or you will have to work from the special Git Bash command line, as I do.
- Install Grunt . This is a utility to compile javascript projects. We need it in order to create a ready-made package for publication from Ghost sources. To install Grunt, you just need to run the command
npm install grunt-cli --gfrom the command line. The npm program comes with nodejs and is essentially a package manager like apt-get on Debian Linux. A handy thing, with which you can download and install all the necessary extensions to work. - In order for Grunt to work, we need to additionally install Ruby. You can also download it on the official website .
- Grunt also requires two Ruby extensions called Bourbon and Sass. You can
gem install bourbonboth of them with onegem install bourbon.
This completes the working environment setting.
Preparing Ghost
Preparation Ghost is divided into two stages. The first is to get files from the official repository on GitHub and then compile them. The second is the final configuration of configs and other things to start a blog in Windows Azure. Let's get started!
The Ghost repository on github is located at this address . To get project files to your computer, open Git Bash (you installed it in the previous step in step 2), go to the folder where you want to save this project and run the command:
git clone https://github.com/TryGhost/Ghost.git
After some time, a local copy of the Ghost repository will appear on your machine with all the files you need. Further, our actions are as follows (the fact that the idea after # is considered a comment and cannot be performed):
  # go to the folder where the project files are directly located
 npm install
 # this command will download and install all the node.js packages that Ghost needs.
 grunt init
 grunt prod
 # these commands will "compile" the project and create a package for installation
Now you need to make another trick. The fact is that by default, the Node.js site running in Azure considers the file server.js to be the start page. In Ghost, the start page is index.js, so we need to remove these differences on our own. This is done very simply. Create a server.js file in the Ghost root directory in Notepad and write one single line there:
var GhostServer = require ('./ index'); Save the changes. That's it, now Windows Azure will correctly find the Ghost startup file that is configured.
So, we are almost ready to publish our new blog in Azure. It remains only to configure the configs. It's all pretty simple. In the root directory of Ghost there is a file called config.example.js. Rename it to config.js and open it for editing.
Further we look for such block:
  production: {
     // must not contain a path suffix after the hostname - "subdirs" are not (yet) supported!
     url: 'http://my-ghost-blog.com',
     mail: {},
     database: {
         client: 'sqlite3',
         connection: {
             filename: path.join (__ dirname, '/content/data/ghost.db')
         },
         debug: false
     },
     server: {
         // Host to be passed to node's `net.Server # listen ()`
         host: '127.0.0.1',
         // Port to be passed to node's net.Server # listen () `, for iisnode set this to` process.env.PORT`
         port: '2368'
     }
 },
Notice that we are looking for the production block. This is the configuration for which we set the value of the DEV_ENV parameter at the very beginning of the post. Here we are interested in two things, namely the url parameter at the very beginning of the block and the port parameter at the very end. The first must be changed to the url on which your blog will live. In the case of Windows Azure, by default, this URL looks like this: <YOUR-SITE> .azurewebsites.net. You can change it if you manually register the domain for the website, but this is a topic for a separate story. Well, the port value is changed to the string process.env.PORT (without quotes). Total, should get the following:
  production: {
     // must not contain a path suffix after the hostname - "subdirs" are not (yet) supported!
     url: 'http: // <YOUR-SITE> .azurewebsites.net',
     mail: {},
     database: {
         client: 'sqlite3',
         connection: {
             filename: path.join (__ dirname, '/content/data/ghost.db')
         },
         debug: false
     },
     server: {
         // Host to be passed to node's `net.Server # listen ()`
         host: '127.0.0.1',
         // Port to be passed to node's net.Server # listen () `, for iisnode set this to` process.env.PORT`
         port: process.env.PORT
     }
 },
Well, the last step is to open the .gitignore file in the root folder of the project, find the lines below and comment on them:
  # / core / client / assets / css
 # / core / built
 # config.js
If we had not done this, then when installing the blog in Windows Azure, Git simply would not copy them, ignoring them.
Site publishing in Windows Azure
Now we are all ready for the final action - the publication of the site. To do this, you need to run several commands in Git Bash:
  git add.
 git commit -m "first ghost publish"
 git remote add azure https: //glamcoder@ghost-test-test-glamcoder.scm.azurewebsites.net: 443 / ghost-test-glamcoder.git
 git push azure master
First we saved all the changes with the repository that we made. Then we commit them with a specific comment. On the third line, we created a link to a remote Git repository. The address of this repository is created specifically for each Web Site in Windows Azure (we did this at the very beginning) and can be found on the Deployments tab. The last command will send all the files on the Windows Azure server. You can see how, during the publishing process, various commands are executed on the server. After it's all over, you’ll have to see your site running in the cloud, and on the Deployments tab you’ll have something like this:
To set up a blog for the first time, follow the link <YOUR-PATH-TO-BLOG> / ghost, where you will be asked to enter the administrator's username and password. After that, you will fully finish installing and setting up your new blog and will be able to start creating!
Good luck!
Ghost impressions
I installed Ghost as a second blog in parallel with the main blog ( http://ghost.glamcoder.ru/ ) and I want to share my impressions of the work.
I'll start with the pros. First, I really like markdown as a markup language for writing posts. It is very clean, easily edited and intuitive. And he is more geeky, which adds charm to him. This is something like LaTeX compared to MS Word.
Secondly, Ghost works smartly. Much faster than Wordpress, not even strangled by plugins. It is clear that this is probably not so much the merit of Node.js (although probably it is also his), as the youth of the project is just and he has not yet had time to become a multi-combine type Nero. But the developers assure that he will never become like this and will always remain clean and simple. Let's shake.
Thirdly, I like its design. Everything is simple, of course, nothing superfluous. Minimalism at its best.
This, perhaps, is not all the advantages of Ghost, but at least the most noticeable.
With the cons is not so simple. My biggest complaint is that the blog is practically not customized by the interface. Those. Of all the settings, only the title and description of the blog and the background image on the main page are available. Anything more there is nothing. No you menus, no widgets, no publication in the social. network. There is not even a comment under the posts. In other words, the blog is really devoid of everything that does not apply to the writing of the text. Nevertheless, I can not call it a minus. This is a feature of the platform, which must be reconciled. Any modifications that you need, you can write yourself. In the literal sense - open the source code and add the necessary modules there. For example, I inserted the code for Yandex.Metrics by editing the standard view template. The same is proposed to do to connect comments from Disqus. Full freedom of creativity!
What I want to say in the end. If you are a geek, a programmer, a techie (underline the necessary) and you like minimalism, then you probably will like Ghost. If you like everything to work immediately and out of the box with minimal effort - then pass by. Soon, the guys from Ghost promise to run their own hosting with blogs, and then, perhaps, it will seem convenient to you. But now Ghost requires a lot of manual work.
PS The article was prepared using materials from Scott Hanselman's blog . Everything is the same there, only more technically.
PPS Post is largely written for those who are not familiar with Git and Windows Azure. So I apologize for the unnecessary details and simplicity. Your comments, suggestions and advice are always welcome :)
Source: https://habr.com/ru/post/203242/
All Articles