Introduction to Android NDK
To develop applications for Android, Google provides two development packages: SDK and NDK. About the SDK, there are many articles, books, as well as good guidelines from Google. But about NDK, even Google itself writes little. And I would single out only one of these books, Cinar O. - Pro Android C ++ with the NDK - 2012 .
This article is aimed at those who are not familiar (or little familiar) with the Android NDK and would like to strengthen their knowledge. I will pay attention to JNI, since it seems to me that you need to start from this interface. Also, at the end we will consider a small example with two functions for writing and reading a file. Who does not like a lot of text, he can watch the video version.
Android NDK (native development kit) is a set of tools that allow you to implement part of your application using languages such as C / C ++.
Google recommends using NDK only in the rarest of cases. Often these are the cases:
')
Java Native Interface - a standard mechanism for running code, running a Java virtual machine, which is written in C / C ++ or Assembler, and arranged in the form of dynamic libraries, makes it possible not to use static linking. This makes it possible to call a C / C ++ function from a Java program, and vice versa.
The main advantage over analogs (Netscape Java Runtime Interface or Microsoft’s Raw Native Interface and COM / Java Interface) is that JNI was originally designed for binary compatibility, for compatibility of applications written in JNI, for any Java virtual machines on a specific platform (when I’m talking about JNI, I’m not attached to a Dalvik machine, because JNI was written by Oracle for the JVM (which is suitable for all Java virtual machines). Therefore, the compiled code in C / C ++ will be executed regardless of the platform. Earlier versions did not allow for binary compatibility.
Binary compatibility or binary compatibility is a type of program compatibility that allows a program to work in various environments without changing its executable files.
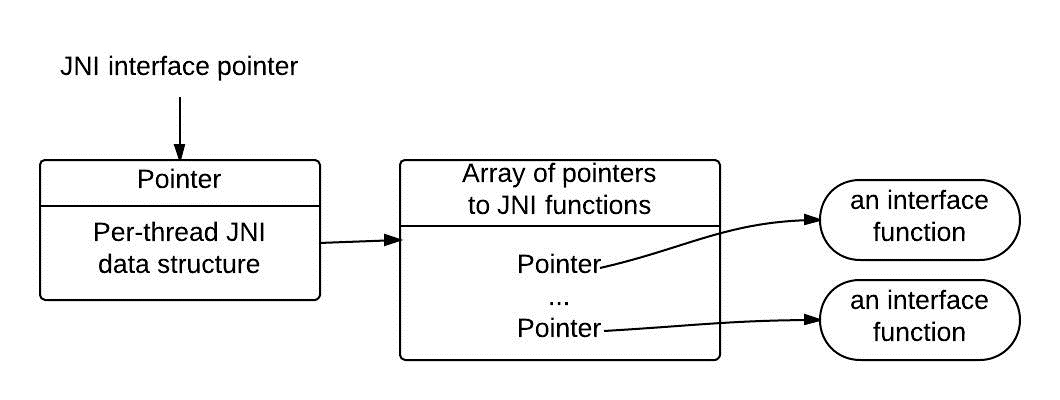
JNI table, organized as a table of virtual functions in C ++. VM can work with several such tables. For example, one will be for debugging, the second for use. The pointer to the JNI interface is valid only in the current thread. This means that the pointer can not walk from one stream to another. But native methods can be called from different threads. Example:
Primitive types are copied between VM and native code, and objects are passed by reference. VM is obliged to track all links that are passed to the native code. All transferred links to the native code cannot be released by the GC. But the native code, in turn, must inform the VM that it no longer needs references to the transferred objects.
JNI divides links into three types: local, global, and weak global links. Local valid until end method. All Java objects returned by the JNI functions are local. The programmer should hope that the VM itself will clean up all local links. Local links are available only in the stream in which they were created. However, if there is a need, they can be freed immediately by the DeleteLocalRef interface JNI method:
Global links remain until they are explicitly released. To register a global link, call the NewGlobalRef method. If the global link is no longer needed, it can be deleted using the DeleteGlobalRef method:
JNI does not check for errors such as NullPointerException, IllegalArgumentException. The reasons:
JNI allows you to use Java Exception. Most of the JNI functions return error code and not Exception itself, and therefore you have to process the code itself, and in Java, throw Exception. In JNI, you should check the error code of the called functions and after them you should call ExceptionOccurred (), which in turn returns an error object:
For example, some JNI array access functions do not return errors, but may cause ArrayIndexOutOfBoundsException or ArrayStoreException exceptions.
JNI has its own primitive and reference data types.

JNI uses modified UTF-8 encoding to represent strings. Java in turn uses UTF-16. UTF-8 is mainly used in C because it encodes \ u0000 to 0xc0, instead of the usual 0x00. Modified strings are encoded so that a sequence of characters that contain only non-zero ASCII characters can be represented using only one byte.
The JNI interface contains not only its own data set, but also its own functions. On their consideration will take a lot of time, since there are more than a dozen of them. You can get acquainted with them in the official documentation .
A small example that you would learn the material covered:
Let's sort line by line:
The JNI_CreateJavaVM () method initializes JavaVM and returns a pointer to it. The JNI_DestroyJavaVM () method unloads the created JavaVM.
All threads in Linux are controlled by the kernel, but they can be attached to JavaVM with the AttachCurrentThread and AttachCurrentThreadAsDaemon functions. As long as the stream is not connected, it does not have access to JNIEnv. Importantly, Android does not suspend the threads that were created by JNI, even if GC is triggered . But before the thread ends, it must call the DetachCurrentThread method to disconnect from the JavaVM.
The structure of your project should look like this:

As we see from Figure 3, all the native code is in the jni folder. After building the project, four folders will be created in the libs folder for each processor architecture in which your native library will be located (the number of folders depends on the number of selected architectures).
In order to create a native project, you need to create a regular Android project and do the following steps:
As mentioned above, this is a make file for building a native project. Android.mk allows you to group your code into modules. Modules can be as static libraries (static library, only they will be copied into your project, in the libs folder), shared libraries (shared library), standalone executable file (standalone executable).
Minimum configuration example:
Consider in detail:
In Android.mk, you can define your variables, but they should not have the following syntax: LOCAL_, PRIVATE_, NDK_, APP_, my-dir. Google recommends naming your variables as MY_. For example:
This make file describes several variables that will help make the build more flexible:
Ndk-build is a GNU Make wrapper. After the 4th version, flags for ndk-build were introduced:
In the 5th version of NDK, a flag was introduced as NDK_DEBUG. If it is set to 1, then a debug version is created. If the flag is not set, then ndk-build by default checks whether the android attribute is: debuggable = "true" in AndroidManifest.xml. If you use ndk above version 8, then Google does not recommend using the android: debuggable attribute in AndroidManifest.xml (because if you use ant debug or build a debug version using the ADT plug-in, they automatically add the NDK_DEBUG flag = 1) .
By default, support for 64-bit utilities is installed, but you can forcefully build only for 32 by setting the flag NDK_HOST_32BIT = 1. Google recommends using 64-bit utilities to improve the performance of large programs.
It used to be a torment. It was necessary to install the CDT plugin, download the compiler cygwin or mingw. Download Android NDK. Connect it all in the Eclipse settings. And how evil it all turned out not to work. The first time I ran into the Android NDK, I set it up all 3 days (and the problem turned out to be that in cygwin you had to give permission 777 to the project folder).
Now everything is much easier with this. Follow this link . Download the Eclipse ADT Bundle which already has everything you need to build.
In order to use native Java code, you must first define native methods in the Java class. For example:
Before the method should put the reserved word "native". Thus, the compiler knows that this is an entry point in the JNI. We need to implement these methods in the C / C ++ file. Google also recommends starting to name the methods with the word native, where X is the real name of the method. But before you implement these methods manually, you should generate a header file. This can be done manually, but you can use the javah utility, which is located in jdk. But let's go further and will not use it through the console, but we will do it using standard Eclipse tools.
Now you can run. In the bin / classes directory will be your header files.
Next, copy these files to the jni directory of our native project. Call the context menu of the project and select Android Tools - Add Native Library. This will allow us to use the jni.h functions. Then you can already create a cpp file (sometimes Eclipse creates it by default) and write the bodies of the methods that are already described in the header file.
I did not add the sample code to the article in order not to stretch it. An example you can view / download from github .
This article is aimed at those who are not familiar (or little familiar) with the Android NDK and would like to strengthen their knowledge. I will pay attention to JNI, since it seems to me that you need to start from this interface. Also, at the end we will consider a small example with two functions for writing and reading a file. Who does not like a lot of text, he can watch the video version.
What is the Android NDK?
Android NDK (native development kit) is a set of tools that allow you to implement part of your application using languages such as C / C ++.
What is NDK used for?
Google recommends using NDK only in the rarest of cases. Often these are the cases:
- You need to increase performance (for example, sorting a large amount of data);
- Use a third-party library. For example, a lot of things are already written in C / C ++ languages and you just need to use existing material. An example of such libraries as, Ffmpeg, OpenCV;
- Programming at a low level (for example, anything that goes beyond Dalvik);
')
What is JNI?
Java Native Interface - a standard mechanism for running code, running a Java virtual machine, which is written in C / C ++ or Assembler, and arranged in the form of dynamic libraries, makes it possible not to use static linking. This makes it possible to call a C / C ++ function from a Java program, and vice versa.
JNI benefits
The main advantage over analogs (Netscape Java Runtime Interface or Microsoft’s Raw Native Interface and COM / Java Interface) is that JNI was originally designed for binary compatibility, for compatibility of applications written in JNI, for any Java virtual machines on a specific platform (when I’m talking about JNI, I’m not attached to a Dalvik machine, because JNI was written by Oracle for the JVM (which is suitable for all Java virtual machines). Therefore, the compiled code in C / C ++ will be executed regardless of the platform. Earlier versions did not allow for binary compatibility.
Binary compatibility or binary compatibility is a type of program compatibility that allows a program to work in various environments without changing its executable files.
How does JNI work
JNI table, organized as a table of virtual functions in C ++. VM can work with several such tables. For example, one will be for debugging, the second for use. The pointer to the JNI interface is valid only in the current thread. This means that the pointer can not walk from one stream to another. But native methods can be called from different threads. Example:
jdouble Java_pkg_Cls_f__ILjava_lang_String_2 (JNIEnv *env, jobject obj, jint i, jstring s) { const char *str = (*env)->GetStringUTFChars(env, s, 0); (*env)->ReleaseStringUTFChars(env, s, str); return 10; } - * env - interface pointer;
- bj - reference to the object in which the native method is described;
- i and s - the arguments passed;
Primitive types are copied between VM and native code, and objects are passed by reference. VM is obliged to track all links that are passed to the native code. All transferred links to the native code cannot be released by the GC. But the native code, in turn, must inform the VM that it no longer needs references to the transferred objects.
Local and global links
JNI divides links into three types: local, global, and weak global links. Local valid until end method. All Java objects returned by the JNI functions are local. The programmer should hope that the VM itself will clean up all local links. Local links are available only in the stream in which they were created. However, if there is a need, they can be freed immediately by the DeleteLocalRef interface JNI method:
jclass clazz; clazz = (*env)->FindClass(env, "java/lang/String"); // (*env)->DeleteLocalRef(env, clazz); Global links remain until they are explicitly released. To register a global link, call the NewGlobalRef method. If the global link is no longer needed, it can be deleted using the DeleteGlobalRef method:
jclass localClazz; jclass globalClazz; localClazz = (*env)->FindClass(env, "java/lang/String"); globalClazz = (*env)->NewGlobalRef(env, localClazz); // (*env)->DeleteLocalRef(env, localClazz); Error processing
JNI does not check for errors such as NullPointerException, IllegalArgumentException. The reasons:
- performance degradation;
- In most functions, C libraries are very, very difficult to defend against errors.
JNI allows you to use Java Exception. Most of the JNI functions return error code and not Exception itself, and therefore you have to process the code itself, and in Java, throw Exception. In JNI, you should check the error code of the called functions and after them you should call ExceptionOccurred (), which in turn returns an error object:
jthrowable ExceptionOccurred(JNIEnv *env); For example, some JNI array access functions do not return errors, but may cause ArrayIndexOutOfBoundsException or ArrayStoreException exceptions.
JNI primitive types
JNI has its own primitive and reference data types.
| Java type | Native type | Description |
|---|---|---|
| boolean | jboolean | unsigned 8 bits |
| byte | jbyte | signed 8 bits |
| char | jchar | unsigned 16 bits |
| short | jshort | signed 16 bits |
| int | jint | signed 32 bits |
| long | jlong | signed 64 bits |
| float | jfloat | 32 bits |
| double | jdouble | 64 bits |
| void | void | N / A |
JNI Reference Types
Modified UTF-8
JNI uses modified UTF-8 encoding to represent strings. Java in turn uses UTF-16. UTF-8 is mainly used in C because it encodes \ u0000 to 0xc0, instead of the usual 0x00. Modified strings are encoded so that a sequence of characters that contain only non-zero ASCII characters can be represented using only one byte.
JNI Functions
The JNI interface contains not only its own data set, but also its own functions. On their consideration will take a lot of time, since there are more than a dozen of them. You can get acquainted with them in the official documentation .
An example of using JNI functions
A small example that you would learn the material covered:
#include <jni.h> //... JavaVM *jvm; JNIEnv *env; JavaVMInitArgs vm_args; JavaVMOption* options = new JavaVMOption[1]; options[0].optionString = "-Djava.class.path=/usr/lib/java"; vm_args.version = JNI_VERSION_1_6; vm_args.nOptions = 1; vm_args.options = options; vm_args.ignoreUnrecognized = false; JNI_CreateJavaVM(&jvm, &env, &vm_args); delete options; jclass cls = env->FindClass("Main"); jmethodID mid = env->GetStaticMethodID(cls, "test", "(I)V"); env->CallStaticVoidMethod(cls, mid, 100); jvm->DestroyJavaVM(); Let's sort line by line:
- JavaVM - provides an interface for calling functions that allow you to create and destroy JavaVM;
- JNIEnv - provides most of the features of the JNI;
- JavaVMInitArgs - arguments for JavaVM;
- JavaVMOption - options for JavaVM;
The JNI_CreateJavaVM () method initializes JavaVM and returns a pointer to it. The JNI_DestroyJavaVM () method unloads the created JavaVM.
Streams
All threads in Linux are controlled by the kernel, but they can be attached to JavaVM with the AttachCurrentThread and AttachCurrentThreadAsDaemon functions. As long as the stream is not connected, it does not have access to JNIEnv. Importantly, Android does not suspend the threads that were created by JNI, even if GC is triggered . But before the thread ends, it must call the DetachCurrentThread method to disconnect from the JavaVM.
The first steps
The structure of your project should look like this:
As we see from Figure 3, all the native code is in the jni folder. After building the project, four folders will be created in the libs folder for each processor architecture in which your native library will be located (the number of folders depends on the number of selected architectures).
In order to create a native project, you need to create a regular Android project and do the following steps:
- In the project root, you need to create a jni folder in which to place the source code of the native code;
- Create an Android.mk file that will build the project;
- Create an Application.mk file that describes the details of the assembly. It is not a prerequisite, but allows the flexibility to customize the assembly;
- Create an ndk-build file that will start the build process (this is also not required).
Android.mk
As mentioned above, this is a make file for building a native project. Android.mk allows you to group your code into modules. Modules can be as static libraries (static library, only they will be copied into your project, in the libs folder), shared libraries (shared library), standalone executable file (standalone executable).
Minimum configuration example:
LOCAL_PATH := $(call my-dir) include $(CLEAR_VARS) LOCAL_MODULE := NDKBegining LOCAL_SRC_FILES := ndkBegining.c include $(BUILD_SHARED_LIBRARY) Consider in detail:
- L OCAL_PATH: = $ (call my-dir) - the function call my-dir returns the path of the folder in which the file is called;
- include $ (CLEAR_VARS) - clears variables that were used before except LOCAL_PATH. This is necessary because all variables are global, because the assembly occurs in the context of the same GNU Make;
- LOCAL_MODULE - the name of the output module. In our example, the name of the output library is set as NDKBegining, but after the build, libraries named libNDKBegining will be created in the libs folder. Android adds the lib prefix to the name, but in java code when connecting you must specify the name of the library without the prefix (that is, the names must match the ones installed in the make files);
- LOCAL_SRC_FILES - enumeration of source files from which the assembly should be created;
- include $ (BUILD_SHARED_LIBRARY) - indicates the type of output module.
In Android.mk, you can define your variables, but they should not have the following syntax: LOCAL_, PRIVATE_, NDK_, APP_, my-dir. Google recommends naming your variables as MY_. For example:
MY_SOURCE := NDKBegining.c : $(MY_SOURCE) , , : LOCAL_SRC_FILES += $(MY_SOURCE) Application.mk
This make file describes several variables that will help make the build more flexible:
- APP_OPTIM is an optional variable that is set to the values of release or debug. Used for optimization when building modules. You can debug both release and debug, but debug provides more information for debugging;
- APP_BUILD_SCRIPT - indicates an alternative path to Android.mk;
- APP_ABI is probably one of the most important variables. It indicates for which processor architecture to assemble modules. The default is armeabi which corresponds to the ARMv5TE architecture. For example, to support ARMv7, you should use armeabi-v7a, for IA-32 - x86, for MIPS - mips, or if you need to support all architectures, then the value should be like this: APP_ABI: = armeabi armeabi-v7a x86 mips. If you are using ndk version 7 or higher, then you can not list all the architectures, but install APP_ABI: = all.
- APP_PLATFORM - platform target;
- APP_STL - Android uses the runtime library libstdc ++. So which is truncated and not all C ++ functionality is available to the developer. However, the APP_STL variable allows the support of extensions to be included in the assembly;
- NDK_TOOLCHAIN_VERSION - allows you to select the gcc compiler version (default 4.6);
NDK-BUILDS
Ndk-build is a GNU Make wrapper. After the 4th version, flags for ndk-build were introduced:
- clean - cleans all generated binary files;
- NDK_DEBUG = 1 - generates a debugging code;
- NDK_LOG = 1 - shows the message log (used for debugging);
- NDK_HOST_32BIT = 1 - Android has the means to support 64-bit utility versions (for example, NDK_PATH \ toolchains \ mipsel-linux-android-4.8 \ prebuilt \ windows-x86_64, etc.);
- NDK_APPLICATION_MK - specifies the path to Application.mk.
In the 5th version of NDK, a flag was introduced as NDK_DEBUG. If it is set to 1, then a debug version is created. If the flag is not set, then ndk-build by default checks whether the android attribute is: debuggable = "true" in AndroidManifest.xml. If you use ndk above version 8, then Google does not recommend using the android: debuggable attribute in AndroidManifest.xml (because if you use ant debug or build a debug version using the ADT plug-in, they automatically add the NDK_DEBUG flag = 1) .
By default, support for 64-bit utilities is installed, but you can forcefully build only for 32 by setting the flag NDK_HOST_32BIT = 1. Google recommends using 64-bit utilities to improve the performance of large programs.
How to build a project?
It used to be a torment. It was necessary to install the CDT plugin, download the compiler cygwin or mingw. Download Android NDK. Connect it all in the Eclipse settings. And how evil it all turned out not to work. The first time I ran into the Android NDK, I set it up all 3 days (and the problem turned out to be that in cygwin you had to give permission 777 to the project folder).
Now everything is much easier with this. Follow this link . Download the Eclipse ADT Bundle which already has everything you need to build.
Calling native methods from Java code
In order to use native Java code, you must first define native methods in the Java class. For example:
native String nativeGetStringFromFile(String path) throws IOException; native void nativeWriteByteArrayToFile(String path, byte[] b) throws IOException; Before the method should put the reserved word "native". Thus, the compiler knows that this is an entry point in the JNI. We need to implement these methods in the C / C ++ file. Google also recommends starting to name the methods with the word native, where X is the real name of the method. But before you implement these methods manually, you should generate a header file. This can be done manually, but you can use the javah utility, which is located in jdk. But let's go further and will not use it through the console, but we will do it using standard Eclipse tools.
Now you can run. In the bin / classes directory will be your header files.
Next, copy these files to the jni directory of our native project. Call the context menu of the project and select Android Tools - Add Native Library. This will allow us to use the jni.h functions. Then you can already create a cpp file (sometimes Eclipse creates it by default) and write the bodies of the methods that are already described in the header file.
I did not add the sample code to the article in order not to stretch it. An example you can view / download from github .
Source: https://habr.com/ru/post/203014/
All Articles