Hardware accelerated rendering in Chrome browser
Introduction
For most web developers, the fundamental representation of web browsers is the DOM. While the process of converting this representation to an image on the screen (hereinafter referred to as rendering) is often covered with a veil of misunderstanding. In recent years, browser developers have been actively optimizing this process, shifting some of the work onto the shoulders of graphics processors: what is called “hardware acceleration”. We will consider rendering in the context of regular pages, excluding Canvas2D and WebGL. This article will try to shed light on the fundamental concept of using hardware acceleration when generating an image of web content in the Chrome browser.
A warning
Here we will talk only about the WebKit engine, or to be more precise about its fork in Chromium. This article covers implementation details in Chrome, which are not documented in any way in the standards. Therefore, there is no guarantee that anything described in this article will apply to other browsers. Nevertheless, knowledge of these subtleties will help you to conduct fine debugging and improve performance.
Also, take into account that the rendering engine in Chrome is evolving in swift steps. And there is no guarantee that everything described here will be valid in the same six months.
')
It is important to keep in mind that at the moment Chrome supports two rendering mechanisms: hardware and old software. At the time of this writing, all pages are rendered using hardware acceleration in Windows, ChromeOS and Chrome on Android. On MacOS and Linux, only pages containing compositional elements are dumped into this mode (we will talk about this below), but this will be fixed very soon.
Ultimately, we consider only the top of the renderer engine, paying attention to those things that are designed to significantly improve performance. Practicing on your own site will help you better understand the layer model. But you shouldn't mindlessly multiply their number, it can bring in extra overhead for the entire graphic stack.
Path from DOM to screen
Concept of layers
When the page is loaded and processed in the browser, it turns into what everyone knows as DOM. The page rendering process proceeds through a series of intermediate transformations directly inaccessible to the developer. The most important of the structures generated in the process is the layer.
There are two types of layers in Chrom: RenderLayers, which contain DOM subtrees, and GraphicsLayers, which contain previous subtrees. Now the latter are of more interest to us, since the Graphics Layers are what are sent to the graphics processor as textures. Hereinafter, wherever the word “layer” occurs, I mean precisely the Graphic Layer.
Slightly distract the terminology on the GPU and try to figure out what texture is?
Think of it as a bitmap portion of a graphic object (bitmap) that is transferred from the main memory (RAM) to the memory of the graphics processor (VRAM). When a texture falls into the hands of a GPU, it can pull it onto a polygonal mesh — in video games, this technique is used to stretch the “skin” onto three-dimensional objects. Chrome uses textures to transfer portions of the page’s content to the GPU so that it can subsequently impose them on a simple square grid and do any 3D transformations with it. This is how 3D CSS works and it also has a great effect on page scrolling performance - but first things first.
Let's look at a couple of examples to more clearly demonstrate the concept of layers.
There is a very useful tool for understanding layers in Chrome - the “show composited layer borders” option in the “rendering” section of the developer toolbar's settings window. This option simply highlights the borders of the layers on the screen in orange. Let's turn it on. All screenshots for examples were taken in Chrome Canary, Chrome 27 at the time of this writing.
Example 1: Single Layer Page
<html> <body> <div>I am a strange root.</div> </body> </html> 
This page has a single layer. The blue grid represents the boundaries of the tiles - the parts of the layer that Chrome uses to break up a large layer and send them to the GPU. Now they are not of much interest to us.
Example 2 : Element in its own layer
<html> <body> <div style="-webkit-transform: rotateY(30deg) rotateX(-30deg); width: 200px;"> I am a strange root. </div> </body> </html> 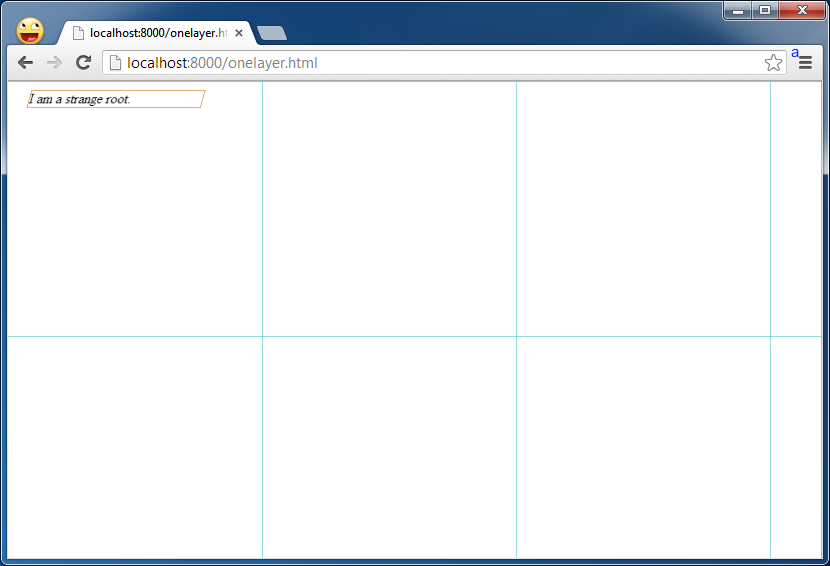
By setting a 3D CSS property to an element that rotates it, we can see that its own layer is highlighted: pay attention to the orange frame, which wraps it in the screenshot above. (This is done so that each layer can be rendered independently of the others)
Layer Creation Conditions
What other elements can get your layer? Chrome's heuristics have been developing in this direction lately, but at the moment any of the following conditions leads to the creation of a layer:
- the CSS element has properties of three-dimensional transformations
<video \>element that uses hardware acceleration when decoding video<canvas \>in 3D (WebGL) context or 2D accelerated- third-party plug-ins (including Flash)
- elements that use CSS transparency animation or transform animation
- elements using CSS filters enable hardware acceleration
- elements that have descendants with their own composition layers
- the presence of the element of a brother (sisterly element) with a lower z-index, which itself has its own layer (in other words, if the element is rendered on top of the composition)
Practical Application: Animation
We know that by animating the CSS transformation, the element will fall into its own layer. And the layers are very good for animation.
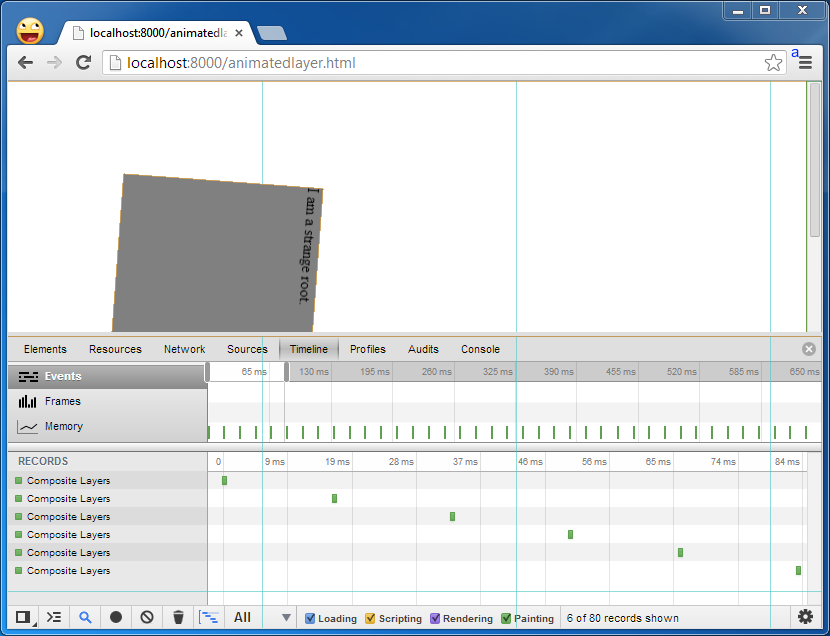
Example 3 : Animated layers
<html> <head> <style type="text/css"> div { -webkit-animation-duration: 5s; -webkit-animation-name: slide; -webkit-animation-iteration-count: infinite; -webkit-animation-direction: alternate; width: 200px; height: 200px; margin: 100px; background-color: gray; } @-webkit-keyframes slide { from { -webkit-transform: rotate(0deg); } to { -webkit-transform: rotate(120deg); } } </style> </head> <body> <div>I am a strange root.</div> </body> </html> In the simplest case, Chrome will programmatically draw the contents of the layer and send it to the graphic processor as a texture. If this content does not change in the future, then there is no need to redraw it. And this is good: redrawing takes time that can be spent, for example, on working out scripts. And if redrawing takes a lot of time, it can lead to annoying defects in the form of a drop in the frame rate and delays in the animation.
You can make sure that in the timeline of the developers panel there are not any redraw operations, as long as the layer rotates here and there.
Caution! Repainting
But if you change the contents of the layer, it will redraw it.
Example 4 : Redraw Layers
<html> <head> <style type="text/css"> div { -webkit-animation-duration: 5s; -webkit-animation-name: slide; -webkit-animation-iteration-count: infinite; -webkit-animation-direction: alternate; width: 200px; height: 200px; margin: 100px; background-color: gray; } @-webkit-keyframes slide { from { -webkit-transform: rotate(0deg); } to { -webkit-transform: rotate(120deg); } } </style> </head> <body> <div id="foo">I am a strange root.</div> <input id="paint" type="button" onclick="" value=”repaint”> <script> var w = 200; document.getElementById('paint').onclick = function() { document.getElementById('foo').style.width = (w++) + 'px'; } </script> </body> </html> Each time the button is pressed, the rotating element will add a pixel in width. This will redraw the entire element, which in this case is in a separate layer.
An easy way to see which parts of the page are redrawn is to enable the “show paint rects” option, all in the same section “Rendering” of the developer panel settings window. After switching on, pay attention to both the animated element and the button are flashing red when you click on the button.

Redraw events can also be seen on the timeline. A keen eye will notice a duplication of redraw events: one for the layer itself, the other for changing the display of the button state.
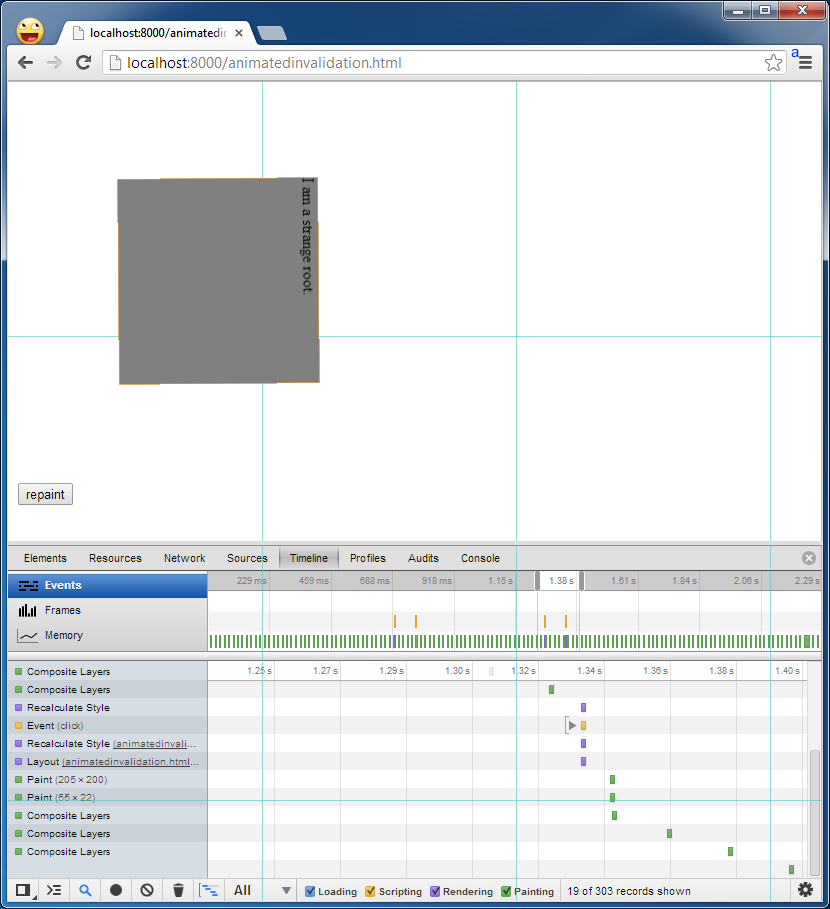
Notice that Chrome doesn't always redraw the layer completely. It tries to be selective and to redraw only those fragments of the layer (the very tiles marked with blue borders) in which the DOM has undergone a change. In our case, there is only one element for the entire layer, but in most real-life projects, elements per layer are much more.
The following question arises: what causes DOM to become outdated and to be redrawn? It is difficult in a few sentences to cover all cases that may lead to the disability of DOM. In most cases, this is damage to DOM by changing CSS styles and dynamically generating visible content at runtime. Tony Gentilkor described them in his blog , and Stoian Stoyanof also wrote a very detailed article , but it is limited to a description of the redrawing without details of this new thing we are trying to talk about - composition by means of the video subsystem.
Add it all together: DOM on the screen
So how does Chrome turn DOM into an image on the screen? Conceptually, the following steps can be distinguished:
- Takes the DOM and breaks it into layers, following the criteria outlined above.
- Programmatically draws each of the layers separately
- Sends them to the GPU as textures.
- On the graphics subsystem assembles all layers into the final image
This is what happens when drawing the first frame of a page. But there are several ways to reduce the overhead of rendering the next frame:
- Not all changes to CSS styles lead to redrawing. Chome can just re-link existing layers of GPUs already in memory. This can be achieved by changing only the compositional properties (because transformations, transparency, filters).
- If part of the layer is changed, it will be redrawn and re-sent to the GPU. If you leave the content unchanged, and change only the compositional properties (transformation or transparency), Chrome can leave them in video memory and re-link it to generate the next frame.
As we should have understood, the layer-based compositional model has a great advantage for rendering performance. Compositioning is a cheaper way to render compared to full redrawing. Therefore, an attempt to avoid layer redrawing, pulling only the compositional properties of elements is a good way to optimize performance. Sensible developers will take note of the list of properties that activate composition, in order to be able to force the creation of layers at the right moment. But be careful in creating layers - this is not free: they need system memory and video memory subsystem (which is limited on mobile devices).
That's all!
Source: https://habr.com/ru/post/202358/
All Articles