Development of cross-platform mobile applications in Delphi # 4
 Part 1
Part 2
Part # 3
In the fourth part of this cycle, we will again return to the development of a “desktop” application and try to understand the LiveBinding object binding technology in more detail. This mechanism is universal and suitable for both mobile and desktop applications. Moreover, this mechanism also works in the VCL. It’s better to get acquainted with LiveBinding in a classic project.
First of all, we will have to perform several tasks of the same type, work on which may seem routine. It is about creating forms for editing lists, namely, a list of units of measurement and a list of products. These forms will be called from the main form menu, which we also have to create.
')
So, in the data module, we put two TFDTable components and configure them to work with the tblUnit and tblFoodstuff tables (by analogy with the tblRecipe data set). Double-click on the component to open the field editor, add all fields (the context menu item Add all fields).
It is important to understand that in almost all implementations, the components of the data sets are inherited from the TDataSet class and work with some set of fields. Here we mean instances of classes that inherit from TField (TIntegerField, TStringField, etc.). A set of fields can be created in design mode (design-time) and set the properties of the fields using the "object inspector". If we consider the TFDTable, then in addition to the fields corresponding to the physical fields of the table, you can create other types of fields, for example, a calculated (Caclulated) or substituted (LookUp) field. The values of these fields will be calculated dynamically in the course of the program, and not taken from the data source. Below we look at an example of creating such fields.
In the same case, if the field set is not created in design mode, when opening a dataset during the program operation, the field set will be created automatically.
Below is a fragment of the uDM.dfm data module form file containing a description of one of the data sets and the associated fields. A textual representation of the form can be obtained by selecting the item “View as Text” in the context menu of the form. In order to return to the normal form view mode, click “View as Form”.
object FDTUnits: TFDTable IndexFieldNames = 'Id' Connection = FDConnection1 UpdateOptions.UpdateTableName = 'tblUnit' TableName = 'tblUnit' Left = 112 Top = 208 object FDTUnitsId: TFDAutoIncField FieldName = 'Id' Origin = 'Id' ProviderFlags = [pfInWhere, pfInKey] ReadOnly = True end object FDTUnitsUnitName: TStringField FieldName = 'UnitName' Origin = 'UnitName' Required = True Size = 25 end object FDTUnitsAbbr: TStringField FieldName = 'Abbr' Origin = 'Abbr' Required = True Size = 7 end end The created data sets must be opened when the program starts. Modify the ConnectToDB procedure as follows:
function TDM.ConnectToDB: Boolean; begin try FDConnection1.Connected := True; FDTRecipe.Open; FDTUnits.Open; FDTFoodstuff.Open; except end; Result := FDConnection1.Connected; end; The next step in developing an application is to create a new form for displaying and editing a table (list) of units of measurement. Naturally, it will be FM HD form. Set the value of the Position property as poMainFormCenter, so that this form is displayed in the middle of the main form.
Add a data module to the list of used modules in the implementation section:
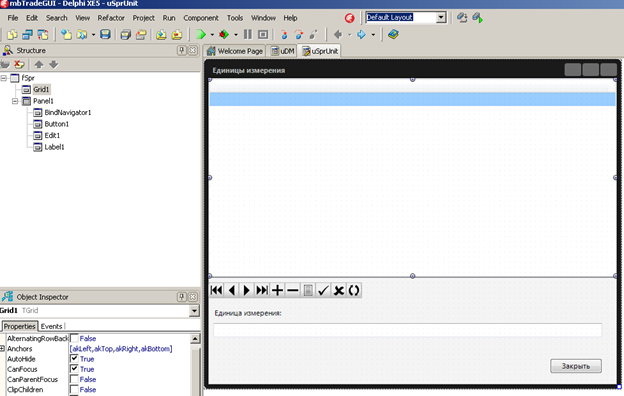
implementation {$R *.fmx} uses uDM; Place the components TGrid, TPanel on the form. Place a button, an input field and a TLabel label on the panel, as shown in the figure. The only purpose of the button is to close the form. The ModalResult property is defined as mrOk.
We keep the names of the visual components by default solely for reasons of clarity. In work projects, naturally, they are better renamed.
Using the LiveBinding editor , we associate visual components with data sources. In the most general terms, LiveBinding is a mechanism that allows you to bind the properties of various objects, but not with the help of a hard reference compiled link, but on the basis of flexible expressions. The LiveBindings mechanism is based on an observer pattern. Thus, a change in some property of object A, using LiveBinding, may entail a change in the property of object B. Relationships between objects can be unidirectional and bidirectional. This approach is very useful for displaying data from data sets. In fact, if in the standard VCL approach, special DB-oriented (DB-Aware) visual components were required to display data from tables, LiveBindings allows using the most common controls (“controls) for this purpose. Moreover, visual components do not require special training to work with LiveBindings. The advantage of this approach is obvious. Let's look at this process a little more closely.
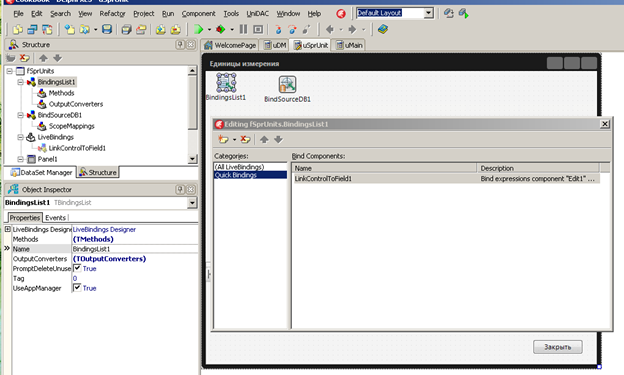
So, open the LiveBinding Designer and find the item corresponding to the data set, FDTUnits. If elements from the data module are not displayed in the LiveBinding designer, then an update should be made (in the context menu, select the Refresh Designer item). We will try to associate the value of the Text property of the Edit1 input field with the value of the UnitName field in the data set. Use the usual drag-n-drop.

What really happened?
Besides the fact that the designer visually displayed a link, two new non-visual components appeared on the form. The TBindSourceDB component uses the DataSet property to link to the original data set (in our case DM.FDTUnits). Notice that as soon as a connection was made between the property of the visual component and the field, in the LiveBinding designer, the DM.FDTUnits object was nested in a new BindSourceDB1 object, and this object appeared on the form.

It is not difficult to guess what value of the DataSet property this object will have. For those who think in terms of “classic VCL development”, the easiest way to understand is TBindSourceDB as an analogue of TDataSource . You can just “throw” this component on the form and specify the value of the DataSet property. And then "bind" to him control. Only now it will not be a special DB control, but any visual component. And, therefore, you must specify which component property it is and how it should display (and, possibly, change) data from the data set. Let's see how to do this.
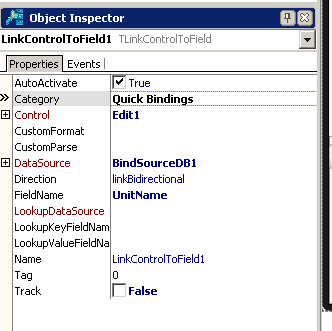
In addition to BindSourceDB1, another object appeared on the form - BindingsList1. It is the repository for all connections between objects. These connections may be of different types. As can be seen from the figure, in our case a link like TLinkControlToField was added to the BindingsList.
You can edit its properties, for example, to make the connection not unidirectional, but unidirectional.
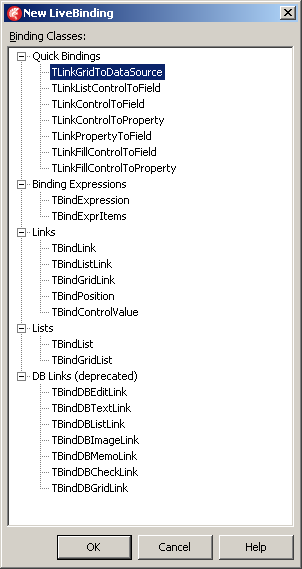
If you try to add a new link, you will see that there are quite a few different types of links that practically allow you to link “everything to everything”.
Now we will connect Grid and BindNavigator with a data set. For the BindNavigator component, it is enough to set the DataSource property. In this case, in the list of links BindingsList1, a new link is not created. But when binding a Grid, on the contrary, an object of type TLinkGridToDataSourceBindSourceDB is created .

In the object inspector we can edit the list of fields. To do this, call the Columns property and in the field editor, click the Add All Fields button. By the way, this editor is very similar to the field editor in the TDBGrid. For each of the fields, you can edit the properties, in particular the width of the field and the text of the title. In addition, you can create a new field, and set an expression (the CustomFormat property) to display in the table column. So in order to display the combination of Id and abbreviations, we can set the following expression:
DataSet.FieldByName('Id').AsString +" - "+DataSet.FieldByName('Abbr').AsString As follows from the above, the LiveBinding mechanism provides quite ample opportunities for displaying data. LiveBinding designer, in turn, allows you to visualize and simplify the process of linking visual components with a data source.
In conclusion, consider another trick to working with LiveBinding. In the designer, make the Abbr field of the DM element active. FDTUnits and in the context menu select Link to new control ... (Link to new control ...). In the list that appears, select the value TEdit.
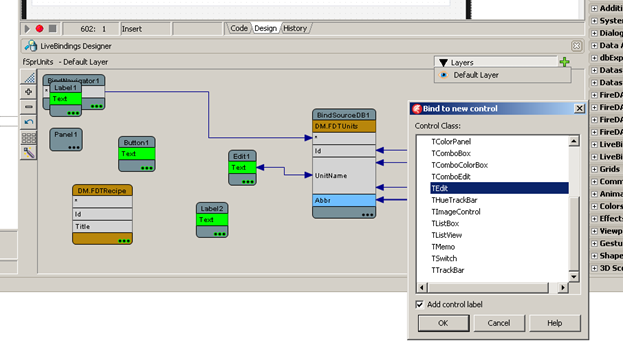
Click the "Ok" button and a new TEdit control will be placed on the form and a TLabel tag stuck to it. You will only need to place this object in the desired position and set the desired value of the Text property of the label.

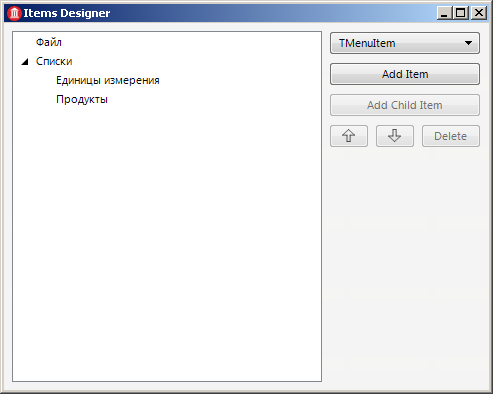
Calling the list editing forms from the main form is organized using the menu. On the main form we place the TMainMenu component. Double-click to open the menu editor. And create several items, as shown in the figure.
For the menu item “Units of Measurement”, we set the following OnClick event handler:
procedure TfMain.aSprUnitExecute(Sender: TObject); begin fSprUnits.ShowModal; end; Naturally, the module with the list form must be connected to the main form.
implementation {$R *.fmx} uses uAddRecipe, uSprUnit; Form-list of products you can do by analogy.
In this part of the cycle, we examined in more detail the mechanism of binding LiveBinding, its purpose and principles of its operation. Next, we will continue the implementation of the program functionality.
Until next Friday!
Source: https://habr.com/ru/post/202302/
All Articles