Run Linux on the Realtek RTL-1185 media processor

Today we got into the hands of a debug board based on SoC RTD1185 - RTK300 Rev. C1 - for the development of multimedia devices. In this article, we will get acquainted with the technical parameters of this SDK, collect and run the base Linux kernel and rootfs on it, successfully solving several problems in the process.
Disclaimer: this article is intended for experienced linuxoids, at least, we did not dwell on minor details. If you have any questions, welcome to the comments.
')
This system is on-chip from our friends from Realtek, codenamed Jupiter, like its brother RTD1186, designed for multimedia applications that decode video in HD MPEG 1/2/4, H.264, VC1, RM / RMVB formats. The media processor also supports USB 2.0 and SATA connectors, a PCI-Express bus and a Gigabit Ethernet network interface.
The presence of Ethernet in conjunction with the appropriate network controller provides the ability to transfer data over a wired network at speeds up to 1 Gbps. Although this device has a small CPU frequency by modern standards, this parameter is compensated by powerful video decoders, which fully justifies the use of this chip in multimedia applications.
Technical parameters of RTD1185:
- CPU: 500 MHz
- HD MPEG 1/2/4 & HD JPEG Decoder
- HD H.264, VC1, RM / RMVB, AVS Decoder
- TV Encoder with CVBS / S-Video / YPbPr / SCART Out
- HDMI v1.3 with CEC
- I2S, SPDIF Out
- USB2.0 Host & PHY
- USB2.0 Device & PHY
- SATA
- 10/100 Ethernet MAC & PHY
- Gigabit Ethernet MAC
- PCI-Express
- Card Reader (SD / MMC)
- DTV Recording & Time-Shifting
- Dual TS-In
Realtek RTL-1185 Kit
The card comes with an IR remote control. Realtek SDK was received from Realtek, which allegedly had to solve all the problems with the firmware build. We called it a “half-worker” because we managed to assemble linux-2.6.12 and the base rootfs without a tambourine. But when it came to audio and video player applications, I had to take the “tambourine”. Well, thanks for that. The whale is pictured below.
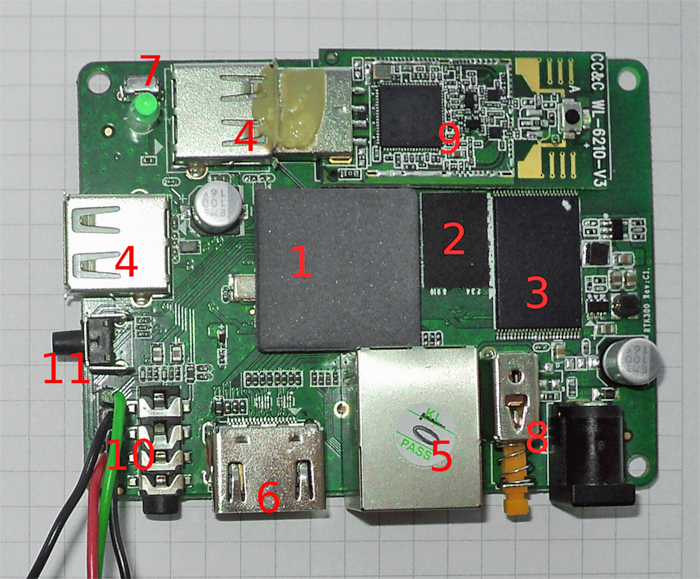
The board contains the following components:
- SoC RTD11185
- 256MB RAM from NANYA
- 256MB NAND SLC - Samsung Flash
- 2x 2.0 USB Host
- FastEthernet RJ45 socket
- HDMI Transmitter out
- IR receiver for remote control (remote control is available, photo below)
- Latching button for on / off
- In one USB Host is inserted USB WiFi based on RTL8190U
- Whip Plug (UART)
- Recovery button

We work with a whale
Well, we met with the board, try to run something on it. Initially, the Realtek firmware was on the whale, apparently it worked on top of QT4.7.
When we received this SDK, it seemed that everything was a bird in our pocket. But it was not there. Of course, not all is going to. There is no documentation to the debug board, nor to the system on a chip (SoC). Google didn't help either. But more on that later.
In this article we use the following notation:
- host # - the command is executed on ArchLinux x86_64;
- ubuntu # - the command is executed ubuntu-12.10 amd64 chroot;
- jupiter # - the command is executed on the whale;
We get the console
Using an oscilloscope, the pinout of the UART on the board was found (near the recovery button): (USB HOST) GND - RX - TX - VCC.
Connect using minicom on the host:
host$ minicom -D /dev/ttyUSB0 -c on We turn on the board and we are met by a “friendly” loader:
hello_world! 5522880 0 wwaiaittcheck_val=0x2700a0 REALTEK ROM Monitor, Revision 0000.0311.0022-ON. Copyright (c) Realtek Semiconductor Corp. - All Rights Reserved. For a list of available commands, type 'help'. Compilation time /version= Feb 4 2013 15:12:08 /0000.0311.0022-ON MAC address = 00.11.22.33.44.55 Processor Company ID/options = 0x01 (MIPS Technologies, Inc.) / 0x00 Processor ID/revision = 0x93 / 0x78 Endianness = Little Flash memory size = 256 MByte SDRAM size = 256 MByte First free SDRAM address = 0x800b1000 Press 'ESC' to Monitor mode Linux Kernel: FW Image from 0xa2020000, to 0x80100000, size=0x44f086 decrypt from 0xa2020000 to 0x80100000, len:0x44f086 Audio FW: FW Image from 0xa2480000, to 0x81b00000, size=0x17b040 decrypt from 0xa2480000 to 0x81b00000, len:0x17b040 Video FW: FW Image from 0xa2600000, to 0x81d80000, size=0x1bfd68 decrypt from 0xa2600000 to 0x81d80000, len:0x1bfd68 Audio data: FW Image from 0xa27c0000, to 0x83000000, size=0x68c78 Video data: FW Image from 0xa2840000, to 0x83100000, size=0x413428 5280Go 5280Go SCPU_CLK90K=0.000 sec. Debug: [go 0x80100000 mtdparts=rtk_nand:212096k,3968k(/),32768k(/usr/local/etc),13312k rootfstype=squashfs root=31:01 ] Reset Ethernet Mac. Address = 0x80100000 After that, the kernel load begins.
Remarkably, the firmware is loaded not by the driver into memory, but by the bootloader itself.
Firmware upgrade
Well, not bad. We will try to update the firmware, which in assembled form was presented in the SDK.
- First you need to format the USB-drive:
host# mkfs.vfat /dev/sdx -n firmware - Copy the install.img firmware image to this drive.
- Insert the USB flash drive and start the software update process. The launch of this “process” can be done in 2 main ways (there are others):
- Recovery-boot mode: you need to turn on the board with the "recovery button" pressed. The loader then takes the kernel to a different address in the flash, that is, if during a flashing we make a brick from our board, stitching the wrong kernel, you can boot into the Recovery mode at any time.
- Standard download: select the appropriate item in the GUI. We will not describe this option in detail.
Everything is simple and clear at first glance. Formatted Copy the firmware to a USB flash drive. We insert into the device. Boot into recovery mode. The flash drive is automatically mounted and the firmware starts. The loader_a utility is responsible for all this. But…
[MCP][RSA] strip rsa header failed - no rsa padding header detected loader_a.c:verona_load_func:1456 Error! Image file, /mnt/usbmounts/sda/install.img, cannot be opened or the hash value is not correct. +++ ALLOC index: 3072 order: 8 1. start remap DVR zone 81c00000(80409000) 256... Okay, what to do. We try differently.
This protection can be bypassed with crook-hacks, but so far we do not need it. If anyone is interested, then the firmware utility loader_a has an argument - nonsecure which disables the hash check. But for this you need to collect busybox for this platform and copy it to the USB drive too, load the board in recovery mode and execute the linux on whale:
jupiter# cp /mnt/usbmounts/sda1/busybox /tmp/busybox && chmod a+x /tmp/busybox && /tmp/busybox killall loader_a && rm /var/lock/hotplug/mount_tmp/.lock_sda && loader_a --nonsecure & Busybox had to be assembled, because in the recovery initramfs there is nothing to do with loader_a. But this is not the main reason. With him it was much easier to study the insides of a recovery-mode, using the same ash, ls, cat from its composition, than without them.
Building the base Linux kernel and rootfs
It's time to build the kernel and rootfs using the Realtek SDK. Since we are working in ArchLinux x86_64, usually all the operations on the assembly of embedded software are performed in Ubuntu 12.10 amd64 chroot for several reasons:
- Often, all the packages needed for building are already in Ubuntu.
- Embedded developers are conservative, often there are SDKs in which host utilities needed to build the firmware (rootfs) are assembled by a certain old gcc version and libraries, and since we have a constantly fresh version of gcc on the arch, we often have problems building these utilities . It is much easier to deploy chroot rootfs than messing around with searching for patches or fixing them yourself.
- Most of the SDKs are deployed and tested under Ubuntu. It's not even about Ubuntu itself. With the same success, you can deploy another distribution kit if you need to.
- Deployment of the assembly system at the customer is easier, since you can pass it all along with the chroot, and his firmware will most likely be assembled right away. But this is if the customer does not work under Windows (in this case, he will use the virtual machine and there is no point in this).
Ubuntu rootfs for chroot is deployed using the debootstrap utility, which we pulled from the AUR.
- deploy ubuntu chroot wiki.ubuntu.com/DebootstrapChroot;
- mount proc, sysfs, devtmpfs, devpts for chroot;
- host # chroot ubuntu-12.10
- ubuntu # apt-get update
- ubuntu # apt-get install vim file lib32z1-dev libc6-i386 sed dos2unix python g ++ - 4.4-multilib
- ubuntu # useradd -s / bin / sh -m developer
Now we are copying the SDK files to ubuntu-12.10 / home / developer / Jupiter.
- ubuntu # su developer / bin / bash
- ububtu $ cd / home / developer / Jupiter / linux / system
- ubuntu $ make menuconfig # enable NFS and NFS root support
- ubuntu $ make PRJ = develop.avhdd.jupiter.nand.loongtle
After these operations, we get the kernel and base rootfs.
Rootfs is copied to / srv / nfs / jupiter in order to use nfs root. Add / etc / exports matching lines .
host # exportfs -a
The kernel is copied to the tftp server in /srv/tftp/vmlinux.develop.avhdd.jupiter.nand.loongtle.bin.
We start the tftp and nfs servers on a host. Configure the host NIC connected via ethernet to the debug card: Ipv4 192.168.0.1/24.
Launch freshly picked Linux
Reboot the board and immediately hold ESC in order to switch to monitor-mode:
REALTEK ROM Monitor, Revision 0000.0311.0022-ON. Copyright (c) Realtek Semiconductor Corp. - All Rights Reserved. For a list of available commands, type 'help'. Compilation time /version= Feb 4 2013 15:12:08 /0000.0311.0022-ON MAC address = 00.11.22.33.44.55 Processor Company ID/options = 0x01 (MIPS Technologies, Inc.) / 0x00 Processor ID/revision = 0x93 / 0x78 Endianness = Little Flash memory size = 256 MByte SDRAM size = 256 MByte First free SDRAM address = 0x800b1000 Press 'ESC' to Monitor mode Realtek> help Available commands : . . (repeat last command line) ; ; (command separator) + + <repeat count> ; compare compare <address1> <address2> <size> continue continue copy copy [-f] <src> <dst> <size> dump dump [-m][-8|-16|-32] <address> [<size>] erase erase -e|-m| <address> <size> factory factory [-r|-w|-sha1] <address> <size> or factory -c fill fill [-8|-16|-32] <address> <size> <data> fread fread tftp://<ipaddr>/<filename> <address> fwrite fwrite tftp://<ipaddr>/<filename> <address> <size> go go [?|.|<address> [<args>]] help help [<command>] info info [boot|board|cpu|sysctrl|memory|uart|all|pll] keyset keyset load load [-r] ([tftp:][//<ipaddr>][/<filename>]) | ([asc:] [//(tty0|tty1)]) ping ping ipaddr [<datagramsize>] port port [-a] [-8|-16|-32] <address> [<value>] reset reset saveenv saveenv setenv setenv [<variable> [<value>]] stty stty [-tty<0|1>] [-b|-u|[-p][<baudrate>][n|o|e][7|8][1|2][hw|none]] test test [-l] | [-m] [ <module> [ <module arguments> ] ] Realtek> The commandline loader is a bit like uboot, but this is not it. It can be seen that you can download the file via tftp, which we will do to unload the Linux kernel from the network.
Realtek> fread tftp://192.168.0.1/vmlinux.develop.avhdd.jupiter.nand.loongtle.bin 0x80100000; go 0x80100000 root=/dev/nfs rw nfsroot=192.168.0.1:/srv/nfs/jupiter,v3 About to binary read tftp://192.168.0.1/vmlinux.develop.avhdd.jupiter.nand.loongtle.bin .............................................................................................................................................................................................s Address = 0x80100000 Realtek LINUX started... Venus setting: ROSs have 2621440 bytes RAM. System CPU has 2 UARTs. System CPU uses external timer interrupt. Bootloader version: 0000.0311.0022-ON. This version string is of new format. The information of this board: Company ID:0x0 CPU ID: 0x33 Board ID: 0x311 Ethernet Mac address: 00.11.22.33.44.55 Model Config length=0 Base year of RTC is 2010. Config serial console: console=ttyS0,115200n8r prom_flashsize = 0x10000000 … BusyBox v1.1.3 (2014.01.27-13:35+0000) Built-in shell (ash) Enter 'help' for a list of built-in commands. / # cat /proc/cpuinfo system type : Realtek DMP/Jupiter processor : 0 cpu model : MIPS 24K V7.8 BogoMIPS : 332.59 wait instruction : yes microsecond timers : yes tlb_entries : 32 extra interrupt vector : yes hardware watchpoint : yes ASEs implemented : mips16 VCED exceptions : not available VCEI exceptions : not available / # cat /proc/fb 0 venusfb / # cat /proc/filesystems nodev sysfs nodev rootfs nodev bdev nodev proc nodev sockfs nodev usbfs nodev pipefs nodev futexfs nodev tmpfs nodev eventpollfs nodev devpts nodev ptpfs ext3 squashfs nodev dvrfs nodev ramfs vfat nodev devfs nodev nfs nodev nfs4 nodev smbfs nodev cifs nodev jffs2 yaffs yaffs2 nodev rpc_pipefs / # cat /proc/meminfo MemTotal: 251716 kB MemFree: 242036 kB Buffers: 60 kB Cached: 1372 kB SwapCached: 0 kB Active: 1144 kB Inactive: 524 kB HighTotal: 0 kB HighFree: 0 kB LowTotal: 251716 kB LowFree: 242036 kB SwapTotal: 32 kB SwapFree: 32 kB Dirty: 0 kB Writeback: 0 kB Mapped: 612 kB Slab: 5496 kB CommitLimit: 125888 kB Committed_AS: 1588 kB PageTables: 56 kB VmallocTotal: 1048548 kB VmallocUsed: 500 kB VmallocChunk: 1047936 kB Thus, we have a basic working system.
What's next?
Try to build QT, gstreamer. Find and compile in the SDK or develop your own plug-ins for gstreamer to use hardware decoders. You may have to get rid of the build system in the SDK in favor of Buildroot . What else you may have to write - encrypting the kernel and firmware. But this is another story for another part of the article.
Thanks for attention!
PS For more information about other electronic components and technologies that we use to develop electronics, you can read on the website of the Promwad team in the section "Hardware Technologies" .
Source: https://habr.com/ru/post/202178/
All Articles