Building your own JS SDK - why and how?

If you are writing an SDK for internal needs of a single project, then many things are simplified: backward compatibility issues are not so acute, instead of writing detailed documentation, you can personally answer colleagues' questions, and the errors found are relatively easy to include in the project. If the SDK is done for all projects of a large company, then the problems become much more. But if your SDK is designed for third-party developers around the world, then it’s just impossible to do without such things as good documentation and auto-tests. It is to the latter that our APS JavaScript SDK can be attributed, and in this article I want to talk about how it works and how we try to make life as easy as possible for third-party developers who use or will use our SDK.
Slides for those who do not like to read multi-letters.
And for the most impatient: what happened with us and our sandbox .
If you are only interested in technical details and code, I advise you to start reading immediately from the second part.
')
What for
We did not need our own SDK to come up with a new type of vehicle shown in the picture to attract attention.
We needed it to support the plugin system as part of Parallels Automation's OSS system and Parallels Plesk hosting control panel. These systems are based on various code bases and they are very large. Parallels Automation has millions of lines of code, and the solution itself is not the final product. A contract is signed with a potential client and the product is branded. The product needs to be expanded, so we needed to enable third-party developers to create a unified UI.
To get a clear picture of Parallels Automation, you need to understand what OSS is . It is a class of operational support systems that manage the network infrastructure, accounting and resource allocation. The main consumers are telecoms and large hosters. For them, it is important not only to manage the infrastructure as such, but also to sell services to its customers. Telecoms get good revenues from selling the service. Imagine a telecom with 10 million users. Even if 1% of users buy a service worth $ 1, his income will be $ 100,000.
APS
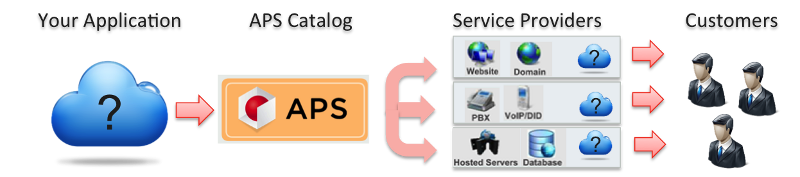
A standard developed by Parallels that allows integrating services into the Parallels Automation ecosystem. The latest version of the standard is APS 2 , which fixes version 1.x errors.
APS 1.x
APS 1.x allowed to integrate applications, describing the business model of integrable objects and declare the UI declaratively in a meta file. Thus, the UI was automatically generated from the business model, which adversely affected the UX. The script-oriented user interface was simply impossible to do. Therefore, APS 2.x was created.
APS 2.x
In APS 2, the business model was completely separated from the presentation logic. Business objects are now available via REST.
After heated discussions and a design review, we stopped at the thin server architecture, in which the UI was described in HTML with very active use of JavaScript. This allowed us to create a script-oriented interface without any significant restrictions.
Restrictions
Though restrictions nevertheless were.
Parallels Automation , unlike, for example, Parallels Desktop for Mac , cannot simply be put out of the box. As a rule, when it is sold, serious contracts are concluded and the Parallels brand is hidden in favor of the purchased hosting provider or telecom. Therefore, the APS UI should have been branded. As mentioned earlier, the level of developers can vary greatly. Product commercial and copyleft restrictive licenses did not suit us.
APS JS SDK
As a result, we came up with the idea of creating our own JavaScript SDK, which allows us to abstract the developer from markup. Abstracting serves as an additional bonus for us and end developers, since legacy markup, strictly speaking, is not semantic.
We also made an initial emphasis on documentation, since JS SDK is not only used internally.
how

How did we create our framework and what rules did we follow?
- used existing frameworks;
- Do not forget about the thoughtful API;
- adhered to Test Driven Development - initially created automated tests;
- worked on the documentation;
- and above the sandbox where you can try the framework in action.
Using existing frameworks
Creating and maintaining your entire JavaScript framework is a very laborious task. Therefore, we decided to use any of the existing frameworks as the basis for building our JS SDK. He had to meet several requirements:
- because we had an existing code base of the layout, which could be changed in the future, then I would like to work with UI elements as with whole objects - widgets that would be based on HTML templates as isolated as possible from JS logic ;
- the tasks of our users are very different, so the framework had to be flexible enough to support a wide variety of UX variants ;
- we did not want to force developers to learn some complex proprietary technologies, so the basic framework should be as widespread as possible ;
- as already mentioned, users can customize the design of their applications, so the framework should allow you to easily change the appearance of widgets ;
- besides, I wanted to find a holistic framework , on the basis of which one could immediately begin to create my widgets;
- and, of course, everyone loves beautiful and dynamic widgets , so the framework had to contain them, or at least allow them to be created.
As options we considered:
- Extjs
- Jquery ui
- loader (RequireJS / CommonJS / ...) + MV * Framework (KnockoutJS / AngularJS / ...)
- Dojo toolkit
Extjs

Powerful, popular, actively developing framework with a large number of cool widgets and a convenient data binding model. But still, this is a thing that was created to be taken and used. This is not a foundation for creating your own framework. Its widgets are difficult to customize, and the customization of the design is added only in the latest versions. But its main drawback for us, of course, was very high license fees.
Jqueryui

Even more popular framework, with a low threshold of entry and the absence of license fees. Widgets that are included in the official delivery, is not enough, but this is not a problem, because there are a huge number of widgets from third-party developers. Unfortunately, at the time of the study, the API of the framework was not quite settled and changed frequently. In addition, the widget code is not separate from the layout.
loader + MV * Framework
At the time of the study, the future of angular was vague, knockout solved very limited problems. But there are customers, contracts and tight deadlines, so in order to proceed to the final development as soon as possible, we needed a holistic basic framework.
Dojo toolkit

A powerful framework with a modular structure based on AMD . Rich, numerous easily customizable widgets with template support. Many years of support for Deferred and Promise . Lack of license fees. But Dojo is strong and weak. He has a relatively large threshold of entry due to which it is poorly distributed. In addition, he recently began to actively move toward mobile devices.
But we still decided to use Dojo :
- the specifics of the system does not imply active use on mobile devices (now quite a lot has changed, but, on the other hand, we have solved the corresponding problems of the framework);
- We tried to lower the threshold of entry, which we will discuss below.
For more on Dojo 's merits, see the translation of David Walsh’s article . There you can read Dojo and ExtJS comparisons in the comments.
Thoughtful API
The basis of any framework is a well thought-out API.
AMD
The foundation of our JS SDK are AMD modules which are visual components - widgets, components for working with data and various auxiliary utilities. In addition, the AMD format allows you to include in the project any third-party libraries that support this packaging format. Thus, we do not limit the developers in their preferences.
Widgets
Visual components - widgets - are logically separated from the HTML presentation. They can dynamically change the values of their properties and inherit from each other. For the convenience of developers, there are 3 ways to describe widgets. And on one screen it is absolutely not necessary to use only one, the methods can be freely combined.
Turning widgets into each other
Widgets can include each other at the template level. For example, the aps / Slider widget consists of horizontal scrolling dijit / form / HorizontalSlider and aps / TextBox:

In addition to the described inclusion of widgets in the template, you can dynamically add child widgets to the screen description. For example, add input to the form.

Declarative announcement
Our framework supports 3 screen descriptions. First declarative. In it, the location of the widgets and their properties are specified as HTML layout with the specified special attributes. The widget hierarchy is defined by the HTML Element hierarchy. After the page loads, the parser is invoked, which creates widgets. Parser can be called on the whole page or on a separate part of it.
Sample code
require(["dojo/parser", "aps/ready!"], function(parser){ parser.parse(); }); <fieldset data-dojo-type=”aps/FieldSet” title=“I am aps/FieldSet”> <input type=”checkbox” data-dojo-type="aps/CheckBox" data-dojo-props=" label: 'CheckBox', description: 'I am aps/CheckBox'" > </fieldset> Programmatic Widget Ad
The second way to declare widgets is software. With the help of require , the necessary modules are connected and by calling the constructor with parameters, the necessary widgets are created. The widget hierarchy is defined by adding child widgets using the addChild method.
Sample code
require([ "aps/FieldSet", "aps/CheckBox", "aps/ready!" ], function (FieldSet, CheckBox) { var fs = new FieldSet({ title : “I am aps / FieldSet” }, "idDiv"); fs.addChild(new CheckBox({ label : “CheckBox”, description : “I am aps / CheckBox” }); fs.startup(); }); Using the bootloader
The third way to describe the screen - using the loader. It is designed by us, and we recommend it. The location of the widgets and their properties are set in the form of a JSON-like structure. Each widget is described by a triple: module name, constructor parameters and an array of child elements. The second and third element are optional. In addition to widgets, the downloader can also create HTML tags.
- it does not waste time parsing HTML (the first method);
- In the program declaration (the second method), the logical order is violated - first, a child widget is created, and then the parent (container) is created, which is inconvenient and difficult to read.
Sample code
require([ "aps/load", "aps/ready!" ], function (load) { load(["aps/FieldSet", { title : "I am aps / FieldSet" }, [ ["aps / CheckBox", { label : "CheckBox", description : "I am aps / CheckBox" } ]]]); }); Data sources
Two modules can be used as a data source for a widget: Store for a remote source and Memory for a local one.
For querying the server, aps / Store uses an extended version of the RQL query language, which is also supported by aps / Memory.
Sample code
require([ "aps/Store", "aps/Grid", "aps/ready!" ], function (load) { var store = new Store({ target : "http://localhost/resources" }); var grid = new Grid({ columns: layoutSimpleGrid, store: store }, "gridDiv"); }); Data binding
For two-way communication of data and widgets, the modules of the Model family and the at method are used. If you want to associate data and widgets, then as a constructor parameter you specify the at method with the model name passed to it and the property name of the model object to which you are mapping. In addition to the possibility of mapping, the model supports the ability to track the value of its properties using the watch method.
Sample code
require([ "aps/TextBox", "dojox/mvc/getStateful", "dojox/mvc/at", "aps/ready!" ], function (TextBox, getStateful, at) { model = getStateful({val : "Hello, world!"}); new TextBox({value : at("model", "val")}, "divTB").startup(); }); Uniform for all modules rules for naming properties and methods
The naming rules are simple and standard:
- the names of private / protected properties and methods begin with an underscore “_”;
- the names of methods, functions and properties begin with a small letter, the names of classes - with a large one; if the class is a mixin, then an underscore is placed in front of a large letter.
Uniform for all modules of the way of interaction between themselves and the outside world
- data and widgets are linked through the Model and Store modules;
- monitoring the state of the widget is done using the watch method, widgets do not generate any special events, all work with the properties is done only through the set and get methods.
Example of interaction with the widget
As an example of interaction with widgets, consider the selection of lines in the Grid widget.
In the simplest case, to create a table with the ability to select rows, it is enough to specify the column structure, the row selection mode (whether you can select one or several rows at a time) and the data source.
If a string is selected, its id is added to a special array stored in the selectionArray property. When you deselect it, it is removed from there. Thus, to track the selection of rows, it is enough to add a callback to the watchElements method and it will automatically be called when the set of selected rows is changed.
Communication is two-way. Therefore, to visually select a row in the table, we just need to add its id to selectionArray .
Sample code
var grid = new Grid({ // columns : layoutSimpleGrid, selectionMode : "single", store : store }); grid.get("selectionArray") // .watchElements(function (index, removals, adds) { alert(adds); }); // grid.get("selectionArray").push("ea7865aa"); Automated Tests
Tests are important, and automated tests are necessary. They allow you to keep the code in a stable state. And it is better to develop them from the very beginning. But before developing tests, you need to think about the build system.
Build system
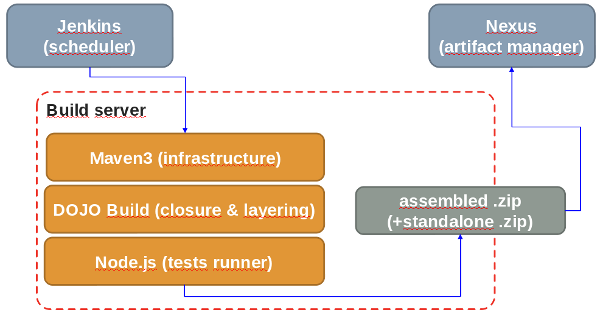
Build launches Jenkins - standard build-scheduler. Maven , node.js and phantomjs headless browser are deployed on the build machine . Our build is built into the maven build lifecycle and includes checking JSHint code, compiling a clojure compiler , packaging, including creating layers (or merging files), testing and deploying the generated archive to the nexus artifact management system.
Automated Testing
Tests can determine the entire fate of the framework, since stability is the key to development.
What we followed when creating autotests:
- you can run without infrastructure , because tests can serve as an example for developers;
- because modular framework, then there must be a strictly separate test for each component ;
- tests should be located next to the framework itself , right in the distribution, so that you can quickly run them out and see how to use the framework;
- and, finally, to understand the tests - you need to strictly adhere to naming conventions ; in our case, test directories start with test, everything else is for manual testing.
Unit tests should always run at build. It often happens that new functionality is required immediately. At the same time, during the development process, it turns out that some of the tests are optional “at first glance” and disabling them “will not hurt anyone”. The test is disabled. Then another. And over time, the number of inconsistencies is such that it becomes pointless to run unit tests.
The build is canceled if at least one test fails. Disable tests can not.
Selection of tools

We chose QUnit and our own system that runs phantomjs , IE, Firefox and Safari in virtual machines. We previously considered:
- TestSwarm;
- Buster.js;
- DOH Robot;
- External Farms (browsershots, browserling, etc);
- Selenium.
Why QUnit
The main thing for us is the simplicity of embedding. One JavaScript programming language for writing both code and tests, which is very convenient. QUnit is simple and common - if necessary, this allows you to easily outsource testing.
Why not TestSwarm

TestSwarm is heavily tied to infrastructure. But the main thing is that the build is marked after the build, and not during the time, which contradicts the methodology adopted by us.
Why not Buster.js

The framework is designed to run modules on the server and on the client - we do not have such a task. In addition, he can not independently launch browsers.

Why not Dojox Robot
The framework included in the Dojo Toolkit . Unfortunately, despite this, abandoned and significantly obsolete.
Why not external farms

I really didn’t want to be tied up on external systems, moreover, it would have required complicated setup of VPN access to our assembly machines. Plus, their use is quite expensive.
Why not Selenium
Cumbersome, requires infrastructure configuration.
Total
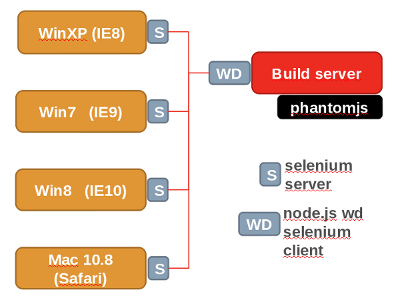
We have a hybrid Selenium Server , which, on command from outside, launches a browser on a virtual machine. All tests are run in one page, while the results can be delivered to the collector or shown in the browser if the tests were run manually.
Test infrastructure components
The diagram shows the components of the test infrastructure. On the build server, phantom.js runs in parallel (for a quick result) and tests on various browsers running on different operating systems on virtual machines.
Documentation

Even the most thoughtful API requires convenient documentation. The APS JS SDK documentation consists of two parts: the API and the Reference Guide .
API
The API section contains a brief description of all available modules and their interfaces. This section is primarily focused on developers who have already sorted out the SDK and want to quickly clarify the presence and proper spelling of a particular method or property. This information is generated based on the comments in the code during the assembly of the code.
Reference Guide
In the description of each module there is a link to the corresponding page of the second part of the documentation - Reference Guide . This section contains an extended (as compared to the API) description of the APS SDK modules and their basic properties and methods. It is regularly updated and updated in accordance with the problems faced by users of our SDK. Also, each Reference Guide article contains examples of using modules.
Examples
Examples of using and creating a module are given for all three ways to declare widgets: declarative, software, and using the loader. But examples that cannot be launched and tried are of little interest. The page of each module in the Reference Guide contains a link to the page with auto-tests. The user can see how the tests are performed, and looking at the source code, see examples showing all the functionality of the widget.
Sandbox

But you always want to try it yourself. And, preferably, quickly and easily. To do this, most of the examples can be run in a special sandbox.
When creating our sandbox, we were inspired by the notorious jsfiddle project, so it is called apsfiddle . As in it, the user has 4 available areas: an HTML editor, a CSS editor, a JS editor, and the result of the code execution (it can be viewed both in the assigned screen area and in a new tab). To create code editors, we used the CodeMirror project.
In addition to manually entering text, in the sandbox you can open your files simply by dragging them into the browser window. Editors fill out automatically. Files can also be opened in the traditional way.
For collaboration, we use TogetherJS .
Editors support
- syntax highlighting;
- check of the entered code on the fly;
- auto substitution of closing brackets and tags;
- folding of code blocks;
- beautiful formatting;
- smart code completion.
Autocompletion
Typically, developers creating a sandbox for HTML + JS are limited to simple editors and a frame in which the entered code is run. We think this is wrong. The person who came to the sandbox does not know the API of the framework very well, and without a maximum of hints, he most likely cannot do anything. Therefore, we implemented smart code completion with tooltips.
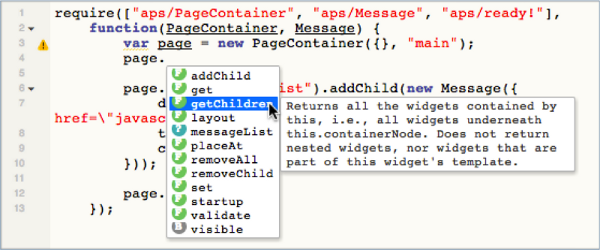
For autocompletion, the Tern project already mentioned in Habré is used . In his work he uses several dictionaries. The dictionary of methods and properties of ECMA5 and JQuery is provided by the author of the project, for the APS JS SDK objects, a dictionary is generated based on the documentation. This allows the editor to suggest methods and properties of the object based on how the designer created it.
"MessageList":{ "!type":"fn(options: object)->!custom:MessageList_ctor", "prototype":{ "add":{ "!type": "fn(description: string, error: string)", "!doc": "added new message" }, ... It often happens that within a quarter of the screen it becomes crowded, so all editors support full-screen mode, in which you can switch between screens with hot keys without exiting to normal mode.
Hotkeys
Hotkeys are an important element of working with apsfiddle . They duplicated all the functionality, and some operations can be done only by them. This is done not to clutter up the screen with a bunch of buttons. In order for the user to immediately recognize which key combinations can be used, when opening apsfiddle, it first displays the full list of keyboard shortcuts:
Systemic
Ctrl + H - help
Ctrl + O - download file
Ctrl + R - clearing fields
Ctrl + Enter - launch
Ctrl + 1 focus on HTML editor
Ctrl + 2 - focus on CSS editor
Ctrl + 3 - focus on JavaScript editor
F11 - switch full screen mode
Esc - exit from full screen mode
Are common
Ctrl + B - make beautiful formatting
Ctrl + F - search
Ctrl + K - folding code block
Ctrl + / - commenting
Ctrl + Space - code completion
HTML
Ctrl + J - switching by tag
Javascript
Ctrl + I - show type
Alt +. - jump to the announcement
Alt +, - jump back
Autosave
To avoid accidental data loss, the entered code is periodically stored in localStorage. The last saved code is inserted into the editors when the apsfiddle is opened .
Note
When we created our sandbox, we did not set ourselves the task of developing a full-fledged Cloud IDE. First of all, we needed a platform where our users could easily test our SDK and quickly learn how to work with it based on the examples provided by us. Therefore, we did not take the code of such large projects as, for example, Cloud9.
In the creation of the most intelligent and convenient code completion for our framework, we are only at the very beginning. Now his work requires compliance with the naming conventions for plug-ins, and we are not yet able to prompt the names of properties during their implicit use. Those. when declaring an object that acts as a constructor argument, and when specifying the property name as a string, for example, to invoke encapsulating methods.
Brief summary
Now APS JS SDK
- has a modular structure;
- includes “thick widgets”, data binding and templating;
- supplied with handwritten and auto-generated documentation;
- checked by autotest and manually;
- has a sandbox with advanced code completion.
All described can be tried here . Our main clients are in the West, and servers are hosted there, so the first download of apsfiddle can be long.
In general, the article turned out to be an overview, if you are interested in some implementation details, then ask in the comments. If there is a lot of questions about something, we will try to highlight it in a separate article.
The authors of the article are Timur Nizametdinov and Evgeny Uspensky, Parallels
Source: https://habr.com/ru/post/202022/
All Articles