Development of Windows 8.1 applications on XAML / С #. Part 1. Making the main screen of the application based on Hub
In this article, we open a series of materials on new features for developing applications for Windows 8.1 on XAML / C #. We plan to consistently go all the way from an empty template to a working application “Product Catalog”.
The first article is devoted to creating a simple version of the application based on the standard Hub App project template in Visual Studio 2013. In it, we will learn how to implement convenient and diverse start screens for your applications.
')
For work you will need:
- OS Windows 8.1 ;
- Visual Studio 2013 ;
- Windows 8.1 SDK (already included in Visual Studio 2013).
Creating an application from a template
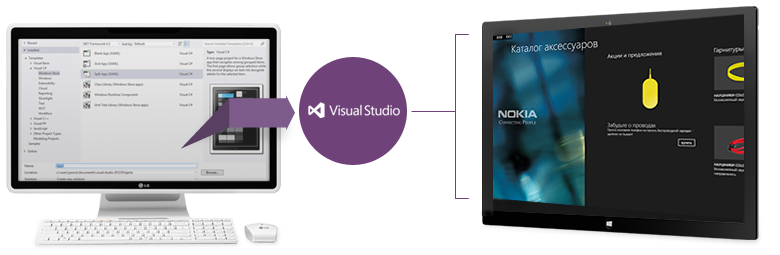
Open Visual Studio 2013, select create a new project ( File -> New -> Project ...). Next, in the templates, select a project in Visual C # -> Windows Store . Indicate that you will use the Hub App template.

Specify any project name, for example, eShop .
Consider the structure of the project:
- Assets \ - folder with images and icons for the project.
- Common \ - files with helper classes for implementing navigation and ensuring the life cycle of an application .
- DataModel \ - files that describe working with data.
- Strings \ - folder with resource files for the implementation of multilingual and application localization.
- Package.appxmanifest is an application manifest that describes key settings, features used, application name, tiles, and other parameters.
- App.xaml - application initialization.
- HubPage.xaml - the main screen of the application. Will contain a list of categories of goods of our store.
- SectionPage.xaml - product categories.
- ItemPage.xaml - a screen for viewing detailed information on the product.
Try running the application by pressing F5 , the green arrow or choosing Debug -> Start Debugging .
Explore the operation of the application:
- Try scrolling the application screen to the right.
- Try clicking on a separate gray tile.
- Try clicking on the group header.
- Try clicking on the group item header.
- Try clicking on the back button in the internal pages.
Return to Visual Studio and stop debugging ( Shift + F5 , red square, or select Debug -> Stop Debugging from the menu).
Consider how it works:
- HubPage.xaml
- DataModel \ SampleData.json
- DataModel \ SampleDataSource.cs
Creating a product catalog showcase based on the Hub control
We created the project on the template Hub App is not accidental. And now, the Hub control is already on the main screen of our application.
Hub is a new control that implements a design pattern for a hierarchical navigation system in an application.
Hub will be the entry point to our application and will be a showcase with stocks and product categories. This control is able to display a variety of content (text, video, images), obtained from various data sources, as well as to place in itself nested controls. Similar behavior could be achieved using the GridView or ListView controls , but this would have required much more effort.
Now let's work on the application.
1. Prepare the data in JSON format.
Open the SampleData.json file and copy the following text:
{"Groups":[ { "UniqueId": "Group-1", "Title": " Nokia Lumia", "Subtitle": " Nokia Lumia", "ImagePath": "Assets/DarkGray.png", "Description" : " Nokia. . .", "Items": [ { "UniqueId": "Group-1-Item-1", "Title": " COLOUD KNOCK", "Subtitle": " . .", "ImagePath": "Assets/2-Misc-Product-Page-Gear-593x500.png", "Price": "999 .", "Description" : " . .", "Content" : " . ." }, { "UniqueId": "Group-1-Item-2", "Title": " COLOUD POP", "Subtitle": " COLOUD POP", "ImagePath": "Assets/3-Misc-Product-Page-Gear-594x500.png", "Price": "999 .", "Description" : " . .", "Content" : " . ." }, { "UniqueId": "Group-1-Item-3", "Title": " COLOUD BOOM ", "Subtitle": "Item Subtitle: 3", "ImagePath": "Assets/1-Misc-Product-Page-Gear-636x500.png", "Price": "999 .", "Description" : " . .", "Content" : " . ." }, { "UniqueId": "Group-1-Item-4", "Title": " NOKIA PURITY PRO MONSTER", "Subtitle": " NOKIA PURITY PRO MONSTER", "ImagePath": "Assets/BH-940-Front.png", "Price": "999 .", "Description" : " , ", "Content" : " , " }, { "UniqueId": "Group-1-Item-5", "Title": " NOKIA PURITY", "Subtitle": " NOKIA PURITY", "ImagePath": "Assets/WH-920-cyan-png.png", "Price": "999 .", "Description" : " -", "Content" : " -" } ] }, { "UniqueId": "Group-2", "Title": " ", "Subtitle": " ", "ImagePath": "Assets/LightGray.png", "Description" : " . ", "Items": [ { "UniqueId": "Group-2-Item-1", "Title": " NOKIA DC-50", "Subtitle": " NOKIA DC-50", "ImagePath": "Assets/Nokia-Portable-Wireless-Charging-Plate-DC-50.png", "Price": "999 .", "Description" : " ", "Content" : " " }, { "UniqueId": "Group-2-Item-2", "Title": " NOKIA DC-19", "Subtitle": " NOKIA DC-19", "ImagePath": "Assets/Nokia-universal-portable-USB-charger-DC-19.png", "Price": "999 .", "Description" : " ", "Content" : " " }, { "UniqueId": "Group-2-Item-3", "Title": " ", "Subtitle": " ", "ImagePath": "Assets/DT-900-Front.png", "Price": "999 .", "Description" : " ", "Content" : " " } ] } ] } Pictures and descriptions for test content were taken from the Nokia site: www.nokia.com/ru-ru/accessories/all/headsets
2. Prepare the application interface and provide data mapping.
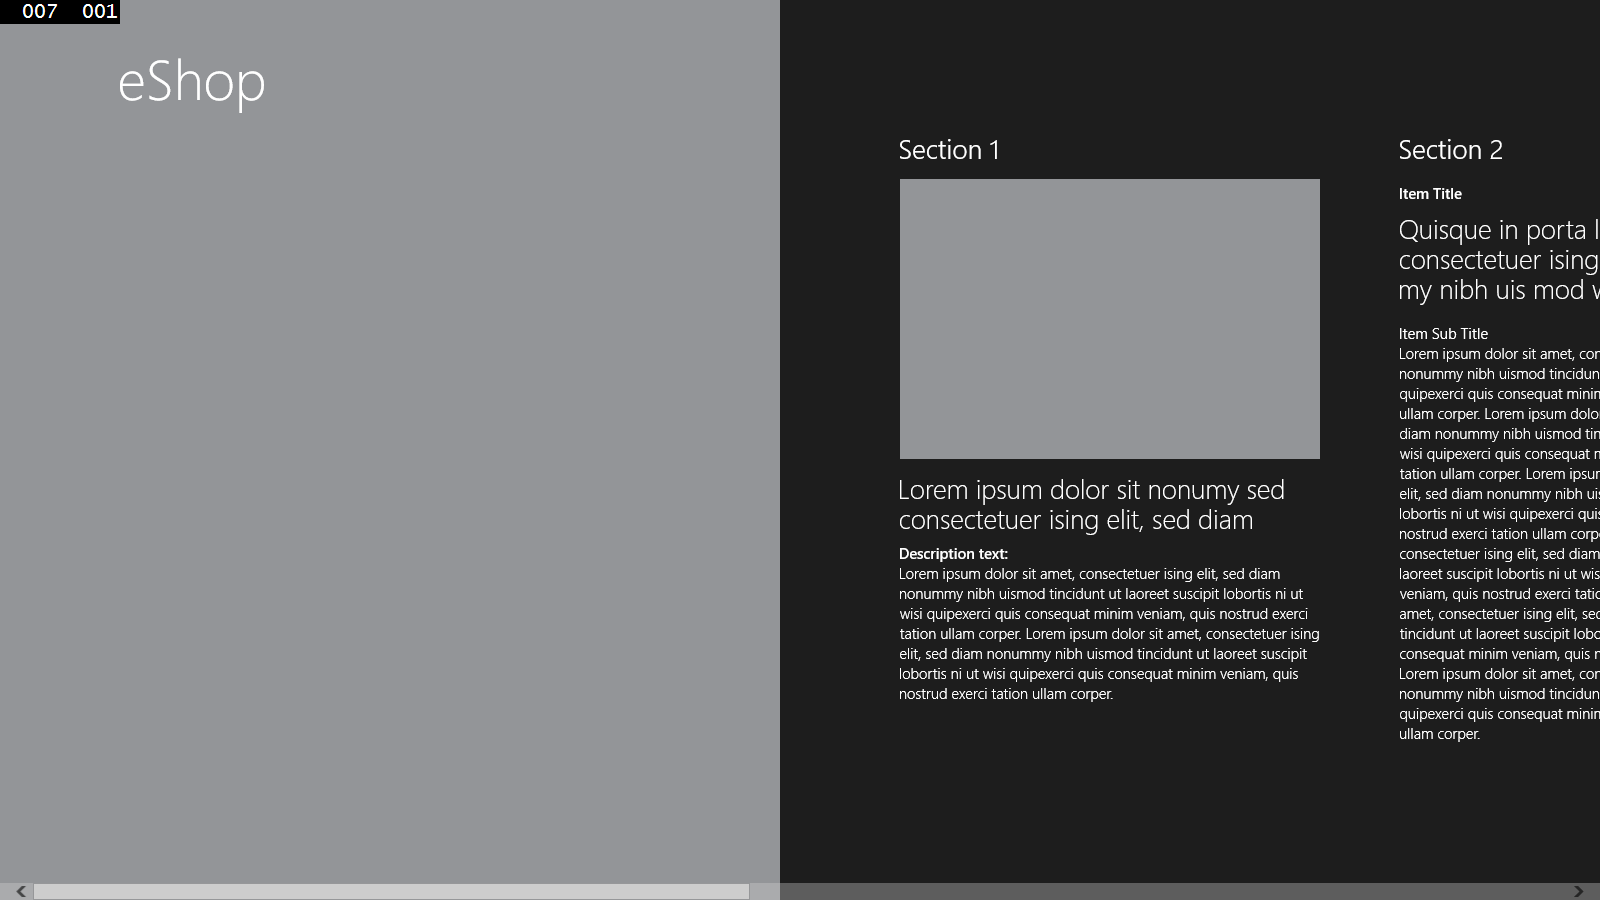
On the main screen of the application there will be four horizontally scrolling sections:
- Section with the name of the application and the background image;
- Section with the promotion of goods;
- Two sections for categories of goods. These will be two identical in terms of appearance sections, using a common display pattern.
Open the HubPage.xaml file and paste the following code there:
<Page DataContext="{Binding DefaultViewModel, RelativeSource={RelativeSource Self}}" x:Name="pageRoot" x:Class="eShop.HubPage" xmlns="http://schemas.microsoft.com/winfx/2006/xaml/presentation" xmlns:x="http://schemas.microsoft.com/winfx/2006/xaml" xmlns:local="using:eShop" xmlns:data="using:eShop.Data" xmlns:common="using:eShop.Common" xmlns:d="http://schemas.microsoft.com/expression/blend/2008" xmlns:mc="http://schemas.openxmlformats.org/markup-compatibility/2006" mc:Ignorable="d"> <Page.Resources> <DataTemplate x:Key="CategoryItemTemplate"> <Grid Height="280" Width="310" Margin="5,10,5,10"> <Grid.RowDefinitions> <RowDefinition Height="Auto"/> <RowDefinition Height="*"/> <RowDefinition Height="Auto"/> </Grid.RowDefinitions> <Border Background="{ThemeResource ListViewItemPlaceholderBackgroundThemeBrush}" Height="150"> <Image Source="{Binding ImagePath}" Stretch="None" AutomationProperties.Name="{Binding Title}"/> </Border> <StackPanel Grid.Row="1" Margin="0,10,0,0"> <TextBlock Text="{Binding Title}" Style="{StaticResource TitleTextBlockStyle}" TextWrapping="NoWrap"/> <TextBlock Text="{Binding Description}" Style="{StaticResource BodyTextBlockStyle}" MaxHeight="60" /> </StackPanel> <Button Grid.Row="2" Content="" Margin="0,10,0,0" HorizontalAlignment="Right" /> </Grid> </DataTemplate> </Page.Resources> <Grid Background="{ThemeResource ApplicationPageBackgroundThemeBrush}"> <Grid.ChildrenTransitions> <TransitionCollection> <EntranceThemeTransition/> </TransitionCollection> </Grid.ChildrenTransitions> <Hub SectionHeaderClick="Hub_SectionHeaderClick" > <Hub.Header> <Grid> <Grid.ColumnDefinitions> <ColumnDefinition Width="80"/> <ColumnDefinition Width="*"/> </Grid.ColumnDefinitions> <Button x:Name="backButton" Style="{StaticResource NavigationBackButtonNormalStyle}" Margin="-1,-1,39,0" VerticalAlignment="Top" Command="{Binding NavigationHelper.GoBackCommand, ElementName=pageRoot}" AutomationProperties.Name="Back" AutomationProperties.AutomationId="BackButton" AutomationProperties.ItemType="Navigation Button"/> <TextBlock x:Name="pageTitle" Text="{StaticResource AppName}" Style="{StaticResource HeaderTextBlockStyle}" Grid.Column="1" VerticalAlignment="Top" IsHitTestVisible="false" TextWrapping="NoWrap" /> </Grid> </Hub.Header> <HubSection Width="780" Margin="0,0,80,0"> <HubSection.Background> <ImageBrush ImageSource="Assets/Background.jpg" Stretch="UniformToFill" /> </HubSection.Background> </HubSection> <HubSection Width="500" Header=" " > <DataTemplate> <Grid> <Grid.RowDefinitions> <RowDefinition Height="Auto" /> <RowDefinition Height="Auto" /> <RowDefinition Height="*" /> <RowDefinition Height="Auto" /> </Grid.RowDefinitions> <Image Source="Assets/DT-900-Front.png" Stretch="None" Width="420" Height="280"/> <TextBlock Style="{StaticResource SubheaderTextBlockStyle}" Grid.Row="1" Margin="0,10,0,0" TextWrapping="Wrap" Text=" " /> <TextBlock Style="{StaticResource BodyTextBlockStyle}" Grid.Row="2" Text=" - !" /> <Button Grid.Row="3" Content="" Margin="0,10,0,0" HorizontalAlignment="Right" /> </Grid> </DataTemplate> </HubSection> <HubSection IsHeaderInteractive="True" DataContext="{Binding Group1Items}" Header="{Binding Title}" Padding="40,40,40,32"> <DataTemplate> <GridView x:Name="itemGridView" ItemsSource="{Binding Items}" Margin="-9,-14,0,0" AutomationProperties.AutomationId="ItemGridView" AutomationProperties.Name="Items In Group" ItemTemplate="{StaticResource CategoryItemTemplate}" SelectionMode="None" IsSwipeEnabled="false" IsItemClickEnabled="True" ItemClick="ItemView_ItemClick"> </GridView> </DataTemplate> </HubSection> <HubSection IsHeaderInteractive="True" DataContext="{Binding Group2Items}" Header="{Binding Title}" Padding="40,40,40,32"> <DataTemplate> <GridView x:Name="itemGridView" ItemsSource="{Binding Items}" Margin="-9,-14,0,0" AutomationProperties.AutomationId="ItemGridView" AutomationProperties.Name="Items In Group" ItemTemplate="{StaticResource CategoryItemTemplate}" SelectionMode="None" IsSwipeEnabled="false" IsItemClickEnabled="True" ItemClick="ItemView_ItemClick"> </GridView> </DataTemplate> </HubSection> </Hub> </Grid> </Page> Pay attention to the following lines:
<Page DataContext="{Binding DefaultViewModel, RelativeSource={RelativeSource Self}}"> {Binding DefaultViewModel} - defines a collection of objects, elements that can be used to bind data within this page.
<HubSection DataContext="{Binding Group1Items}" Header="{Binding Title}"> {Binding Group1Items} - determines from which object the data will be taken for display in the control. The Group1Items object contains information about the product category and the products it contains.
{Binding Title} - indicates a property containing the name of the category of goods in the Group1Items object.
More information about data binding to controls can be found here .
3. Let's get the data and carry out their binding.
Open the HubPage.cs file, find the navigationHelper_LoadState method in it and replace it with the following code:
private async void navigationHelper_LoadState(object sender, LoadStateEventArgs e) { var sampleDataGroup1 = await SampleDataSource.GetGroupAsync("Group-1"); this.DefaultViewModel["Group1Items"] = sampleDataGroup1; var sampleDataGroup2 = await SampleDataSource.GetGroupAsync("Group-2"); this.DefaultViewModel["Group2Items"] = sampleDataGroup2; } SampleDataSource.GetGroupAsync method - gets data on products and categories from the SampleData.json file, which we initially filled with content.
The SampleDataSource object was automatically generated when creating a project from a template and has the following data model:
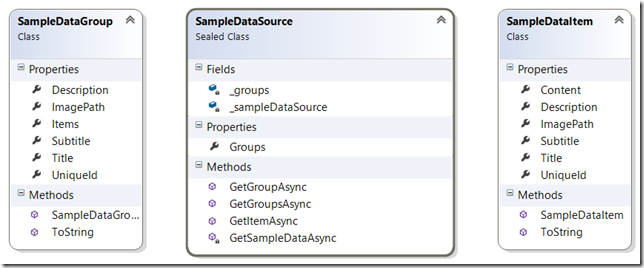
DefaultViewModel is a public property that is a directory of objects used on the page to bind an interface to data. Use on the page is defined in the tag <Page>.
4. It is time to start the application.
You can start the application by pressing F5 , the green arrow or selecting Debug -> Start Debugging .
The appearance of the resulting application is presented in the figures below.
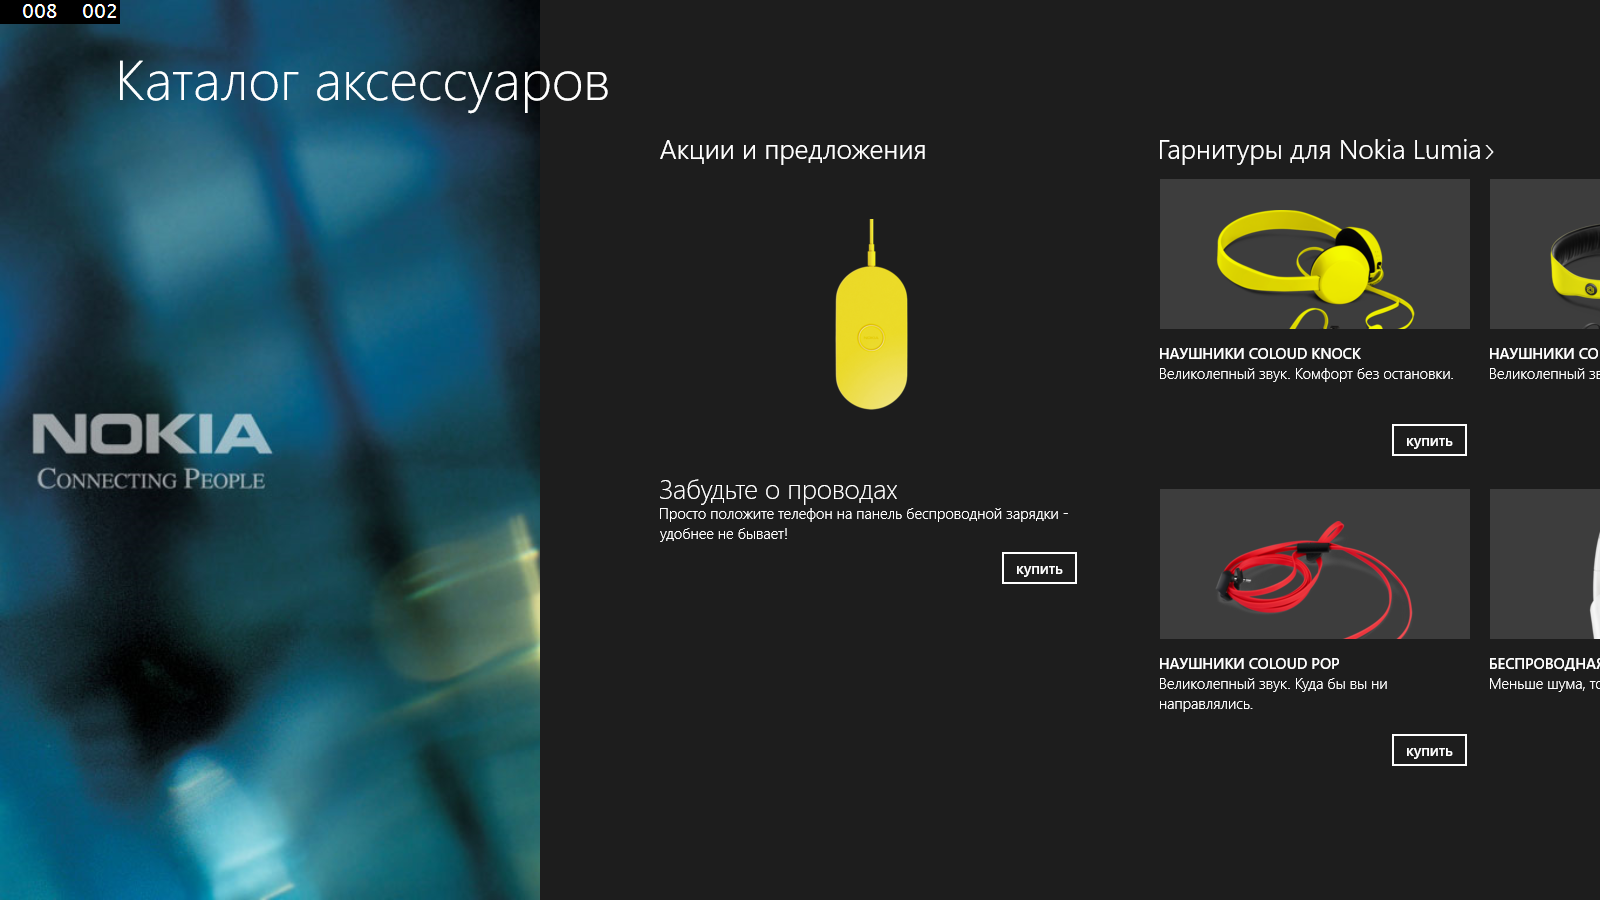

As you can see, the application has visually changed and learned how to use local data. However, there is still much to do before a full-fledged application.
We will deal with this in the following articles.
You can download the finished example at the link: http://sdrv.ms/1gKmlvw
Source: https://habr.com/ru/post/201966/
All Articles