An example of using WxPython to create a node interface. Part 4: Implementing Drag & Drop
In a small series of articles will be described the use of WxPython to solve a very specific task of developing a user interface, and even how to make this solution universal. This tutorial is designed for those who have already begun to study this library and want to see something more complex and holistic than the simplest examples (although everything will start from relatively simple things).
In this part, we will add Drag & Drop support to our application and teach it to create new nodes in this way.
')
Part 1: Learning to draw
Part 2: Handling Mouse Events
Part 3: We continue to add features + keyboard handling
Part 4: Implementing Drag & Drop
Part 5: We connect nodes
Who cares, welcome under the cat…
Drag & Drop support is a useful and popular thing, but here we will use it not quite for its intended purpose. We will thus create new nodes. This business works quite simply. It is required to create an object of class “wx.TextDropTarget” and pass it to the method “SetDropTarget” of class “wx.Window” from which our canvas is inherited. Accordingly, at the moment of the drop, the method “wx.TextDropTarget.OnDropText” will be called, which we will need to implement. For the test, the implementation of this class will look like this:
Now, when throwing text into the window, a message with the position and the text itself will be printed in the console. As you might have guessed, for accepting files, there is a similar class “wx.FileDropTarget”, which works in the same way, well, or the class “wx.PyDropTarget”, which can take everything and everything.
Simply typing the text is not very useful, so we use the resulting text to create nodes with it. But first you need to slightly change the architecture and add a node factory (this will be useful for the future). At the moment - it will be a very simple factory:
which simply creates an instance of “SimpleTextBoxNode”, which is an advanced heir to “SimpleBoxNode”:
which in turn renders the specified text on top of the rectangular node.
It remains to add to the canvas a method that allows you to add new nodes from the description:
And modernize TextDropTarget a bit so that it calls this method when the text arrives:
And now we can create new text nodes by simply throwing text fragments onto the canvas.
It looks like this:
The code, as always, can be found in the appropriate commit on GitHub .
But besides creating nodes, using Drag & Drop, you can also organize copying of nodes, and it is very easy. If the user at the moment of the start of dragging the node holds the Ctrl key, we just need to initiate the beginning of Drag & Drop and give the description of the node. And the node creation code will do the rest of the work for us. To initiate Drag & Drop, we will add the following code to the left mouse click handler:
Here we create the source of Drag & Drop and give it the description we received from the node. It remains to implement the “GetCloningNodeDescription” method of the node and everything will be ready. But first we implement the interface:
And now the implementation of the method in the node:
which just gives up its text.
The current version of the code lives here .
Well, before completing the fourth part, add the last little thingies. Let's make the nodes scale to the size of the text. To do this, we will slightly change the text node rendering method:
The “GetTextExtent” method in this case returns the size of a rectangle that occupies text. Accordingly, before rendering the node, we update its dimensions so that it is 10 pixels larger than the text on each side. This is how the whole process now looks like:
The code lives in this commit on GitHub .
PS: Write about typos in PM.
In this part, we will add Drag & Drop support to our application and teach it to create new nodes in this way.
')
Part 1: Learning to draw
Part 2: Handling Mouse Events
Part 3: We continue to add features + keyboard handling
Part 4: Implementing Drag & Drop
Part 5: We connect nodes
Who cares, welcome under the cat…
9. Add Drag & Drop Support
Drag & Drop support is a useful and popular thing, but here we will use it not quite for its intended purpose. We will thus create new nodes. This business works quite simply. It is required to create an object of class “wx.TextDropTarget” and pass it to the method “SetDropTarget” of class “wx.Window” from which our canvas is inherited. Accordingly, at the moment of the drop, the method “wx.TextDropTarget.OnDropText” will be called, which we will need to implement. For the test, the implementation of this class will look like this:
class TextDropTarget(wx.TextDropTarget): def __init__(self): wx.TextDropTarget.__init__(self) def OnDropText(self, x, y, data): print x, y, data Now, when throwing text into the window, a message with the position and the text itself will be printed in the console. As you might have guessed, for accepting files, there is a similar class “wx.FileDropTarget”, which works in the same way, well, or the class “wx.PyDropTarget”, which can take everything and everything.
10. Create nodes with Drag & Drop
Simply typing the text is not very useful, so we use the resulting text to create nodes with it. But first you need to slightly change the architecture and add a node factory (this will be useful for the future). At the moment - it will be a very simple factory:
class NodesFactory(object): def __init__(self): pass def CreateNodeFromDescription(self, nodeDescription): return SimpleTextBoxNode(text=nodeDescription) which simply creates an instance of “SimpleTextBoxNode”, which is an advanced heir to “SimpleBoxNode”:
class SimpleTextBoxNode(SimpleBoxNode): def __init__(self, **kwargs): super(SimpleTextBoxNode, self).__init__(**kwargs) self.text = kwargs.get("text", "No text") def Render(self, gc): super(SimpleTextBoxNode, self).Render(gc) gc.DrawText(self.text, self.position[0]+10, self.position[1]+10) which in turn renders the specified text on top of the rectangular node.
It remains to add to the canvas a method that allows you to add new nodes from the description:
def CreateNodeFromDescriptionAtPosition(self, nodeDescription, pos): node = self._nodesFactory.CreateNodeFromDescription(nodeDescription) if node: node.position = pos self._canvasObjects.append(node) self.Render() And modernize TextDropTarget a bit so that it calls this method when the text arrives:
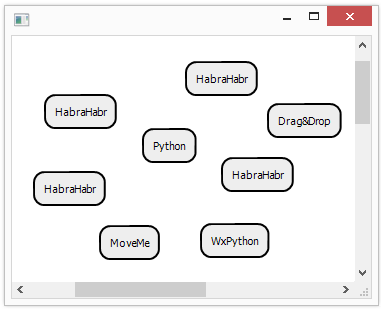
class TextDropTarget(wx.TextDropTarget): def __init__(self, canvas): wx.TextDropTarget.__init__(self) self._canvas = canvas def OnDropText(self, x, y, data): print x, y, data self._canvas.CreateNodeFromDescriptionAtPosition(data, [x, y]) And now we can create new text nodes by simply throwing text fragments onto the canvas.
It looks like this:
The code, as always, can be found in the appropriate commit on GitHub .
11. Clone nodes with Drag & Drop
But besides creating nodes, using Drag & Drop, you can also organize copying of nodes, and it is very easy. If the user at the moment of the start of dragging the node holds the Ctrl key, we just need to initiate the beginning of Drag & Drop and give the description of the node. And the node creation code will do the rest of the work for us. To initiate Drag & Drop, we will add the following code to the left mouse click handler:
if evt.ControlDown() and self._objectUnderCursor.clonable: text = self._objectUnderCursor.GetCloningNodeDescription() data = wx.TextDataObject(text) dropSource = wx.DropSource(self) dropSource.SetData(data) dropSource.DoDragDrop(wx.Drag_AllowMove) Here we create the source of Drag & Drop and give it the description we received from the node. It remains to implement the “GetCloningNodeDescription” method of the node and everything will be ready. But first we implement the interface:
class ClonableObject(CanvasObject): def __init__(self, **kwargs): super(ClonableObject, self).__init__(**kwargs) self.clonable = True def GetCloningNodeDescription(self): """ GetNodeDescription should return a dictionary that contains all information required for cloning this node at another position """ raise NotImplementedError() And now the implementation of the method in the node:
def GetCloningNodeDescription(self): return self.text which just gives up its text.
The current version of the code lives here .
12. Scalable nodes
Well, before completing the fourth part, add the last little thingies. Let's make the nodes scale to the size of the text. To do this, we will slightly change the text node rendering method:
def Render(self, gc): textDimensions = gc.GetTextExtent(self.text) self.boundingBoxDimensions = [textDimensions[0]+20, textDimensions[1]+20] super(SimpleTextBoxNode, self).Render(gc) gc.DrawText(self.text, self.position[0]+10, self.position[1]+10) The “GetTextExtent” method in this case returns the size of a rectangle that occupies text. Accordingly, before rendering the node, we update its dimensions so that it is 10 pixels larger than the text on each side. This is how the whole process now looks like:
The code lives in this commit on GitHub .
PS: Write about typos in PM.
Source: https://habr.com/ru/post/201784/
All Articles