Turn a static website into a mobile application using jQuery Mobile and PhoneGap

After acquiring an Android-based phone, the task arose of making a mobile application from the brainexer website. The choice fell on jQuery Mobile and PhoneGap . Prior to that, there was no knowledge of mobile development, so I had to realize a certain layer of new information, from which I would like to share a squeeze. As a result, the article is a small quick start - how to get an application from Google Play from a pack of html files.
jQuery Mobile
First of all, we remove all unnecessary (menu, footer, etc.) and put the main content in the standard template in the data-role = "content".
<!doctype html> <html> <head> <meta charset="utf-8" /> <meta name="viewport" content="width=device-width, initial-scale=1"> <link rel="stylesheet" href="http://code.jquery.com/mobile/1.3.2/jquery.mobile-1.3.2.min.css"> <script src="http://code.jquery.com/jquery-1.9.1.min.js"></script> <script src="http://code.jquery.com/mobile/1.3.2/jquery.mobile-1.3.2.min.js"></script> </head> <body> <div data-role="page"> <div data-role="header"> <h1></h1> </div> <div data-role="content"> <p></p> </div> </div> </body> </html> You need to remember to change the js and css files to local versions before building.
The menu can also be placed on the start page index.html in the form of an accordion consisting of collapsible-set and listview
<div data-role="collapsible-set" data-theme="b"> <div data-role="collapsible"> <h3> 1</h3> <ul data-role="listview"> <li><a href="page1.html"> 1</a></li> <li><a href="page2.html"> 2</a></li> </ul> </div> <div data-role="collapsible"> <h3> 2</h3> <ul data-role="listview"> <li><a href="page3.html"> 3</a></li> </ul> </div> </div> 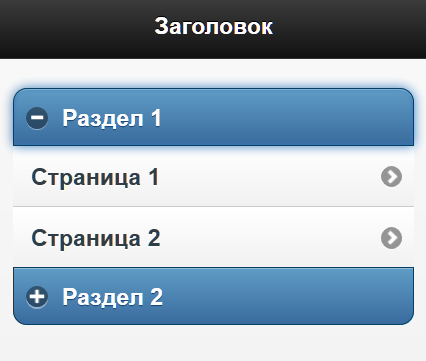
JQuery Mobile has several themes [ae] and with the data-theme attribute we have indicated which one we want to use. “B” is blue.
')
If the site uses modal dialogues, then they can be implemented as follows. A block is placed on the page.
<div id="dialog1" data-role="page"> <div data-role="header"> <h1> </h1> </div> <div data-role="content"> <p> </p> </div> </div> And the view link,
<a data-rel="dialog" href="#dialog1"> </a> by clicking on which the dialogue will open.
If any additional menu is needed on the page, then it can be placed in the header on the right. The title itself is shifted to the left, otherwise the buttons will run over it.
<div data-role="header"> <h1 style="text-align:left;margin-left:15px;"></h1> <div data-type="horizontal" data-role="controlgroup" class="ui-btn-right"> <a data-rel="dialog" data-iconpos="notext" data-icon="gear" data-role="button" href="#dialog1"></a> <a data-rel="dialog" data-iconpos="notext" data-icon="bars" data-role="button" href="#dialog2"></a> </div> </div> 
It uses the control button data-role = "button" which uses the icon data-icon = "gear" without text data-iconpos = "notext"
Actually this is the whole basis that I needed for my application. All other controls can be found on the website.
view.jquerymobile.com/1.3.2/dist/demos
Phonegap
The next step is to pack everything that happened in apk.
First, nodejs.org is installed, after the phonegap itself is installed
npm install -g phonegap Create a HelloWorld application
phonegap create MyApp All html files are placed in the folder www, index.html start page.
There are two options for building an application.
1) Download the Android SDK and when launching the phonegap build, the local environment will be used. The main advantage of installing the SDK is that it will be possible to use the Android emulator, but it also has a minus, it is sufficiently slow.
2) Use the build.phonegap.com service - the main task of which is to ensure that the developer does not need to set up the environment for building for different platforms. That is, without installing sdk Android, Windows Phone, you can build apk, xap, etc. The question will only remain on what to test them. The minus of this option appears if you have more than one application. Since the free assembly is available only one private project.
To build an application using build.phonegap.com we run
phonegap remote build android Plugins
If you need something directly from the phone, for example access to the camera or file system, then you need to inform about it with the help of a special command. For example, my sound is played using html audio, but there are problems with android, so I had to use the Media plugin, just to get the user's locale to select the interface language, the Globalization plugin is needed.
Install cordova
npm install -g cordova And accordingly we run the commands in the application folder
cordova plugin add org.apache.cordova.media cordova plugin add org.apache.cordova.globalization The list of installed plugins can be obtained with the command
cordova plugin list [ 'org.apache.cordova.globalization', 'org.apache.cordova.media' ] Add to html a link to cordova.js
<script src="cordova.js"></script> Now for example you can get a locale. Access to api needs to be done after the device ready event.
document.addEventListener("deviceready", onDeviceReady, false); function onDeviceReady() { navigator.globalization.getLocaleName( function (locale) { alert(locale.value); }, function (error) { alert(error); }); } Icons and screensavers
In the folders "www \ res \ icon \ android \" "www \ res \ screen \ android \" there are icons and splash screens, respectively. By default, there are pictures with PhoneGap logos, so it would be nice to replace them with your own. Also, the common default icon is in www \ and is called icon.png
configuration file
The config.xml file is in the www folder, in it you need to specify the application id, application version, title, description and author.
<widget id="com.phonegap.helloworld" version="1.0.0"> <name>HelloWorld</name> <description> Hello World sample application that responds to the deviceready event. </description> <author email="support@phonegap.com" href="http://phonegap.com"> PhoneGap Team </author> </widget> Release version
To build an apk version that can be published on Google Play, you need to create a keystore file using the keytool.exe utility from the JDK and upload it to build.phonegap.com. Run rebuild and get TestApp-release.apk
Google play
The last step is to register at play.google.com/apps/publish/signup .
Create an application, make a description, upload a logo and screenshots. Fill apk and click publish. That's it, the application is ready.
Cross platform
At the end you can mention the main bonus. In addition to the Android version, you have ready-made applications for all other supported platforms, of which iOS and Windows Phone are popular, but since, unlike Android, they are not so simple with the ability to test, I have not used this bonus yet.
Source: https://habr.com/ru/post/201752/
All Articles