An example of using WxPython to create a node interface. Part 3: We continue to add features + keyboard handling
In a small series of articles will be described the use of WxPython to solve a very specific task of developing a user interface, and even how to make this solution universal. This tutorial is designed for those who have already begun to study this library and want to see something more complex and holistic than the simplest examples (although everything will start from relatively simple things).
In the last part, we implemented mouse event handling, and now we will add another feature and implement keyboard event handling.
Part 1: Learning to draw
Part 2: Handling Mouse Events
Part 3: We continue to add features + keyboard handling
Part 4: Implementing Drag & Drop
Part 5: We connect nodes
')
Who cares, welcome under the cat…
Last time we learned to move nodes, now it's time to learn how to remove them, and not only them, but also any objects on the canvas. True to delete, you must first specify what we want to delete, i.e. select the object, so we start not with the deletion, but with the selection.
For selection, everyone usually uses a single click, but, as far as I know, wxPython does not have a special single click event, so we’ll track it ourselves. We will do this in the simplest way: if the user has clicked on the left mouse button and released it over the same pixel, then this is a click. To do this, we need to remember where the user pressed the button (we will save it in “self._lastLeftDownPos”), and when released we compare and save the selected object:
Well, so that the user can see what he has allocated there, add the following fragment to the canvas rendering code:
Everything? No, not all, the attentive reader noticed that we checked whether the object is selectable and called the new RenderSelection method, which all selected objects should have. Therefore, in the image and likeness of the move, we will add a new base class from which all objects will be inherited, which can be selected:
By the way, since our base classes become larger and everything becomes more complicated, now their designers take as many parameters as they like and pass them up the inheritance hierarchy in the form of a dictionary, which is what the “super (SelectableObject, self) .__ init __ (* * kwargs) ".
It remains only to add the following code to the node:
which renders a selection around an object and you can see this result if you click on one of the nodes:
The current code, as always, can be found in the corresponding commit on GitHub .
So we got to the removal of objects. To delete, we need to track when the user clicks the Delete button and delete the item itself, if it is deleted.
To begin, we will need a handler for the event of pressing the buttons of the keyboard, which we will register as follows:
And the handler itself will execute the following code:
Here we, in the case of the arrival of the event of pressing the button with the code wx.WXK_DELETE, check whether the object is selected and if it is deleted. If there is one, we beautifully notify him that it would be time for him to rest (by calling Delete) and removing him from the list of objects in the canvas. evt.Skip () tells the system to call the rest of the event handlers registered elsewhere.
Now, traditionally, it remains to add the base class for the objects to be deleted:
And you can enjoy the removal of objects from the canvas. The truth is not very long, since adding objects will be only in the next part :)
The current version of the code lives in this commit on GitHub .
PS: Write about typos in PM.
In the last part, we implemented mouse event handling, and now we will add another feature and implement keyboard event handling.
Part 1: Learning to draw
Part 2: Handling Mouse Events
Part 3: We continue to add features + keyboard handling
Part 4: Implementing Drag & Drop
Part 5: We connect nodes
')
Who cares, welcome under the cat…
7. Select objects
Last time we learned to move nodes, now it's time to learn how to remove them, and not only them, but also any objects on the canvas. True to delete, you must first specify what we want to delete, i.e. select the object, so we start not with the deletion, but with the selection.
For selection, everyone usually uses a single click, but, as far as I know, wxPython does not have a special single click event, so we’ll track it ourselves. We will do this in the simplest way: if the user has clicked on the left mouse button and released it over the same pixel, then this is a click. To do this, we need to remember where the user pressed the button (we will save it in “self._lastLeftDownPos”), and when released we compare and save the selected object:
def OnMouseLeftUp(self, evt): #Selection if (self._lastLeftDownPos and self._lastLeftDownPos[0] == evt.GetPosition()[0] and self._lastLeftDownPos[1] == evt.GetPosition()[1] and self._objectUnderCursor and self._objectUnderCursor.selectable): self._selectedObject = self._objectUnderCursor self.Render() Well, so that the user can see what he has allocated there, add the following fragment to the canvas rendering code:
if self._selectedObject: gc.PushState() self._selectedObject.RenderSelection(gc) gc.PopState() Everything? No, not all, the attentive reader noticed that we checked whether the object is selectable and called the new RenderSelection method, which all selected objects should have. Therefore, in the image and likeness of the move, we will add a new base class from which all objects will be inherited, which can be selected:
class SelectableObject(CanvasObject): def __init__(self, **kwargs): super(SelectableObject, self).__init__(**kwargs) self.selectable = True def RenderSelection(self, gc): """ RenderHighlighting method should draw an object with a selection border around it. """ raise NotImplementedError() By the way, since our base classes become larger and everything becomes more complicated, now their designers take as many parameters as they like and pass them up the inheritance hierarchy in the form of a dictionary, which is what the “super (SelectableObject, self) .__ init __ (* * kwargs) ".
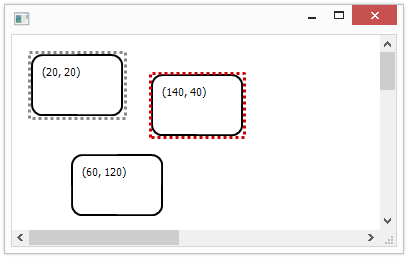
It remains only to add the following code to the node:
def RenderSelection(self, gc): gc.SetBrush(wx.Brush('#888888', wx.TRANSPARENT)) gc.SetPen(wx.Pen('#CC0000', 3, wx.DOT)) gc.DrawRectangle(self.position[0]-2, self.position[1]-2, self.boundingBoxDimensions[0]+4, self.boundingBoxDimensions[1]+4) which renders a selection around an object and you can see this result if you click on one of the nodes:
The current code, as always, can be found in the corresponding commit on GitHub .
8. Deleting objects
So we got to the removal of objects. To delete, we need to track when the user clicks the Delete button and delete the item itself, if it is deleted.
To begin, we will need a handler for the event of pressing the buttons of the keyboard, which we will register as follows:
self.Bind(wx.EVT_KEY_DOWN, self.OnKeyPress) And the handler itself will execute the following code:
def OnKeyPress(self, evt): if evt.GetKeyCode() == wx.WXK_DELETE: if self._selectedObject and self._selectedObject.deletable: self._selectedObject.Delete() if self._selectedObject in self._canvasObjects: self._canvasObjects.remove(self._selectedObject) self._selectedObject = None else: evt.Skip() #Update object under cursor pos = self.CalcUnscrolledPosition(evt.GetPosition()).Get() self._objectUnderCursor = self.FindObjectUnderPoint(pos) self.Render() Here we, in the case of the arrival of the event of pressing the button with the code wx.WXK_DELETE, check whether the object is selected and if it is deleted. If there is one, we beautifully notify him that it would be time for him to rest (by calling Delete) and removing him from the list of objects in the canvas. evt.Skip () tells the system to call the rest of the event handlers registered elsewhere.
Now, traditionally, it remains to add the base class for the objects to be deleted:
class DeletableObject(CanvasObject): def __init__(self, **kwargs): super(DeletableObject, self).__init__(**kwargs) self.deletable = True def Delete(self): """ Delete method is called when an object is deleted from a canvas. """ raise NotImplementedError() And you can enjoy the removal of objects from the canvas. The truth is not very long, since adding objects will be only in the next part :)
The current version of the code lives in this commit on GitHub .
PS: Write about typos in PM.
Source: https://habr.com/ru/post/201608/
All Articles