SDL 2.0 Lesson Cycle: Lesson 2

From the translator: the continuation of the Twinklebear tutorials series, originally available here . Previous lesson can be found here .
Today we will start refactoring the code from the last lesson, adding some very useful functions, and also analyze how the images are positioned and scaled in SDL_Window.
As usual, we will start the program with the inclusion of SDL. Also in this lesson we will use the class string, so we will connect it as well.
')
#include "SDL.h" #include <string> const int SCREEN_WIDTH = 640; const int SCREEN_HEIGHT = 480; SDL_Window *window = nullptr; SDL_Renderer *renderer = nullptr; We will also declare a couple of constant values for the width and height of the screen, together with the global window and renderer declarations, so that they are accessible from our functions. Again we initialize the pointers as nullptr for security. If you are not using C ++ 11, initialize them as NULL.
Note: You should try to avoid using non-constant global values, or global values in general, that is, you should never declare a global SDL_Window or SDL_Renderer. However, for this simple lesson we will still use them. We will cover the application of global objects through several lessons.
Remember how we in the first lesson loaded texture? It’s not so bad to load one texture into main, but imagine if there were a couple of hundred? We would have to print the same piece of code every time! It is much better to declare a function for loading textures by file name:
SDL_Texture* LoadImage(std::string file){ SDL_Surface *loadedImage = nullptr; SDL_Texture *texture = nullptr; loadedImage = SDL_LoadBMP(file.c_str()); if (loadedImage != nullptr){ texture = SDL_CreateTextureFromSurface(renderer, loadedImage); SDL_FreeSurface(loadedImage); } else std::cout << SDL_GetError() << std::endl; return texture; } This function should look very familiar, because this is the same code that we wrote in the first lesson, but now it is combined into a good function. With its help, we can pass the file name as a line and get a pointer to the loaded texture. Note that the pointer will be nullptr if the download fails.
Next, we want to write a function to simplify drawing. Also, this function will allow you to specify the position of the image on the screen. It will take x and y coordinates, texture pointers and renderer and draw a texture at the specified point.
void ApplySurface(int x, int y, SDL_Texture *tex, SDL_Renderer *rend){ SDL_Rect pos; pos.x = x; pos.y = y; SDL_QueryTexture(tex, NULL, NULL, &pos.w, &pos.h); SDL_RenderCopy(rend, tex, NULL, &pos); } To indicate where the texture will be drawn, we need to create an SDL_Rect, the address of which we will pass to SDL_RenderCopy as a parameter of the target rectangle.
In order to create our rectangle, we take the x and y that were passed, and assign the corresponding values to the corresponding rectangle values. However, we also need to specify the width and height, because SDL 2.0 allows us to scale the texture. Try playing around with the width and height values and see what happens!
Now we just pass the width and height of the texture to draw it on a 1: 1 scale. We can get these values using the SDL_QueryTexture function. It takes a pointer to the texture, the next two parameters we specify as NULL (these parameters are responsible for the format and level of access that we do not need). Finally, we need to pass the addresses of the variables that the function will fill with the width and height of the texture.
Now that we have received the initialized SDL_Rect, we can transfer it to SDL_RenderCopy so that the texture is drawn at the point we need with the original height and width. The remaining NULL parameter passed to this function is responsible for cutting out a fragment of the original texture. We will analyze its use later.
Let's see our functions in action. First of all, run the SDL and create a window and renderer like last time. But we have something new here, namely SDL_WINDOWPOS_CENTERED. This option allows when creating a window to center it on a specific axis, in this case we use centering the window on both x and y.
int main(int argc, char** argv){ if (SDL_Init(SDL_INIT_EVERYTHING) == -1){ std::cout << SDL_GetError() << std::endl; return 1; } window = SDL_CreateWindow("Lesson 2", SDL_WINDOWPOS_CENTERED, SDL_WINDOWPOS_CENTERED, SCREEN_WIDTH, SCREEN_HEIGHT, SDL_WINDOW_SHOWN); if (window == nullptr){ std::cout << SDL_GetError() << std::endl; return 2; } renderer = SDL_CreateRenderer(window, -1, SDL_RENDERER_ACCELERATED | SDL_RENDERER_PRESENTVSYNC); if (renderer == nullptr){ std::cout << SDL_GetError() << std::endl; return 3; } Let's upload our pictures. For this tutorial, we will draw a background image, tiled, and a second image centered over the background.
Here is our background:

And this will be on top of the background:

Let's load them using the LoadImage function we just wrote.
SDL_Texture *background = nullptr, *image = nullptr; background = LoadImage("Lesson2res/background.bmp"); image = LoadImage("Lesson2res/image.bmp"); if (background == nullptr || image == nullptr) return 4; Note that you need to change the paths to the images so that they match the paths on your system.
Before we draw pictures, we need to know where we want to place them. To begin with, it is necessary to understand how the SDL coordinate system works, since it differs slightly from the standard 2D Cartesian coordinate system. The SDL coordinate system looks like this:
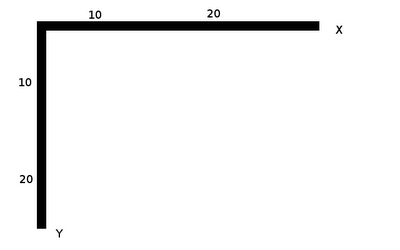
Point (0,0) is located in the upper left corner of the screen. Y values increase as the screen moves down, and X values to the right. It should also be noted that the point we transmit when drawing the image indicates the upper left corner of the image, unlike the center, as in some other libraries.
Before we draw: remember that what we draw will be located under the subsequent images. Thus, the picture drawn in the first place will be under all, and in the last - over all.
Probably, you have already noticed that our background image has a resolution of 320x240, which means we have to draw it four times to tile the entire screen.
Before we draw anything, we will clear the screen, then we will position the elements. In order to get the width and height of the texture, we again use the QueryTexture function. Of course, you can use a loop to draw the background, but in this case we will use the blunt method and just write the same text 4 times.
SDL_RenderClear(renderer); int bW, bH; SDL_QueryTexture(background, NULL, NULL, &bW, &bH); ApplySurface(0, 0, background, renderer); ApplySurface(bW, 0, background, renderer); ApplySurface(0, bH, background, renderer); ApplySurface(bW, bH, background, renderer); Now we will draw an image that will be placed on top of the background and in the center of the screen. Calculate the center point is extremely simple, because the point that we pass to the ApplySurface function is the coordinate of the upper left corner of the image. Therefore, we need to add an offset so that the center of the image coincides with the center of the screen.
int iW, iH; SDL_QueryTexture(image, NULL, NULL, &iW, &iH); int x = SCREEN_WIDTH / 2 - iW / 2; int y = SCREEN_HEIGHT / 2 - iH / 2; ApplySurface(x, y, image, renderer); In order to see the drawn, we need to show the renderer, and then wait a few seconds to see the result.
SDL_RenderPresent(renderer); SDL_Delay(2000); Finally, we will complete the program by freeing the occupied memory, exiting the SDL and returning 0.
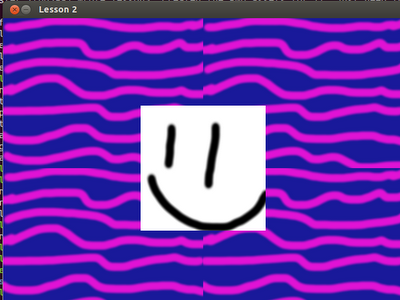
SDL_DestroyTexture(background); SDL_DestroyTexture(image); SDL_DestroyRenderer(renderer); SDL_DestroyWindow(window); SDL_Quit(); return 0; } When you compile and run the program, the window should look like this:
End of the lesson
Today's lesson has come to its end. See you in lesson 3: external SDL libraries for everyone.
Source: https://habr.com/ru/post/200730/
All Articles