Multiple DNS servers: why it is hosted and how it is implemented in Parallels Plesk Panel
Prehistory
Puzzled by receiving feedback and more accurate prioritization of tasks, the Plesk developers started an account on UserVoice - http://plesk.uservoice.com . Thus, they organized a place where customers can offer their innovations, write what they don’t like, vote for the functions they need (the ones that get the most votes get into the design). One of the popular requests we received from our users is “Automate slave DNS support”. This is a rather old feature request that almost all Plesk Server Administrators want. In order to close this issue once and for all, we decided to make the appropriate Plesk extension. What were the reasons to do it that way? What exactly did we do?
')
There are several reasons why a hoster may need at least two NS servers (or even more):
- You bought a domain from a registrar. In order for a domain to be delegated, most registrars (for example, Russian nic.ru, Reg.ru, webnames.ru, etc.) require that the domain zone be served by at least a couple of name server (NS);
- You have several servers with hosting, you have not yet “grown” to use products of the Parallels Automation level or Parallels Plesk Automation level, but you want to use a single set of NS servers for all domains hosted by you;
- You want to have your NS servers and not depend on third parties;
- You want your domain information in whois to have your NS servers. For example, hereis data for whois on parallels.com:
Domain Name: PARALLELS.COM Registrar: MONIKER ONLINE SERVICES LLC Whois Server: whois.moniker.com … Name Server: NS1.PARALLELS.COM Name Server: NS2.PARALLELS.COM Name Server: NS3.PARALLELS.COM …
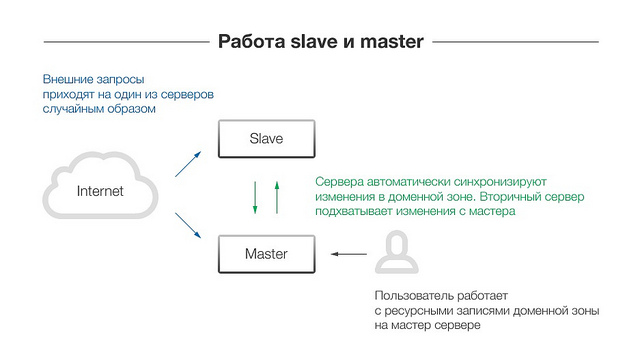
As you can see, there are enough reasons to have your own NS servers. Usually, hosters configure a pair of name servers in master-slave mode to solve these problems. At the same time, domain zones are created on both servers, but resource records of domain zones are managed only on the master. A secondary (slave) name server downloads changes automatically from the wizard. Thus, you always have two name servers with an identical set of domain zones and with an identical set of resource records.
The only nasty little thing - you need to create / delete a zone on both servers. Automatically this does not happen. Therefore, we create a domain zone on the master. Then we create a domain zone on the slave, specifying the address of the master server. Everything, now, adding domain resource records on the master, we can be sure that the slave will automatically take them from there.
How did we implement it?
The integration of Parallels Plesk Panel and slave DNS for many years was not a very trivial task. This implies that the Plesk server performs the role of a master. Plesk has implemented slave / master modes for a domain zone, there is a global list of IP addresses that can be used to request domain zones. But there is no mechanism for creating new domain zones on the slave server. And will not. Because the concept of Plesk is the hosting automation panel for a single server. If you need integration of several servers, separation by types of services, then Parallels has other products: Parallels Plesk Automation, Parallels Operation Automation, and, finally, a large complex solution of Parallels Automation.
“So what's the problem?” You ask. But the fact is that there are a number of Plesk users for whom the products listed above are not required, they are overqualified for solving their specific tasks. And they only need integration with the slave-name server.
To solve this problem, at one time each Plesk administrator wrote his own software solutions. Or bought commercial. Or manually performed the operation of creating / deleting domain zones on the slave server.
It would seem that difficult? Plesk has a local NS-server, let it be a master, there is an event system, let's hang up the execution of our script for the events "creating a DNS zone" and "deleting a DNS zone". Everyone will be happy. Unfortunately, there are no such events in Plesk.
Plesk developers not only develop Plesk, but they themselves constantly use their product. Therefore, we have made for Plesk users an extension that allows Plesk to integrate with the external slave-name server, on which BIND9 stands. Download it for free, without SMS, please follow the link - autoinstall.plesk.com/extensions/packages/slave-dns-manager-1.0-1.zip
How it works?
Plesk uses BIND as the local NS server. He has the ability to remote control using the standard utility rndc. Nobody bothers us to put BIND on a remote server and manage it through rndc. In Plesk 11.5, the “Custom DNS backend” mechanism appeared. Through it, you can connect a third-party DNS service, such as AWS Route53. You can read more about this in the documentation .
In a nutshell, the meaning of this functionality can be described as the ability to register a script in Plesk that will receive a JSON description of the DNS zone, what needs to be done with the zone each time Plesk creates / updates / deletes any active zone. That's all we need. At implementation of this functionality it was meant that you will not put local BIND with Plesk, and you will use external service. But! Deleting a local BIND is not necessary. The script can work in parallel with the local DNS-service. This is the idea that our extension uses.
The extension operation algorithm is as follows:
- In the settings of the extension register slave-server
- The IP address of the slave server is automatically added to the list of those who are allowed to transfer domain zones from the Plesk server
- When an active domain zone is created / updated / deleted in Plesk, Plesk creates / changes / deletes a domain zone in a local DNS service
- Next, a script is launched that receives the domain name, the command (create / update / delete)
- The script runs the rndc command for each connected slave server.
- Slave Servers Synchronize Domain Zones from a Plesk Server
Thus, we got a very simple and very solid scheme of work with slave-name servers. All the problems associated with the file format of the zones, the connection and the restart of the service are taken over by the DNS service itself. The administrator only needs to configure the slave server once to work with an external Plesk. Now you can go to the registrar and say that the Plesk server and the slave server are the NS servers of your domains. And thanks to this, we solved all the tasks listed at the beginning of the post.
And now a little more, with lots of technical details.
Configure the slave name server (using the example of a server with Debian 7):
- We put BIND
apt-get install bind9 - We allow the creation of new zones through rndc. In the
/etc/bind/named.conf.optionsfile, inside the options {} directive, we write:allow-new-zones yes; - We specify from which IP address control commands can be received, and we tell BIND to listen to all available network interfaces. In the
/etc/bind/named.conf.localfile/etc/bind/named.conf.localwrite:controls { inet * port 953 allow { <PLESK_IP>; <ANOTHER_PLESK_IP> 127.0.0.1; }; }; - Be sure to remember the access key, it is located in the
/etc/bind/rndc.keyfile:key "rndc-key" { algorithm hmac-md5; secret "vwOxonI4n4CVRUhKAOAAIA=="; };
That's it, the configuration of the name server slave is over.
The next step is to go to our Plesk and install the extension (we already said above where to download it). On the extension page we add our slave server, specifying its IP and key. The extension will create a configuration file for the rndc utility, which will contain the settings for our slave server. Now Plesk will create all created, updated and deleted zones on the slave server automatically by executing the following commands for each configured slave server:
- Creature
/usr/sbin/rndc -c slave.config addzone example.com '{ type slave; file "/var/lib/bind/example.com"; masters { <PLESK_IP>; }; };' - Update
/usr/sbin/rndc -c slave.config refresh example.com - Deletion
/usr/sbin/rndc -c slave.config delzone example.com
Now, when adding domains to Plesk, the DNS zone is automatically created on both the master server and the slave server.
By the way, we read the comments and answer the questions (also in our tech-blog of the Parallels Plesk Panel developers - also: devblog.plesk.com ).
Links
Source: https://habr.com/ru/post/200452/
All Articles