Publish Ruby, Python, Node.js, Perl and Java web applications to Azure Cloud Services
 In this article, we will look at how to deploy web applications written using various technologies in the Azure Cloud Services cloud. Namely, it will be Ruby, Python, Node.js, Perl and with some reservations also Java and Railo (ColdFusion). As an example of a Ruby application, we’ll use Redmine working on Ruby on Rails, Lightning Fast Shop running Django will go to Python, we’ll use a small project using express.js in Node.js, we’ll use an empty Mojolicious project in Perl. The purpose of this article is not an excursion on all these web technologies, but only to show a convenient and universal way of publishing in the Azure cloud. So there won't be any Ruby, Python or Perl code in it. But there will be a lot of screenshots, shell scripts and instructions for packaging and deploying applications.
So, what is Azure Cloud Services and what it eats with:
Unfortunately, the abundance of marketing materials in the network poorly reveals this topic and creates a lot of noise. And we will try to discuss this issue in human language, understandable for simple web developers. First, it is important to understand the developer who wants to learn how to use Azure Cloud Services, this is what this service is actually a virtual machine factory. How this is implemented is technically not so important, the main thing that we are interested in is that the Azure infrastructure can quickly and automatically provide us with a number of identical virtual machines with a number of resources on which our web site or another application can run.
')
In the Azure system, all these virtual machines are about the same and can be Windows Server 2008, 2008 R2 and 2012. Apparently, this is done because the creation of such virtual machines is cheap enough for the system and these machines themselves consume a lot of resources plus the same virtual machines are easy to manage. Although I personally do not know the internal structure of Azure Cloud Services and this is only a guess. The main difference from VPS hosting is that we do not need to configure these virtual machines. The Azure system will deploy the virtual machine itself and install our application on it when necessary. This allows you to dynamically create and delete virtual machines as needed, automatically and without our participation. In order to implement this technology, our application must be specifically written and packaged so that the system knows how to install it.
Why it is beneficial to us: First of all, it saves resources, and therefore our money (depends, of course, on the price of the service). Sites do not always need the maximum amount of resources. If buying VPS or Dedicated hosting, we have to take the maximum configuration that we may need, then in the case of Azure Cloud Services we can only pay for the virtual machines that we need at the moment. When the load on the resource will increase, the Azure system will automatically allocate new virtual machines to serve our site. When the load drops, the virtual machines will return to the system and we will not pay for them.
Why the hoster needs this (in this case, Microsoft): The reason is the same - saving resources. Usually for different sites and services the maximum amount of resources is needed not simultaneously. So, this allows the provider to pick up more web sites on fewer physical resources. The same savings as in the case of shared hosting - not everyone needs a peak load at the same time. Therefore, shared hosting is usually cheaper.
And now the unpleasant moment - it complicates the development of the application and binds us to the platform. Rather, it does not complicate, but slightly changes the approach, makes it not so familiar. After all, developers are usually used to the fact that there is some server to which you can open an SSH session or RDP, where you can execute various commands to configure the environment they need. Despite the fact that theoretically in the Azure Cloud Services system, you can also open RDP to a virtual machine, a little sense from this, for debugging purposes. Indeed, after 5 minutes, the system can produce a dozen more of these “servers” that will not be configured by you manually. And then completely remove your configured server without warning.
Solving the problem of server configuration is quite simple - you need to pack our application before publishing so that the system itself knows how to configure it, what actions need to be performed on the server for our application to work. In addition to the application itself, this package should also include all its dependencies that may be needed on the server to launch and configure it. And most importantly, there should be scripts that can configure a clean new virtual machine for our application. Azure will deploy this package and run scripts every time a new virtual machine comes online.
In this article, we will use this solution to maintain maximum platform independence. After all, platform dependence and the inability to move to another service is one of the main factors hindering the transition to cloud services at the moment. It is not by chance that we chose well-known applications for examples and open source technologies — the ways of customizing these applications on other platforms are well known. So, if necessary, you can transfer the application from one platform to another. So, enough theory, let's move on to practice. Now we will consider an example of the use of each technology in turn. Since for each technology there will be many identical actions, I will not repeat the article to shorten it, so I advise you to read the entire text in a row, even if you are not going to use this particular technology.
Ruby
Let's start with Ruby and look at all the key points with her example, so this chapter will be the longest. If you didn't work with Ruby, that's okay. We practically will not use specific commands, and actions for setting up all platforms are the same type. First we need a Windows workstation. We will use Helicon Zoo to run Ruby applications on IIS on both the workstation and the Azure system. Not only will it be easier to configure the runtime for our application, such a configuration in Azure will create a much better and more robust performance solution than running a Ruby process with an embedded server on port 80, as is often done in other instructions. Plus, launching an application in IIS will also allow us to include other technologies and capabilities of IIS itself in the application, add sections on ASP.NET and other languages listed in this article to the site, configure SSL and URL Rewriting, fully use multi-core machines, ship static data IIS itself, which also saves resources, and much more.
If you have already worked with Ruby, then perhaps your workstation already has an installed and configured version of Ruby, with installed gems, etc. That's all well and good, but how to transfer it to Azure Cloud Services? Using the same Helicon Zoo packages, we will be able to pack all the dependencies of the application in one archive, which will allow us to easily transfer it to other servers and to Azure Cloud Services as well. So, to be sure, we will install the latest version of Ruby from the Helicon Zoo repository, regardless of the availability of other Ruby on your machine.
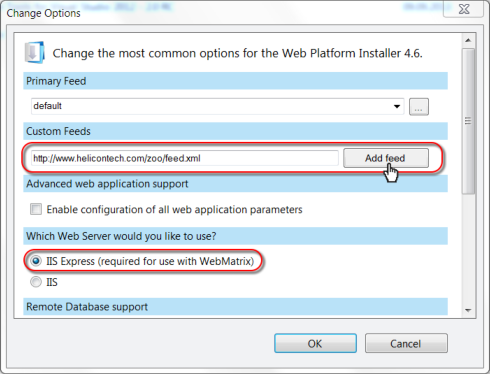
So, follow the link and install the Microsoft Web Platform Installer . Launch it and click Options and in the opened window add Helicon Zoo feed: http://www.helicontech.com/zoo/feed.xml
On the workstation, I also advise you to choose IIS Express as a server, since it will be easier to work with it for tests and less settings will be required.
Next you need to install the Windows Azure SDK and the easiest way to do this is using the same Web Platform Installer. Enter “Azure SDK 2.1” in the search or simply click on this link . If at the time of reading the article the SDK version is outdated and the link does not work, just find a newer one in the list:
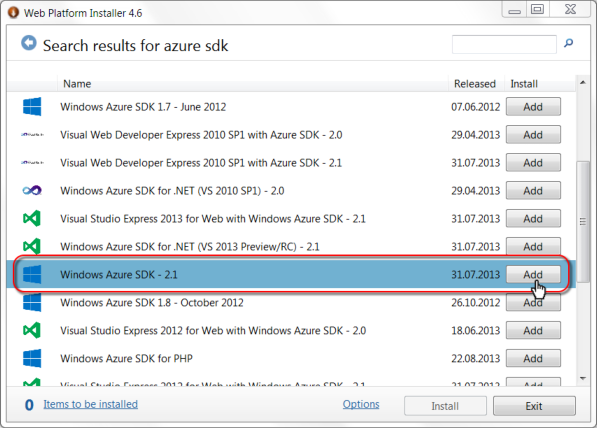
Azure SDK includes a set of utilities for creating and testing packages for Windows Azure Cloud Services, which we will need. We will use command line utilities and will not use Visual Studio and other tools for automatic publishing sites, as I tried to minimize the amount of "magic" in the article. Especially since we publish an application in Ruby, it is doubtful that Visual Studio will be your development tool. Therefore, I propose to install the base Azure SDK, and not the Azure SDK for Ruby. The latter already includes some Ruby distribution and a set of configurations that may not be bad, but definitely not the ones that will be used in this article. If you are used to using Visual Studio to create Azure packages, it’s not difficult for you to create the necessary package manually using this article.
Now let's create a Ruby application on our workstation. If you already have a ready-made Ruby Rack application, then you need to run the Web Platform Installer, and install the “Ruby project” from the Zoo section -> Templates. Then follow the instructions on the invitation page of the resulting template site.
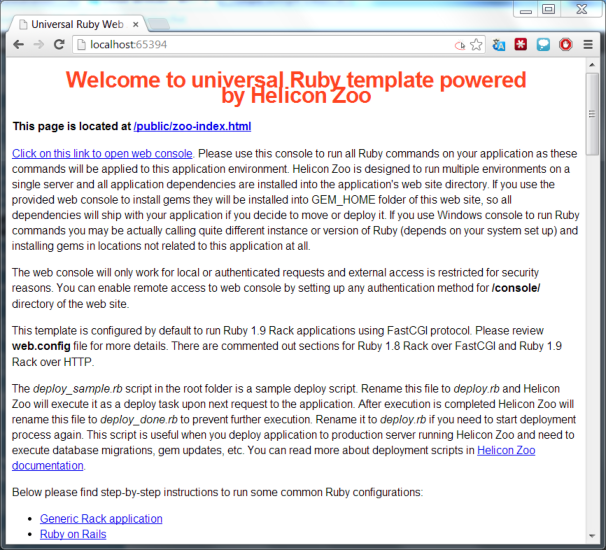
However, everyone seems to be tired of installing “Hello World” applications, and writing more advanced code is beyond the scope of this article, so we will simply install Redmine, as a fairly complex and well-known Ruby on Rails open source application. To do this, open the same Web Platform Installer, go to Zoo -> Applications and install Redmine. When the installation is complete, the application deployment process will start, which simply automatically performs the steps described in this article (English) in the Manual installation section.

At the same time, no pre-installation of Ruby, Dev Kit, gems, and even IIS Express itself is required - Web Platform Installer and Helicon Zoo will take care of everything. All required packages will be downloaded from the Internet and installed on your workstation. After completing the installation of all components, you should see the first page of Redmine. Of course, in a good way, you still need to configure the correct database, but for our test, the default SQLite is quite enough.
Pay attention to the file structure of the resulting site (you may need to click F5 in WebMatrix to update the folder view):
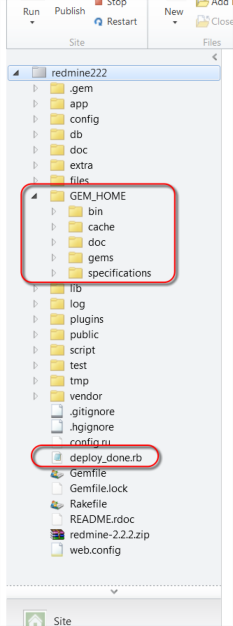
The GEM_HOME folder contains all the gems on which our application depends. It is from there that they will be loaded during operation. The deploy_done.rb file is the deploy.rb script, which we observed in the previous step, on the page with the message “Application deployment in progress”. Upon completion of its execution, Helicon Zoo renamed this file to deploy_done.rb to prevent it from being restarted unnecessarily. If you need to start the process in a new way, just rename this file back to deploy.rb and from the next request to the server the script will be launched again. This script contains standard commands for finding and installing missing dependencies, creating, if necessary, database migrations, etc. This is one of the ways how to execute commands in the context of the application. For details, see the Helicon Zoo documentation . Another way is to launch Helicon Zoo Manager (for IIS Express) from Start -> Programs -> Helicon -> Zoo, and there, by choosing our application, you can click on Start Web console or Start IDE.
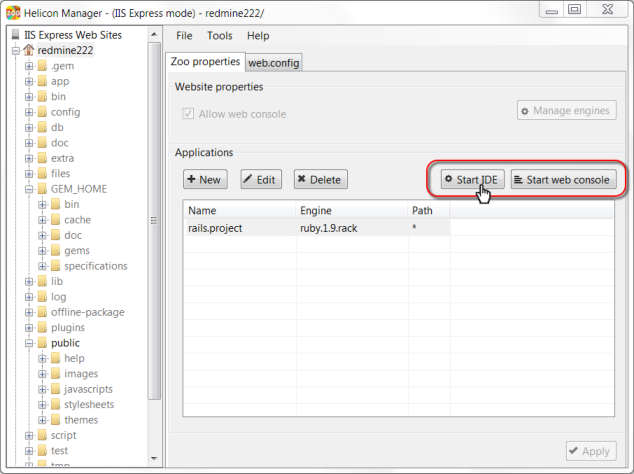
Web console allows you to execute commands in the context of the application and on behalf of the user of this application (Application pool user in the case of IIS and interactive user in the case of IIS Express), both on the local machine and on the remote server. The Start IDE button allows you to start the program (by default it will be the cmd.exe command line) in a pre-configured environment from variables and paths for the selected web application. It will also allow the execution of commands that will be applied to our application, rather than globally to the system. Most modern IDEs, such as Aptana or PyCharm, have a built-in command line, correctly recognize these variables, and allow you to work with local folders of the application more or less in isolation and execute commands directly from the environment. So I recommend configuring the launch of your favorite IDE using the Start IDE button and executing all the commands from there. You can also export environment variables to the .cmd file by clicking on Tools -> Export application environment. This file can then be called before executing other script commands intended for the application and it will set the required paths and environment variables. This is useful if for example you need to apply commands to a timer application from Windows Scheduler.
Why is it so important to use these tools? Because they allow you to pack all the dependencies inside the application. After all, our application will be sent to work on Azure Cloud Services and we need to carry with us all the necessary dependencies. Of course, we could run the 'bundle install' Ruby command to download from the Internet and install all dependencies every time a new Cloud Services node comes into service. However, then our application will also depend on the operation of the rubygems.org service and other Internet resources, the 100% availability of which is in question. In addition, there is always the likelihood that we forget to specify the exact version of any gem from the secondary dependencies and our application suddenly stops working with the release of a new, incompatible version of the gem, although we didn’t seem to change anything. Multiply all these probabilities, and you will get not so attractive uptime. So, we need to minimize the number of external dependencies, so that if possible, when installing from the Internet, nothing is swaying - then all new virtual machines will be exact copies of each other.
And there is one subtle point - the habit. If for example Java programmers are used to having all dependencies packed with an application for granted, then Ruby programmers are more used to configuring the server by hand and at their own discretion. So working with Helicon Zoo will require some discipline, namely: you cannot start the console or IDE to work with the application, even on your workstation, without first configuring the path to the application. You can do this either by running the console and IDE from Helicon Zoo Manager, or by executing the file exported from environment.cmd before running other commands. It also follows that you cannot install gems and other modules globally. Using these rules, you can get an easily portable application that is convenient to transfer from one server to another.
Since we installed Redmine directly from the Helicon Zoo repository, all dependencies were installed into the application automatically. Now, in order to transfer our Redmine to another server, we only need to install Helicon Zoo -> Ruby Hosting Package on this server and transfer the folder with the site itself. The Ruby Hosting Package already includes Ruby of different versions, the Dev kit, the Helicon Zoo Module, and all other dependencies that might be useful on the server. Instead of installing Ruby Hosting Package, you can, in principle, install only the required packages from the Helicon Zoo repository separately to save space. However, there is an increased chance of missing something, and Ruby distributions do not take up so much space to save.
On the server, we will not download the Ruby and Helicon Zoo packages from the Internet in order not to depend on the availability of distributions and servers. For this, there is also a way to pack everything once, then install it from the archive. We use the Web Platform Installer and the command line utility WebpiCMD.exe . You can usually find it in the Web Platform Installer installation folder: C: \ Program Files \ Microsoft \ Web Platform Installer. This utility can package products from the Web Platform Installer for subsequent installation without connecting to the Internet.
To get started, start the console with administrative rights by clicking on it with the right button and selecting the 'Run as administrator' option:

This is necessary so that a new console window does not open when WebpiCMD.exe is launched, otherwise it will be difficult to read the output of the command. We will save the installation packages in the site directory with Redmine in the 'offline-package' folder. Since I installed Redmine under IIS Express, then my site is in the folder 'C: \ Users \ Slov \ Documents \ My Web Sites \ redmine222 '. In your case, the folder name will be different, so correct this in the following command and execute in the console:
mkdir "C:\Users\Slov\Documents\My Web Sites\redmine222\offline-package" WebpiCmd.exe /offline /Products:RubyHostingPackage /Path:"C:\Users\Slov\Documents\My Web Sites\redmine222\offline-package" /Feeds:http://www.helicontech.com/zoo/feed.xml As you can see from the team, we specify the product that should be saved for offline installation. At the same time, WebpiCmd.exe will save all its possible dependencies, bitmaps, etc. The command transfers the path to the folder where to save the packages and the URL of the Helicon Zoo repository, where all these packages come from. The whole process may take some time. Remember that many shell commands do not like spaces in the path, so do not forget the quotes. This command will save the RubyHostingPackage product and all its possible dependencies to the 'offline-package' folder inside our web site. Then the contents of this folder can be used to install the Ruby Hosting Package on another machine. At the time of this writing, Helicon Zoo includes seven hosting packages and their names are as follows:
CFMLHostingPackage CFML Hosting Package JavaHostingPackage Java Hosting Package RubyHostingPackage Ruby Hosting Package NodejsHostingPackage Node.js Hosting Package PerlHostingPackage Perl Hosting Package PHPHostingPackage PHP Hosting Package PythonHostingPackage Python Hosting Package In more detail about offline installation it is possible to read in English according to this link . You can view the internal names of all available products using the / List command of the WebpiCmd.exe command. The original English documentation for the WebpiCMD.exe utility is here .
If you look at the structure of the resulting folder 'offline-package', then in the bin folder you will see that WebpiCMD.exe has by the way already included a working copy of itself in the package. That’s what we’ll be calling on the Azure Cloud Services virtual machine to install the dependencies back from the package.

Before you pack our site for Azure, you need to add a script to it that will install all the dependencies on the virtual machine. According to Azure rules, this script should be in the bin directory under the root of the site itself. Let's call this file startup.cmd. Here are its contents:
[bin \ startup.cmd]
echo Starting installation... rem icacls "%RoleRoot%\approot" /grant "Everyone":F /T rem AppData Web Platform Installer rem md "%RoleRoot%\appdata" reg add "hku\.default\software\microsoft\windows\currentversion\explorer\user shell folders" ^ /v "Local AppData" /t REG_EXPAND_SZ /d "%RoleRoot%\appdata" /f rem WebpiCmd.exe pushd "%RoleRoot%\approot\offline-package\bin" rem WebpiCmd.exe offline-package rem - RubyHostingPackage, install.txt install-error.txt WebpiCmd.exe /install /Products:RubyHostingPackage /XML:%RoleRoot%\approot\offline-package\feeds\latest\webproductlist.xml ^ /Feeds:%RoleRoot%\approot\offline-package\feeds\latest\supplementalfeeds\feed.xml ^ /AcceptEula >%RoleRoot%\approot\public\install.txt 2>%RoleRoot%\approot\public\install-error.txt popd rem AppData reg add "hku\.default\software\microsoft\windows\currentversion\explorer\user shell folders" ^ /v "Local AppData" /t REG_EXPAND_SZ /d %%USERPROFILE%%\AppData\Local /f rem , . echo Completed installation. The variable% RoleRoot% will indicate where our role is being set, and the% RoleRoot% \ approot folder will correspondingly be the root folder of the site. The main line in this file is a call to WebpiCmd.exe. Note the redirection of the installation log output to the install.txt file, and the STDERR output will be in the install-error.txt file - both to the public folder of the resulting site. It will then be possible to request these files at the URL in order to read possible installation errors if the experience fails the first time. The first line sets the rights to write to the folder with the site - these rights are necessary for Redmine itself to work, because Ruby applications are often written to the application folder.
Now it’s time to pack your site for Azure Cloud Services. My site is in the folder “C: \ Users \ Slov \ Documents \ My Web Sites \ redmine222”. Let's move the console to the folder above our website - I will have this folder “C: \ Users \ Slov \ Documents \ My Web Sites \”. Here we need to create three files: the service configuration file * .cscfg, the file with parameters for creating the package * .csdef, and the script cmd file which will be convenient to pack it all up. Here are the files with some comments:
[remine222.csdef]
<?xml version="1.0" encoding="utf-8"?> <ServiceDefinition name="WindowsAzure2" xmlns="http://schemas.microsoft.com/ServiceHosting/2008/10/ServiceDefinition" schemaVersion="2013-03.2.0"> <WebRole name="redmine222" vmsize="Small"> <Sites> <Site name="Web" physicalDirectory="./redmine222"> <Bindings> <Binding name="Endpoint1" endpointName="Endpoint1" /> </Bindings> </Site> </Sites> <Endpoints> <InputEndpoint name="Endpoint1" protocol="http" port="80" /> </Endpoints> <Startup> <Task commandLine="startup.cmd" executionContext="elevated" taskType="simple" > </Task> </Startup> </WebRole> </ServiceDefinition> The name of the role and the name of the folder where it is located must for some reason coincide.
[redmine222.cloud.cscfg]
<?xml version="1.0" encoding="utf-8"?> <ServiceConfiguration serviceName="WindowsAzure2" xmlns="http://schemas.microsoft.com/ServiceHosting/2008/10/ServiceConfiguration" osFamily="2" osVersion="*" schemaVersion="2013-03.2.0"> <Role name="redmine222"> <Instances count="1" /> <ConfigurationSettings> </ConfigurationSettings> </Role> </ServiceConfiguration> Descriptions and formats of these files can be found on the Internet and in the documentation for Windows Azure itself, so omit the details.
[redmine222.pack.cmd]
@echo off set WINDOWS_AZURE_SDK_PATH="C:\Program Files\Microsoft SDKs\Windows Azure\.NET SDK\v2.1" call %WINDOWS_AZURE_SDK_PATH%\bin\setenv.cmd pushd %~dp0 if "%ServiceHostingSDKInstallPath%" == "" ( echo Can't see the ServiceHostingSDKInstallPath environment variable. Please run from a Windows Azure SDK command-line (run Program Files\Windows Azure SDK\^<version^>\bin\setenv.cmd^). GOTO :eof ) rem , IIS .. rem iisreset /stop rem deploy_done.rb deploy.rb ren redmine222\deploy_done.rb deploy.rb rem Windows Azure cspack redmine222.csdef /out:redmine222.cspkg popd Pay attention to the line
ren redmine222\deploy_done.rb deploy.rb This command renames the deploy_done.rb file in deploy.rb, which will restart the deployment script in Helicon Zoo on the first request to a deployed application. If we have packed all the modules correctly and we do not need to migrate the database, then this step is not necessary and can save time. However, the likelihood that the first time everything will be properly packed is not very high, so for the first attempts I recommend to leave this line.
Another recommendation would be to edit the web.config file of the site root and add such a line to the <system.webServer> section:
<httpErrors existingResponse="PassThrough" /> This line includes the issuance of detailed messages about the 500th error in external requests to IIS. Without this line, if something breaks in the application, then you will not see the error text, but only the dry message 'Server error'. To work in production mode, this line is better to remove, but for the first run it may be useful.
Under this link you can find the examples of the files described above in accordance with the structure of the project folders - so that it is clearer where to go.
All files are ready. Now, before calling redmine222.pack.cmd, you need to stop IIS or IIS Express on the workstation to unlock the application files. Then call redmine222.pack.cmd from our console with administrative rights. The packaging process will take some time and as a result we will have the file redmine222.cspkg, which is actually a ZIP archive with all the necessary packages. The size of this file I turned out 138 megabytes, which is a lot, because it includes versions of Ruby 1.8, 1.9, two versions of Ruby DevKit, the Helicon Zoo Module, the Microsoft URL Rewrite, Redmine itself, and all the gems required for its operation. But this archive includes all the dependencies and we do not have to download anything from the Internet, and the archive itself will be transmitted within the Azure network, which, I dare to hope, is much faster.
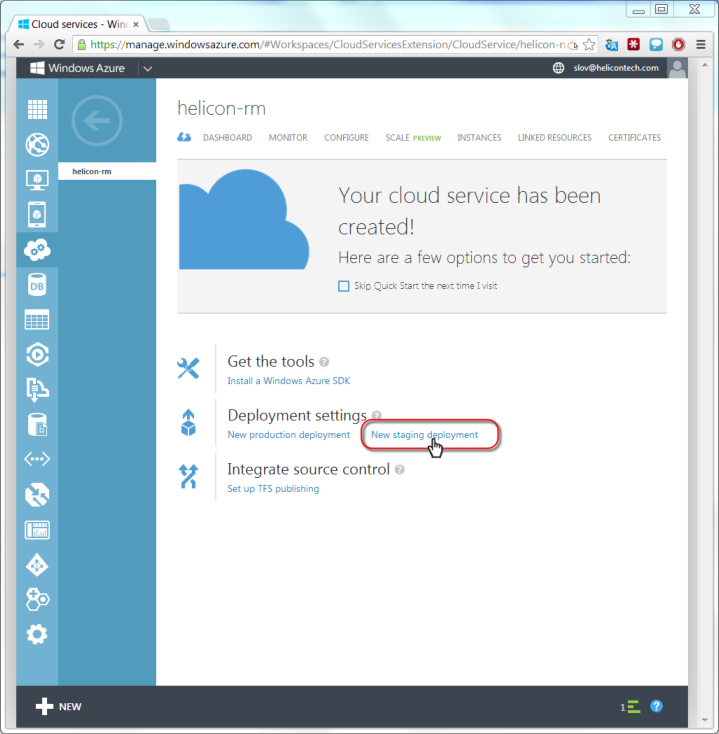
Now let's go to the Windows Azure Management Portal. You need to create a new Cloud Service and select the URL for it:

Then you need to select "New staging deployment":
Select our files from Redmine from a local folder. You need to specify the flag “Deploy even if role contain a single instance”, because in the file redmine222.csdef we have indicated to use one role role, which is enough for tests, although in real conditions you will most likely need to increase this number.

After that, the process of downloading the package to Azure, creating a new virtual machine, deploying our package with the application on this virtual machine, and running the installation scripts will begin. The process is quite long, it takes me 20 minutes - no less. When all installation processes are complete, click on the Site URL link.

You should see the Helicon Zoo's Applcation deployment page, which is then updated to the Redmine home page:

In order to make your web site visible to users under a more acceptable domain name, you need to specify either a CNAME record on the domain name inside .cloudapp.net (preferred) in the settings of your domain at the registrar or specify the A-record of your domain to the public IP address your Azure application. Microsoft itself does not provide domain registration services.
Python
In this chapter, we will look at how to manually install an application that is not in the Helicon Zoo repository. To do this, we will use the open source Lightning Fast Shop (LFS) application written in Python using Django. The steps for publishing an application to the Azure Cloud Service will be almost identical to the last chapter, but the steps to deploy the application to the workstation will be different.
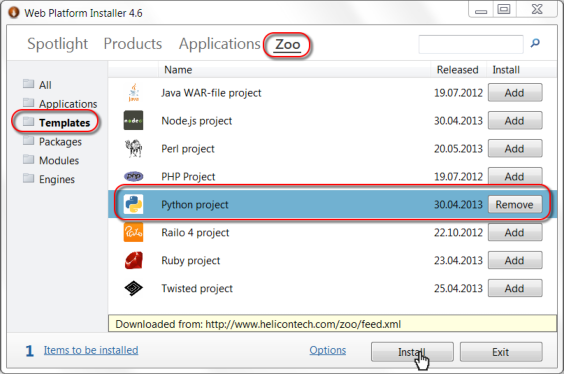
So, we put the Microsoft Web Platform Installer , Helicon Zoo feed and Windows Azure SDK , as in the last chapter, if any of this is not installed. Run the Web Platform Installer and install the Zoo -> Templates -> Python project on the IIS Express.
WebMatrix will launch and a new site will open:
We have just installed a template project for Python. In this project, virtualenv is already configured, which will be used to install all modules and dependencies inside the site. To run your Python project, you can go further by following the instructions on the Python project invitation page. Just do not forget to run the console or IDE (for example, PyCharm ) using Helicon Zoo Manager, so that the console starts up with pre-configured virtualenv, otherwise the commands will not find the path to our application.
Lightning Fast Shop is quite large and capricious in the installation program, so I ask you to repeat the following instructions step by step for manually installing it on IIS and Helicon Zoo. I will not give too detailed explanations of what is happening, because what is happening is related to the features of the LFS project, and not to Helicon Zoo or Azure. Setting up another project may follow a different scenario. In case of failure, try starting with smaller and simpler projects, following the instructions from the Python project. I chose the LFS project just to show that not only “Hello World” can be launched on Azure Cloud Services.
- Download the LFS distribution from the official website . I chose version 0.7.7. You need to download the necessary installer version, which has a file name like django-lfs-installer-0.7.7.tar.gz.
The archive will be the folder 'lfs-installer' - unpack its contents to the root of the site with our Python project (in my case this is the folder C: \ Users \ Slov \ Documents \ My Web Sites \ ZooPythonProject2).
Launch Helicon Zoo Manager, select the desired site with the project and click on Start IDE to launch the configured console.
In the console enter:python bootstrap.pybin\buildout –vDATABASES = { 'default': { 'ENGINE': 'django.db.backends.sqlite3', # Add 'postgresql_psycopg2', 'postgresql', 'mysql', 'sqlite3' or 'oracle'. 'NAME': os.path.join(DIRNAME, 'sqlite3.bd'), # Or path to database file if using sqlite3. 'USER': '', # Not used with sqlite3. 'PASSWORD': '', # Not used with sqlite3. 'HOST': '', # Set to empty string for localhost. Not used with sqlite3. 'PORT': '', # Set to empty string for default. Not used with sqlite3. } }bin\django syncdb bin\django lfs_init bin\django collectstatic
And then open http: // localhost: 8080 / in the browserbin/django runserver
Now, to run a project on IIS through Helicon Zoo, you need to set PYTHONPATH in the web.config file . In LFS, it is long and includes many egg-packages. You can find it in the file bin \ django_script.py:#!"C:\Users\Slov\Documents\My Web Sites\ZooPythonProject2\venv\Scripts\python.exe" import sys sys.path[0:0] = [ 'c:\\users\\slov\\docume~1\\mywebs~1\\zoopyt~1\\eggs\\django_lfs-0.7.6-py2.7.egg', 'c:\\users\\slov\\docume~1\\mywebs~1\\zoopyt~1\\eggs\\gunicorn-18.0-py2.7.egg', 'c:\\users\\slov\\docume~1\\mywebs~1\\zoopyt~1\\eggs\\djangorecipe-1.1.2-py2.7.egg', 'c:\\users\\slov\\docume~1\\mywebs~1\\zoopyt~1\\eggs\\django-1.3.1-py2.7.egg', 'c:\\users\\slov\\docume~1\\mywebs~1\\zoopyt~1\\eggs\\zc.recipe.egg-2.0.1-py2.7.egg', 'c:\\users\\slov\\docume~1\\mywebs~1\\zoopyt~1\\eggs\\zc.buildout-2.2.1-py2.7.egg', 'c:\\users\\slov\\docume~1\\mywebs~1\\zoopyt~1\\eggs\\south-0.7.3-py2.7.egg', 'c:\\users\\slov\\docume~1\\mywebs~1\\zoopyt~1\\eggs\\pillow-1.7.5-py2.7-win32.egg', 'c:\\users\\slov\\docume~1\\mywebs~1\\zoopyt~1\\eggs\\lfs_order_numbers-1.0b1-py2.7.egg', 'c:\\users\\slov\\docume~1\\mywebs~1\\zoopyt~1\\eggs\\lfs_contact-1.0-py2.7.egg', 'c:\\users\\slov\\docume~1\\mywebs~1\\zoopyt~1\\eggs\\django_tagging-0.3.1-py2.7.egg', 'c:\\users\\slov\\docume~1\\mywebs~1\\zoopyt~1\\eggs\\django_reviews-0.2.1-py2.7.egg', 'c:\\users\\slov\\docume~1\\mywebs~1\\zoopyt~1\\eggs\\django_postal-0.9-py2.7.egg', 'c:\\users\\slov\\docume~1\\mywebs~1\\zoopyt~1\\eggs\\django_portlets-1.1.1-py2.7.egg', 'c:\\users\\slov\\docume~1\\mywebs~1\\zoopyt~1\\eggs\\django_paypal-0.1.2-py2.7.egg', 'c:\\users\\slov\\docume~1\\mywebs~1\\zoopyt~1\\eggs\\django_pagination-1.0.7-py2.7.egg', 'c:\\users\\slov\\docume~1\\mywebs~1\\zoopyt~1\\eggs\\django_lfstheme-0.7.3-py2.7.egg', 'c:\\users\\slov\\docume~1\\mywebs~1\\zoopyt~1\\eggs\\django_compressor-1.1.1-py2.7.egg', 'c:\\users\\slov\\documents\\my web sites\\zoopythonproject2\\venv\\lib\\site-packages', 'c:\\users\\slov\\docume~1\\mywebs~1\\zoopyt~1\\eggs\\django_piston-0.2.3-py2.7.egg', 'c:\\users\\slov\\docume~1\\mywebs~1\\zoopyt~1\\eggs\\django_countries-1.5-py2.7.egg', 'c:\\users\\slov\\docume~1\\mywebs~1\\zoopyt~1\\eggs\\django_appconf-0.6-py2.7.egg', 'c:\\users\\slov\\docume~1\\mywebs~1\\zoopyt~1\\eggs\\six-1.4.1-py2.7.egg', 'c:\\users\\slov\\docume~1\\mywebs~1\\zoopyt~1\\parts\\django', 'c:\\users\\slov\\docume~1\\mywebs~1\\zoopyt~1', 'c:\\users\\slov\\docume~1\\mywebs~1\\zoopyt~1\\parts', 'c:\\users\\slov\\docume~1\\mywebs~1\\zoopyt~1\\lfs_project', ] import djangorecipe.manage if __name__ == '__main__': sys.exit(djangorecipe.manage.main('lfs_project.settings'))
As you can see there are absolute ways that does not suit us, because the project will be transferred to Azure. To set PYTHONPATH via web.config, these paths need to be redone into such a bit strange format. Here is a snippet of my web.config:<?xml version="1.0" encoding="UTF-8"?> <configuration> <system.webServer> <heliconZoo> <application name="python.project"> <environmentVariables> <add name="VIRTUAL_ENV" value="%APPL_PHYSICAL_PATH%\venv" /> <add name="PATH" value="%APPL_PHYSICAL_PATH%\venv\Scripts;%PATH%" /> <add name="PYTHONPATH" value=".\eggs\django_lfs-0.7.6-py2.7.egg ;.\eggs\gunicorn-18.0-py2.7.egg ;.\eggs\djangorecipe-1.1.2-py2.7.egg ;.\eggs\django-1.3.1-py2.7.egg ;.\eggs\zc.recipe.egg-2.0.1-py2.7.egg ;.\eggs\zc.buildout-2.2.1-py2.7.egg ;.\eggs\south-0.7.3-py2.7.egg ;.\eggs\pillow-1.7.5-py2.7-win32.egg ;.\eggs\lfs_order_numbers-1.0b1-py2.7.egg ;.\eggs\lfs_contact-1.0-py2.7.egg ;.\eggs\django_tagging-0.3.1-py2.7.egg ;.\eggs\django_reviews-0.2.1-py2.7.egg ;.\eggs\django_postal-0.9-py2.7.egg ;.\eggs\django_portlets-1.1.1-py2.7.egg ;.\eggs\django_paypal-0.1.2-py2.7.egg ;.\eggs\django_pagination-1.0.7-py2.7.egg ;.\eggs\django_lfstheme-0.7.3-py2.7.egg ;.\eggs\django_compressor-1.1.1-py2.7.egg ;.\venv\lib\site-packages ;.\eggs\django_piston-0.2.3-py2.7.egg ;.\eggs\django_countries-1.5-py2.7.egg ;.\eggs\django_appconf-0.6-py2.7.egg ;.\eggs\six-1.4.1-py2.7.egg ;.\parts\django ;%APPL_PHYSICAL_PATH% ;.\parts ;.\lfs_project" /> <add name="WSGI_APP" value="welcome.application" /> <add name="CONSOLE_URL" value="console" /> <add name="DEPLOY_FILE" value="deploy.py" /> <add name="ERROR_LOG_DIR" value="log" /> <add name="IDE" value="C:\Windows\system32\cmd.exe" />
You can copy it to your web.config, however if you configure a version other than 0.7.7, your PYTHONPATH may differ.
Also set the variable DJANGO_SETTINGS_MODULE in the web.config:<!-- django project --> <add name="DJANGO_SETTINGS_MODULE" value="lfs_project.settings" />
Now the contents of the folder '\ lfs_project \ sitestatic' need to be transferred to the folder '\ static' in the root of the site.
Everything, the project is ready to start on IIS. Click the link in WebMatrix and you should see the LFS home page.
The folder structure resulted in the following:
Further we will prepare a package for Azure Cloud Services. Launch Helicon Zoo Manager, select the desired site and click Start IDE to launch the console. Web console is not suitable here, because she will not have enough rights. Run the following commands there:mkdir offline-package WebpiCmd.exe /offline /Products:PythonHostingPackage /Path:"offline-package" /Feeds:http://www.helicontech.com/zoo/feed.xml
This will save the Python Hosting Package in the offline-package directory inside the site.
Then create three files for Azure Cloud Services in the 'My Documents \ My Web Sites' folder, as in the previous chapter. I highlighted in bold those lines that are different in these files from the previous ones:
[LFS.Cloud.cscfg]<?xml version="1.0" encoding="utf-8"?> <ServiceConfiguration serviceName="WindowsAzure2" xmlns="http://schemas.microsoft.com/ServiceHosting/2008/10/ServiceConfiguration" osFamily="2" osVersion="*" schemaVersion="2013-03.2.0"> <Role name="ZooPythonProject2"> <Instances count="1" /> <ConfigurationSettings> </ConfigurationSettings> </Role> </ServiceConfiguration>
[LFS.csdef]<?xml version="1.0" encoding="utf-8"?> <ServiceDefinition name="WindowsAzure2" xmlns="http://schemas.microsoft.com/ServiceHosting/2008/10/ServiceDefinition" schemaVersion="2013-03.2.0"> <WebRole name="ZooPythonProject2" vmsize="Small"> <Sites> <Site name="Web" physicalDirectory="./ZooPythonProject2"> <Bindings> <Binding name="Endpoint1" endpointName="Endpoint1" /> </Bindings> </Site> </Sites> <Endpoints> <InputEndpoint name="Endpoint1" protocol="http" port="80" /> </Endpoints> <Startup> <Task commandLine="startup.cmd" executionContext="elevated" taskType="simple" > </Task> </Startup> </WebRole> </ServiceDefinition>
[LFS.pack.cmd]@echo off set WINDOWS_AZURE_SDK_PATH="C:\Program Files\Microsoft SDKs\Windows Azure\.NET SDK\v2.1" call %WINDOWS_AZURE_SDK_PATH%\bin\setenv.cmd pushd %~dp0 if "%ServiceHostingSDKInstallPath%" == "" ( echo Can't see the ServiceHostingSDKInstallPath environment variable. Please run from a Windows Azure SDK command-line (run Program Files\Windows Azure SDK\^<version^>\bin\setenv.cmd^). GOTO :eof ) rem , IIS .. rem iisreset /stop <b>del /s /q *.log *.pyc *.pyo</b> rem Windows Azure cspack lfs.csdef /out:lfs.cspkg popd
And it remains to create a file \ bin \ startup.cmd in the root of the site:echo Starting installation... rem icacls "%RoleRoot%\approot" /grant "Everyone":F /T rem AppData Web Platform Installer rem md "%RoleRoot%\appdata" reg add "hku\.default\software\microsoft\windows\currentversion\explorer\user shell folders" ^ /v "Local AppData" /t REG_EXPAND_SZ /d "%RoleRoot%\appdata" /f rem WebpiCmd.exe pushd "%RoleRoot%\approot\offline-package\bin" rem WebpiCmd.exe offline-package rem - <b>PythonHostingPackage</b>, install.txt install-error.txt WebpiCmd.exe /install /Products:PythonHostingPackage /XML:%RoleRoot%\approot\offline-package\feeds\latest\webproductlist.xml ^ /Feeds:%RoleRoot%\approot\offline-package\feeds\latest\supplementalfeeds\feed.xml /AcceptEula ^ >%RoleRoot%\approot\static\install.txt 2>%RoleRoot%\approot\static\install-error.txt popd rem AppData reg add "hku\.default\software\microsoft\windows\currentversion\explorer\user shell folders" ^ /v "Local AppData" /t REG_EXPAND_SZ /d %%USERPROFILE%%\AppData\Local /f rem , . echo Completed installation.
In this archive you will find an example of the files described above.
Run LFS.pack.cmd. The resulting file LFS.cspkg takes 70mb from me.
Remove the old Staging Environment from the Azure Portal and create a new one. Let's transfer files as in the previous chapter and we expect start.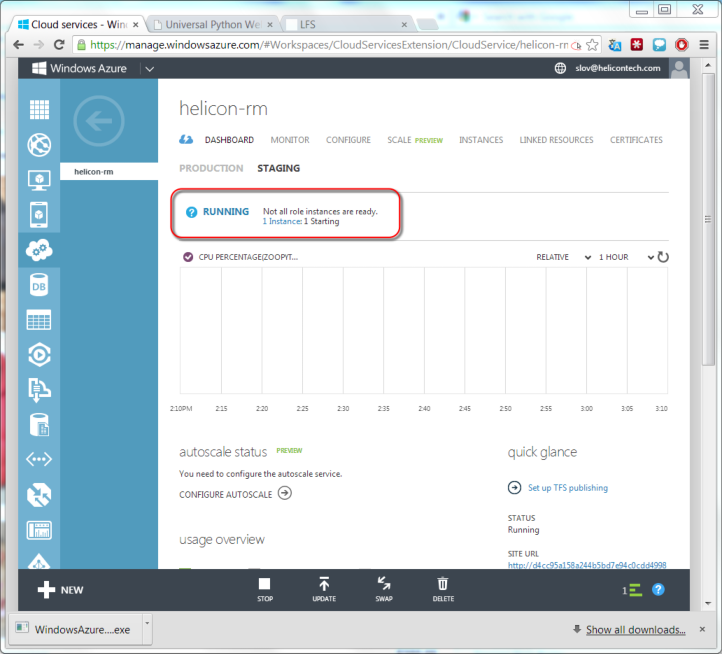
When the line “Not all instances are ready” disappears, you can open a link where we should see the running Lightning Fast Shop in Azure Cloud Services.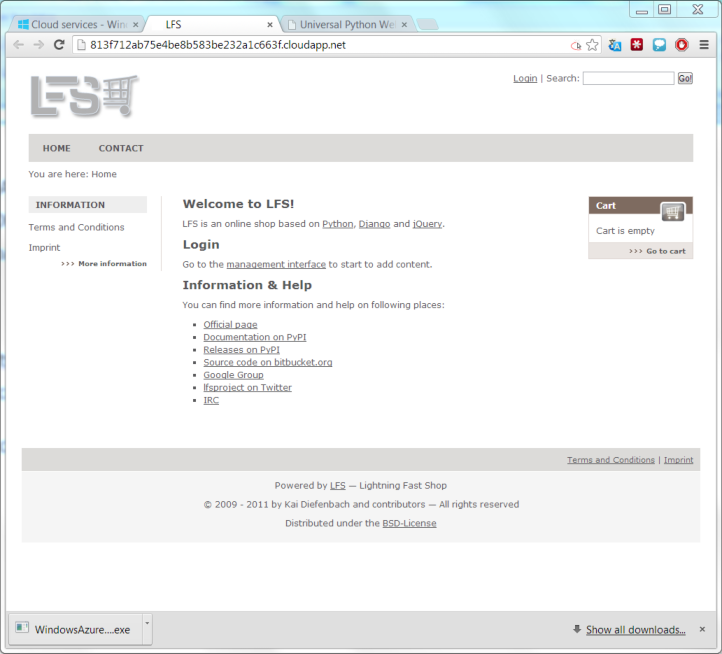
Node.js
Now on the queue Node.js. So, run the Microsoft Web Platform Installer and install the Zoo -> Templates -> Node.js project . All dependencies will be installed automatically.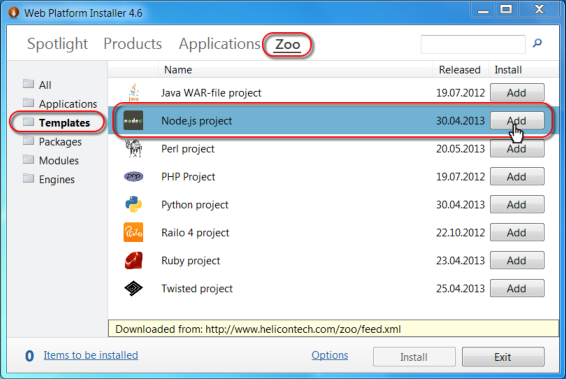
After launch, the project will unfold into a completely finished Model-View-Route application built on the basis of express.js, sqlite3, persist.js and Twitter Bootstrap. In this template, for example, there will already be a simple blog and an administrative panel to it. Such an application can be a good starting point for creating your own website. If you already have a ready-made Node.js website, then you obviously know the purpose of all the files specified in the template project. Just overwrite your files over, leaving the web.config intact, and your application should work.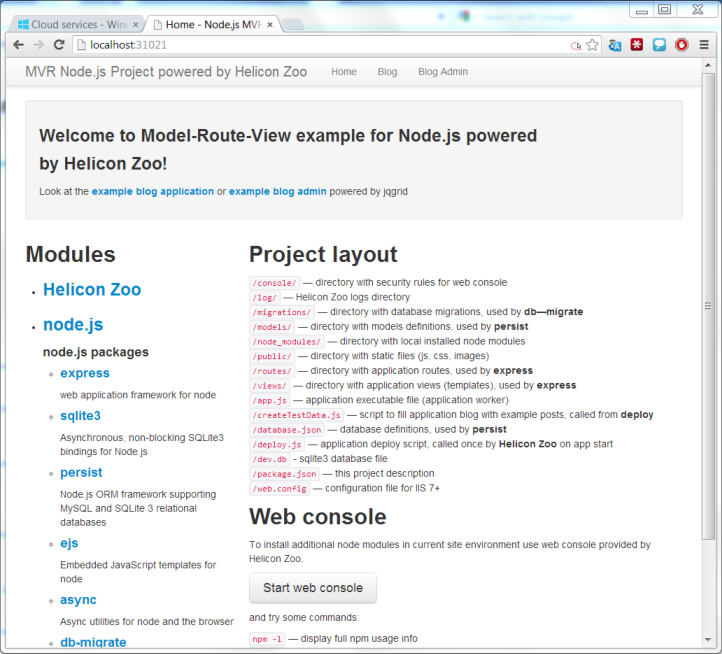
We will install this simple blog on Azure Cloud Services. As in the previous chapters, we will launch the Helicon Zoo Manager and click Start IDE or Start web console. In the console, type:mkdir offline-package WebpiCmd.exe /offline /Products:NodejsHostingPackage /Path:"offline-package" /Feeds:http://www.helicontech.com/zoo/feed.xml
Next, create the file bin \ startup.cmd :
[bin \ startup.cmd]echo Starting installation... rem icacls "%RoleRoot%\approot" /grant "Everyone":F /T rem AppData Web Platform Installer rem md "%RoleRoot%\appdata" reg add "hku\.default\software\microsoft\windows\currentversion\explorer\user shell folders" ^ /v "Local AppData" /t REG_EXPAND_SZ /d "%RoleRoot%\appdata" /f rem WebpiCmd.exe pushd "%RoleRoot%\approot\offline-package\bin" rem WebpiCmd.exe offline-package rem – NodejsHostingPackage, install.txt install-error.txt WebpiCmd.exe /install /Products:NodejsHostingPackage /XML:%RoleRoot%\approot\offline-package\feeds\latest\webproductlist.xml ^ /Feeds:%RoleRoot%\approot\offline-package\feeds\latest\supplementalfeeds\feed.xml ^ /AcceptEula >%RoleRoot%\approot\public\install.txt 2>%RoleRoot%\approot\public\install-error.txt popd rem AppData reg add "hku\.default\software\microsoft\windows\currentversion\explorer\user shell folders" ^ /v "Local AppData" /t REG_EXPAND_SZ /d %%USERPROFILE%%\AppData\Local /f rem , . echo Completed installation.
«My Web Sites»:
[Node.js.Cloud.cscfg]<?xml version="1.0" encoding="utf-8"?> <ServiceConfiguration serviceName="WindowsAzure2" xmlns="http://schemas.microsoft.com/ServiceHosting/2008/10/ServiceConfiguration" osFamily="2" osVersion="*" schemaVersion="2013-03.2.0"> <Role name="Node.js project"> <Instances count="1" /> <ConfigurationSettings> </ConfigurationSettings> </Role> </ServiceConfiguration>
[Node.js.csdef]<?xml version="1.0" encoding="utf-8"?> <ServiceDefinition name="WindowsAzure2" xmlns="http://schemas.microsoft.com/ServiceHosting/2008/10/ServiceDefinition" schemaVersion="2013-03.2.0"> <WebRole name="Node.js project" vmsize="Small"> <Sites> <Site name="Web" physicalDirectory="./Node.js project"> <Bindings> <Binding name="Endpoint1" endpointName="Endpoint1" /> </Bindings> </Site> </Sites> <Endpoints> <InputEndpoint name="Endpoint1" protocol="http" port="80" /> </Endpoints> <Startup> <Task commandLine="startup.cmd" executionContext="elevated" taskType="simple" > </Task> </Startup> </WebRole> </ServiceDefinition>
[Node.js.pack.cmd]@echo off set WINDOWS_AZURE_SDK_PATH="C:\Program Files\Microsoft SDKs\Windows Azure\.NET SDK\v2.1" call %WINDOWS_AZURE_SDK_PATH%\bin\setenv.cmd pushd %~dp0 if "%ServiceHostingSDKInstallPath%" == "" ( echo Can't see the ServiceHostingSDKInstallPath environment variable. Please run from a Windows Azure SDK command-line (run Program Files\Windows Azure SDK\^<version^>\bin\setenv.cmd^). GOTO :eof ) rem , IIS .. rem iisreset /stop rem Windows Azure cspack Node.js.csdef /out:Node.js.cspkg popd
.
Node.js.pack.cmd, Node.js.cspkg 41. : https://dl.dropboxusercontent.com/u/7840290/habrahabr/Node.js.zip
Azure Cloud Services . 5-10, , , , Ruby.Perl
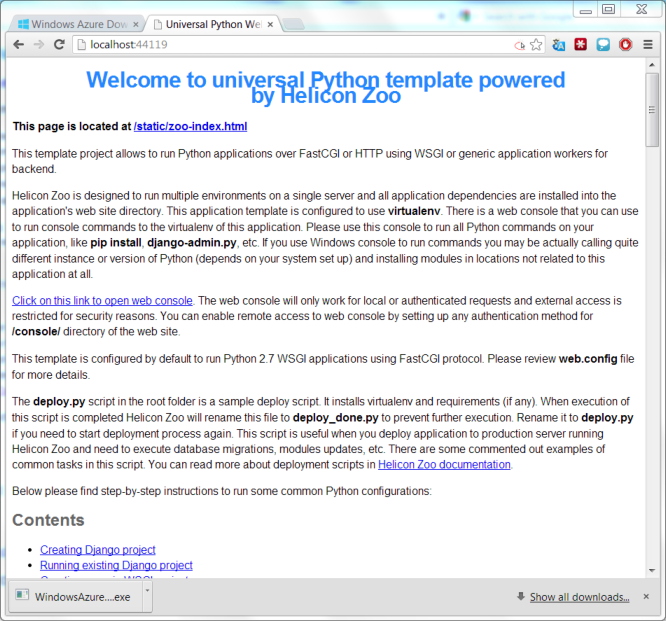
«Hello World» Mojolitious. Perl . Microsoft Web Platform Installer Zoo -> Templates -> Perl project .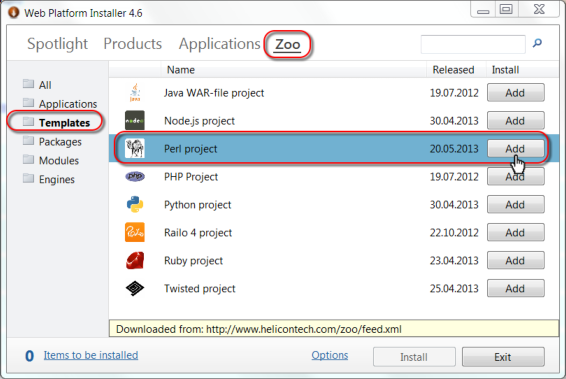
«Welcome to universal Perl template powered by Helicon Zoo», «open web console» :cpanm Mojolicious
app.pl :
[app.pl]use Mojolicious::Lite; get '/' => sub { shift->render(text => 'Hello from Mojolicious!') }; app->start;
«» «Hello from Mojolicious!». , .
, :mkdir offline-package WebpiCmd.exe /offline /Products:PerlHostingPackage /Path:"offline-package" /Feeds:http://www.helicontech.com/zoo/feed.xml
bin\startup.cmd:
[bin\startup.cmd]echo Starting installation... rem icacls "%RoleRoot%\approot" /grant "Everyone":F /T rem AppData Web Platform Installer rem md "%RoleRoot%\appdata" reg add "hku\.default\software\microsoft\windows\currentversion\explorer\user shell folders" ^ /v "Local AppData" /t REG_EXPAND_SZ /d "%RoleRoot%\appdata" /f rem WebpiCmd.exe pushd "%RoleRoot%\approot\offline-package\bin" rem WebpiCmd.exe offline-package rem – PerlHostingPackage, install.txt install-error.txt WebpiCmd.exe /install /Products:PerlHostingPackage /XML:%RoleRoot%\approot\offline-package\feeds\latest\webproductlist.xml ^ /Feeds:%RoleRoot%\approot\offline-package\feeds\latest\supplementalfeeds\feed.xml ^ /AcceptEula >%RoleRoot%\approot\public\install.txt 2>%RoleRoot%\approot\public\install-error.txt popd rem AppData reg add "hku\.default\software\microsoft\windows\currentversion\explorer\user shell folders" ^ /v "Local AppData" /t REG_EXPAND_SZ /d %%USERPROFILE%%\AppData\Local /f rem , . echo Completed installation.
«My Web Sites» ( «My Web Sites\Perl project»):
[Perl.Cloud.cscfg]<?xml version="1.0" encoding="utf-8"?> <ServiceConfiguration serviceName="WindowsAzure2" xmlns="http://schemas.microsoft.com/ServiceHosting/2008/10/ServiceConfiguration" osFamily="2" osVersion="*" schemaVersion="2013-03.2.0"> <Role name="Perl project"> <Instances count="1" /> <ConfigurationSettings> </ConfigurationSettings> </Role> </ServiceConfiguration>
[Perl.csdef]<?xml version="1.0" encoding="utf-8"?> <ServiceDefinition name="WindowsAzure2" xmlns="http://schemas.microsoft.com/ServiceHosting/2008/10/ServiceDefinition" schemaVersion="2013-03.2.0"> <WebRole name="Perl project" vmsize="Small"> <Sites> <Site name="Web" physicalDirectory="./Perl project"> <Bindings> <Binding name="Endpoint1" endpointName="Endpoint1" /> </Bindings> </Site> </Sites> <Endpoints> <InputEndpoint name="Endpoint1" protocol="http" port="80" /> </Endpoints> <Startup> <Task commandLine="startup.cmd" executionContext="elevated" taskType="simple" > </Task> </Startup> </WebRole> </ServiceDefinition>
[Perl.pack.cmd]@echo off set WINDOWS_AZURE_SDK_PATH="C:\Program Files\Microsoft SDKs\Windows Azure\.NET SDK\v2.1" call %WINDOWS_AZURE_SDK_PATH%\bin\setenv.cmd pushd %~dp0 if "%ServiceHostingSDKInstallPath%" == "" ( echo Can't see the ServiceHostingSDKInstallPath environment variable. Please run from a Windows Azure SDK command-line (run Program Files\Windows Azure SDK\^<version^>\bin\setenv.cmd^). GOTO :eof ) rem , IIS .. rem iisreset /stop rem Windows Azure cspack Perl.csdef /out:Perl.cspkg popd
: https://dl.dropboxusercontent.com/u/7840290/habrahabr/Perl.zip
Perl.pack.cmd. Perl.cspkg 92. Azure Cloud Services Mojolicious , .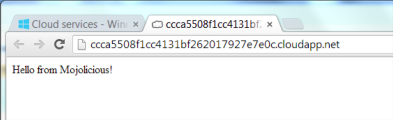
Java ColdFusion (Railo)
Java ColdFusion. ColdFusion Helicon Zoo Railo . – Java Railo Azure Cloud Services , – Azure. 200 . Railo Java Oracle JDK, 125 , 200. , Java , . , . Java . Java – . , Java, , .
Java- Oracle JDK, , , Helicon Zoo. Oracle JDK Oracle. JDK-7 , : http://www.oracle.com/technetwork/java/javase/downloads/jdk7-downloads-1880260.html Azure Cloud Services Windows-64 bit. . JDK-7 , Java- Helicon Zoo. Zoo -> Applications -> SCM Manager – Git, Mercurial SVN Java. Zoo -> Applications -> Mura CMS – CMS ColdFusion. .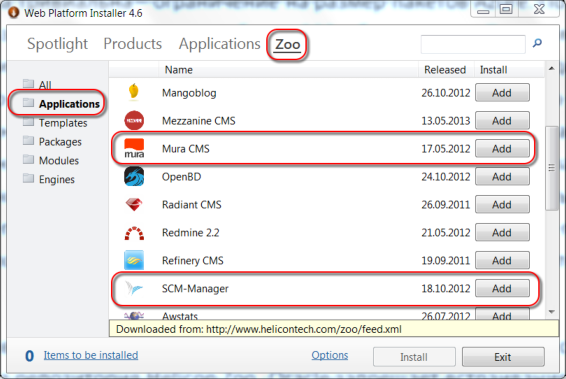
Mura CMS «My Web Sites\Mura CMS1». – offline-package Java Hosting Package CFML Hosting Package Helicon Zoo, :mkdir offline-package WebpiCmd.exe /offline /Products:CFMLHostingPackage /Path:"offline-package" /Feeds:http://www.helicontech.com/zoo/feed.xml
offline-package\bin JDK-7.
bin\startup.cmd JDK-7:
[bin\startup.cmd]echo Starting installation... rem icacls "%RoleRoot%\approot" /grant "Everyone":F /T rem AppData Web Platform Installer rem md "%RoleRoot%\appdata" reg add "hku\.default\software\microsoft\windows\currentversion\explorer\user shell folders" ^ /v "Local AppData" /t REG_EXPAND_SZ /d "%RoleRoot%\appdata" /f rem WebpiCmd.exe pushd "%RoleRoot%\approot\offline-package\bin" rem JDK-7 jdk-7u45-windows-x64.exe /s rem WebpiCmd.exe offline-package rem – PerlHostingPackage, install.txt install-error.txt WebpiCmd.exe /install /Products:CFMLHostingPackage /XML:%RoleRoot%\approot\offline-package\feeds\latest\webproductlist.xml ^ /Feeds:%RoleRoot%\approot\offline-package\feeds\latest\supplementalfeeds\feed.xml ^ /AcceptEula >%RoleRoot%\approot\install.txt 2>%RoleRoot%\approot\install-error.txt popd rem AppData reg add "hku\.default\software\microsoft\windows\currentversion\explorer\user shell folders" ^ /v "Local AppData" /t REG_EXPAND_SZ /d %%USERPROFILE%%\AppData\Local /f rem , . echo Completed installation.
:
[Mura.Cloud.cscfg]<?xml version="1.0" encoding="utf-8"?> <ServiceConfiguration serviceName="WindowsAzure2" xmlns="http://schemas.microsoft.com/ServiceHosting/2008/10/ServiceConfiguration" osFamily="2" osVersion="*" schemaVersion="2013-03.2.0"> <Role name="Mura CMS1"> <Instances count="1" /> <ConfigurationSettings> </ConfigurationSettings> </Role> </ServiceConfiguration>
[Mura.csdef]<?xml version="1.0" encoding="utf-8"?> <ServiceDefinition name="WindowsAzure2" xmlns="http://schemas.microsoft.com/ServiceHosting/2008/10/ServiceDefinition" schemaVersion="2013-03.2.0"> <WebRole name="Mura CMS1" vmsize="Small"> <Sites> <Site name="Web" physicalDirectory="./Mura CMS1"> <Bindings> <Binding name="Endpoint1" endpointName="Endpoint1" /> </Bindings> </Site> </Sites> <Endpoints> <InputEndpoint name="Endpoint1" protocol="http" port="80" /> </Endpoints> <Startup> <Task commandLine="startup.cmd" executionContext="elevated" taskType="simple" > </Task> </Startup> </WebRole> </ServiceDefinition>
[Mura.pack.cmd]@echo off set WINDOWS_AZURE_SDK_PATH="C:\Program Files\Microsoft SDKs\Windows Azure\.NET SDK\v2.1" call %WINDOWS_AZURE_SDK_PATH%\bin\setenv.cmd pushd %~dp0 if "%ServiceHostingSDKInstallPath%" == "" ( echo Can't see the ServiceHostingSDKInstallPath environment variable. Please run from a Windows Azure SDK command-line (run Program Files\Windows Azure SDK\^<version^>\bin\setenv.cmd^). GOTO :eof ) rem , IIS .. rem iisreset /stop rem Windows Azure cspack Mura.csdef /out:Mura.cspkg popd
Mura.pack.cmd. Mura.cspkg 275 . : Java . 300 .
, Azure Cloud Services , . .Conclusion
, . . , PHP ASP.NET, Windows Azure. Helicon Zoo PHP Hosting Package, Microsoft PHP , Zoo .
, – . , «» Azure, . , , Windows Linux. , Azure , , , Media Services, Mobile Services, SQL Databases . , .
Source: https://habr.com/ru/post/200376/
All Articles