“Perfect” www cluster. Part 1. Frontend: NGINX + Keepalived (vrrp) on CentOS
In this series of articles on the “Ideal www cluster”, I want to convey the basic basics of building a highly available and high-performance www solution for web-loaded projects for an unprepared administrator.
The article will contain step-by-step instructions and will suit any person who has mastered the power of copy-paste.
Errors found by you will help me and those who will read this article later on! So any improvements and edits are welcome!
I want to note that this instruction was born in the process of migration of Acronis web-systems to a high-available cluster. I hope my notes will be useful for you !.
')
In the process of examination and the research I conducted, she proved her right to life and safely serves us faithfully day by day.
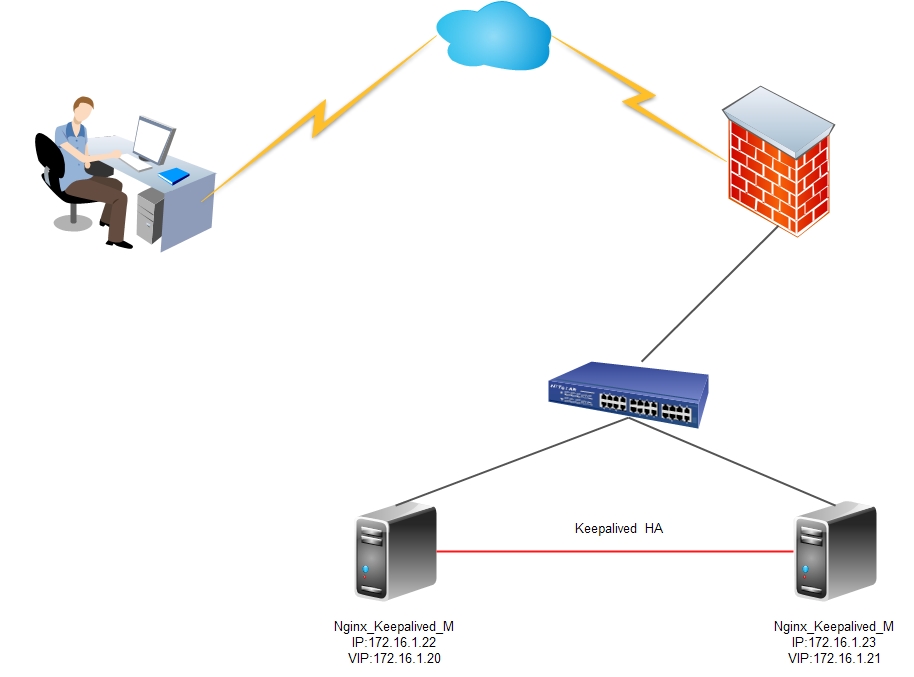
On the frontend, we will use a bundle of two services:
keepalived - implementations of VRRP (Virtual Router Redundancy Protocol) for Linux. The keepalived daemon monitors the operability of machines and, in the event of a failure detection, eliminates the failed server from the list of active servers, delegating its addresses to another server.
In other words, we have 2 servers on which one public address is registered. If any of these servers falls, then the address of the fallen is picked up by the second.
The keepalived daemons communicate via VRRP protocol, sending each other messages to the address 224.0.0.18.
If the neighbor has not sent his message, then after the expiration of the period he is considered dead and both addresses are serviced by the remaining node. As soon as the fallen server starts sending its messages to the network, everything returns to its place.
nginx [engine x] is an HTTP server and reverse proxy server, as well as a mail proxy server, written by Igor Sysoev. For a long time, it has served the servers of many high-loaded Russian sites, such as Yandex, Mail.Ru, VKontakte and Rambler. According to Netcraft statistics, nginx served or proxied 15.08% of the most loaded sites in October 2013.
Basic HTTP server functionality
- Maintenance of static queries, index files, automatic creation of a list of files, open file descriptor cache;
- Accelerated reverse proxying with caching, simple load balancing and fault tolerance;
- Accelerated support for FastCGI, uwsgi, SCGI and memcached servers with caching, simple load balancing and fault tolerance;
- Modularity, filters, including compression (gzip), byte-ranges (resume), chunked answers, XSLT-filter, SSI-filter, image conversion; multiple subqueries on the same page, processed in the SSI filter through a proxy or FastCGI, are executed in parallel;
- SSL support and TLS SNI extensions.
Other HTTP Server Features
- Virtual servers, defined by IP-address and name;
- Support for keep-alive and pipelined connections;
- Configuration flexibility;
- Changing the settings and updating the executable file without interrupting customer service;
- Setting log formats, buffered logging, fast log rotation;
- Special pages for 3xx-5xx errors;
- rewrite module: changing URI using regular expressions;
- Perform different functions depending on the client’s address;
- Access restriction depending on the client's address, password (HTTP Basic authentication) and the result of the subquery;
- HTTP referer check;
- Methods PUT, DELETE, MKCOL, COPY and MOVE;
- FLV and MP4 streaming;
- Limit the speed of response;
- Limiting the number of simultaneous connections and requests from one address;
- Embedded Perl.

Important! For the solution below, we should have 2 network interfaces on each of the keepalived nodes
we have to accurately indicate our mask and understand where broadcast is in our network, if we don’t do this, we will try for a very long time to understand why things are not working as we want!
# My private network
[root @ nginx-frontend-01 ~] #
nano /etc/sysconfig/network-scripts/ifcfg-eth2 DEVICE=eth2 BOOTPROTO=static ONBOOT=yes IPADDR=10.100.100.56 NETWORK=10.100.100.0 NETMASK=255.255.255.0 BROADCAST=10.100.100.255 # Public network
[root @ nginx-frontend-01 ~] #
nano /etc/sysconfig/network-scripts/ifcfg-eth3 DEVICE=eth3 BOOTPROTO=static ONBOOT=yes IPADDR=72.xx1 NETMASK=255.255.255.248 BROADCAST=72.xx55 GATEWAY=72.xx49 That is, in my public network, mask / 29 and it means my broadcast xxx55, if there was a network / 24, then you could specify xxx255
If you mix it up, then you get a bunch of problems
# Set keepalived
yum install keepalived -y # This is very bad, this is not necessary! only for testing purposes and at your own risk, I warned. Turn off selinux
sed -i 's/SELINUX=enforcing/SELINUX=disabled/g' /etc/sysconfig/selinux # We set up keepalived on the first nginx-frontend-01 node, it is very important, the comment sign "!" but not "#"
mv /etc/keepalived/keepalived.conf /etc/keepalived/keepalived.conf.old && nano /etc/keepalived/keepalived.conf [root @ nginx-frontend-01 ~] #
nano /etc/keepalived/keepalived.conf ! Configuration File for keepalived global_defs { notification_email { root@localhost } notification_email_from root@localhost smtp_server localhost smtp_connect_timeout 30 ! router_id nginx-frontend-01 } vrrp_instance nginx2 { ! , state BACKUP ! interface eth3 ! , vrrp_instance virtual_router_id 102 ! , BACKUP MASTER priority 100 advert_int 1 dont_track_primary ! broadcast mcast_src_ip xxx55 ! , authentication { auth_type PASS auth_pass b65495f9 } ! , MASTER virtual_ipaddress { xxx2/29 dev eth3 } } vrrp_instance nginx1 { ! - , , state MASTER ! interface eth3 ! , vrrp_instance virtual_router_id 101 ! backup priority 200 advert_int 1 dont_track_primary ! broadcast mcast_src_ip xxx55 ! , authentication { auth_type PASS auth_pass b65495f8 } virtual_ipaddress { ! , , xxx1/29 dev eth3 } ! gateway virtual_routes { default via xxx49 dev eth3 metric 2 } } # Configuring keepalived on the second nginx-frontend-02 node is very important, the comment sign "!" but not "#"
mv /etc/keepalived/keepalived.conf /etc/keepalived/keepalived.conf.old && nano /etc/keepalived/keepalived.conf [root @ nginx-frontend-02 ~] #
nano /etc/keepalived/keepalived.conf ! Configuration File for keepalived global_defs { notification_email { root@localhost } notification_email_from root@localhost smtp_server localhost smtp_connect_timeout 30 ! router_id nginx-frontend-02 } vrrp_instance nginx1 { ! , state BACKUP ! interface eth3 ! , vrrp_instance virtual_router_id 101 ! , BACKUP MASTER priority 100 advert_int 1 dont_track_primary ! broadcast mcast_src_ip xxx55 ! , authentication { auth_type PASS auth_pass b65495f9 } ! , MASTER virtual_ipaddress { xxx1/29 dev eth3 } } vrrp_instance nginx2 { ! - , , state MASTER ! interface eth3 ! , vrrp_instance virtual_router_id 102 ! backup priority 200 advert_int 1 dont_track_primary ! broadcast mcast_src_ip xxx55 ! , authentication { auth_type PASS auth_pass b65495f9 } ! , , virtual_ipaddress { xxx2/29 dev eth3 } virtual_routes { ! gateway default via xxx49 dev eth3 metric 2 } } # Add to startup and run
chkconfig keepalived on && service keepalived restart # Add permissions to the firewall, more than half of the problems, due to the fact that we forget about the firewall!
iptables -A INPUT -i eth3 -p vrrp -j ACCEPT iptables -A OUTPUT -o eth3 -p vrrp -j ACCEPT iptables -A INPUT -d 224.0.0.0/8 -i eth3 -j ACCEPT iptables-save > /etc/sysconfig/iptables # This is a very important step.
Setting this variable allows individual local processes to act on behalf of an external (foreign) IP address.
echo "net.ipv4.ip_nonlocal_bind=1" >> /etc/sysctl.conf && sysctl -p # Check
/etc/init.d/keepalived restart && tail -f -n 100 /var/log/messages # Check how our keepalived nodes communicate with each other
tcpdump -vvv -n -i eth3 host 224.0.0.18 # We need to see it
xxx55 > 224.0.0.18: VRRPv2, Advertisement, vrid 102, prio 200, authtype simple, intvl 1s, length 20, addrs: xxx2 auth "b65495f9" 07:50:50.019548 IP (tos 0xc0, ttl 255, id 5069, offset 0, flags [none], proto VRRP (112), length 40) xxx55 > 224.0.0.18: VRRPv2, Advertisement, vrid 101, prio 200, authtype simple, intvl 1s, length 20, addrs: xxx1 auth "b65495f9" Now you can turn off the servers alternately, lower interfaces, pull wires, etc.
We will always have both of these addresses on the network and our nginx will respond to them.

# We are connecting the official nginx repository for CentOS 6
rpm -Uhv http://nginx.org/packages/rhel/6/noarch/RPMS/nginx-release-rhel-6-0.el6.ngx.noarch.rpm # Update the system and install nginx
yum update -y yum install nginx # Remove hosts by default, by default there is a standard nginx greeting
rm -f /etc/nginx/conf.d/default.conf rm -f /etc/nginx/conf.d/virtual.conf rm -f /etc/nginx/conf.d/ssl.conf # We bring the main config to a similar look
mv /etc/nginx/nginx.conf /etc/nginx/nginx.conf.old nano /etc/nginx/nginx.conf user nginx; # worker_processes 10; pid /var/run/nginx.pid; events { # worker_connections 1024; # epoll — , Linux 2.6+ http://nginx.org/ru/docs/events.html use epoll; # multi_accept on; } error_log /var/log/nginx/error.log warn; http { include /etc/nginx/mime.types; default_type application/octet-stream; log_format main '$remote_addr - $remote_user [$time_local] "$request" ' '$status $body_bytes_sent "$http_referer" ' '"$http_user_agent" "$http_x_forwarded_for"'; access_log /var/log/nginx/access.log main; connection_pool_size 256; client_header_buffer_size 4k; client_max_body_size 100m; large_client_header_buffers 8 8k; request_pool_size 4k; output_buffers 1 32k; postpone_output 1460; # gzip gzip on; gzip_min_length 1024; gzip_proxied any; gzip_proxied expired no-cache no-store private auth; gzip_types text/plain text/xml application/xml application/x-javascript text/javascript text/css text/json; gzip_comp_level 5; gzip_disable "MSIE [1-6]\.(?!.*SV1)"; sendfile on; tcp_nopush on; tcp_nodelay on; keepalive_timeout 75 20; server_names_hash_max_size 8192; ignore_invalid_headers on; server_name_in_redirect off; proxy_buffer_size 8k; proxy_buffers 8 64k; proxy_connect_timeout 1000; proxy_read_timeout 12000; proxy_send_timeout 12000; # , proxy_cache_path /var/cache/nginx levels=2 keys_zone=pagecache:5m inactive=10m max_size=50m; # backend mod_rpaf real_ip_header X-Real-IP; proxy_set_header Host $host; proxy_set_header X-Real-IP $remote_addr; proxy_set_header X-Forwarded-For $proxy_add_x_forwarded_for; allow all; include /etc/nginx/conf.d/*.conf; } # Now we put in order our universal vhost
nano /etc/nginx/conf.d/all.conf upstream web { # backend nginx , fail backend # back01 server 10.211.77.131 weight=10 max_fails=60 fail_timeout=2s; # back02 server 10.211.77.136 weight=10 max_fails=60 fail_timeout=2s; } server { listen 80; location / { proxy_pass http://web; proxy_set_header Host $host; proxy_set_header X-Real-IP $remote_addr; proxy_set_header X-Forwarded-For $proxy_add_x_forwarded_for; } } # And our config for SSL site operation, for each site there must be a config file with its certificate
nano /etc/nginx/conf.d/ssl.conf upstream ssl { # back01 # server 10.211.77.131 weight=10 max_fails=60 fail_timeout=2s; # back02 server 10.100.100.63 weight=10 max_fails=60 fail_timeout=2s; } server { listen 443; ssl on; ssl_certificate /etc/nginx/ssl/GeoTrustCA.crt; ssl_certificate_key /etc/nginx/ssl/GeoTrustCA.key; # SSL ssl_ciphers RC4:HIGH:!aNULL:!MD5:!kEDH; ssl_session_cache shared:SSL:10m; ssl_prefer_server_ciphers on; ssl_protocols SSLv3 TLSv1; location / { proxy_pass http://ssl; proxy_set_header Host $host; proxy_set_header X-Real-IP $remote_addr; proxy_set_header X-Forwarded-For $proxy_add_x_forwarded_for; } } # Run nginx and add it to autoload!
/etc/init.d/nginx start && chkconfig nginx on To be continued, thank you for your attention!
Source: https://habr.com/ru/post/198934/
All Articles