DevExtreme: Quickly create a cross-platform HTML5 business application in Visual Studio
In previous articles we have already written about our mobile development framework - PhoneJS . Today we will talk about one more product, which is designed to increase developer productivity, including for mobile platforms.
This is DevExtreme - a toolkit for Visual Studio 2010 and later.

DevExtreme includes:
A business application is usually an interface around a database plus business logic. Many web frameworks (Ruby on Rails, Django, Yii, ASP.NET MVC, and others) include scaffolding tools for instantly generating an application framework based on existing data.
DevExtreme provides a similar opportunity to create so-called multi-channel applications that will work both on mobile devices (including iOS, Android, Windows Phone 8, Tizen and Microsoft Surface), and in ordinary web browsers. This is done using a special generator.
')
Let's look at his work in action on the example of creating a simple system for processing orders.
Good applications consist of a frontend and a backend. Backend is increasingly done in the form of a thin server (for example, a REST service). In the .NET development environment, the OData protocol is popular, so our wizard can generate code based on the meta data returned by the OData service.
In general, when generating an application through a wizard, you can use any ready-made OData service with support for CORS or JSONP . In our example, we will create our service using the DevExtreme 13.1 WCF OData Service project template, which is a slightly improved standard service over the Entity Framework model (we added support for CORS and JSONP, as well as
So, create a new project. Let's call it, for example, CRM.DataService. As a Solution name, we simply indicate CRM.

Select "Generate from database".

Click "New connection".
For example, take the well-known Northwind.
We select the tables we need: Categories, Customers, Employees, Order Details, Orders, Shippers, Suppliers.
Is done. You can already open our service in the browser (View in Browser in the context menu) and make sure that everything is working fine:
We proceed to the generation of the application.
Now that we have a ready service with data, we need to add a new project using the DevExtreme 13.1 Multi-Chanel Application template. Make File > Add > New Project .
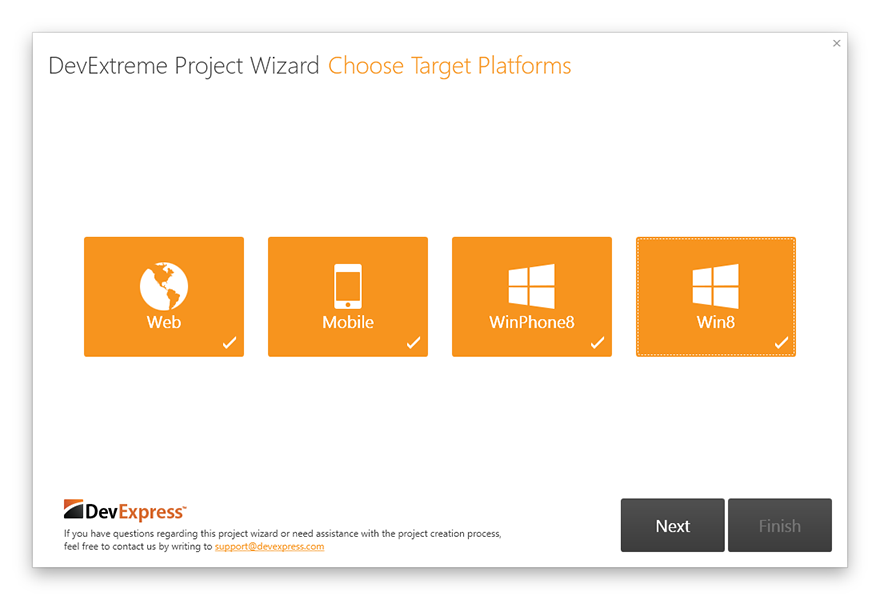
We select the necessary platforms on which our application should work. Note all.
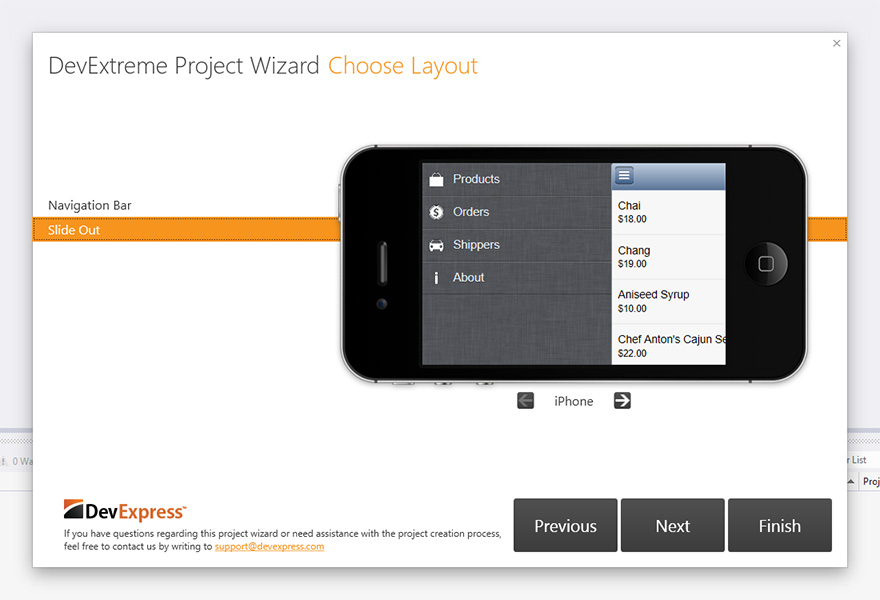
Next, we indicate one of the pre-installed layouts. Let it be SlideOut.
In the next step, the wizard offers to select a data source. If the OData service is in the same solution as the application itself (like ours), then the data source will be automatically specified. If you use some remote service, you must specify the URL manually.
We check the connection by clicking "Discover". Now you can select the desired tables to generate models and views.

Please note that in the “Generate views” column we only noted three entities that we want to use in the UI. The rest is only needed for working with data.
The switch in the “View generation options” section allows you to select the degree of isolation of the views. We will specify “Add generated views to the shared platform-independent project” to use common view files for all platforms, thereby avoiding duplication of code.
On the other hand, if you want to customize the appearance on different platforms, it makes sense to generate files separately for each project. However, the files can be copied from the Shared-project to the platform projects, and then some of the views will be common, and some specific.
Click "Finish" to complete the generation.
As a result, we obtain the following projects:
They have a similar folder and file structure, let's look at it in a bit more detail:
At the root are index files and configuration files.
Let's make the start project CRM.Mobile and press F5 !
The browser will start, and the application will open in the simulator. Here you can view and edit information about products, suppliers and orders.
I would like to dwell on the visual elements (widgets) that are used in the resulting application.
DxList is used to present a list of data. It supports templates for items, display of grouped data, and mobile UI idioms, such as pull down to refresh and load as you scroll.
Input fields are represented by the following widgets:
A complete list of widgets can be found in the documentation .
In order to test the application on a specific platform, the left side of the simulator page provides a panel in which you can change the theme of the application and the simulator's skin, for example, iOS7 or the expected one from day to day Tizen . Also available themes for Android and Windows Phone 8.
Under the theme switch panel, there is a QR code for debugging an application on a mobile device via a cloud proxy server, “puncturing” access to the developer’s machine.
The QR code contains a special URL that can be opened in the device’s browser or in the Courier app (available in iTunes and Google Play ). Running through Courier is functionally similar to assembling a native package, followed by installation on a smartphone / tablet, but saves time.
Applications for other platforms are located in the corresponding projects and are launched just as easily: CRM.Desktop launches the browser, CRM.Win8 launches the Windows Store application on the full screen or in the emulator, and CRM.Win8Phone opens in the Windows Phone emulator 8 (provided that you installed SDK).
So, we got the application framework without writing a single line of code. Of course, the application has a fairly simple appearance, which is typical for business applications, but DevExtreme allows you to change and customize the UI to your taste.
The first thing that catches your eye is the lack of icons for the “Orders” and “Shippers” items in the navigation pane. This is explained by the fact that in the standard set there are no icons named “orders” and “shippers” (the full list can be found in the Kitchen Sink demo application).
For orders it is possible to use the image "Money", and for suppliers - "Car". To do this, in the CRM.Mobile project in the crm.config.js file in the
See diff on github .
All orders can be grouped into the following categories:
The dxTabs widget works well for visualizing these three groups. Add it to the markup. Double-click to open the views / order / orders.dxview file from the CRM.Shared project, a visual editor will open.
Make sure that it is configured for the right project and the right topic:

In Toolbox, find the dxTabs widget and drag it onto the presentation layout.
In the Properties (Properties) change the widget options:

In the file with the code orders.js, we implement the logic for splitting orders into groups. See full diff .
The list of products now contains only names. It is logical to add prices here, for example, in the $ 9.99 format. To do this, in the views / product / products.dxview view, we change the markup :
On this screen for more information, you can specify the contact details of suppliers.
Northwind has a telephone number for each supplier. We will use it. Add a contact phone to the shippers.dxview view:
Here, in addition to general information about the order, it would be convenient to display the products included in the order. To do this, add the data source for the order products to the file with the code order-details.js:
For a visual representation of the list of products we will use the dxList widget. This can be done with the help of a visual designer or manually. As a result, you should get this markup:
See full diff .
The second thing that needs to be changed is the display of information in the
You also need to make similar edits to the order editing view — order-edit.dxview and to the file with order-edit.js code. In the order-details.dxview view, the
At this application customization will be considered complete. But if necessary, you can make deeper changes in both the logic and the user interface.
The final chord of developing a mobile application using DevExtreme is building the native package and installing it on the device.
DevExtreme allows you to build packages for the following platforms:

Let's pack our application for the Android platform. To do this, on the CRM.Mobile project, you need to right-click and select “Build native packages ...” in the menu that appears. After this, a dialog will open, with which we will assemble the native package.
Choose Android:
Then you can use the existing certificate of the developer for Android, or generate a new one. To create a new certificate, Visual Studio must be run as an administrator.

Now, you can start building the package and then install the received APK file on your Android device.
Then you can click “Build another package” to build for other platforms or “Finish” to return to the IDE.
We showed how to quickly create cross-platform applications in Visual Studio using DevExtreme. From launching an IDE to assembling installation packages ready for download to the app stores, we spent no more than 15 minutes!
The resulting solution (available on GitHub ) contains a REST service for accessing data and workable project skeletons for desktop computers and a variety of mobile devices — from iPhone to Microsoft Surface.
"Overboard" there are a lot of interesting things, for example, we did not at all talk about the visual designer for ChartJS diagrams . We hope to fix this in the following articles, but for now let's give links to the official DevExtreme page and to the DevExtreme Learning Center .
This is DevExtreme - a toolkit for Visual Studio 2010 and later.
DevExtreme includes:
- Mentioned above PhoneJS .
- JavaScript library for visualizing ChartJS data.
- Project template for Visual Studio.
- Wizard to quickly create a cross-platform application.
- Visual Studio integrated visual designer.
- Mobile device simulator for debugging applications in the browser.
- Tools for quick launch on the device by QR code
- Tools for packaging applications in native containers.
A business application is usually an interface around a database plus business logic. Many web frameworks (Ruby on Rails, Django, Yii, ASP.NET MVC, and others) include scaffolding tools for instantly generating an application framework based on existing data.
DevExtreme provides a similar opportunity to create so-called multi-channel applications that will work both on mobile devices (including iOS, Android, Windows Phone 8, Tizen and Microsoft Surface), and in ordinary web browsers. This is done using a special generator.
')
Let's look at his work in action on the example of creating a simple system for processing orders.
Creating an OData service
Good applications consist of a frontend and a backend. Backend is increasingly done in the form of a thin server (for example, a REST service). In the .NET development environment, the OData protocol is popular, so our wizard can generate code based on the meta data returned by the OData service.
In general, when generating an application through a wizard, you can use any ready-made OData service with support for CORS or JSONP . In our example, we will create our service using the DevExtreme 13.1 WCF OData Service project template, which is a slightly improved standard service over the Entity Framework model (we added support for CORS and JSONP, as well as
ImageStreamProvider ).So, create a new project. Let's call it, for example, CRM.DataService. As a Solution name, we simply indicate CRM.
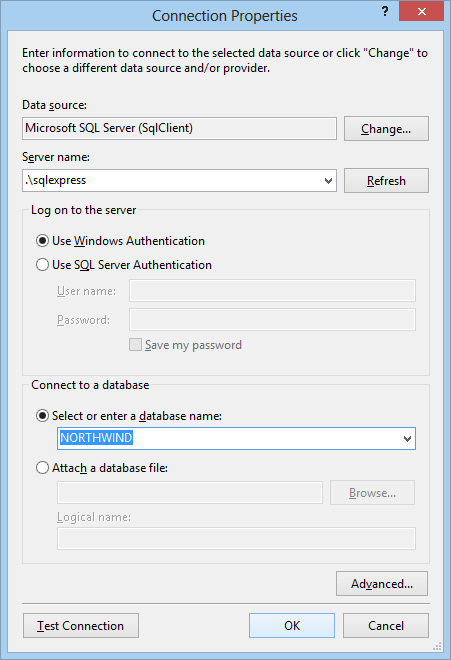
Select "Generate from database".
Click "New connection".
For example, take the well-known Northwind.
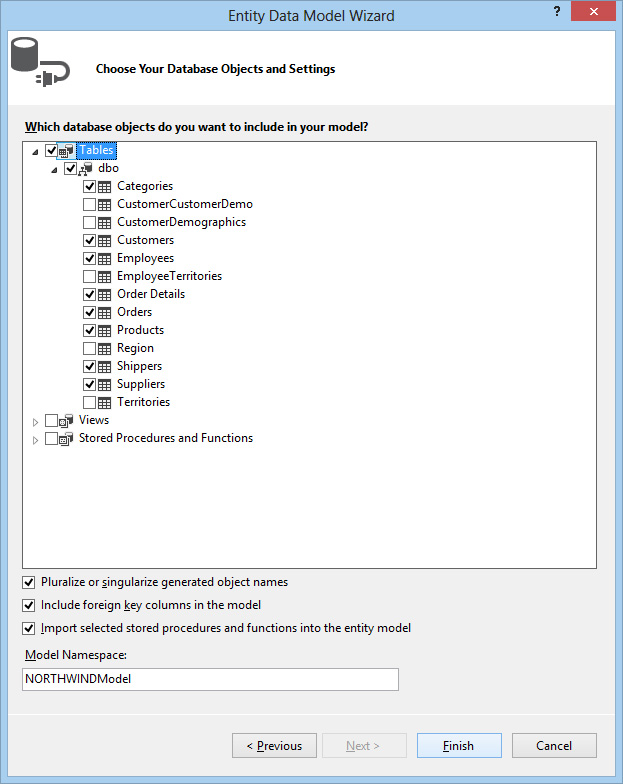
We select the tables we need: Categories, Customers, Employees, Order Details, Orders, Shippers, Suppliers.
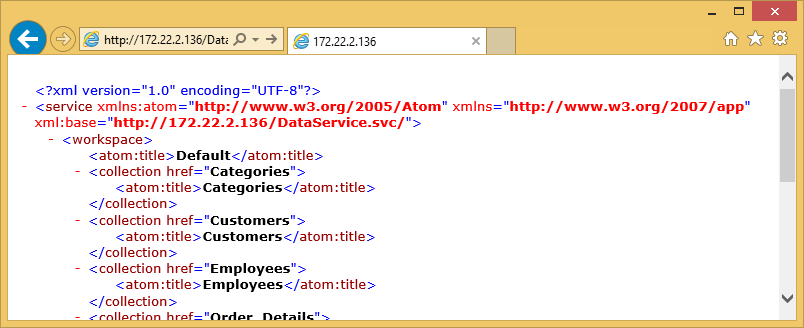
Is done. You can already open our service in the browser (View in Browser in the context menu) and make sure that everything is working fine:
We proceed to the generation of the application.
Create application
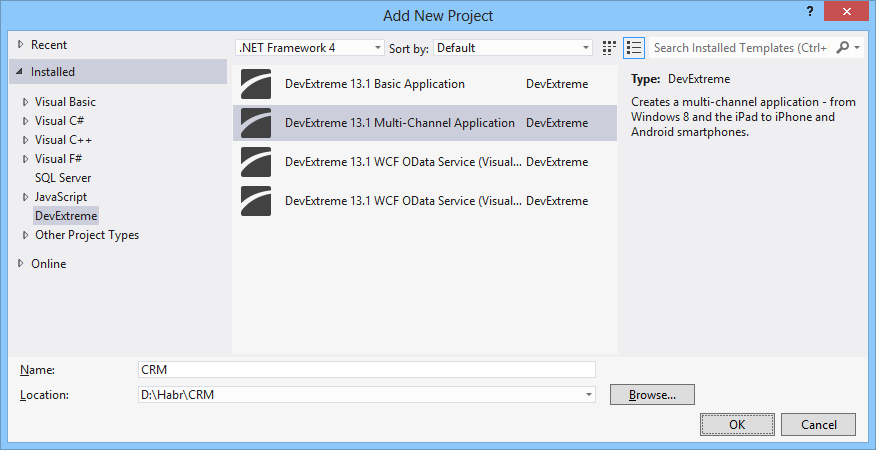
Now that we have a ready service with data, we need to add a new project using the DevExtreme 13.1 Multi-Chanel Application template. Make File > Add > New Project .
We select the necessary platforms on which our application should work. Note all.
Next, we indicate one of the pre-installed layouts. Let it be SlideOut.
In the next step, the wizard offers to select a data source. If the OData service is in the same solution as the application itself (like ours), then the data source will be automatically specified. If you use some remote service, you must specify the URL manually.
We check the connection by clicking "Discover". Now you can select the desired tables to generate models and views.
Please note that in the “Generate views” column we only noted three entities that we want to use in the UI. The rest is only needed for working with data.
The switch in the “View generation options” section allows you to select the degree of isolation of the views. We will specify “Add generated views to the shared platform-independent project” to use common view files for all platforms, thereby avoiding duplication of code.
On the other hand, if you want to customize the appearance on different platforms, it makes sense to generate files separately for each project. However, the files can be copied from the Shared-project to the platform projects, and then some of the views will be common, and some specific.
Click "Finish" to complete the generation.
As a result, we obtain the following projects:
- CRM.Mobile
- CRM.Desktop
- CRM.Shared
- CRM.Win8
- CRM.Win8Phone
They have a similar folder and file structure, let's look at it in a bit more detail:
- data - is present only in the Shared-project, contains observable-models for entities (Product, Category, etc.),
- js - files from libraries (jQuery, Knockout, PhoneJS, etc.),
- css - the built-in styles of themes for coloring the application in accordance with the platform,
- layout - a set of pre-installed layouts,
- view - application screens (a markup file and a code file for each screen)
At the root are index files and configuration files.
Let's make the start project CRM.Mobile and press F5 !
The browser will start, and the application will open in the simulator. Here you can view and edit information about products, suppliers and orders.
I would like to dwell on the visual elements (widgets) that are used in the resulting application.
DxList is used to present a list of data. It supports templates for items, display of grouped data, and mobile UI idioms, such as pull down to refresh and load as you scroll.
Input fields are represented by the following widgets:
- dxTextBox - for text data,
- dxNumberBox - for numbers,
- dxSwitch - to switch logical values (true, false)
- dxLookup - data entry with a choice from the list.
A complete list of widgets can be found in the documentation .
Debugging
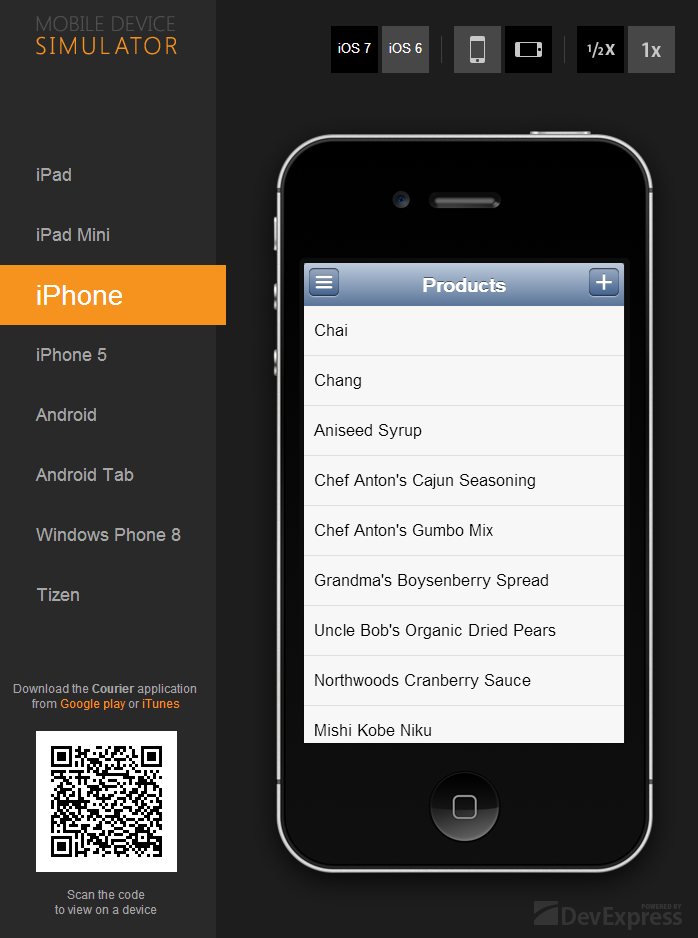
In order to test the application on a specific platform, the left side of the simulator page provides a panel in which you can change the theme of the application and the simulator's skin, for example, iOS7 or the expected one from day to day Tizen . Also available themes for Android and Windows Phone 8.
Under the theme switch panel, there is a QR code for debugging an application on a mobile device via a cloud proxy server, “puncturing” access to the developer’s machine.
The QR code contains a special URL that can be opened in the device’s browser or in the Courier app (available in iTunes and Google Play ). Running through Courier is functionally similar to assembling a native package, followed by installation on a smartphone / tablet, but saves time.
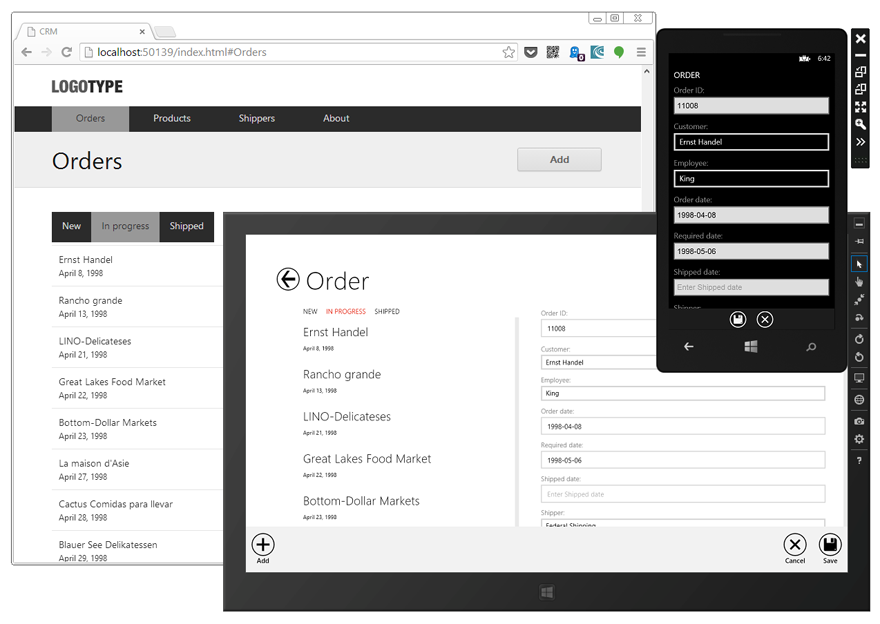
Applications for other platforms are located in the corresponding projects and are launched just as easily: CRM.Desktop launches the browser, CRM.Win8 launches the Windows Store application on the full screen or in the emulator, and CRM.Win8Phone opens in the Windows Phone emulator 8 (provided that you installed SDK).
So, we got the application framework without writing a single line of code. Of course, the application has a fairly simple appearance, which is typical for business applications, but DevExtreme allows you to change and customize the UI to your taste.
We improve the appearance
Navigation bar
The first thing that catches your eye is the lack of icons for the “Orders” and “Shippers” items in the navigation pane. This is explained by the fact that in the standard set there are no icons named “orders” and “shippers” (the full list can be found in the Kitchen Sink demo application).
For orders it is possible to use the image "Money", and for suppliers - "Car". To do this, in the CRM.Mobile project in the crm.config.js file in the
navigation array, you need to change the icon field of the corresponding objects. You can set your own image through the iconSrc property.See diff on github .
Order list
All orders can be grouped into the following categories:
- New orders (New) - orders for which the delivery date is not specified (ShippedDate) and the manager (EmployeeID);
- Orders in processing (In Progress) - orders for which the delivery date is not specified, but the manager is indicated;
- Completed orders (Shipped) - orders for which the delivery date is indicated.
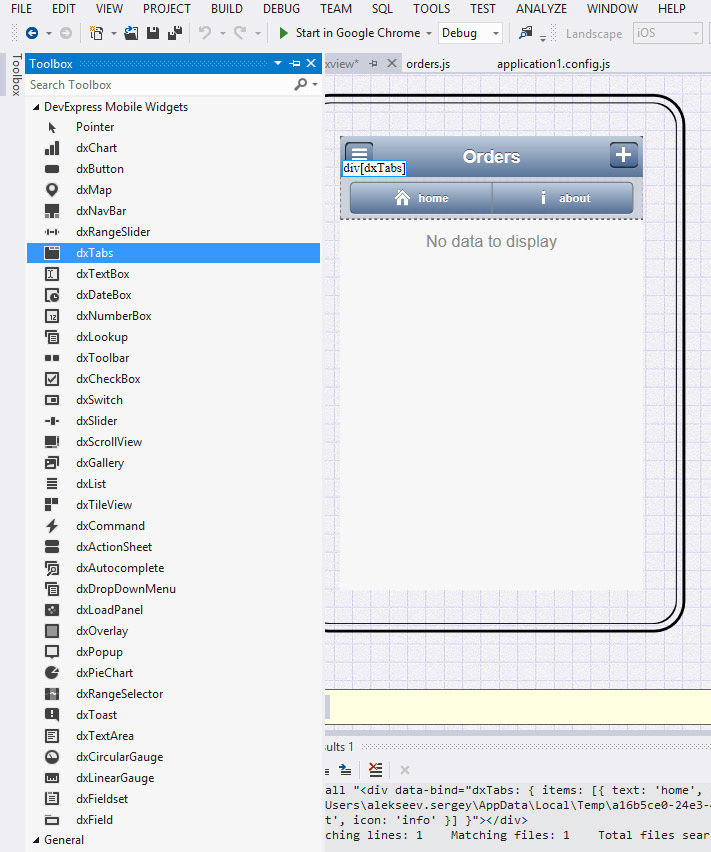
The dxTabs widget works well for visualizing these three groups. Add it to the markup. Double-click to open the views / order / orders.dxview file from the CRM.Shared project, a visual editor will open.
Make sure that it is configured for the right project and the right topic:
In Toolbox, find the dxTabs widget and drag it onto the presentation layout.
In the Properties (Properties) change the widget options:
items: tabs ,selectedIndex: selectedTabIndex ,itemClickAction: handleTabClickIn the file with the code orders.js, we implement the logic for splitting orders into groups. See full diff .
Grocery list
The list of products now contains only names. It is logical to add prices here, for example, in the $ 9.99 format. To do this, in the views / product / products.dxview view, we change the markup :
<div class="list-item" data-bind="text: Globalize.format(UnitPrice(), 'c')"></div> List of Suppliers
On this screen for more information, you can specify the contact details of suppliers.
Northwind has a telephone number for each supplier. We will use it. Add a contact phone to the shippers.dxview view:
<div class="list-item" data-bind="text: Phone"></div> Detailed order presentation
Here, in addition to general information about the order, it would be convenient to display the products included in the order. To do this, add the data source for the order products to the file with the code order-details.js:
orderDetailsSource: { store: CRM.db.Order_Details, filter: ["OrderID", Number(params.id)], expand: "Product", paginate: false, map: function(item) { return new CRM.Order_DetailsViewModel(item); } }, For a visual representation of the list of products we will use the dxList widget. This can be done with the help of a visual designer or manually. As a result, you should get this markup:
<h2 class="dx-detail-item-label">Order items</h2> <div class="dx-fieldset order-details"> <div data-bind="dxList: { dataSource: orderDetailsSource, scrollingEnabled: false }" style="background: none;"> <div data-bind="dxAction: '#ProductDetails/{Product.ProductID}'" data-options="dxTemplate : { name: 'item' }"> <div data-bind="text: Product.ProductName"></div> <div> Quantity: <span data-bind="text: Quantity"></span> </div> <div> Total price: <span data-bind="text: TotalPriceFormatted"></span> </div> </div> </div> </div> See full diff .
The second thing that needs to be changed is the display of information in the
Employee field. It would be more correct to indicate the surname of the employee, and not his position (the generator heuristics unsuccessfully chose the Title field). To fix this, in the order-details.dxview view in the Employee field, replace data-bind="text: order.Employee.Title" with data-bind="text: order.Employee.LastName" .You also need to make similar edits to the order editing view — order-edit.dxview and to the file with order-edit.js code. In the order-details.dxview view, the
Employee field should displayExpr LastName as the displayExpr , and in the select field, we also specify LastName in the select field in order-edit.js.At this application customization will be considered complete. But if necessary, you can make deeper changes in both the logic and the user interface.
Build a native package
The final chord of developing a mobile application using DevExtreme is building the native package and installing it on the device.
DevExtreme allows you to build packages for the following platforms:
- iOS
- Android
- Windows Phone 8
- Tizen
- Phonegap build
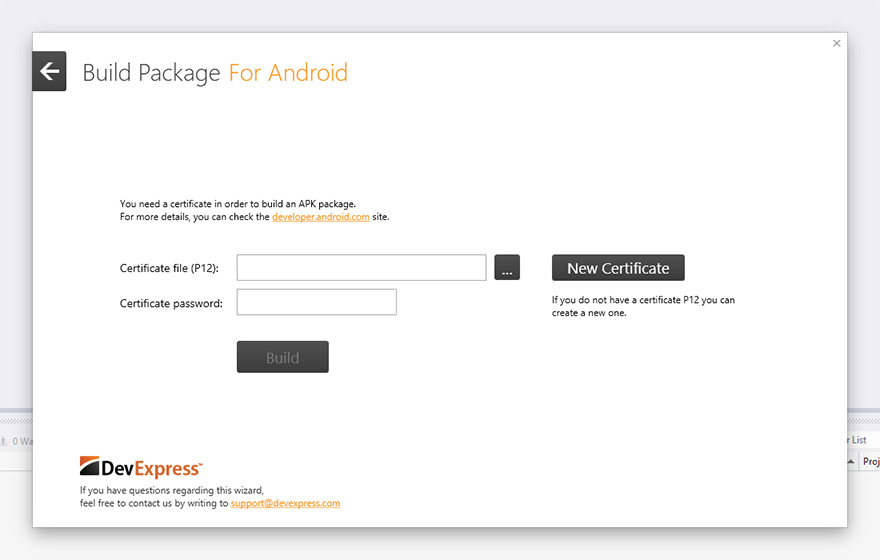
Let's pack our application for the Android platform. To do this, on the CRM.Mobile project, you need to right-click and select “Build native packages ...” in the menu that appears. After this, a dialog will open, with which we will assemble the native package.
Choose Android:
Then you can use the existing certificate of the developer for Android, or generate a new one. To create a new certificate, Visual Studio must be run as an administrator.
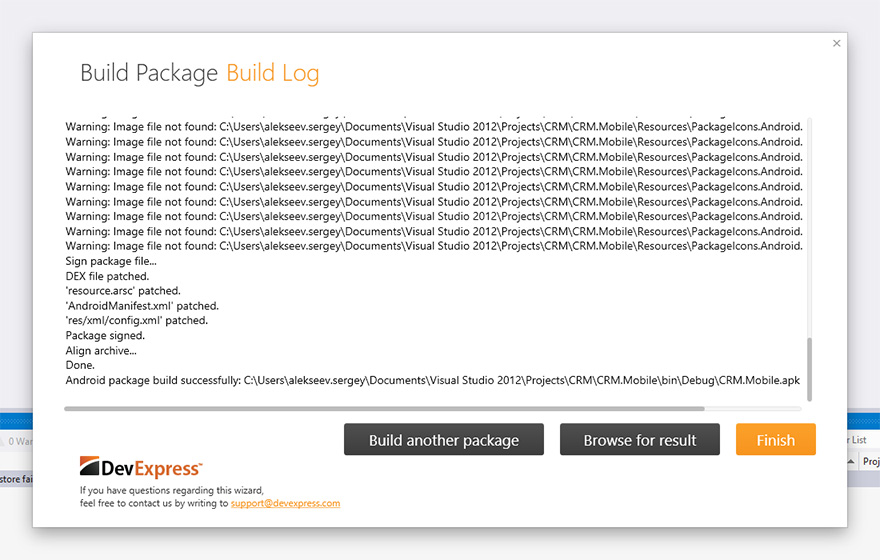
Now, you can start building the package and then install the received APK file on your Android device.
Then you can click “Build another package” to build for other platforms or “Finish” to return to the IDE.
Results
We showed how to quickly create cross-platform applications in Visual Studio using DevExtreme. From launching an IDE to assembling installation packages ready for download to the app stores, we spent no more than 15 minutes!
The resulting solution (available on GitHub ) contains a REST service for accessing data and workable project skeletons for desktop computers and a variety of mobile devices — from iPhone to Microsoft Surface.
"Overboard" there are a lot of interesting things, for example, we did not at all talk about the visual designer for ChartJS diagrams . We hope to fix this in the following articles, but for now let's give links to the official DevExtreme page and to the DevExtreme Learning Center .
Source: https://habr.com/ru/post/198728/
All Articles