Problem solving web server settings when publishing web applications
When publishing a web application from Visual Studio, a developer may encounter some problems, and not always the error text can help get rid of the problems and properly configure the server.
Below I will describe the most common ones.
I hope that this article will help save time, a large amount of which I spent studying problems.
Let's try to deploy the application on a clean Windows 2008 R2 server, on which the “Web Server (IIS)” role is installed.
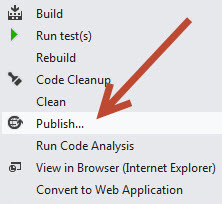
1. To do this, in Visual Studio (I have Visual Studio 2012 Professional), right-click on the project and select the "Publish ..." menu item
The Publish Wizard window opens in which you want to create a profile.

')
Enter the profile name (I called the profile the same way as my web server is called “app10”) and click the “OK” button.
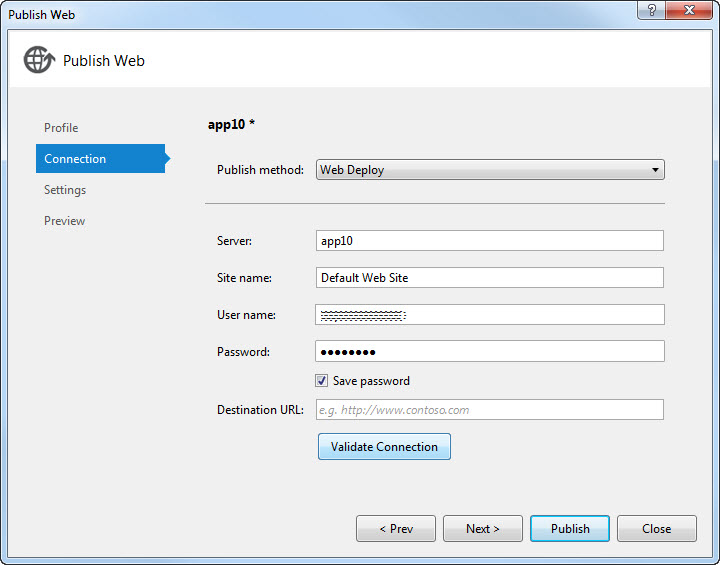
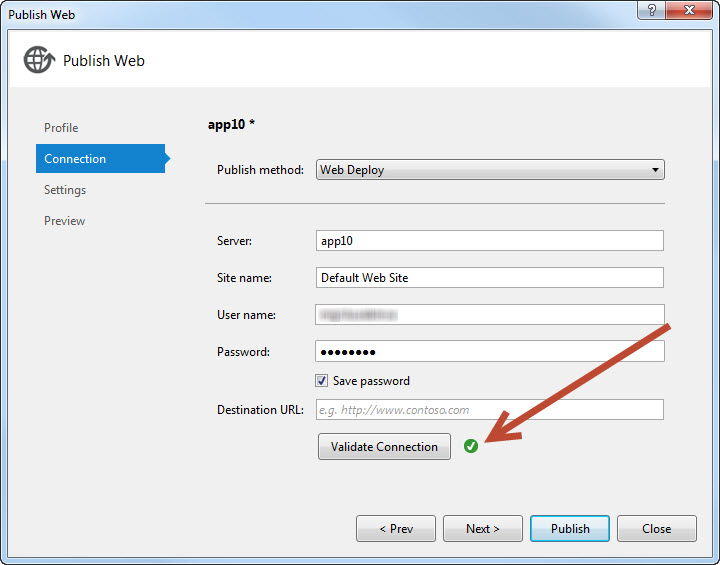
Then we fill in the input fields and click the “Validate Connection” button.
And here the most interesting begins.
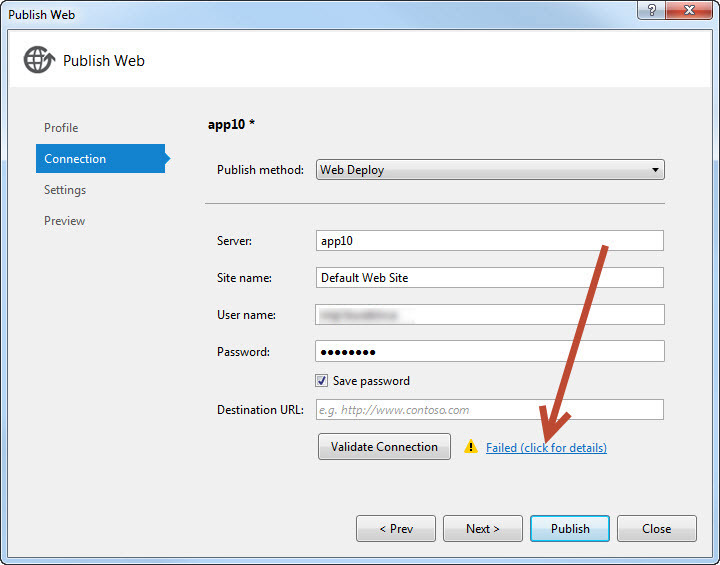
2. Validation failed.
In order to view the text of the error, you need to click on the “Failed (click for details)” hyperlink
3. First mistake:
The studio did not receive a response from the server.
You need to check the settings of the web server (in my case it has the domain name “app10”), for which you need to go to Server Manager (I have an English version of Windows 2008 R2 installed on my server, so I will write English names for menu items and window titles) .
4. Open IIS Manager and select the node with the name of the machine:

I hid the username in the screenshot.
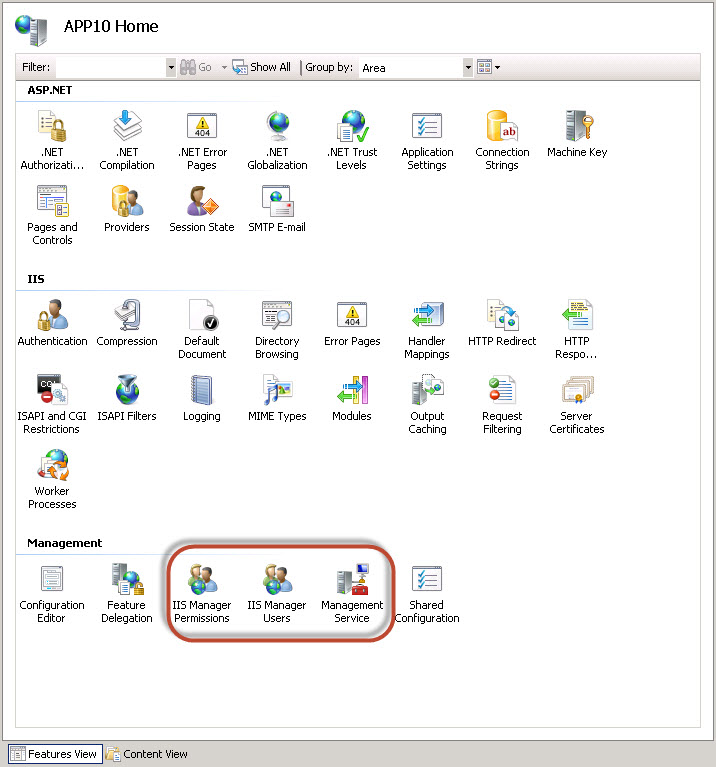
5. In the “Management” section, you need to check the availability of the “IIS Manager Permissions”, “IIS Manager Users” and “Management Service” items.
I do not have them, so you need to install.
To do this, right-click on the “Web Server (IIS)” item in the left part of the “Server Manager” window and select the “Add Role Services” option.
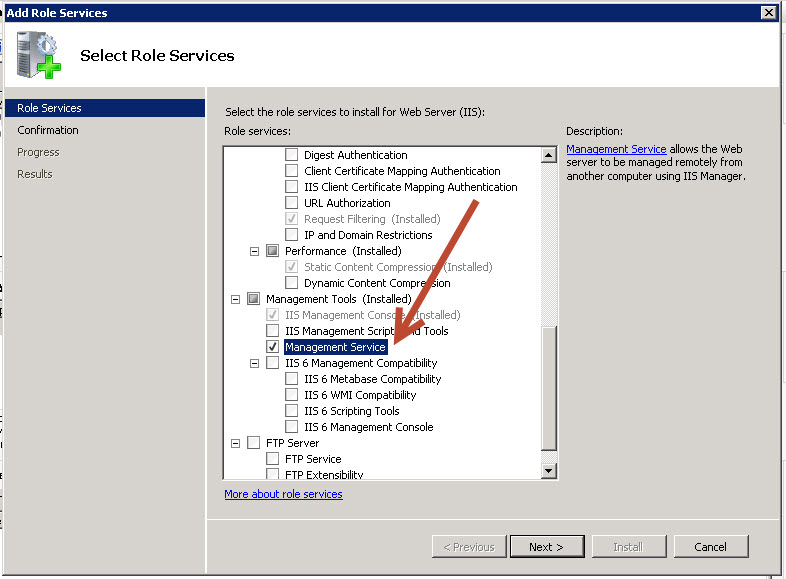
The role selection window will open.
In the “Management Tools” section, check “Management Service” and click the “Next” button.
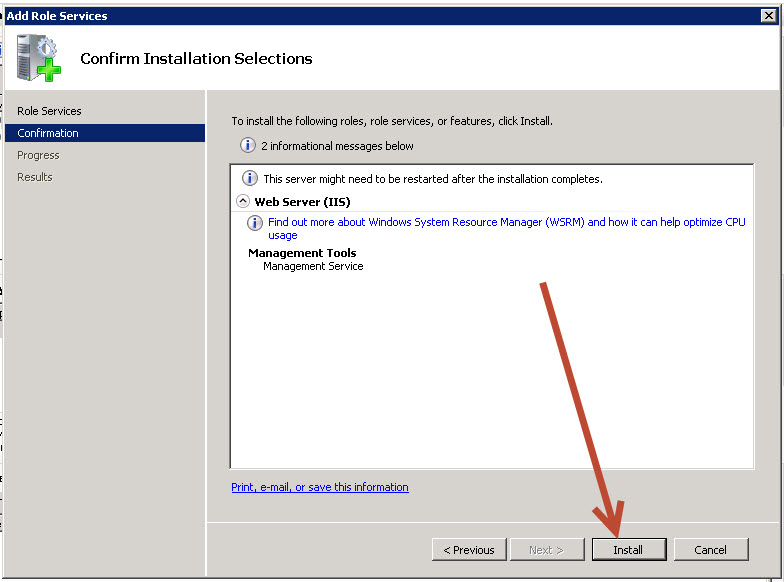
In the next window of the Add Role Wizard, click the Install button.
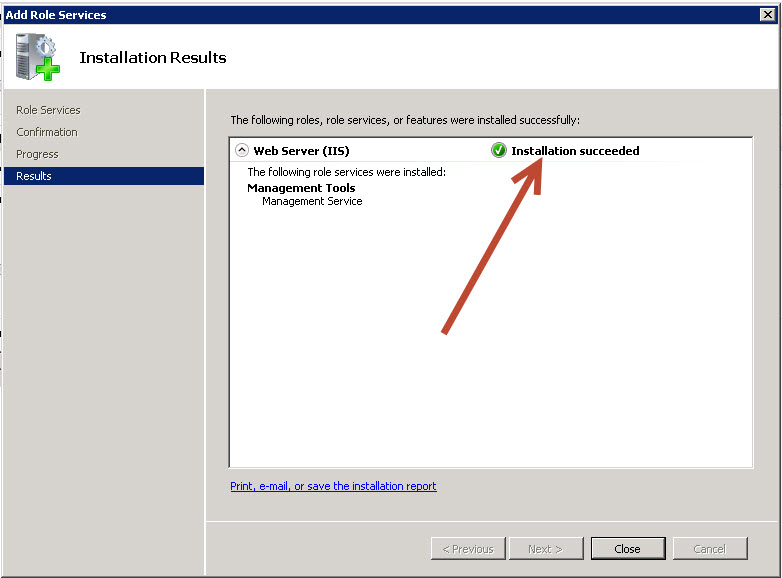
You must wait until the end of the process of adding the role and make sure that everything is successful:
Close the role adding window and again go to the “Management” section (see clause 5).
Items we needed appeared.
6. It is necessary to verify that the Windows Firewall does not interfere with the establishment of a connection.
To do this, open the “Windows Firewall with Advanced Security” snap-in, which is located in the “Start” menu - “Administrative Tools”.
You must ensure that incoming connections to port 8172 are allowed.
(My firewall is completely disabled).
7. Make sure that the Web Management Service is listening on port 8172.
To do this, in the server settings, double-click on the item "Management Service"

In the window that opens, check that port 8172 is specified, and also allow remote connections by ticking the checkbox “Enable remote connection”.
If you do not check this box, an error will appear in the Publishing Wizard in Visual Studio:
Now click the “Apply” button with a green check mark on the right side of the add-ons window.
After applying the settings, click the “Start” button in the same place, which will start the service.
8. Switch to Visual Studio and click the “Validate Connection” button in the publishing wizard again.
I opened a certificate error, but you can simply ignore it and click the “Accept” button, having previously checked the “Save this certificate for future sessions of Visual Studio” checkbox.
9. After that, I had an error 404:
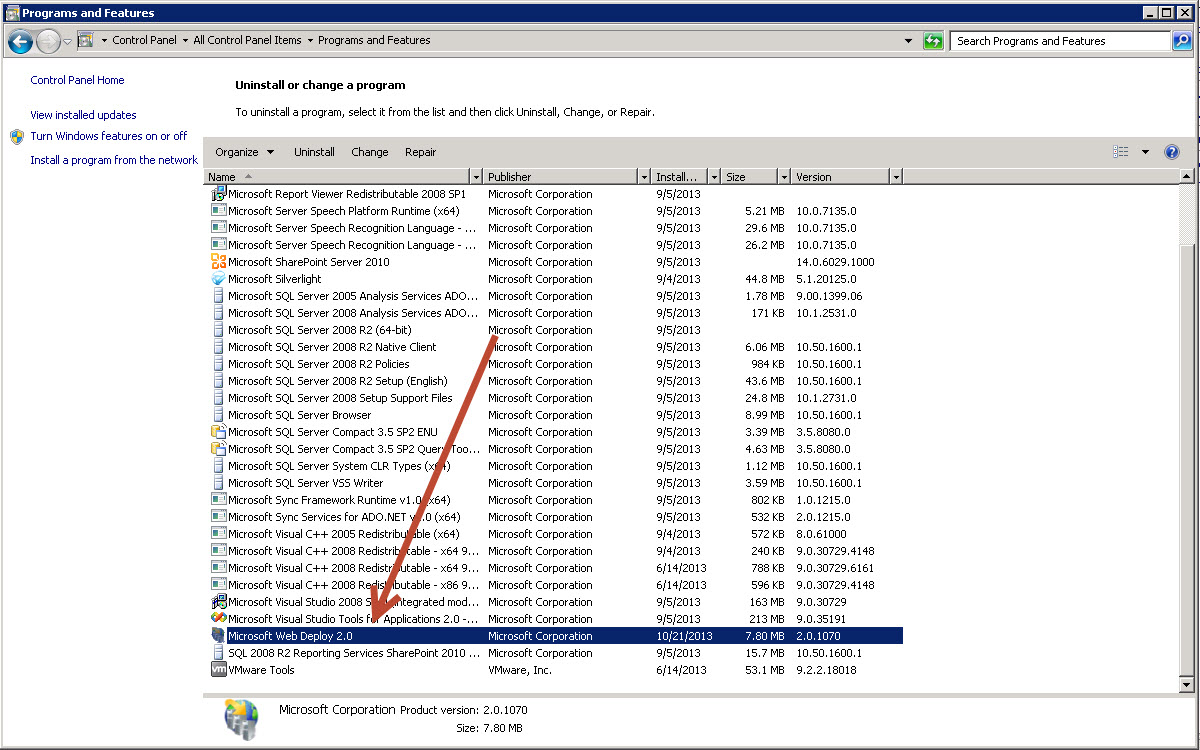
You must make sure that the Microsoft Web Deploy 2.0 tool is installed.
To do this, go to "Start" - "Control Panel" - "Programs and Features" and check the presence of the installed product "Microsoft Web Deploy 2.0".
If not, download it from here and install it on the server.
During installation, you need to select the “Custom” installation type and select all the items offered by the installer for installation:

Complete the installation.
After that, update the “Programs and Features” window and it will appear.
10. After installing Microsoft Web Deploy 2.0, you must restart the Web Management Service.
Now we press the “Validate Connection” button in the publishing wizard in Visual Studio and VUAL !!!
Verification passed successfully.
Click the Next button twice and publish the application to the web server by clicking the Publish button.
At the end of this article I want to say that the most informative messages when errors occur during the publication of a web application can be found in the IIS log file, which by default is located in the following path:
Just remember that as with other IIS logs, the data is not logged immediately, so you may have to wait a couple of minutes to see the latest messages, or restart the web management services to reset the log data to file.
Good luck!
UPDATE 08/03/2015
If during the verification of the connection to the server (when clicking on the “Validate Connection” button) an error occurs:
in IIS Manager, select the node with the name of the machine and double-click with the left mouse button on the item “Management Service Delegation”:

In the window that opens, you need to add a new rule by clicking on the “Add Rule ...” link at the top right and selecting the “Deploy Applications with Content” option and clicking the “OK” button:

In the window that opens, you must specify the user whose credentials you use to publish from Visual Studio:
Also, in the Providers drop-down menu, you must additionally select the “createApp” and “setAcl” items:
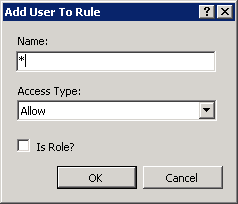
After clicking the “OK” button, the add user window will open.
Here in the field “Name” you can put * and click OK:
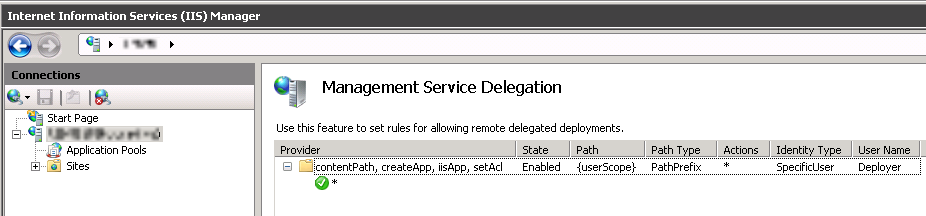
After performing these actions, the “Management Service Delegation” rules window will look like this:
And the error described will disappear.
UPDATE 1/19/2017
If during the verification of the connection to the server (when clicking on the “Validate Connection” button) an error occurs:
and at the end of the error text it says “The remote server returned an error: (550)”.
This means that you were sealed in the “Site name” parameter in the publishing settings window.
Check the site name and compare it with where you publish your application.
Below I will describe the most common ones.
I hope that this article will help save time, a large amount of which I spent studying problems.
Let's try to deploy the application on a clean Windows 2008 R2 server, on which the “Web Server (IIS)” role is installed.
1. To do this, in Visual Studio (I have Visual Studio 2012 Professional), right-click on the project and select the "Publish ..." menu item
The Publish Wizard window opens in which you want to create a profile.
')
Enter the profile name (I called the profile the same way as my web server is called “app10”) and click the “OK” button.
Then we fill in the input fields and click the “Validate Connection” button.
And here the most interesting begins.
2. Validation failed.
In order to view the text of the error, you need to click on the “Failed (click for details)” hyperlink
3. First mistake:
Could not connect to the destination computer ("app10"). On the remote computer, make sure that Web Deploy is installed and that the required process ("The Web Management Service") is started.)The studio did not receive a response from the server.
You need to check the settings of the web server (in my case it has the domain name “app10”), for which you need to go to Server Manager (I have an English version of Windows 2008 R2 installed on my server, so I will write English names for menu items and window titles) .
4. Open IIS Manager and select the node with the name of the machine:
I hid the username in the screenshot.
5. In the “Management” section, you need to check the availability of the “IIS Manager Permissions”, “IIS Manager Users” and “Management Service” items.
I do not have them, so you need to install.
To do this, right-click on the “Web Server (IIS)” item in the left part of the “Server Manager” window and select the “Add Role Services” option.
The role selection window will open.
In the “Management Tools” section, check “Management Service” and click the “Next” button.
In the next window of the Add Role Wizard, click the Install button.
You must wait until the end of the process of adding the role and make sure that everything is successful:
Close the role adding window and again go to the “Management” section (see clause 5).
Items we needed appeared.
6. It is necessary to verify that the Windows Firewall does not interfere with the establishment of a connection.
To do this, open the “Windows Firewall with Advanced Security” snap-in, which is located in the “Start” menu - “Administrative Tools”.
You must ensure that incoming connections to port 8172 are allowed.
(My firewall is completely disabled).
7. Make sure that the Web Management Service is listening on port 8172.
To do this, in the server settings, double-click on the item "Management Service"
In the window that opens, check that port 8172 is specified, and also allow remote connections by ticking the checkbox “Enable remote connection”.
If you do not check this box, an error will appear in the Publishing Wizard in Visual Studio:
Could not connect to the remote computer ("app10") using the specified process ("The Web Management Service") because the server did not respond. Make sure that the process ("The Web Management Service") is started on the destination computer. The remote server returned an error: (403) Forbidden.Now click the “Apply” button with a green check mark on the right side of the add-ons window.
After applying the settings, click the “Start” button in the same place, which will start the service.
8. Switch to Visual Studio and click the “Validate Connection” button in the publishing wizard again.
I opened a certificate error, but you can simply ignore it and click the “Accept” button, having previously checked the “Save this certificate for future sessions of Visual Studio” checkbox.
9. After that, I had an error 404:
Could not connect to the remote computer ("app10"). On the destination computer, make sure that Web Deploy is installed and that the required process ("The Web Management Service") is started. The remote server returned an error: (404) Not Found.You must make sure that the Microsoft Web Deploy 2.0 tool is installed.
To do this, go to "Start" - "Control Panel" - "Programs and Features" and check the presence of the installed product "Microsoft Web Deploy 2.0".
If not, download it from here and install it on the server.
During installation, you need to select the “Custom” installation type and select all the items offered by the installer for installation:
Complete the installation.
After that, update the “Programs and Features” window and it will appear.
10. After installing Microsoft Web Deploy 2.0, you must restart the Web Management Service.
Now we press the “Validate Connection” button in the publishing wizard in Visual Studio and VUAL !!!
Verification passed successfully.
Click the Next button twice and publish the application to the web server by clicking the Publish button.
At the end of this article I want to say that the most informative messages when errors occur during the publication of a web application can be found in the IIS log file, which by default is located in the following path:
%SystemDrive%\Inetpub\logs\WMSvcJust remember that as with other IIS logs, the data is not logged immediately, so you may have to wait a couple of minutes to see the latest messages, or restart the web management services to reset the log data to file.
Good luck!
UPDATE 08/03/2015
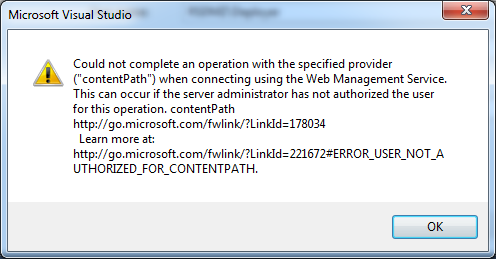
If during the verification of the connection to the server (when clicking on the “Validate Connection” button) an error occurs:
Could not complete an operation with the specified provider ("contentPath") when connecting using the Web Management Service.
in IIS Manager, select the node with the name of the machine and double-click with the left mouse button on the item “Management Service Delegation”:
It happens that the item 'Management Service Delegation' is missing
To eliminate this problem, you need to run the WebDeploy installer again, select the “Change” item and install the components.
Then restart the server management snap-in and this item will appear.
Then restart the server management snap-in and this item will appear.
In the window that opens, you need to add a new rule by clicking on the “Add Rule ...” link at the top right and selecting the “Deploy Applications with Content” option and clicking the “OK” button:
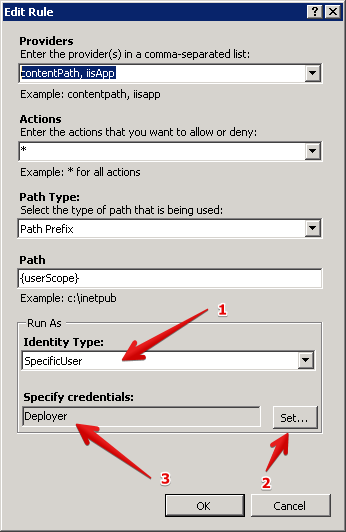
In the window that opens, you must specify the user whose credentials you use to publish from Visual Studio:
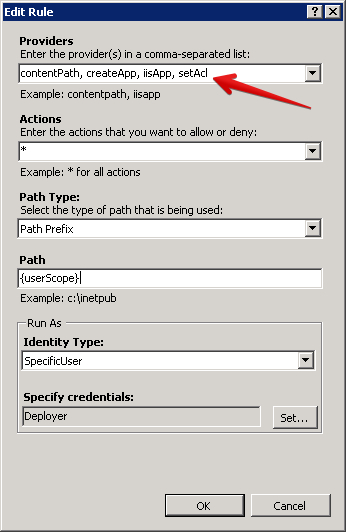
Also, in the Providers drop-down menu, you must additionally select the “createApp” and “setAcl” items:
After clicking the “OK” button, the add user window will open.
Here in the field “Name” you can put * and click OK:
After performing these actions, the “Management Service Delegation” rules window will look like this:
And the error described will disappear.
UPDATE 1/19/2017
If during the verification of the connection to the server (when clicking on the “Validate Connection” button) an error occurs:
Could not connect to the remote computer ("serverName") using the specified process ("Web Management Service") because the server did not respond. Make sure that the process ("Web Management Service") is started on the remote computer...
and at the end of the error text it says “The remote server returned an error: (550)”.
This means that you were sealed in the “Site name” parameter in the publishing settings window.
Check the site name and compare it with where you publish your application.
Source: https://habr.com/ru/post/198452/
All Articles