Example of “claims-based” authorization with “xml-based” access policy configuration

Introduction
The topic of authentication and authorization will always be relevant for most web applications. Many .NET developers have already managed to get acquainted with the Windows Identity Foundation (WIF), its approaches and capabilities for implementing so-called "identity-aware" applications. For those who did not have time to work with WIF, the first acquaintance can be started by studying the next section of MSDN . In this article, I propose to take a closer look at the so-called “claims-based” approach to authorizing users by examining how it might look like an example.
Claims-Based Authorization
"Claims-Based" authorization is an approach in which the decision of authorization to grant or deny access to a specific user is based on arbitrary logic, which uses as input data a certain set of "claims" relating to this user. Drawing an analogy with the “Role-Based” approach, a certain administrator in his set of “claims” will have only one element with the type “Role” and the value “Administrator”, for example. In more detail, the advantages and problems that this approach solves can be found on the same MSDN , I also advise you to look at the lecture Dominic Bayer .
In general, the above approach encourages developers to separate the business logic of the application from the logic of authorization and it is really convenient. So what does this look like in practice? To her actually get down.
')
Formulation of the problem
Suppose you need to create some API service that will be available to several client applications. The functionality of client applications is different, users also. It is possible that other client applications will appear, with their users and the interaction scheme with the API, so we need to have a flexible authorization system in order to be able at any stage to configure the API access policy for this or that application / user. The API in our case will be built using ASP.NET Web API 2.0, the client applications will be, for example, the Windows Phone application and the Web site.
Consider the applications of their users and functionality in more detail:
Windows phone client

- By itself, can only register new users.
- Registered users can:
- view your profile;
- update your profile;
- change your password;
Web client

- By itself does not have access to the API.
- Users registered with the mobile client can:
- view your profile;
- update your profile;
- change your password;
- System administrators can:
- all the same as the users for your account;
- everything is the same as the users for the account of any user;
- view a list of all registered users;
- create / delete users;
Implementation
Let's start by defining the interface of the future API service:
public interface IUsersApiController { // List all users. IEnumerable<User> GetAllUsers(); // Lookup single user. User GetUserById(int id); // Create user. HttpResponseMessage Post(RegisterModel user); // Restore user's password. HttpResponseMessage RestorePassword(string email); // Update user. HttpResponseMessage Put(int id, UpdateUserModel value); // Delete user. HttpResponseMessage Delete(string email); } The immediate implementation of the API is left out of this article, at least, for example, an option like this also comes down:
public class UsersController : ApiController { //... public HttpResponseMessage Post([FromBody]RegisterModel user) { if (ModelState.IsValid) { return Request.CreateResponse(HttpStatusCode.OK, "Created!"); } else { return Request.CreateErrorResponse(HttpStatusCode.BadRequest, ModelState); } } //... } The next step is to create a descendant of the ClaimsAuthorizationManager class and override some of its methods.
ClaimsAuthorizationManager is the WIF component that allows you to intercept incoming requests in one place and execute arbitrary logic, which, based on the current user's claims, * decides on granting or denying access.* - about where this set is formed let's talk a bit later.
Without going far, we can borrow its implementation from MSDN via this link . As we see from the Examples section, the following methods are redefined:
/// <summary> /// Overloads the base class method to load the custom policies from the config file /// </summary> /// <param name="nodelist">XmlNodeList containing the policy information read from the config file</param> public override void LoadCustomConfiguration(XmlNodeList nodelist) {...} /// <summary> /// Checks if the principal specified in the authorization context is authorized /// to perform action specified in the authorization context on the specified resource /// </summary> /// <param name="pec">Authorization context</param> /// <returns>true if authorized, false otherwise</returns> public override bool CheckAccess(AuthorizationContext pec) {...} Looking at the implementation and comments to it, you can figure out what is happening and I will not dwell on it. I will note only the access policy format from this example:
... <policy resource="http://localhost:28491/Developers.aspx" action="GET"> <or> <claim claimType="http://schemas.microsoft.com/ws/2008/06/identity/claims/role" claimValue="developer" /> <claim claimType="http://schemas.xmlsoap.org/claims/Group" claimValue="Administrator" /> </or> </policy> <policy resource="http://localhost:28491/Administrators.aspx" action="GET"> <and> <claim claimType="http://schemas.xmlsoap.org/claims/Group" claimValue="Administrator" /> <claim claimType="http://schemas.xmlsoap.org/ws/2005/05/identity/claims/country" claimValue="USA" /> </and> </policy> <policy resource="http://localhost:28491/Default.aspx" action="GET"> </policy> ... The access policy here is a set of “policy” sections, each of which is identified by attributes such as “resource” and “action”. Inside each such section are listed the “claims” that are required to access the resource. In the case of WebApi, “resource” is the name of the controller, “action” is the name of the action method. Moreover, it is possible to build access rules using logical conditions *.
* - and everything would be great if in the current implementation it was possible to configure more than 2 x elements of the “claim” inside the “and” or “or” blocks.
While we are using all “as-is”, except for the name of the heir, we change it to
XmlBasedAuthorizationManager If you try to knock down a project, it turns out that we lack the PolicyReader class, you can take it from the full source code of the MSDN example.After the new implementation is ready, we will configure the WebAPI application to use it as an authorization manager. For this:
1. Register the configuration sections required for WIF operation:
<configSections> <section name="system.identityModel" type="System.IdentityModel.Configuration.SystemIdentityModelSection, System.IdentityModel, Version=4.0.0.0, Culture=neutral, PublicKeyToken=B77A5C561934E089" /> <section name="system.identityModel.services" type="System.IdentityModel.Services.Configuration.SystemIdentityModelServicesSection, System.IdentityModel.Services, Version=4.0.0.0, Culture=neutral, PublicKeyToken=B77A5C561934E089" /> <!-- Others sections--> </configSections> 2. Specify which implementation should be used as an authorization manager:
<system.identityModel> <identityConfiguration> <claimsAuthorizationManager type="YourProject.WebApi.Security.XmlBasedAuthorizationManager, YourProject.WebApi, Version=1.0.0.0, Culture=neutral"> <!-- Policies --> </claimsAuthorizationManager> <claimsAuthenticationManager type="YourProject.WebApi.Security.AuthenticationManager, YourProject.WebApi, Version=1.0.0.0, Culture=neutral" /> </identityConfiguration> </system.identityModel> Great, we told WIF which implementation to use, but as you noticed, there are two details in the configuration above:
- instead of a set of xml-sections of the "policy" we are empty;
- there is an xml-element "
claimsAuthenticationManager", which I did not mention earlier.
Consider these points in order.
1. Access Policy Configuration
Returning to the formulation of the problem, as well as taking into account the access policy format already considered, we will try to create a configuration for our API. You get the following set of rules:
<policy resource="Users" action="GetAllUsers"> <and> <claim claimType="http://schemas.xmlsoap.org/ws/2005/05/identity/claims/system" claimValue="WebApplication" /> <claim claimType="http://schemas.microsoft.com/ws/2008/06/identity/claims/role" claimValue="Admin" /> </and> </policy> <policy resource="Users" action="Post"> <claim claimType="http://schemas.xmlsoap.org/ws/2005/05/identity/claims/system" claimValue="WPhoneApplication" /> </policy> <policy resource="Users" action="RestorePassword"> <claim claimType="http://schemas.xmlsoap.org/ws/2005/05/identity/claims/system" claimValue="WPhoneApplication" /> </policy> <policy resource="Users" action="GetUserById"> <or> <and> <claim claimType="http://schemas.xmlsoap.org/ws/2005/05/identity/claims/system" claimValue="WebApplication" /> <claim claimType="http://schemas.microsoft.com/ws/2008/06/identity/claims/role" claimValue="Admin" /> </and> <and> <claim claimType="http://schemas.microsoft.com/ws/2008/06/identity/claims/role" claimValue="User" /> <!-- {0} "request" ? --> <!-- <claim claimType="UserId" claimValue="{0}" /> --> </and> </or> </policy> <policy resource="Users" action="Put"> <or> <and> <claim claimType="http://schemas.xmlsoap.org/ws/2005/05/identity/claims/system" claimValue="WebApplication" /> <claim claimType="http://schemas.microsoft.com/ws/2008/06/identity/claims/role" claimValue="Admin" /> </and> <and> <claim claimType="http://schemas.microsoft.com/ws/2008/06/identity/claims/role" claimValue="User" /> <!-- {0} "request" ? --> <!-- <claim claimType="UserId" claimValue="{0}" /> --> </and> </or> </policy> We see that some policy sections are simpler, some more complicated, some are repeated. Consider in parts, starting with a simple option - access policy for getting a list of users :
<policy resource="Users" action="GetAllUsers"> <and> <claim claimType="http://schemas.xmlsoap.org/ws/2005/05/identity/claims/system" claimValue="WebApplication" /> <claim claimType="http://schemas.microsoft.com/ws/2008/06/identity/claims/role" claimValue="Admin" /> </and> </policy> Everything is extremely obvious: those users have access to this resource, whose “claims” set contains both “claim” elements.
Now a more complicated option is to get information about a user by ID :
<policy resource="Users" action="GetUserById"> <or> <and> <claim claimType="http://schemas.xmlsoap.org/ws/2005/05/identity/claims/system" claimValue="WebApplication" /> <claim claimType="http://schemas.microsoft.com/ws/2008/06/identity/claims/role" claimValue="Admin" /> </and> <and> <claim claimType="http://schemas.microsoft.com/ws/2008/06/identity/claims/role" claimValue="User" /> <!-- {0} "request" ? --> <!-- <claim claimType="UserId" claimValue="{0}" /> --> </and> </or> </policy> Returning to the requirements, only administrators of the web application, as well as users, can have access to this resource, provided that each user can only receive data on his account . As we see, we easily install the first requirement in the first
.. block. But what about the users?Unfortunately, the current implementation, which We have valiantly copied, does not allow to configure this condition now. Moreover, as I mentioned above , it also does not allow nested elements to be used inside logical "
and/or " blocks. If we are to be extremely honest, this implementation rigidly sets the number of “claim” elements equal to two inside “ and/or ” blocks.As for the condition “each individual user can only receive data on his account, ” I plan to offer my own solution in the next article. I propose for now to come to terms with the fact that all users can view information about each other, as it comes out of the created configuration. Especially while the implementation of the
GetUserById method looks like a throw new NotImplementedException() .But in order for the current configuration to work properly, we will slightly
PolicyReader implementation of the PolicyReader class: /// <summary> /// Read the Or Node /// </summary> /// <param name="rdr">XmlDictionaryReader of the policy Xml</param> /// <param name="subject">ClaimsPrincipal subject</param> /// <returns>A LINQ expression created from the Or node</returns> private Expression<Func<ClaimsPrincipal, bool>> ReadOr(XmlDictionaryReader rdr, ParameterExpression subject) { Expression defaultExpr = Expression.Invoke((Expression<Func<bool>>)(() => false)); while (rdr.Read()) { if (rdr.NodeType != XmlNodeType.EndElement && rdr.Name != "or") { defaultExpr = Expression.OrElse(defaultExpr, Expression.Invoke(ReadNode(rdr, subject), subject)); } else break; } rdr.ReadEndElement(); Expression<Func<ClaimsPrincipal, bool>> resultExpr = Expression.Lambda<Func<ClaimsPrincipal, bool>>(defaultExpr, subject); return resultExpr; } /// <summary> /// Read the And Node /// </summary> /// <param name="rdr">XmlDictionaryReader of the policy Xml</param> /// <param name="subject">ClaimsPrincipal subject</param> /// <returns>A LINQ expression created from the And node</returns> private Expression<Func<ClaimsPrincipal, bool>> ReadAnd(XmlDictionaryReader rdr, ParameterExpression subject) { Expression defaultExpr = Expression.Invoke((Expression<Func<bool>>)(() => true)); while (rdr.Read()) { if (rdr.NodeType != XmlNodeType.EndElement && rdr.Name != "and") { defaultExpr = Expression.AndAlso(defaultExpr, Expression.Invoke(ReadNode(rdr, subject), subject)); } else break; } rdr.ReadEndElement(); Expression<Func<ClaimsPrincipal, bool>> resultExpr = Expression.Lambda<Func<ClaimsPrincipal, bool>>(defaultExpr, subject); return resultExpr; } Well, we configured the policy of access to the resources of our API, created the implementation of the authorization manager, which can work with our configuration. Now you can proceed to authentication - the stage that precedes authorization.
2. Authentication and ClaimsAuthenticationManager
Even before deciding whether a user has access to a resource, it is first necessary to authenticate, and if it is successful, fill the user's “claims” set.
For authentication, we will use Basic Authentication and, for example, its implementation in Thinktecture.IdentityModel.45 . To do this, in the NuGet console, run the command:
Install-Package Thinktecture.IdentityModel WebApiConfig code of the WebApiConfig class to approximate the following: public static class WebApiConfig { public static void Register(HttpConfiguration config) { var authentication = CreateAuthenticationConfiguration(); config.MessageHandlers.Add(new AuthenticationHandler(authentication)); config.MapHttpAttributeRoutes(); config.Routes.MapHttpRoute( name: "DefaultApi", routeTemplate: "api/{controller}/{id}", defaults: new { id = RouteParameter.Optional } ); config.EnableSystemDiagnosticsTracing(); config.Filters.Add(new ClaimsAuthorizeAttribute()); } private static AuthenticationConfiguration CreateAuthenticationConfiguration() { var authentication = new AuthenticationConfiguration { ClaimsAuthenticationManager = new AuthenticationManager(), RequireSsl = false //only for testing }; #region Basic Authentication authentication.AddBasicAuthentication((username, password) => { var webSecurityService = ServiceLocator.Current.GetInstance<IWebSecurityService>(); return webSecurityService.Login(username, password); }); #endregion return authentication; } } Here I will only note that to check the credentials that came from the request, I use a certain
IWebSecurityService . You can use your own logic here, for example: return username == password;Now, with each request to any resource, authentication will be verified, but we also need to transform the base set of the current user’s “claims”. This is handled by the
ClaimsAuthenticationManager , or rather our successor to this class, which we have already registered : public class AuthenticationManager : ClaimsAuthenticationManager { public override ClaimsPrincipal Authenticate(string resourceName, ClaimsPrincipal incomingPrincipal) { if (!incomingPrincipal.Identity.IsAuthenticated) { return base.Authenticate(resourceName, incomingPrincipal); } var claimsService = ServiceLocator.Current.GetInstance<IUsersClaimsService>(); var claims = claimsService.GetUserClaims(incomingPrincipal.Identity.Name); foreach (var userClaim in claims) { incomingPrincipal.Identities.First().AddClaim(new Claim(userClaim.Type, userClaim.Value)); } return incomingPrincipal; } } As you can see, if a user is authenticated, his “claims” set, say from the database, is
IUsersClaimsService by using the newly created instance of IUsersClaimsService . After the "transformation", an instance of ClaimsPrincipal returns further to the pipeline for later use, for example, by authorization.Check result
It's time to test the performance of our solution. To do this, we naturally need users with certain "claims". Let's not fantasize for a long time over where to get them and slightly modify the
AuthenticationManager for testing purposes. Instead of using IUsersClaimsService following code: public class AuthenticationManager : ClaimsAuthenticationManager { public override ClaimsPrincipal Authenticate(string resourceName, ClaimsPrincipal incomingPrincipal) { ... if (incomingPrincipal.Identity.Name.ToLower().Contains("user")) { incomingPrincipal.Identities.First().AddClaim(new Claim(ClaimTypes.Role, "User")); } return incomingPrincipal; } } Great, now all users whose login contains the word “user” will contain the required “claim”.
Run the project and follow the link localhost : [port] / api / users
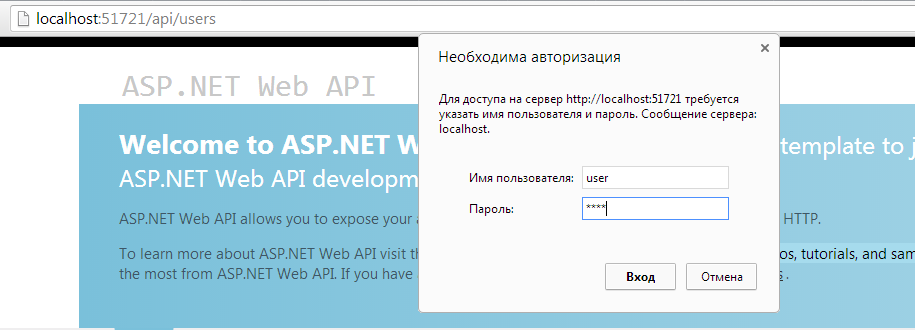
We enter the cherished login and password, our simple authorization check them for equality, and the authorization manager transforms the “claims” set:

Continue the execution and make sure that the mere mortal cannot view the list of all users:

Now let's remember that at the stage of configuring the access policy we had to allow all users for a while to view information about each other, and we will use this. Let's try to find out about the user with Id = 100, by following the link ~ / api / users / 100:

And here we are seeing that a kind of implementation that appeared on the sidelines returns information about any user :)
Conclusion
So, we got acquainted with some WIF features, sorted out an example of where to start when building a flexible authorization system, and also “coded” a bit.
Thanks for attention.
Source: https://habr.com/ru/post/198424/
All Articles