Core Data for iOS. Chapter 4 Theoretical part
Good day, good day!
Today I want to start writing a series of lectures with practical tasks on the book “Pro Core Data for iOS” by Michael Privat and Robert Warner, which you can buy from this link. Each chapter will contain a theoretical and practical part.

Content:
')
You can create custom applications with a terrific interface that helps them in everyday life and problem solving, but if you incorrectly present the data in the application, the application will become difficult to maintain, its performance will fall and over time it may become completely unsuitable for use. In this chapter, we will look at how to design models (data) so that they do not spoil your application.
The American philosopher Ralph Waldo Emerson once said: “A foolish consistency is the hobgoblin of little minds” (Stupid following of something is the lot of fools). People often use this statement in order to protect themselves from attacks and questions from others to the details. We hope that we will not fall for this bait, although we periodically assert that Core Data is not a database, but treat it as a database (author: something is remembered “if something goes like a duck, quacks like duck, it means duck "). In this section, we will look at how to design the data structure of the application, and drawing a parallel to this process to the process of designing the structure of a relational database will help us a lot, not only with discussion, but also with the final result. At some points, of course, analogies will not exist, but during the discussion we will try to mark these points.
Core Data entities look, act, smell, and taste the same as the tables in relational databases. Attributes are table fields, relationships are JOINs for primary and foreign keys, and entities themselves are the same records in the tables. If our data model is “superimposed” on the storage type SQLite, then Core Data itself implements everything in exactly the way that we described above and in chapters №2 / №3. However, you should not forget that your data can be stored in memory, or, for example, in some file (atomic storage), and there are no tables and fields, primary keys and external ones. Core Data abstracts the data structure from the type of storage used, thereby achieving convenience and versatility in the design and interaction with data. Allow Core Data to embrace your mind, merge into one with Core Data: either you will feel all the power using Core Data, or you will find yourself at the bottom of the trough using non-optimal data structures.
Newbies who are just starting to learn Core Data, creating their first data models, constantly resent that they don’t have the ability to create and be responsible for the primary keys in their entities, as they used to do in traditional modeling of the database structure. There are no auto-keying keys in Core Data because they are not needed there. Core Data takes responsibility for creating a unique key for each object to be added (managed object). No primary keys imply that there are no foreign keys: Core Data manages the relationships between the entities themselves and performs any necessary joins. Immediately stop! Stop feeling uncomfortable because you don’t need to declare primary and foreign keys!
Another place that can drag you down into the quagmire is the modeling of many-to-many relationships. Imagine for a moment that players in the League Manager application may belong to different teams. If that were the case, then each team could have a lot of players, and each player could play for different teams. If you created a traditional relational database, then you would have three tables: one for teams, one for players, and one for tracking which player belongs to which team. At the same time, in Core Data, the same 2 entities are Player and Team, and the many-to-many relationship is configured by setting the usual tick. Core Data, however, “under the hood” still implements this using 3 tables: ZTEAM, ZPLAYER and Z1TEAMS, but these are implementation details. You do not need to know that there will be a third or fourth table, Core Data will take care of this, it will do it better.
Tip : Take care of the data, not the data storage mechanisms.
The theory of designing relational databases combines a data modeling process, called normalization (the normalization process), which aims to reduce or eliminate redundancy, as well as provide efficient access to data in the database.
The normalization process consists of five levels, or forms, and work continues at level 6. Perhaps only mathematicians will like the definitions of the first five forms, only they will most likely understand them. They look like this:
(c) www.databasedesign-resource.com/normal-forms.html
We have neither a sufficient number of pages to describe all forms, nor a desire to go through the definitions of all normal forms and explain their essence. Instead, this section will describe each normal form relative to Core Data and give some design tips. Remember that following a certain normal form requires following all the normal forms that precede this one.
The database that corresponds to the first normal form (1NF) is considered normalized. To follow this form (level) of normalization, each record in the database must have the same number of fields. In the context of Core Data, this means that any managed object must have a certain (predetermined) number of attributes. Given that Core Data does not allow you to create one entity with a different number of attributes, we can conclude that the models in Core Data are automatically normalized.
The second normal form (2NF) and the third normal form (3NF) relate to the connections between non-key and key fields, requiring that non-key fields be facts about the key field to which they belong. Since in Core Data you do not care about the keys, this question is removed. However, you must make sure that all attributes of an entity describe this particular entity, and not something else. For example, the Player entity should not have the uniformColor attribute, since the color of the form describes the state of the team, rather than the player.
The following two normal forms, the fourth normal form (4NF) and the fifth normal form (5NF) can be considered the same forms in the Core Data world. They are responsible for reducing or eliminating the redundancy of the described data, pushing you to transfer attributes with multiple values into separate entities and create many-to-many connections between entities. In terms of Core Data, the 4NF form states that an entity should not have attributes that can have multiple values. Instead, it is worth transferring these attributes to a separate entity and creating a many-to-many relationship between entities. Consider the example of our application with teams and players from the application LeagueManager. The data model, which will violate 4 normal form and 5 normal form, will consist of one entity, Team, with an additional attribute - player. Then we will create new Team instances for each player, with the result that we will have some superfluous (unnecessary) team objects. Instead, in the data model used in the LeagueManager application, a Player entity is created, which is combined by a many-to-many relationship with the Team entity.
In the process of modeling, do not forget about these simple rules. For example, in the data model in the LeagueManager application, the uniformColor attribute in the Team essence represents an opportunity for normalization. The names of the colors of the forms is a finite set, which means that it would be possible to create an additional entity called Color, which will have the name attribute and which is connected by a many-to-one relationship with the Team entity.
Some developers simply agree to use the default development tools. Others create tools only when the current ones seem to be inferior to them. Others stubbornly insist on creating their own tools. We fall into the last category of developers who use only the tools that we ourselves have made. We are proud of the products we create, and sometimes we even celebrate small victories and good luck in saving development time. We never consider the time spent on developing our tools because this time is included in the category of “playing time” which is enjoyable. However, no matter how surprisingly it sounded, it never occurred to us to write our own designer of models for Core Data, probably because XCode is doing a good job with the task. Perfect integration into the development environment, which we probably can not surpass in their tools. Everything else, Xcode comes with a built-in graphical data model maker, which makes it much easier to design. In previous chapters, we have already had to deal with him. In this section, we will have less time to understand how Core Data works, and we will pay attention to tools that we will often use.
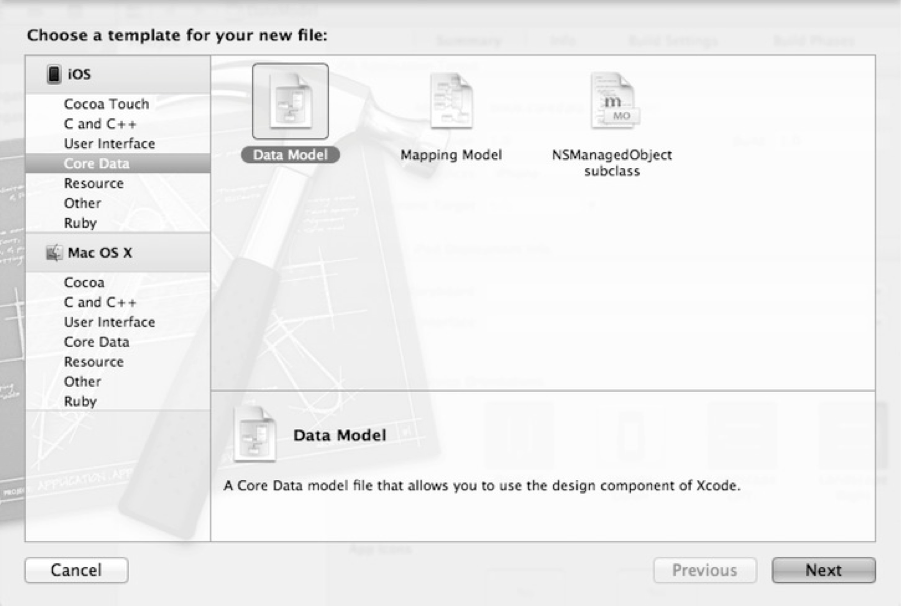
No code will be written in this section. Instead, we will focus on the data modeler's user interface. To add a data model to our project, select the menu items: File -> New -> New FIle, in the left part of the window select the section “Core Data”. You will see three types of files: Data Model, Mapping Model, NSManagedObject subclass. Mapping models help you in migrating data from one data model to another (for more details, see Chapter 8). Select the type of Data Model, specify the name of the data model and save it.
Opening the newly created model file, Xcode opens it in the visual model editor. The presence of a large number of buttons and options can confuse you. The figure below shows the elements that are used in the simulation and their description is given.
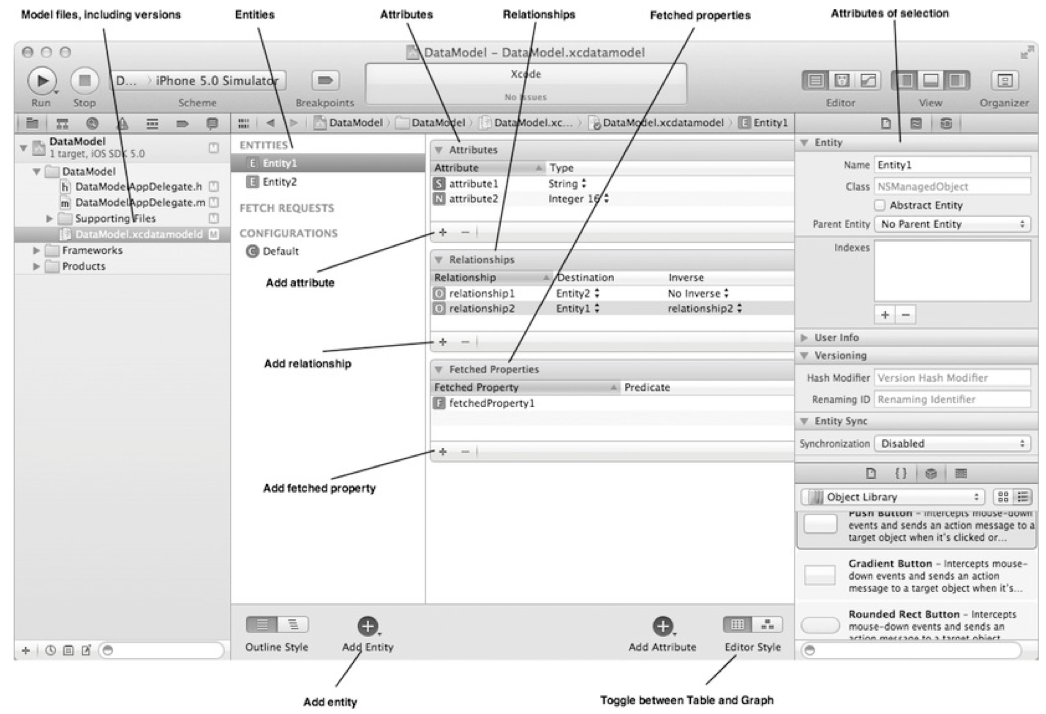
The model editor allows you to easily switch between entities, properties, relationships (relationships), queries, and data model configurations. It is also possible to switch between options for displaying data models: a graph view, or a tabular view.

To make it more interesting to discuss the data model, I propose to open the model that we developed in the League Manager application.
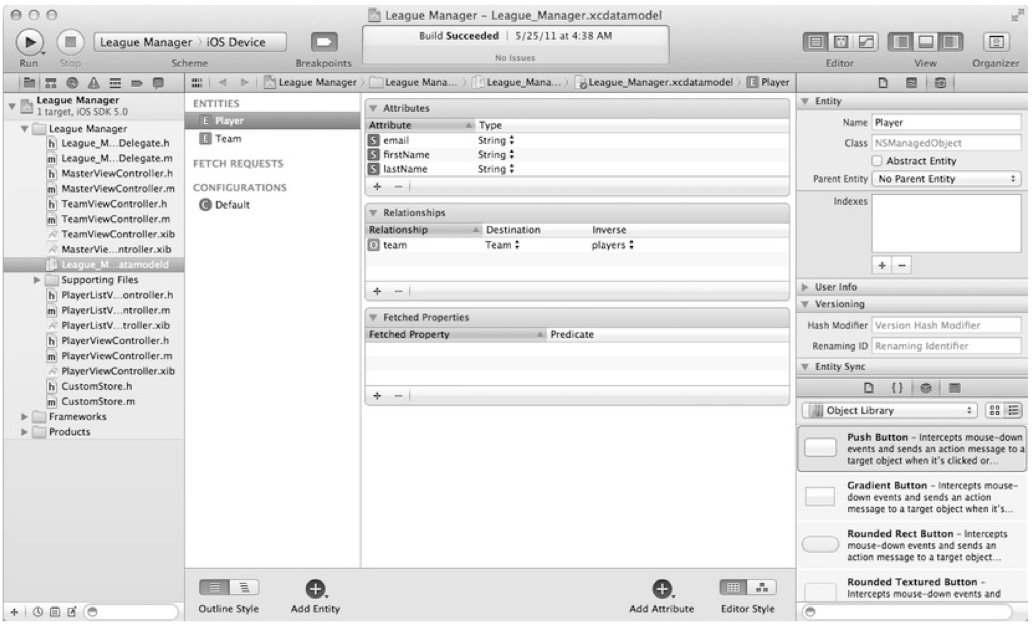
As we can see, by default, Xcode displays entities as tables. If it is more convenient for you to work with a graphical representation of models, then you need to click on the “Graph View” button located above the “Editor Style” label in the lower right part of the editor.
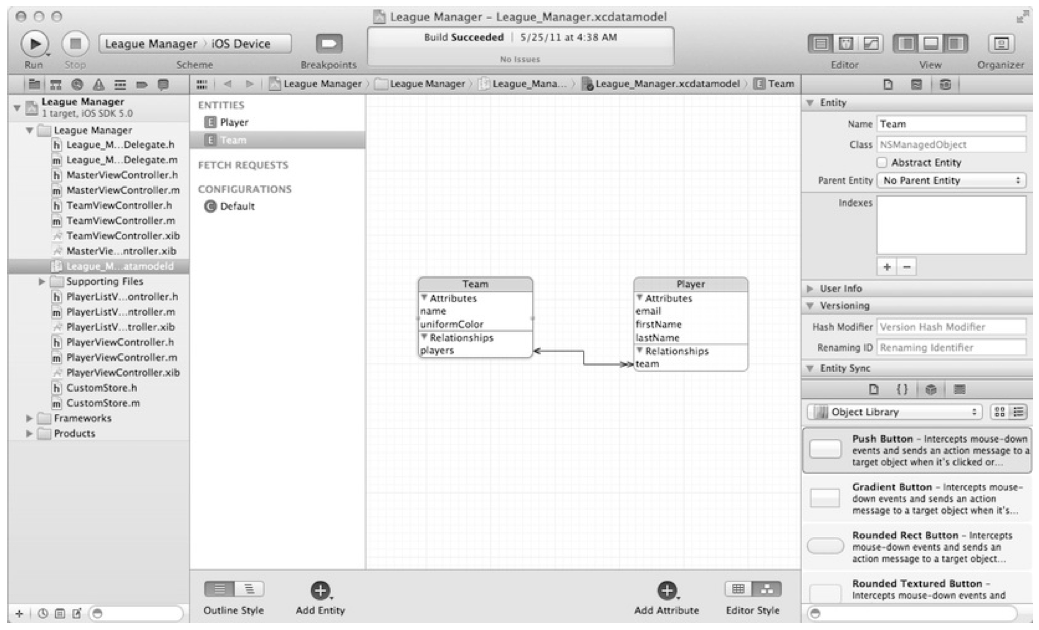
The graphical representation should be familiar to the designers and is something standard, describing the entities and the connections between them. You, probably, have already noticed that the connection from the essence of the Team to the Player with two arrows. This is because a relationship is a one-to-many relationship. A team may have several players. Feedback from Player to Team is a one-to-one relationship and is respectively indicated by one arrow. A player can belong to only one team.
From the experience of using the visual designer of models, we can confidently say that editing entities and attributes is much more convenient in tabular form, the graphical representation is good for visualizing the connections between them. However, you may have your own approach.
You can get more information about a property or entity by choosing him / her. In the figure below, for example, the entity Player is selected. In the upper right part, you can see details about the Player entity; her name, her NSManagedObject class, missing parent class, not an abstract class. By selecting a property, the panel changes its appearance to display the properties of the properties. If we select the email attribute, the panel will change its form as follows:

+ Email attribute is called
+ Is optional
+ Not temporary or indexable.
+ String type
+ No minimum and maximum length restrictions.
+ No default
+ No associated regular expressions
+ The field is not indexed by Spotlight.
+ The field value will not be stored in an external record.
Switching to the team connection entity Player changes the panel as follows:
+ Is called the team attribute
+ The ultimate (related) entity is the entity Team
+ There is feedback and it's called players
+ Is optional but not temporary
+ Not a one-to-many relationship
+ Minimum and maximum number is 1
+ Nullify removal rule is used.
+ The field is not indexed by Spotlight.
+ The field value will not be stored in an external record.
Take a look at the essence of the Player:

Entities are defined by their names. Core Data allows you to inherit from NSManagedObject in order to provide an alternative implementation of managed objects. If you create a subclass of the NSManagedObject class and want to associate it with a specific entity, then you will need to specify the name of the new class in the Class field in the Entity section (image above).
Select any attribute in the "Attributes" section of Xcode so that the right pane changes its view and displays all the information on the selected attribute. The table below describes the name of the attribute property and its purpose.
In the same way as when viewing attribute information, we can view the properties of the link by selecting any link.
Links have several properties. Firstly, they have a name and a final entity (the entity to which the link belongs). The final entity describes the type of object the link points to. For the Player entity, the “team” link is, as expected, pointing to the Team entity. Core Data architects strongly advise to indicate in every connection its feedback (inverse relashionship) - a relationship that is directed in the opposite direction. For example, the Player entity has a connection with the Team, so based on the recommendation, as we implemented, the Team should also have a connection with the Player. In fact, if you forget or don’t want to give feedback, a warning will be generated by the compiler. Additional two properties are available for attributes: Transient and Optional. Transient communication is not stored in the repository during the save operation. If the team connection was of type Transient, then if you save and then restart the application, you would lose information about which team the player belongs to. The Player object would still be saved, but there is no connection to the Team object. Transient communications can be useful when you need to set values at run time, for example, a password or something that results from the information received while the application is running. If the link is Optional, then it simply means that you can set it to nil. For example, a player may not have a team.
The multiplicity of relationships determines the number of targets to which the source object may relate: to-one or to-many. By default, a relationship is one-to-one, which means that the source object can only refer to one endpoint. This is just the case in the team example with the Player entity: a player can have no more than one team. However, a team can have many players, which is why the player connection is essentially a Team to many connection. These values (from the co-many side) are represented as a set (NSSet) of objects. The multiplicity of a connection can also be determined by changing the minimum and maximum values, which represent the power of a finite set of entities in a connection.
Finally, Core Data uses the rules for removing links in order to know what to do with target objects when deleting the source. There are many deletion options that Core Data supports. There are such types of deletions: No action, Nullify, Cascade, Deny. The “Rules of Settings” section in this chapter discusses the rules of deletion and their meaning.
So far in the book, we have mentioned attributes and links several times already. The third property that an entity may have: a query (selection). Requests as properties are comparable to links in that they can refer to other objects. If the entity property of the type “Link” refers directly to the target objects, then the “Requests” (also the entity property) refers to the objects selected by the specified predicate. Requests as properties are a kind of “smart” playlist in iTunes, in which the user specifies the music library and then filters the content according to certain criteria. Although requests as properties do not behave in the same way as sampling in iTunes, they are calculated once at the first request, the results of this selection are cached until we ourselves say we need to refresh by calling the
In the League Manager application, we can, for example, create a query property that will return all players from a team whose names begin with a “W”. Select the Team entity, click the "+" button in the "Fetched Properties" section and name the new request wPlayers. Select the Player entity as the final one (the type of the entity that will be requested and returned).
In the "Predicate" field, specify the criteria for the filter using the standard NSPredicate format (for more information about the format and NSPredicate, we will talk in Chapter 6). In this example, the predicate will look like this:
After that, the personalized query we have created will become the same attribute of the Player object as the name attribute. You can use it in the same way as other attributes. You can ensure that the added request works correctly by adding code to the delegate method of the League Manager
If we run this code for execution, depending on what data you already have in the application, we should see something like the following output:
The last important point to consider is creating queries as properties in Xcode. We can use queries as properties in the same way as we use NSFetchRequests in the application, with the only difference being that the queries as properties are set in advance in the model editor. To create a new query as a property that will select all teams with a green color of the form, for example, select the Team entity in the Entities section, hold the Add Entity button until a drop-down list appears, select the option from this list "Add Fetch Request". Let's call this query “GreenTeams”. In the middle column in Xcode, you should see the "+" button to add a new filtering criterion. Click on the "+" button and type in the text box: uniformColor == "Green". Everything should look something like this:

Requests as properties created in this way are stored in the data model and can be obtained using the NSManagedObjectModel class's
Depending on the data that you have in the application, you should see something like the following output:
So far, we have been actively discussing entities. Entities describe attributes and relationships that a managed object possesses. In order to add a new entity, you must click on the "+" button labeled "Add Entity" and specify the name.
By default, instances of entity objects are represented by the NSManagedObject type, however, as the size and complexity of the project increases, it may be necessary to create your own classes that will represent managed objects. The managed objects you create must inherit from the NSManagedObject class, the name of the created class must be specified in the "Class" field when editing the entity.

We have not yet touched on one topic at this stage - the inheritance of entities. The mechanism of inheritance of entities is similar to the mechanism of class inheritance, when created attributes / methods are inherited. For example, you can create a Person entity, and inherit a Player entity from Person. If the application had other representations of people, for example, a trainer, then the Coach essence could also be inherited from Person. If we wanted to prohibit a programmer from directly creating an instance of a Person entity, then it suffices for us to indicate that this entity is abstract. For example, create a Person entity with a dateOfBirth field and mark it as an abstract entity.
The next step is to change the Player entity: setting up the parent (inherited) Person entity. Select the Player entity and in the drop-down list named “Parent Entity” select “Person”:
Now the DateOfBirth attribute will be available to the Player entity.
Attributes describe the entity. Entity attributes describe the current state of an entity and can be represented by various types of data. Select any entity, in the "Attributes" section, click on the "+" (add a new attribute, do not forget to specify the name). The figure below shows the possible attribute settings:
Earlier in this chapter we already talked about the various properties of attributes. Undoubtedly, the most important attribute property is its type. By default, Core Data provides several types:

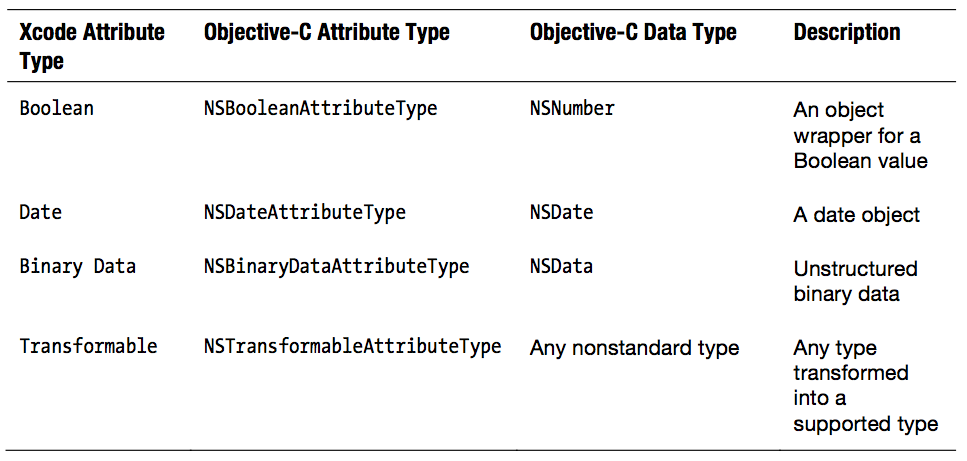
Most of the types listed above are directly related to data types in Objective-C. The only type that falls out of the overall picture is the type Transformable, which is designed for custom (created by the programmer) types. It is recommended to use the Transformable type in cases where none of the existing types can contain the data you require. As an example, you can take again our League Manager application, in which you need to store colors that can be represented by the type of CGColorRef. In this case, the attribute must be Transient and Transformable, and at the same time we will have to provide Core Data the mechanism for converting an attribute to an already existing type. Use custom (custom) attributes when you create your own class that inherits from NSManagedObject.
In the normalization process, you will most likely create several entities, depending on the complexity of the data model. Connections allow you to associate entities with each other, as is done in the League Manager application with Player and Team entities. Core Data allows you to tune (I repent, I like that word) connections, so that they, in turn, most accurately reflect the relationship between the simulated data.
In Xcode, when creating a connection or when choosing one, we see a set of settings that will allow us to change the nature of the connection. For example, if we select the team connection in the Player entity, we will see something like the following picture:

List of fields:
In the following sections, we will look at these fields in more detail how they affect the properties of an entity and what they mean.
The first field, Name, becomes the name of the NSManagedObject attribute of the related object. Under accepted agreements, the name must be in lower case (lowercase). If the connection is "to-many", then the name should take the form of pl. including It should be understood that all these are only agreements, following which will make your models more understandable, readable and easily supported. It can be noted that in the League Manager application we follow the agreements, so the link in the essence of the Player is called team. In essence, the Team connection with players is called "players".
The next field, Destination, defines an entity from the other end of the link. Inverse field allows you to select the same connection, but only from the side of the final entity.
Leaving the Inverse field in the No Inverse Relationship value guarantees that you receive two warnings: a consistency error and an incorrectly configured attribute.
You can ignore, after all, these are just compiler warnings, not errors, but you may have unexpected consequences. Core Data uses two-way communication information to maintain the consistency of the object graph to process the Redo / Undo operation. Leaving the connection without specifying the Inverse entity, you take responsibility for maintaining the consistency of the object graph to perform Undo / Redo operations. Apple documentation strongly advises against this, in particular in the case of using the “to-many” relationship. In case you do not specify an inverse link, the managed object from the other end of the link will not be marked as a modified object if the managed object on this side of the link has changed.
By marking the connection as “Transient”, you indicate to Core Data that this connection should not be stored in the repository. Transitional communication still supports Redo / Undo operations, but disappears when the application is closed. Here are some possible uses for the transition link:
In most cases, you will want your connections to be permanent and maintained.
The next field, Optional, is a checkbox that determines whether a relationship can be nil or not. Consider it to be something like NULL or non-NULL values in a database field. If the checkbox is set, the entity may be saved without specifying a connection. If you try to save the entity with the checkbox cleared, the saving will end in failure. If, in essence, Player in the League Manager application leaves the team connection with the checkbox cleared, then each player will have to belong to some team. Setting the team connection in nil and then saving (calling the save method :) will result in an error with the text "team is a required value".
The option is also a checkbox. If the checkbox is set, then the current link may indicate a set of objects at that end, but if not, then we get a “to-one” link.
It determines the number of objects on the side of communication that the current object can have. The option is valid only if the “to-many” type connection is selected.
Exceeding the limit while saving will give an error “Too many items”, and an insufficient number - “Too few items”.
By the way, the minimum value may be greater than the maximum, which is generally acceptable to Core Data, since no checks are performed. Therefore, if the minimum value is greater than the maximum, any attempt to save the object graph will fail.
Delete rules define the actions that Core Data needs to take when deleting an object with links.
There are 4 types of deletion:
1. Cascade - the source object is deleted, all related (final) objects are also deleted.
2. Deny - if the source object is associated with some objects, the deletion does not occur.
3. Nullify - the source object is deleted, the feedback of all related objects is set to nil.
4. No Action - the source object is deleted, the related objects do not change at all.
In the League Manager application, the deletion rule for player communication is Cascade, which means that when a team is deleted, all of its players will also be deleted. If we changed the deletion rule to Deny, the deletion would not happen if the team had at least one player. Setting the same deletion rules in Nullify led to the fact that all players would remain in the vault, but with the link to the team set to zero, while the team itself would be deleted.
Today I want to start writing a series of lectures with practical tasks on the book “Pro Core Data for iOS” by Michael Privat and Robert Warner, which you can buy from this link. Each chapter will contain a theoretical and practical part.
Content:
- Chapter number 1. Getting Started ( Practical Part )
- Chapter number 2. Digest Core Data ( practical part )
- Chapter number 3. Data storage: SQLite and other options
- Chapter 4 Creating a data model
- Chapter number 5. We work with data objects
- Chapter number 6. Processing Result Sets
- Chapter number 7. Performance tuning and memory usage
- Chapter number 8. Version Control and Migration
- Chapter number 9. Managing tables using NSFetchedResultsController
- Chapter number 10. Using Core Data in Advanced Applications
')
Introduction
You can create custom applications with a terrific interface that helps them in everyday life and problem solving, but if you incorrectly present the data in the application, the application will become difficult to maintain, its performance will fall and over time it may become completely unsuitable for use. In this chapter, we will look at how to design models (data) so that they do not spoil your application.
Database Design
The American philosopher Ralph Waldo Emerson once said: “A foolish consistency is the hobgoblin of little minds” (Stupid following of something is the lot of fools). People often use this statement in order to protect themselves from attacks and questions from others to the details. We hope that we will not fall for this bait, although we periodically assert that Core Data is not a database, but treat it as a database (author: something is remembered “if something goes like a duck, quacks like duck, it means duck "). In this section, we will look at how to design the data structure of the application, and drawing a parallel to this process to the process of designing the structure of a relational database will help us a lot, not only with discussion, but also with the final result. At some points, of course, analogies will not exist, but during the discussion we will try to mark these points.
Core Data entities look, act, smell, and taste the same as the tables in relational databases. Attributes are table fields, relationships are JOINs for primary and foreign keys, and entities themselves are the same records in the tables. If our data model is “superimposed” on the storage type SQLite, then Core Data itself implements everything in exactly the way that we described above and in chapters №2 / №3. However, you should not forget that your data can be stored in memory, or, for example, in some file (atomic storage), and there are no tables and fields, primary keys and external ones. Core Data abstracts the data structure from the type of storage used, thereby achieving convenience and versatility in the design and interaction with data. Allow Core Data to embrace your mind, merge into one with Core Data: either you will feel all the power using Core Data, or you will find yourself at the bottom of the trough using non-optimal data structures.
Newbies who are just starting to learn Core Data, creating their first data models, constantly resent that they don’t have the ability to create and be responsible for the primary keys in their entities, as they used to do in traditional modeling of the database structure. There are no auto-keying keys in Core Data because they are not needed there. Core Data takes responsibility for creating a unique key for each object to be added (managed object). No primary keys imply that there are no foreign keys: Core Data manages the relationships between the entities themselves and performs any necessary joins. Immediately stop! Stop feeling uncomfortable because you don’t need to declare primary and foreign keys!
Another place that can drag you down into the quagmire is the modeling of many-to-many relationships. Imagine for a moment that players in the League Manager application may belong to different teams. If that were the case, then each team could have a lot of players, and each player could play for different teams. If you created a traditional relational database, then you would have three tables: one for teams, one for players, and one for tracking which player belongs to which team. At the same time, in Core Data, the same 2 entities are Player and Team, and the many-to-many relationship is configured by setting the usual tick. Core Data, however, “under the hood” still implements this using 3 tables: ZTEAM, ZPLAYER and Z1TEAMS, but these are implementation details. You do not need to know that there will be a third or fourth table, Core Data will take care of this, it will do it better.
Tip : Take care of the data, not the data storage mechanisms.
Normalization of the relational database
The theory of designing relational databases combines a data modeling process, called normalization (the normalization process), which aims to reduce or eliminate redundancy, as well as provide efficient access to data in the database.
The normalization process consists of five levels, or forms, and work continues at level 6. Perhaps only mathematicians will like the definitions of the first five forms, only they will most likely understand them. They look like this:
“If you’re there, it’s a MVD in R, say A -> -> B, then you’ll have only dependencies (FDs or MVDs) in X (). Equivalently: If you are in BCNF and all are in FDs. ”
(c) www.databasedesign-resource.com/normal-forms.html
We have neither a sufficient number of pages to describe all forms, nor a desire to go through the definitions of all normal forms and explain their essence. Instead, this section will describe each normal form relative to Core Data and give some design tips. Remember that following a certain normal form requires following all the normal forms that precede this one.
The database that corresponds to the first normal form (1NF) is considered normalized. To follow this form (level) of normalization, each record in the database must have the same number of fields. In the context of Core Data, this means that any managed object must have a certain (predetermined) number of attributes. Given that Core Data does not allow you to create one entity with a different number of attributes, we can conclude that the models in Core Data are automatically normalized.
The second normal form (2NF) and the third normal form (3NF) relate to the connections between non-key and key fields, requiring that non-key fields be facts about the key field to which they belong. Since in Core Data you do not care about the keys, this question is removed. However, you must make sure that all attributes of an entity describe this particular entity, and not something else. For example, the Player entity should not have the uniformColor attribute, since the color of the form describes the state of the team, rather than the player.
The following two normal forms, the fourth normal form (4NF) and the fifth normal form (5NF) can be considered the same forms in the Core Data world. They are responsible for reducing or eliminating the redundancy of the described data, pushing you to transfer attributes with multiple values into separate entities and create many-to-many connections between entities. In terms of Core Data, the 4NF form states that an entity should not have attributes that can have multiple values. Instead, it is worth transferring these attributes to a separate entity and creating a many-to-many relationship between entities. Consider the example of our application with teams and players from the application LeagueManager. The data model, which will violate 4 normal form and 5 normal form, will consist of one entity, Team, with an additional attribute - player. Then we will create new Team instances for each player, with the result that we will have some superfluous (unnecessary) team objects. Instead, in the data model used in the LeagueManager application, a Player entity is created, which is combined by a many-to-many relationship with the Team entity.
In the process of modeling, do not forget about these simple rules. For example, in the data model in the LeagueManager application, the uniformColor attribute in the Team essence represents an opportunity for normalization. The names of the colors of the forms is a finite set, which means that it would be possible to create an additional entity called Color, which will have the name attribute and which is connected by a many-to-one relationship with the Team entity.
Using Model Designer in Xcode
Some developers simply agree to use the default development tools. Others create tools only when the current ones seem to be inferior to them. Others stubbornly insist on creating their own tools. We fall into the last category of developers who use only the tools that we ourselves have made. We are proud of the products we create, and sometimes we even celebrate small victories and good luck in saving development time. We never consider the time spent on developing our tools because this time is included in the category of “playing time” which is enjoyable. However, no matter how surprisingly it sounded, it never occurred to us to write our own designer of models for Core Data, probably because XCode is doing a good job with the task. Perfect integration into the development environment, which we probably can not surpass in their tools. Everything else, Xcode comes with a built-in graphical data model maker, which makes it much easier to design. In previous chapters, we have already had to deal with him. In this section, we will have less time to understand how Core Data works, and we will pay attention to tools that we will often use.
No code will be written in this section. Instead, we will focus on the data modeler's user interface. To add a data model to our project, select the menu items: File -> New -> New FIle, in the left part of the window select the section “Core Data”. You will see three types of files: Data Model, Mapping Model, NSManagedObject subclass. Mapping models help you in migrating data from one data model to another (for more details, see Chapter 8). Select the type of Data Model, specify the name of the data model and save it.
Opening the newly created model file, Xcode opens it in the visual model editor. The presence of a large number of buttons and options can confuse you. The figure below shows the elements that are used in the simulation and their description is given.
The model editor allows you to easily switch between entities, properties, relationships (relationships), queries, and data model configurations. It is also possible to switch between options for displaying data models: a graph view, or a tabular view.
To make it more interesting to discuss the data model, I propose to open the model that we developed in the League Manager application.
As we can see, by default, Xcode displays entities as tables. If it is more convenient for you to work with a graphical representation of models, then you need to click on the “Graph View” button located above the “Editor Style” label in the lower right part of the editor.
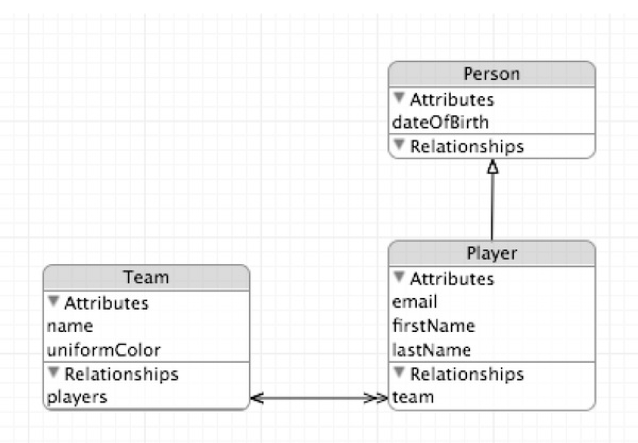
The graphical representation should be familiar to the designers and is something standard, describing the entities and the connections between them. You, probably, have already noticed that the connection from the essence of the Team to the Player with two arrows. This is because a relationship is a one-to-many relationship. A team may have several players. Feedback from Player to Team is a one-to-one relationship and is respectively indicated by one arrow. A player can belong to only one team.
From the experience of using the visual designer of models, we can confidently say that editing entities and attributes is much more convenient in tabular form, the graphical representation is good for visualizing the connections between them. However, you may have your own approach.
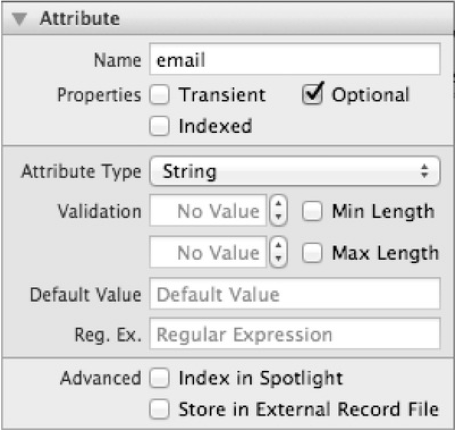
You can get more information about a property or entity by choosing him / her. In the figure below, for example, the entity Player is selected. In the upper right part, you can see details about the Player entity; her name, her NSManagedObject class, missing parent class, not an abstract class. By selecting a property, the panel changes its appearance to display the properties of the properties. If we select the email attribute, the panel will change its form as follows:
+ Email attribute is called
+ Is optional
+ Not temporary or indexable.
+ String type
+ No minimum and maximum length restrictions.
+ No default
+ No associated regular expressions
+ The field is not indexed by Spotlight.
+ The field value will not be stored in an external record.
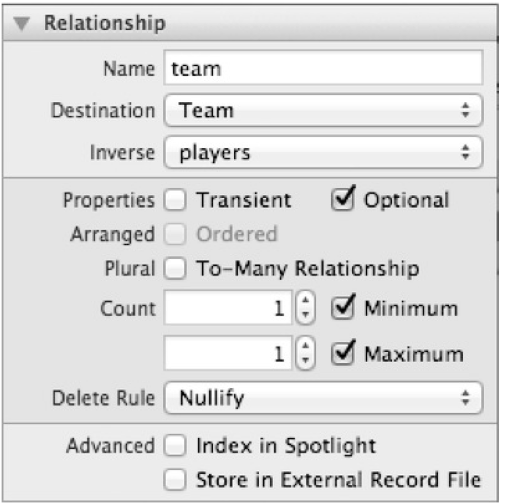
Switching to the team connection entity Player changes the panel as follows:
+ Is called the team attribute
+ The ultimate (related) entity is the entity Team
+ There is feedback and it's called players
+ Is optional but not temporary
+ Not a one-to-many relationship
+ Minimum and maximum number is 1
+ Nullify removal rule is used.
+ The field is not indexed by Spotlight.
+ The field value will not be stored in an external record.
Take a look at the essence of the Player:
Entities are defined by their names. Core Data allows you to inherit from NSManagedObject in order to provide an alternative implementation of managed objects. If you create a subclass of the NSManagedObject class and want to associate it with a specific entity, then you will need to specify the name of the new class in the Class field in the Entity section (image above).
View and edit attributes
Select any attribute in the "Attributes" section of Xcode so that the right pane changes its view and displays all the information on the selected attribute. The table below describes the name of the attribute property and its purpose.
| Name | Description |
|---|---|
| Name | Attribute Name |
| Transient | Tells Core Data not to retain this attribute. It is useful to use this type of property in conjunction with the second attribute to support non-standard or custom types. Custom types will be discussed later in this chapter. |
| Optional | An optional attribute can be nil. Non-optional attributes must take any non-nil value. |
| Indexed | By indexed attributes search faster, but they take up more space in the repository. |
| Attribute type | Attribute type. Depending on the type selected, certain validation (verification) fields will be displayed. |
| Validation | Used to set the minimum and maximum length for the selected String type, or the minimum / maximum value for the selected integer type. |
| Min Length | Checkbox to enable verification of the minimum length |
| Max Length | Checkbox to enable verification of maximum length |
| Minimum | Checkbox to enable minimum value check |
| Maximum | Checkbox to enable maximum value check |
| Default value | The default value for this attribute is if no value has been specified. |
| Reg. Ex. | Regular expression for data validation |
View and edit links
In the same way as when viewing attribute information, we can view the properties of the link by selecting any link.
Links have several properties. Firstly, they have a name and a final entity (the entity to which the link belongs). The final entity describes the type of object the link points to. For the Player entity, the “team” link is, as expected, pointing to the Team entity. Core Data architects strongly advise to indicate in every connection its feedback (inverse relashionship) - a relationship that is directed in the opposite direction. For example, the Player entity has a connection with the Team, so based on the recommendation, as we implemented, the Team should also have a connection with the Player. In fact, if you forget or don’t want to give feedback, a warning will be generated by the compiler. Additional two properties are available for attributes: Transient and Optional. Transient communication is not stored in the repository during the save operation. If the team connection was of type Transient, then if you save and then restart the application, you would lose information about which team the player belongs to. The Player object would still be saved, but there is no connection to the Team object. Transient communications can be useful when you need to set values at run time, for example, a password or something that results from the information received while the application is running. If the link is Optional, then it simply means that you can set it to nil. For example, a player may not have a team.
The multiplicity of relationships determines the number of targets to which the source object may relate: to-one or to-many. By default, a relationship is one-to-one, which means that the source object can only refer to one endpoint. This is just the case in the team example with the Player entity: a player can have no more than one team. However, a team can have many players, which is why the player connection is essentially a Team to many connection. These values (from the co-many side) are represented as a set (NSSet) of objects. The multiplicity of a connection can also be determined by changing the minimum and maximum values, which represent the power of a finite set of entities in a connection.
Finally, Core Data uses the rules for removing links in order to know what to do with target objects when deleting the source. There are many deletion options that Core Data supports. There are such types of deletions: No action, Nullify, Cascade, Deny. The “Rules of Settings” section in this chapter discusses the rules of deletion and their meaning.
Using Queries as Properties
So far in the book, we have mentioned attributes and links several times already. The third property that an entity may have: a query (selection). Requests as properties are comparable to links in that they can refer to other objects. If the entity property of the type “Link” refers directly to the target objects, then the “Requests” (also the entity property) refers to the objects selected by the specified predicate. Requests as properties are a kind of “smart” playlist in iTunes, in which the user specifies the music library and then filters the content according to certain criteria. Although requests as properties do not behave in the same way as sampling in iTunes, they are calculated once at the first request, the results of this selection are cached until we ourselves say we need to refresh by calling the
refreshObject:mergeChanges: method.In the League Manager application, we can, for example, create a query property that will return all players from a team whose names begin with a “W”. Select the Team entity, click the "+" button in the "Fetched Properties" section and name the new request wPlayers. Select the Player entity as the final one (the type of the entity that will be requested and returned).
In the "Predicate" field, specify the criteria for the filter using the standard NSPredicate format (for more information about the format and NSPredicate, we will talk in Chapter 6). In this example, the predicate will look like this:
lastName BEGINSWITH "W" .After that, the personalized query we have created will become the same attribute of the Player object as the name attribute. You can use it in the same way as other attributes. You can ensure that the added request works correctly by adding code to the delegate method of the League Manager
application:didFinishLaunchingWithOptions: which will use the wPlayer attribute. The code shown below requests all teams, takes the first team (if one exists) and selects all players according to the specified predicate in the wPlayer attribute. After that, all players satisfying the condition are displayed in the console (their names and surnames). NSFetchedRequest *fetchRequest = [[NSFetchedRequest alloc] init]; [fetchRequest setEntity:[NSEntityDescription entityForName:@"Team" inManagedObjectContext:self.managedObjectContext]]; NSArray *teams = [self.managedObjectContext executeFetchRequest:fetchRequest error:nil]; if([teams count] > 0){ NSManagedObject *team = [teams objectAtIndex:0]; NSSet *wPlayers = [team valueForKey:@"wPlayers"]; for(NSManagedObject *wPlayer in wPlayers) { NSLog(@"%@ %@", [wPlayer valueForKey:@"firstName"], [wPlayer valueForKey:@"lastName"]); } } If we run this code for execution, depending on what data you already have in the application, we should see something like the following output:
2011-07-31 19:08:23.005 League Manager[8039:f203] Dwyane Wade 2011-07-31 19:08:23.006 League Manager[8039:f203] Tyson Warner The last important point to consider is creating queries as properties in Xcode. We can use queries as properties in the same way as we use NSFetchRequests in the application, with the only difference being that the queries as properties are set in advance in the model editor. To create a new query as a property that will select all teams with a green color of the form, for example, select the Team entity in the Entities section, hold the Add Entity button until a drop-down list appears, select the option from this list "Add Fetch Request". Let's call this query “GreenTeams”. In the middle column in Xcode, you should see the "+" button to add a new filtering criterion. Click on the "+" button and type in the text box: uniformColor == "Green". Everything should look something like this:
Requests as properties created in this way are stored in the data model and can be obtained using the NSManagedObjectModel class's
fetchRequestTemplateForName: method. Add some code to the application:didFinishLaunchingWithOptions: delegate method to test the functionality of the new request: NSFetchRequest *fetchRequest = [self.managedObjectModel fetchRequestForTemplateName:@"GreenTeams"]; NSArray *teams = [self.managedObjectContext executeFetchRequest:fetchRequest error:nil]; for(NSManagedObject *team in teams){ NSLog(@"%@", [team valueForKey:@"name"]); } Depending on the data that you have in the application, you should see something like the following output:
2011-07-31 19:17:25.598 League Manager[8184:f203] Boston Celtics Entity creation
So far, we have been actively discussing entities. Entities describe attributes and relationships that a managed object possesses. In order to add a new entity, you must click on the "+" button labeled "Add Entity" and specify the name.
By default, instances of entity objects are represented by the NSManagedObject type, however, as the size and complexity of the project increases, it may be necessary to create your own classes that will represent managed objects. The managed objects you create must inherit from the NSManagedObject class, the name of the created class must be specified in the "Class" field when editing the entity.
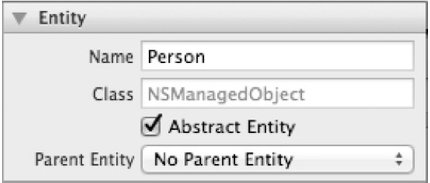
We have not yet touched on one topic at this stage - the inheritance of entities. The mechanism of inheritance of entities is similar to the mechanism of class inheritance, when created attributes / methods are inherited. For example, you can create a Person entity, and inherit a Player entity from Person. If the application had other representations of people, for example, a trainer, then the Coach essence could also be inherited from Person. If we wanted to prohibit a programmer from directly creating an instance of a Person entity, then it suffices for us to indicate that this entity is abstract. For example, create a Person entity with a dateOfBirth field and mark it as an abstract entity.
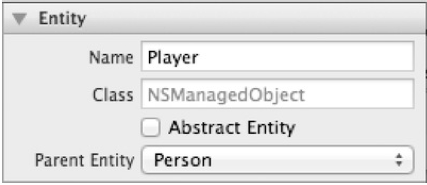
The next step is to change the Player entity: setting up the parent (inherited) Person entity. Select the Player entity and in the drop-down list named “Parent Entity” select “Person”:
Now the DateOfBirth attribute will be available to the Player entity.
Creating Attributes
Attributes describe the entity. Entity attributes describe the current state of an entity and can be represented by various types of data. Select any entity, in the "Attributes" section, click on the "+" (add a new attribute, do not forget to specify the name). The figure below shows the possible attribute settings:
Earlier in this chapter we already talked about the various properties of attributes. Undoubtedly, the most important attribute property is its type. By default, Core Data provides several types:
Most of the types listed above are directly related to data types in Objective-C. The only type that falls out of the overall picture is the type Transformable, which is designed for custom (created by the programmer) types. It is recommended to use the Transformable type in cases where none of the existing types can contain the data you require. As an example, you can take again our League Manager application, in which you need to store colors that can be represented by the type of CGColorRef. In this case, the attribute must be Transient and Transformable, and at the same time we will have to provide Core Data the mechanism for converting an attribute to an already existing type. Use custom (custom) attributes when you create your own class that inherits from NSManagedObject.
Making connections
In the normalization process, you will most likely create several entities, depending on the complexity of the data model. Connections allow you to associate entities with each other, as is done in the League Manager application with Player and Team entities. Core Data allows you to tune (I repent, I like that word) connections, so that they, in turn, most accurately reflect the relationship between the simulated data.
In Xcode, when creating a connection or when choosing one, we see a set of settings that will allow us to change the nature of the connection. For example, if we select the team connection in the Player entity, we will see something like the following picture:
List of fields:
- Name
- Ultimate essence
- Feedback
- Transient
- Optional
- Is the relationship "to-many"
- Qty (minimum and maximum)
- Removal rules
In the following sections, we will look at these fields in more detail how they affect the properties of an entity and what they mean.
Name of communication (Name)
The first field, Name, becomes the name of the NSManagedObject attribute of the related object. Under accepted agreements, the name must be in lower case (lowercase). If the connection is "to-many", then the name should take the form of pl. including It should be understood that all these are only agreements, following which will make your models more understandable, readable and easily supported. It can be noted that in the League Manager application we follow the agreements, so the link in the essence of the Player is called team. In essence, the Team connection with players is called "players".
Finite and Inverse Entities (Destination and Inverse)
The next field, Destination, defines an entity from the other end of the link. Inverse field allows you to select the same connection, but only from the side of the final entity.
Leaving the Inverse field in the No Inverse Relationship value guarantees that you receive two warnings: a consistency error and an incorrectly configured attribute.
You can ignore, after all, these are just compiler warnings, not errors, but you may have unexpected consequences. Core Data uses two-way communication information to maintain the consistency of the object graph to process the Redo / Undo operation. Leaving the connection without specifying the Inverse entity, you take responsibility for maintaining the consistency of the object graph to perform Undo / Redo operations. Apple documentation strongly advises against this, in particular in the case of using the “to-many” relationship. In case you do not specify an inverse link, the managed object from the other end of the link will not be marked as a modified object if the managed object on this side of the link has changed.
Transient
By marking the connection as “Transient”, you indicate to Core Data that this connection should not be stored in the repository. Transitional communication still supports Redo / Undo operations, but disappears when the application is closed. Here are some possible uses for the transition link:
- Relationships between entities that are temporary and should not exist any longer than the current application launch session
- Communication information that can be obtained from some external data source, be it another Core Data store or some other source of information.
In most cases, you will want your connections to be permanent and maintained.
Optional
The next field, Optional, is a checkbox that determines whether a relationship can be nil or not. Consider it to be something like NULL or non-NULL values in a database field. If the checkbox is set, the entity may be saved without specifying a connection. If you try to save the entity with the checkbox cleared, the saving will end in failure. If, in essence, Player in the League Manager application leaves the team connection with the checkbox cleared, then each player will have to belong to some team. Setting the team connection in nil and then saving (calling the save method :) will result in an error with the text "team is a required value".
Communication "to many" (To-many)
The option is also a checkbox. If the checkbox is set, then the current link may indicate a set of objects at that end, but if not, then we get a “to-one” link.
Quantity (minimum and maximum)
It determines the number of objects on the side of communication that the current object can have. The option is valid only if the “to-many” type connection is selected.
Exceeding the limit while saving will give an error “Too many items”, and an insufficient number - “Too few items”.
By the way, the minimum value may be greater than the maximum, which is generally acceptable to Core Data, since no checks are performed. Therefore, if the minimum value is greater than the maximum, any attempt to save the object graph will fail.
Delete Rule
Delete rules define the actions that Core Data needs to take when deleting an object with links.
There are 4 types of deletion:
1. Cascade - the source object is deleted, all related (final) objects are also deleted.
2. Deny - if the source object is associated with some objects, the deletion does not occur.
3. Nullify - the source object is deleted, the feedback of all related objects is set to nil.
4. No Action - the source object is deleted, the related objects do not change at all.
In the League Manager application, the deletion rule for player communication is Cascade, which means that when a team is deleted, all of its players will also be deleted. If we changed the deletion rule to Deny, the deletion would not happen if the team had at least one player. Setting the same deletion rules in Nullify led to the fact that all players would remain in the vault, but with the link to the team set to zero, while the team itself would be deleted.
Source: https://habr.com/ru/post/198242/
All Articles