How I stopped worrying and fell in love with Hyper-V Server

Recently, I had a task to “get used to the user's skin” and actually check how it works on the free Microsoft Hyper-V Server 2012.
Yes, yes, there is free cheese not only in a mousetrap, but also at Microsoft. If you want to virtualize a server or at least your old laptop, but do not want to pay extra money for the hypervisor, then Hyper-V Server is what you need to try. Why? Firstly, it is really free - all functions, including even “enterprise”, are available to users immediately and without any reservations, secondly, it is supported and developed by a large company, and, thirdly, it’s just plain old Windows, though a bit cropped to Server Core.
Under the cut, you will find a story about how to install and configure Hyper-V Server and elegantly bypass the limitations of this platform using Linux.
Installation
Everything is so standard that even nothing to write about. ISO image we take from here on the proud link "Free Download".
')
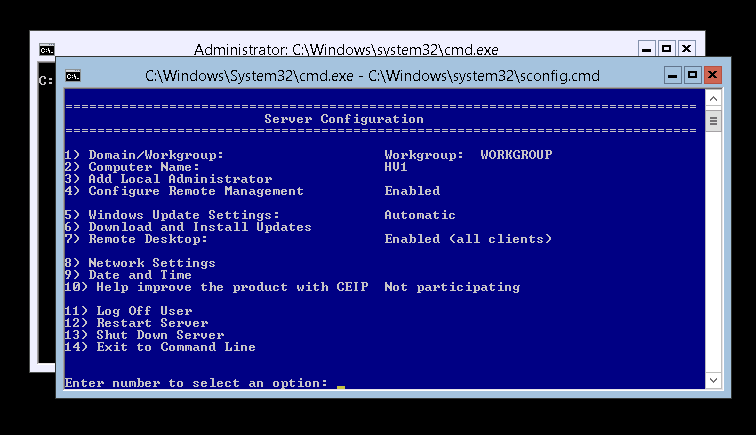
The entire installation process takes a few minutes and ends with a standard invitation for the administrator. After setting the password, an unusually bare desktop with two console windows opens.

In principle, if you think about it, it's not so scary: after all, the task of our server is to run virtual machines, and you can also play solitaire somewhere else.
Configuration: System
Use the blue console to set the necessary parameters - name, network addresses, enable RDP and auto-update.
Speaking of updating the system: circumcision to Server Core was done to reduce the attack surface, in other words, to reduce the number of services and software components that may contain vulnerabilities, and therefore must be patched regularly. And since installing patches often requires a server reboot, reducing the number of updated server components will not only lead to an increase in its security, but also accessibility.
Configuration: Hyper-V
For some reason, no virtual switches are created during installation, so virtual machines by default have no connection with the outside world. Fix it - let's create the simplest switch bridge to the physical adapter.
Run powershell in the second console. Yes, circumcision of the server to console programs makes sacrifices, but we are pursuing noble goals (see above).
1) We learn under what names the adapters appear. To do this, run the command Get-NetAdapter
PS C:\Users\Administrator> Get-NetAdapter Name InterfaceDescription ifIndex Statu s ---- -------------------- ------- ----- Ethernet 5 Broadcom BCM5708C NetXtreme II Gi...#47 16 Up Ethernet 4 Intel(R) PRO/1000 PT Dual Port Ser...#2 15 Di... Ethernet 3 Intel(R) PRO/1000 PT Dual Port Serve... 14 Di... Ethernet 2 Broadcom BCM5708C NetXtreme II Gi...#49 13 Up 2) Create a virtual switch tied to an Ethernet adapter 5
PS C:\Users\Administrator> New-VMSwitch -Name "bridged" -NetAdapterName "Ethernet 5" Name SwitchType NetAdapterInterfaceDescription ---- ---------- ------------------------------ bridged External Broadcom BCM5708C NetXtreme II GigE (NDIS VBD Client) #47 To create a virtual machine - everything is ready.
Create a virtual machine
Most likely, we will need an ISO image to install the operating system, we copy it in the usual way for Windows - over the network through dollar balls on our server.
Now create a car.
PS C:\Users\Administrator> New-VM -Name "test1" -Path C:\vms\test1 -MemoryStartupBytes 2GB -NewVHDPath C:\vms\test1\disk1.vhdx -NewVHDSizeBytes 40GB -SwitchName "bridged" Name State CPUUsage(%) MemoryAssigned(M) Uptime Status ---- ----- ----------- ----------------- ------ ------ test1 Off 0 0 00:00:00 Operating normally There is a small subtlety in choosing the type of network adapter - if the choice of operating system fell on Windows 2012, then you can choose a standard adapter, but if something else is better, choose the “legacy” type of adapter. This can be done by adding the adapter to the virtual machine with the -IsLegacy 1 key.
Remove-VMNetworkAdapter -VMName test1 Add-VMNetworkAdapter -VMName test1 -IsLegacy 1 -SwitchName «bridged» Insert an ISO image into the default DVD drive
PS C:\Users\Administrator> Set-VMDvdDrive -VMName test1 -Path C:\iso\en_windows_server_2012_vl_x64_dvd_917758.iso For the future - when you need to pull the disk out of the virtual drive, you need to run Set-VMDvdDrive -VMName <machine name> -Path $ null
Well, sort of, everything ... You can run!
PS C:\Users\Administrator> Start-VM test1 Mmmm, I ran the progress at the top of the powershell window, apparently everything started. Check the command Get-VM
PS C:\Users\Administrator> Get-VM test1 Name State CPUUsage(%) MemoryAssigned(M) Uptime Status ---- ----- ----------- ----------------- ------ ------ test1 Running 0 2048 00:01:30 Operating normally Everything is good - the machine works.
However, how to look at the screen ?!
Wait a second ... but how can you look at the installation screen, where to poke a mouse? In general - where is the console? locally - no way: it is not on the server!
What Microsoft offers - you can put RSAT (remote system administration tools) on the client station. With these tools, you can connect to the virtual machine console, and, by the way, from there, you can also create and run virtual machines via mmc snap-in Hyper-V. However, there are interesting features:
- RSAT for Windows 8 only works with Windows 2012
- RSAT for Windows 7 Sp1 works only with Windows 2008 R2 SP1
In my opinion, it’s not a matter of changing the server version to change the client axis! Where are the product managers at Microsoft looking at ?! How can I go to the console?
The idea came from no waiting ... Why not use a Linux virtual machine as a RDP proxy?
A gift for everyone
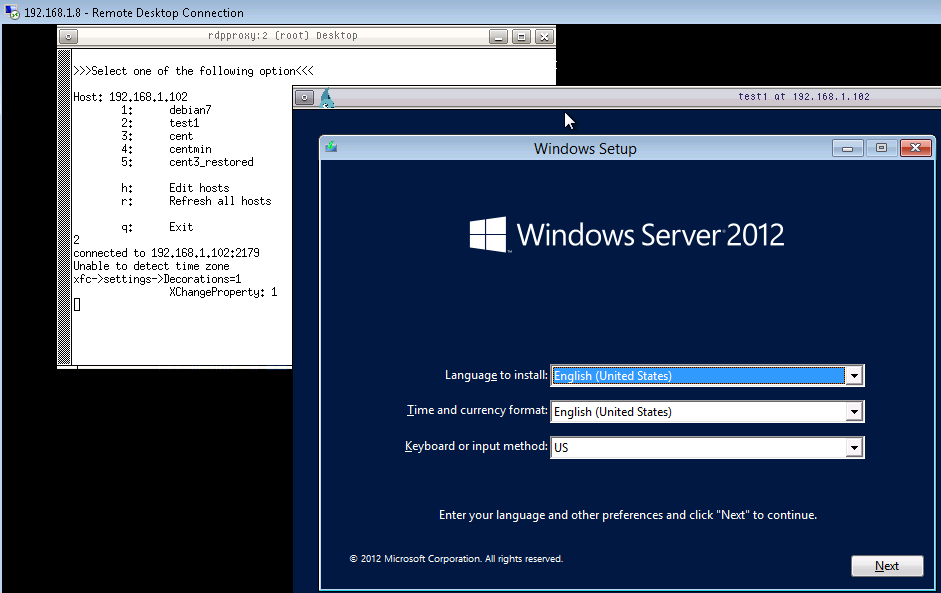
As a result, I made a virtual machine based on CentOS, which can be accessed via RDP, logged in, and then run the console on any virtual machines on this or any Hyper-V server on the network in a simple interactive script.
You can download this machine image (371MB) and deploy it using the free version of Veeam Backup & Replication on a Hyper-V server. The root user has the password 123qweASD. To change the password, you must first run passwd, and then do not forget vncpasswd.
After starting the machine, you can find out the IP address of this machine by running this command on the server Get-VM <machine name> | select -ExpandProperty NetworkAdapters | select Ipaddresses. You need to have a DHCP server on the network.
PS C:\Users\Administrator> get-vm rdpproxy | select -ExpandProperty NetworkAdapters | select IPaddresses IPAddresses ----------- {192.168.1.8, fe80::215:5dff:fe01:6703} Using the client's RDP, we go to this machine, add a Hyper-V server, select a virtual machine and ... voilà - now you can proceed with the installation of the operating system

How it works
The main work was done by cool guys from FreeRDP. No - well, they are really cool, because they supported the RDP protocol even better than at Microsoft. There is support for RemoteFX, add-ins, caches, audio redirection and clipboard ... in general, all that they can connect not only to different versions of Windows, but also to virtual machines directly through a specially open for this on Hyper-V server port 2179.
All the latest protocols needed to work with Hyper-V are only in beta 1.1.0 version. I modified the version a bit just to override the sending of Ctrl + Alt + Del to the combination Ctrl + Alt + Insert, and the Linux proxy was the first to process it and to go to Windows the virtual machine had no way. As an honest person, I posted the source here: https://github.com/VeeamSoftware/FreeRDP
Xrdp is used as the RDP server.
The script for polling hosts and launching consoles is written in bash. I wrote on it for the first time - I beg your condescension to the clumsiness.
Poll hosts for the presence of running virtual machines and their identifiers made through WMI. Thanks to the wmic utility, written on the basis of the Samba 4 library.
CentOS 6.4 has inside itself a part of Integration Services, which via the channel host-virtual machine about itself some information, from which we need only IP addresses.
Something about the future
Not very good news, on Friday a new version of Hyper-V Server 2012 R2 just came out, I tried to run on its Preview, but CentOS integration services could not get IP address on the host. Apparently Microsoft again changed / expanded something without backward compatibility. Let's wait for the release of Intergation Services for Linux and support this version.
Conclusion
Hyper-V Server is a good system for starting the development of a small IT company. Full gratuity - a good help when the budget is limited. And in the future, this hypervisor will allow you to easily add "enterprise" capabilities without extra expenses: develop capacity by adding new servers, implement more cunning network schemes, provide fault tolerance through clustering, etc.
I hope that this story and applains will help you use this platform effectively from the first steps.
useful links
- What is new for us in Hyper-V 2012 R2 (TechNet article in English)
- Video retrospective of all Hyper-V features from the first to the just-released version with a demo (47 min, in English)
- Free Hyper-V Buckup from our company
- Free monitoring from us
- Hyper-V 2012 R2 posters (in English)
Source: https://habr.com/ru/post/198144/
All Articles