With a camera in the clouds. Part 2

Thanks to everyone who read and commented on the first part . Thanks to you, the sequel will be even more interesting. If you have not read it yet, I recommend it. There is little text, and there are cool videos.
It was originally planned that this part will be final. But, for the convenience of hitting the scroll, now let's just focus on these issues:
')
- Trainings Developing flight skills.
- Model selection: airplane, helicopter or multikopter?
- The choice of a specific design and size
- Motors and ESC
- Flight controller
As usual, immediately to the point.

I think that each of us, before we collect something big and expensive, wants to make sure that he can fly on it. And also, training will help to decide whether yours is a hobby at all or not.
Basically, there are 2 ways to go. The first is a simulator. This method is perfect for those who are going to fly a glider or a flying wing.
A simulator complete with a training console costs money. And to buy a good remote that is compatible with simulators, it makes no sense until you have firmly decided to assemble a large model. If your goal is FPV, flying a simulator can also be boring.
If you are targeting flights on a multicopter, keep in mind that different flight controllers provide such different control of the device that a universal simulator will not help you.
The second method is much more fascinating. I recommend to allocate 2-3 thousand rubles and buy a micro-helicopter. It turns out cheaper than a simulator, but for a multikopter it will prepare you just fine.
Why not microcopter? First of all, microcopters do not have the modes that you will use on a large device. They fly quite differently. Secondly, the skill of flying a helicopter is enough with a small excess, which will give you more confidence in your abilities, and will immediately expand your horizons in this area. Thirdly, to fly on a good micro-helicopter is really a pleasure. If you don’t like the helicopter, try a glider simulator. Maybe the wings are yours.
Why precisely micro helicopter? It is suitable for flying in the room, and for street experiments with low wind. This is convenient for training. A good microclass is really hard to break. Learning to make a circle or eight on such a device can be done in a few days, after which the image of controlling a multirotor will be transformed from a complex abstraction into simple arithmetic.
Below is a description of the types and principles of operation of micro-helicopters, which occupies 30% of the total volume of the 2nd part. If you know what a 4-channel classic and a fixed / collective pitch are, click here to teleport directly to the selection of the FPV model. In this section, I end up recommending WLToys V911. If you are a beginner, read on and discover the world of micro-helicopters again.
What to avoid? What is a control channel?
For a start, I will say the same as many before me. You absolutely do not fit the 2 and 3 channel models sold in grocery stores. These are not helicopters, but flying fans.
The control channel is the ability to smoothly or discretely change the level of a control signal. Very roughly it can be said that the car has 2 of them: speed and direction control (in reality, there are more of them due to the gearbox and the separation of gas and brakes).
2 channel systems
Now imagine a helicopter with 2 channels? What can he do? He either flies always forward with the possibility of changing the height and turning of the nose, or does not know how to turn, but he can change the speed.
3 channel systems
3-channel helicopters are not far from the 2-channel ones. As a rule, they are coaxial, but there are two-rotor or under the classics. Classic 3-channel helicopter looks like this:

This model flies back and forth at the expense of the rear screw, lifting and lowering the tail. Normal office helicopters do this at the expense of the main screw, giving the pilot the ability to control the roll (swinging along the longitudinal axis, allowing you to slide left and right), but more on that later.
Flight altitude control here is achieved by changing the speed of both main propellers. In more serious models, not only the speed of rotation of the blades changes, but also their pitch , that is, their inclination angle relative to the plane of rotation (adjustment angle, angle of attack).
Turns this helicopter, changing the speed of one of the screws. They rotate in opposite directions on the same axis. Which spun faster, there we fly.
One of the signs highlighted in the top illustration is necessarily present in a bad helicopter. Do not be deceived, whatever is written on the box (or on the seller’s face).
Infrared control panel
The remote control for such “propelleroids”, as a rule, is infrared, requires reflection from the walls, which limits its use in principle.

In a normal helicopter, the remote control necessarily has a free play of sticks in any direction, even though diagonally, this is the implementation of 4-channel control with the possibility of manual mixing.
Normal coaxial
Usually beginners are recommended 4-channel coaxial. The coaxial scheme implies the presence of two screws on the axis at once, as in the previous group. But now we have control thrusts coming from the screw into the body of the machine. More specifically, they are attached to the skew apparatus that controls the angle of attack of the blades (in cyclic pitch). Usually, such a system is called a fixed pitch , since the blades rotate only both together and do not have the ability to rotate relative to each other. It looks like this.

The skewing apparatus allows the helicopter to perform “sliding movements” in any direction, and to the right, and forward, and diagonally. In this case, you can not change the course, that is, the position of the nose. This maximizes helicopter control to multikopter control.
How it works? Each blade as it moves in a circle changes the angle of attack. The sharper it is to tilt it to the plane of rotation, the stronger it will strive upward, that is, raise the helicopter. Since the blades of this screw have a rigid longitudinal hitch (the so-called fixed pitch, fixed pitch, FP), while on one side of the screw the angle of attack increases, on the other side it decreases. Where it is smaller, and outweighs the helicopter.
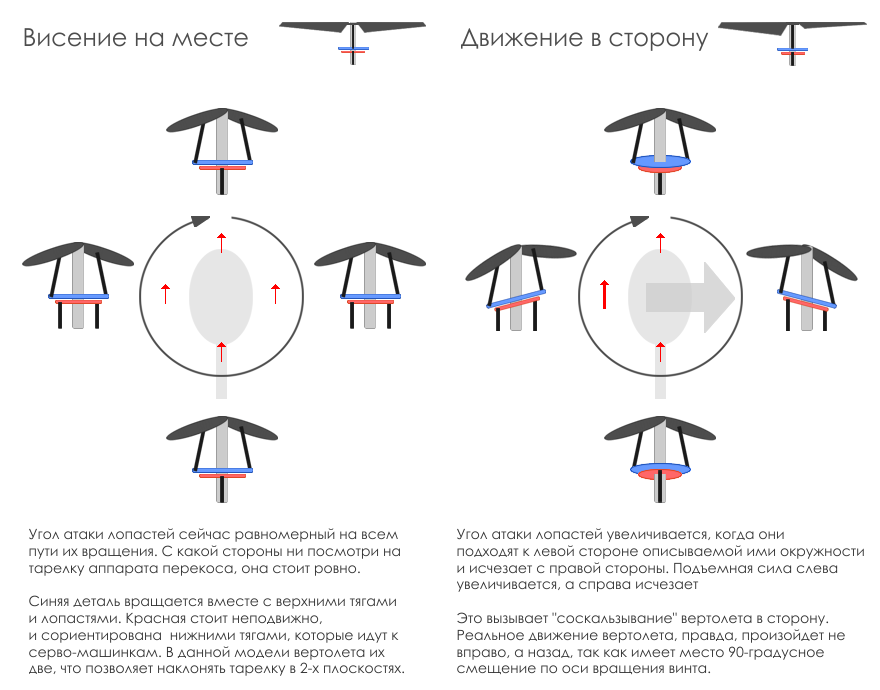
The rotation of the helicopter around the axis is still carried out by changing the speed of one screw relative to the speed of the other. The tail screw is not needed here at all, but sometimes it is installed without a drive for beauty. In China, apparently, they did not see real coaxial helicopters, and it seems to them that the screw in the back is needed for realism.
As a result, we have 4 control channels:
- Sliding back and forth (pitch)
- Sliding left-right (roll, roll)
- Above-below (gas, throttle)
- Rotation of the nose (yaw, rude, yaw)
The console is usually radio. There are megahertz and gigahertz. The first with a long retractable antenna, the second without. 2.4 GHz is the most.
To be honest, I did not like coaxial. Yes, it can fly around the office. But somehow everything is clumsy. Maybe, of course, I was not lucky with the model. It was “Dragonfly Mini”. She constantly broke down, and a flybar flew in from it (a stabilizing stick with weights on its top).
But I think that the point is not in the model, but in the class itself. The co-ax is very stable, and it is good at it to hang in place. He can make some kind of figure. But to make it somehow unnatural, not as a helicopter, but rather as a multi-rotor in an insufficient, confined space.
Another annoying flaw is that the co-ax can not fight the wind. His top propeller is out of control, and in the wind, in essence, it becomes a sail that blows the ship into the distance. But sooner or later you want to fly on the street, to feel - as it is.
If for some reason you still want one, I recommend Blade mCX2 from quality ones .
Suitable models
When I bought a micro-helicopter of the classical scheme, they said in the store that after 2 weeks I wouldn’t take it. It turned out to be wrong. After a couple of days, not only I could take off on it, but everyone who took it.
What is it different from coaxial? Yes, in fact, only the fact that the second (steering) screw on his back on the tail, as expected. Real coaxial helicopters have both controlled screws, and toys - only the bottom one (the upper one, as I wrote, is a sail). But the classic toy scheme is already not much different from the present. As a result, we get a more “helicopter” helicopter. Here is what it looks like:

Pay attention to the skew unit and the rear vertical screw. Such a helicopter will give you a lot of pleasure when you can fly around a chandelier or a room for the first time. I got WLtoys V911 , and I did not regret. What they did with him, only had to replace the battery (price 200 rubles). In this case, the V911 costs about 2500 rubles, along with the remote control. Just like the fans from the first category.
After the acquisition, I saw a couple of posts on the Internet with the recommendations of this particular helicopter, and I agree 100% with them. In the video, we specifically flew for you (sorry for the quality, now you know how to shoot 5s in the dark):
Enemies in this helicopter was not detected. But he is the enemy of LCD TVs and cars, so fly freely, but still be careful. Below is a video in which I tried to kill this helicopter.
If you use the terminology - this is a helicopter of the classical scheme with a fixed pitch and flybar. On sale, there are more nimble free flybars with fixed pitch. The role of the stick with weights there is a computer. The lack of a flybar makes the model more resistant to wind. On the other hand, they have more massive blades that rotate much faster. So spoiling anything in an apartment or office increases chances.
From quality again, I recommend Blade. This time it’s mSR X without flybar and mSR with flybar. Although, if your goal is FPV, why do you need a high-quality micro-helicopter, the V911 will not disappoint at the time of training for sure.
More than enough
For reference, since we were brought to the microclass, there are even cooler models. But! They are not suitable for an apartment. They are designed for pilots who want to try themselves in 3D-flights, and not in FPV. These are collective pitch micro-helicopters. Usually referred to as CP ( Collective Pitch ). The swashplate of such helicopters is controlled not by two, but by three servo drives.
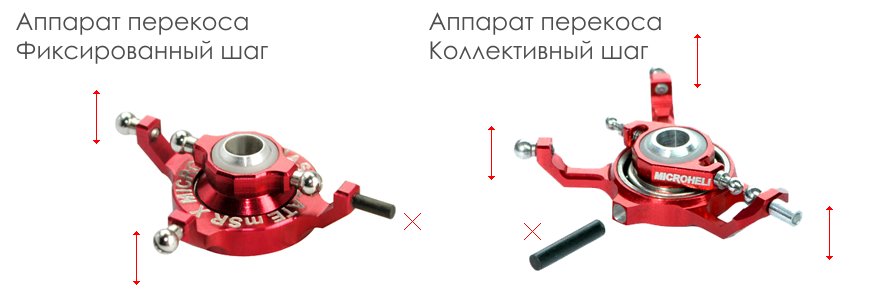
Thus, it moves freely in 3 dimensions. That is, it can have not only any inclination, but also be positioned at different distances from the screw, rising or falling slightly lower along the shaft axis.
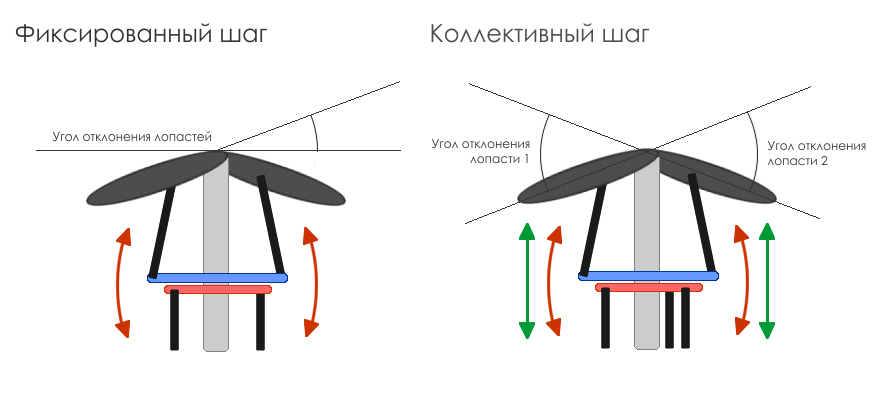
This design allows you to save all the functionality of the helicopters from the previous group, adding the ability to change the angle between the blades. That is, here you can control not only the cyclic pitch (lifting force on any side of the screw), but also the total (total lifting force of the screw). And this, in turn, leads to flight altitude control without changing the rotation speed of the propeller, moreover, allowing the propeller to turn the lift force for the 3d aerobatics. That is, the helicopter can fly “upside down”.
Control of such a helicopter is more difficult, since it does not stabilize itself. That is, if you tilt it forward, it will continue to move even after the handle on the remote control returns to its center position. To hang, you have to make the opposite compensating movement of the handle.
Of the versions that can still fly indoors, there is a Blade CPX nano . The device is attractive, but the reviews about it are not very. Engines burn quickly.
Blade mCPX v2 is slightly larger, and is a very successful model. But he is the place in the gym or on the street. It costs about 7,000 rubles without a remote control.
There is an even more charged version on brushless motors, which I actually ordered, later abandoning it in favor of the quadcopter. Called Blade mCPX BL . The only negative - in the apartment or office, well, absolutely impossible, dangerous. The price is about 9000 rubles in stores without a remote control.
There are also Chinese counterparts, for example WLToys V922. 6500 rubles with remote control.
Conclusions about mikroklass. A little about the remote control.
In general, for training, helicopters with a collective step are not needed. Enough classics with flybar and fixed pitch. If you choose a difficult path, get better at once a normal remote for 8 channels or more, so that you can later adapt it to control the gimbal and video camera bracket of your FPV system. To the maximum: 7 channels are needed for the flight controller + 2 for the course camera + 3 for the suspension with an HD camera and all sorts of flashlights. Total - 12 channels.
There is, however, one nuance. For helicopters Blade fit Spectrum remotes. Most FPV-Schnick flies on Futaba, so think. Details on the remote control will be a separate section in the next section.

Copter, helicopter or plane? Before proceeding with this section, I had to think seriously. Comparison tables are not suitable here, it's like comparing a motorcycle and a boat. I do not want to impose my opinion either, since it cannot be objective.
In general, for a full-fledged FPV and shooting interesting videos you need both a plane or a flying wing, and a multikopter.
Venice. Shooting with quadcopter and flying wing.
Decide for yourself where to start. The glider is cheaper and more romantic, and the multi-rotor is more technological, and a bit like a UFO.
Personally, I was bribed by the multikopter's ability to hover in place (the glider is always in motion), to explore high vertical objects, to circle the object in a circle with a camera towards it. And then, after the micro-helicopter, switching to it is somehow easier.
Gliders and flying wings are more wind dependent, but not subject to vibrations, and have greater flight range and speed. They are difficult to manage at low altitudes, but for some it turns out perfectly:
Low flying wing
In the video - TBS CAIPIRINHA flying wing for $ 265 without receiver and remote control. There is a larger version - TBS ZEPHYR from $ 1,300. In the comments to the first part there was a link to the affordable and popular glider Bixler for 2000 rubles. Without speed control, receiver, transmitter and battery.
The helicopter for FPV and shooting is suitable only large and stable. Manage it is very difficult. This is a collective step, with all that it implies. If you are a novice, a helicopter FPV will be extremely dangerous.
Now I propose to stay on multicopter. We'll talk about the gliders some other time. Let me just say that a flying wing differs from a classic airplane or a glider in that it does not have a keel, that is, a steering wheel. Its rotation functions are mixed with roll management, and you have only 3 control channels.

The minimum size of a multicopter for flying into the clouds is 450 mm diagonally, excluding screws. If you want to limit flights in the courtyard or in the park, but have not bought the remote yet, I recommend looking at the ready-made quadrocopter DJI Phantom and installing the GoPro Hero digital camera on it (details about it in the next section). Together with the remote control, it costs 26,000 rubles. This is a very high-quality thing from the world leader.
Preparing to release Phantom Vision with an integrated video system, but at the time of writing this post has not happened yet.

On YouTube you can find a great variety of videos with this quadrocopter for “ phantom fpv ”. Below I post an archive of training of an author unknown to me.
FPV on Phantom
If you already have a remote or you still want to fly farther, faster and higher, you may not need to take the Phantom. I collected something more powerful. And I do not regret.
So, multicopters are of different types:
For FPV, X4 is suitable, i.e. quadrocopter. 4 is not suitable, since the beam in front will interfere with the camera. X6 (hexacopter) can carry a large load on board and does not fall if one of the motors breaks. But breakdowns are rare, and the FPV camera is not necessary to carry with them. The X8 (Octocopter) is assembled for something quite heavy, such as a RED-EPIC or full-length DSLR. And you can also attach a grab or such a hand for gesturing to others:
From the quality X6 and X8, again, DJI or folding frames from Tarot . Of course, such a device is heavy, big and expensive, but the video turns out to be of a completely different quality.
Video from Octocopter and Hexacopter
There is a tricopter. He has only 3 rays. It is very maneuverable, but complex in design and not very reliable (the motor on the back beam changes the angle of inclination, this drive sometimes fails). Rather, it is an exotic, but extremely interesting. As the first device - perhaps a very bold step, but its advantages are as follows:
- The most comfortable decline among all multirotors
- 120-degree angle between the front beams allows you to shoot wide-angle video without screws in the frame
- High turning speed provides the ability to shoot fast-moving objects.
- Interesting management and a sense of complete control of the model

Let us return to the most common FPV-scheme - X4. Of the quality frames for quadcopters are DJI F450 and its FPV-mod TBS Discovery . The first from the manufacturer of the above-mentioned Phantom, and the second from the well-known FPV team Black Sheep.
What are the advantages of the TBS Discovery platform and why is it so popular?
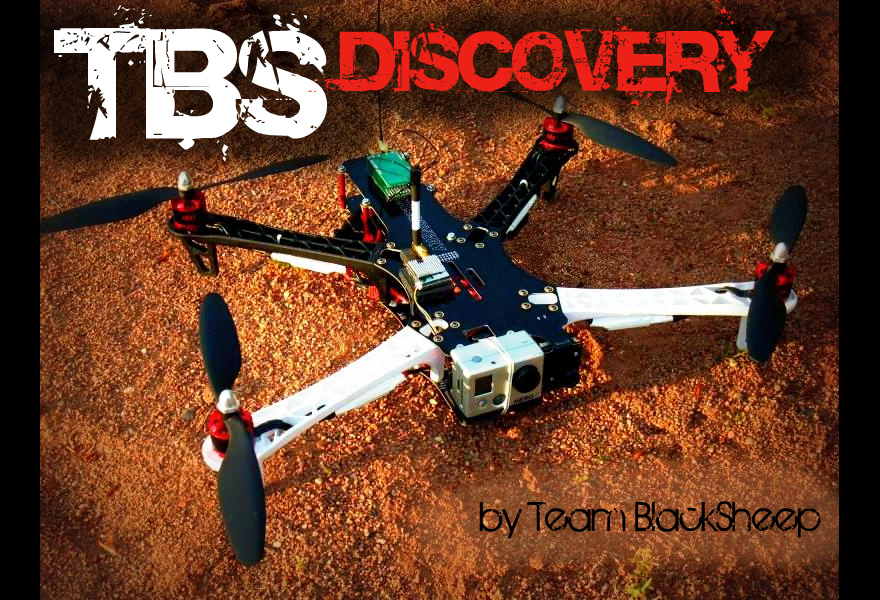
- The front beams are spaced apart at a larger angle than the symmetrical design of the F450, which makes it easy to place the wide-angle camera without capturing screws
- The frame has wiring for mounting the main electronics. This is not just neat and aesthetically pleasing, but also facilitates the model.
- TBS Discovery uses standard beams from the F450 platform, which can be bought at any specialty store even in Russia
- This platform is well suited various common motors and speed control (ESC)
- Blask Sheep team sells not only the frame, but also a lot of proven and optimized components and accessories for FPV
- We can say that TBS Discovery is fashionable. Especially in combination with their brand vest .
- The frame has attachment points for 2 cameras - course and recording. There is also the possibility of mounting pan / tilt ServoCity DDT500 Direct Drive Tilt and Tarot 2D suspension (there is even a version of the frame with an integrated brand suspension )
- The battery is placed between the plates of the frame, which ensures the reliability of its attachment and
good appearanceand good aerodynamics.
There are also disadvantages:
- The model has different characteristics of the flight back and forth and left and right, it is not like a UFO, if you twist it around the axis in flight.
- The model does not add up. This is a major drawback. In contrast, offer a stylish, but a huge case for transportation.
- Reasonableness of the finished design may somewhat restrict the “Kulibin” sleeping in you (and even more so, not sleeping). I can not imagine how something extra can be placed on this frame, except for the suspension.
- I think their prices are reasonable, but there are options and cheaper. There are even clones, and different. Maseratti or charged Ssang-Yong, it's up to you, but the price difference is completely different. So, the original frame costs $ 75, and a clone $ 30. Moreover, the original has wiring on the board.
- We'll have to either wait a long time for the parcel, or search in Russia with a margin of 30% + shipping costs. Sometimes the manufacturer can not ship the goods at all.
There are more advantages than disadvantages, and TBS Discovery is perhaps the only thing I can recommend with a clear conscience. In the first part you have already seen a spectacular video from London. Here are some more clips. They are less spectacular, but they allow us to better understand how it will actually be:
TBS Discovery features with camera mount
Very confident FPV with a funny crash at the end
Side view, electronics setup and test flight
If you find a DJI F450 in stock somewhere nearby, you can first assemble it with the expectation of replacing the Black Sheep frame, when the package arrives, and if the desire arises. In addition, you will have time to get some experience. F450 platform is also good, here is the video
Features DJI F450
In conclusion of this section, I will say that the frame is not so important. You can even make it yourself. I was generally sold Hornet 460 because of my inexperience in this matter. Professionals assured that I should throw it away. Since there was no clear answer to the question why , I did not throw it away, but made a good copter out of it. Less garbage to our homeland.

The quadcopter, as a rule, flies on 4 two-blade screws without pitch control, then if it doesn’t need any skewers. The lifting force at the edges can be adjusted simply by changing the rotational speeds of the motors relative to each other. Of course, electric motors are used. To complete the picture, however, I will post a video with some exceptions:
Collective Pitch Nitrocopter ( video is boring )
Variable plane of rotation of the screws to control the tilt of the body ( fun )
But this is, of course, for reference (deputies, the second video, if that is a fake, that is, not quite true). Do without weapons in our FPV. Motors for copters are used brushless and vary in size, power, shaft diameter and kV value. Of course, the motor also has a mass.
For Discovery, a suitable size is 22x12 mm. (Ø28x26-28 mm.) Or 22x16 mm. (Ø28x30-34 mm.) (Recommended). If you assemble another copter, you can easily navigate in the appropriate frame sizes.
kV is the theoretical number of revolutions delivered by the motor to each volt that is applied to it, when operating without load (screw). In general, Discovery normally flies on motors from 700 to 900kV, as well as any proportional copter. You can try and large values, for example 1200kV.
In essence, a low kV motor has more turns of thinner winding. It will work with a lower voltage, higher current, and give more torque. This will allow the use of large screws to achieve greater acceleration. A high kV will work with smaller screws, providing perhaps less acceleration, but greater speed.
I, too, was completely confused with a bunch of kV, battery voltage, amperage and size of screws, until I presented a visual model with a car gearbox.
Imagine that kV is a gear, a gear ratio. In 1st gear, we quickly get under way, but also quickly and run into the speed limit. In 3rd gear, we can accelerate faster, but we will get under way slowly.
Unlike a car, the copter does not have a gearbox, and we need to choose a gear ratio once and for all. In the car, we would be guided by power, engine speed and full weight.For example, an ordinary engine with working revolutions of, say, 3000 per minute, with 90 horsepower and a vehicle weight of 1 ton is always second gear, 1.5 tons is first, and 400 forces per 2 tons is third. In a kopter, instead of engine power, we have current from the battery, instead of revolutions, the mains voltage, and instead of weight, screws. Therefore, a motor with a large kV value may not be suitable for large screws (in high gear a lot of weight cannot be dispersed). Theoretically, it would be possible to connect a high-voltage battery (an analog of a resourceful engine) with a high instantaneous current (an analog of high power), but the motor may fail (transmission breakdown). It should also be understood that the battery life is limited, and the use of a larger transmission will require more current, which will lead to less flight time, although you fly and more interesting.
Never turn on the brushless motor without a load on the maximum power, kV is an exclusively theoretical value. With the screw turns will be less, and without it could be defective ESC.
It is clear that all the analogies in the text above are arbitrary, but otherwise it is simply impossible to describe the mutual influences of the elements of the structure on each other. If the post is read by professionals, suggest something in the comments, please.
For the operation of the brushless motor, a speed regulator is also needed (ESC, sometimes simply: a controller, a regulator). The motor is not directly connected to the battery, since it is three-phase and has 3 contacts, not 2. ESC differ in the maximum current with which they are able to work. The most common - 30A, but you can use less powerful up to 18A (see below). The operating frequency of a normal ESC is 400 Hz. According to experienced fans, the difference between 450 Hz and 1 kHz (new Afro ESC) was not found.
It is worth adding that the regulator controls the engine speed discretely. So, the smaller the kV, the more accurate the adjustment is provided. It’s like an imaginary discrete gas in a car — the lower the transmission, the more accurate the control of the speed change.
If the shaft diameter on the motor is smaller than the screw needs, you can use an adapter. If more - can also be adapted.
For Discovery, the manufacturer recommends 750KV motors . Their branded motors are actually branded RCTimer A2830-14 750KV 185W with a shaft of 3.175 mm and an adapter for screws on a shaft of 5 mm. Maybe you will find somewhere in Russia. What is written on the little engine is still not visible from afar.
For more dynamic flights and reduced vibration, Black Sheep has 900KV motors with improved ESC TBS BULLETPROOF 30Ain the kit. In fact, these are Tiger Motors MT2216-10 / MT2216-11 900KV 210W motors with a 5 mm shaft and re-glued labels. But you need to understand that in the case of these motors it is better to use the original ESC TBS Bulletproof.
If you don’t want to wait for the original ESC, you can help:
- RCTimer SK ESC 30A - the same, but with a different sticker
- HobbyKing F-20A / F-30A BEC programmable ESC with SimonK firmware
On 750KV engines you can fly 10-12 minutes with a 4S 3.3Ah battery. At 900KV - 6-8 minutes with the same battery, and up to 11 minutes with 4.5Ah 4S.
In more detail about batteries and installation of ESC I will write in the following part.
If you do not want to be limited to the proven and optimal options, you can calculate the copter yourself, here are the tools:
- eCalc multicopter - selection of optimal screws
- eCalc - selection of motor-screw combination
- Adamone motorcalc - selection of a motor-screw combination

Why is the choice of controller so important? The fact is that the control and characteristics of your quadrocopter are more dependent on electronics and motors than on the frame. Moreover, the motors affect the flight performance of the device, and the controller - its management and functionality.
In general, the DJI company, in addition to the F450 platform and the Phantom quadcopter, by luck also releases one of the best controllers for multikopter. There is a professional series Wookong M / A2 and amateur - Naza, in versions V2 and Lite.
Now about each of them in order.
Choose Wookong or A2 if you are engaged in commercial photo and video. Wookong in combination with Octocopter and good suspension form a serious and expensive device costing from 250,000 rubles. The controller itself costs about $ 1000, which is expensive for amateur FPV. The functionality allows you to fly a route on Google Maps (up to 50 points), control the flight from a computer (when upgrading to a ground station), focus on a point of interest (video below), follow a point of interest, etc.
Naza V2 is the intermediate link between amateur Naza Lite and professional Wookong and A2. From the older brother V2 distinguish weaker hardware, 16 points on the map instead of 50, the lack of special modes with a point of interest, the lack of support for the ground station on the iPad and the worst stabilization in flight. In my opinion, the option with V2 for professionals is controversial, because if you have non-trivial professional tasks, you will understand that you do not have enough budget for Wookong, and now something is not optimal. Naza V2 is more likely for FPV enthusiasts who want to play professionals, or professionals for whom aerial photography is an inessential part of the job. Price from 15,000 rubles in Russia.
For quadcopter FPV, Naza M Lite is probably the most suitable. It is inexpensive (from 8,000 rubles in Russia complete with GPS), its functionality is maximally curtailed, which speeds up addiction. At the same time it flies just fine. The beginner will be pleased with the full package “for pilots dummies”, which I will discuss below.
In fairness, I note that Black Sheep is also not against installing the OpenPilot CopterControl controller on Discovery. But, firstly, you will have to adjust it, and secondly, it is suitable for acrobatics, and not for FPV with a novice pilot.
If some vendor starts explaining to you that Lite doesn’t accurately land and has worse flight performance than V2, plug your ears - this is noticeable only when professional video shooting for which Discovery is, in principle, not the best option. And Lite has the function of stabilizing the 2-axis suspension.
The autopilot puts the copter on the Naza Lite not with an accuracy of 15 meters, as some pros say, but with an accuracy of 0.5-1.5 meters, depending on the wind. Especially for the post today recorded a video with landing in autopilot mode on the side of the road. Exactly the same from where it took off.
The real difference is that V2 can fly on points on the map and connects to the proprietary DJI OSD system (flight information on your screen). Naza comparison table . The problem is that TBS Discovery also has a proprietary OSD. And neither one nor the second OSD is useful to us. Later I will describe a more informative, easy and cheap OSD from the Chinese.
If you want to play autopilot with points on the map, get the full version (V2), but in the case of FPV, it’s better to buy a ticket to Santorini with the best views with the saved money.
Each DJI controller has built-in vibration isolation of sensitive elements and HomeLock, CourseLock and Attitde modes. HomeLock allows you to control the copter without taking into account the current position of his nose. That is, a pen on himself - he flies towards you, to the right - he flies towards the right relative to you. This is convenient when the device is far away from you, and you do not see how it is turned towards you. CourseLock does the same thing, only focusing not on the point from which it was launched, but on the initial orientation of the nose. Attitde turns the gas knob into a flight height regulator, where its average position is to hold the current altitude.
GPS Lite versions come with him and without him. We - only with him. What is the essence of the question: such a pancake is added to a flight controller, in which a GPS receiver and a magnetic compass are located.
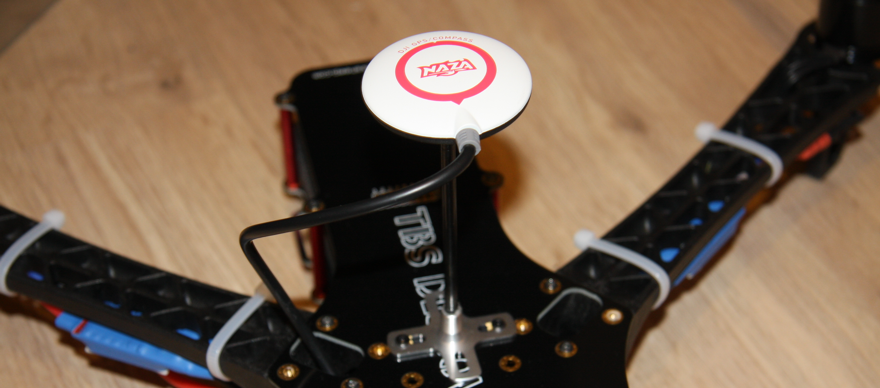
When this device is connected to the controller, the GPS Attitude mode appears in which the electronics stabilizes both the flight altitude of the copter and its position in space. That is, if you are tired, the car is approaching, the horse or a beautiful girl, you can let go of the handles (sticks) on the remote, and the copter will just hang in the air until the situation changes. If you do not know how to land it, you can simply turn off the console and it will sit itself where you started it from (read the instructions).
I recommend to always calibrate the compass before flying. Even if you fly in the same field as last time. Below is a video of unsuccessful auto-landing due to neglect of this rule.
Atti GPS mode will be useful to you for several weeks of flights. Gradually, at a safe height, you will begin to turn it off, getting used to the more nimble Attitude mode (only height control). For example, the maximum speed of my copter in GPS Atti mode is 65 km / h, and in Attitude mode it is 80 km / h. This is more fun. Naza also has an Extreme Manual mode - but it's completely scary, you can really bump somewhere.
Perhaps, I will not give here instructions on how to configure Naza - this is a very high-quality product, which even has video guides on the site. Let me just say a couple of nuances:
BEFORE STARTING THE COPPER AT LEAST FOR A MINUTE, SET THE INSTANT POWERING MODE! INTELLEGENT MODE MAY RESULT IN BLOODY IMPLICATIONS IN AN APARTMENT - YOU JUST CANNOT TURN OFF THE MOTORS, IF ANYTHING WON'T GO. I HAVE BEEN HAPPY - MY PALATE HAS FRAUGHT WITH A MODEL WITH BARE HANDS TO A WINNING END.
DO ESC CALIBRATION BEFORE TESTING COPPER. EACH ESC CONNECTED DIRECTLY TO THE DOOR RECEIVER AND CALIBRATES. WITHOUT A CALIBRATION, ANY TIME WILL NOT SAVE, AND THE COUPTER IS TURNED OVER THE START. GOOGLE HELP.
If the first 2 warnings are processed by starting the motors, check which direction they are turning. Must inward on each side in the direction of movement of the apparatus back and forth. The instructions for the controller have a picture of how it should look. You can also see the correct version in the illustration above, with the types of copters. The nose there is looking up.
Check that the shape of the screws corresponds to their direction of rotation. The screws must be different. 2 pairs of 2 screws - direct and reverse. When rotating, the screw should pull the copter up, not down.
When installing the GPS module, make sure that the arrow on it points to the nose of the model, as well as the arrow on the body of the controller itself; otherwise, an uncontrolled crash of the copter will occur some time after its launch on the airfield.
, Naza Assistant, .
Naza Assistant . - TBS Discovery. :
- 750KV: 134/109/93/198 183/143
- 900KV: 166/135/131/179 188/176
Extended list of settings depending on your goals in NAZA gains database
I also recommend that you adjust the channels X1 and X2 to control the wheels on the remote control and to adjust the above parameters to adjust the electronics in the test flight.
It will also be useful to configure Forced FailSafe on any toggle switch so that you do not have to turn off the remote to return home. In this case, be sure to configure FailSafe to return home + landing , and not easy - landing a. Below are a few videos about setting up various remotes. Unfortunately, in English.
Configure Forced FailSave for Futaba T10CAP
Configure Forced FailSave for Futaba 8FG
The Naza manual has a section on setting the 1st and 2nd levels of protection when the battery is discharged. Treat this procedure carefully, otherwise the copter may fall from a sudden loss of current or, conversely, a false alarm system protection.
To protect the 1st level, you specify how the voltage is without load, the voltage of a fully charged battery, subtracting 1 volt from it. Load 0 and fly until the warning is triggered. Remember the residual battery voltage. The difference between the settings you have set and the actual residual voltage of the battery - this is the loss of voltage during the load. Usually, about 0.5 V. Write it in the appropriate field.
Do the same with the protection of the second level. There you can specify the voltage without load as the nominal value of your battery or slightly below. In my case, for a 3S-battery, it is not set at 11.1 V (nominal), but at 10.9 V - 0.6 V loss under load. That is, the copter must be planted at a voltage of 10.3 V under load, otherwise it will do it itself.
Some tips for TBS Discovery and more:
- Use good screws to reduce vibration and balance them.
- For longer flights, use low KV motors in combination with large propellers. At the same time monitor the current consumption.
- To prevent the screws from entering the frame, use a 8-inch size for wide-angle lenses and 10 inches for an average angle.
- 25A ESC is more than enough for this platform. The maximum gas is 15A per motor, and an average of 10A.
- To securely install the ESC, solder the 3.5 mm motor connectors directly to the controller boards.
- Standard DJI motors have an 8 mm shaft. APC screws are made under 6 mm. and must be adapted. Graupner screws stand up right.
- Program ESC like this: Break off, Battery type NiMh (to turn off LiPo's engine stop function due to low battery voltage), Cut-off type: Soft cut, Cut-off voltage, Aircraft type response mode high (400 Hz), Governor off and everything else off too
- Calibrate each ESC separately, connecting it to the receiver and pushing the gas into the upper and lower limits to beeps. Keep in mind that those not connected to ESC motors will not squeak, since They do not have a built-in speaker and actually squeak with motors (like in childhood they played radio on some motor).
- The thrust of the screw only affects how much it can pull, but not at what speed. Thus, the thrust effect on acceleration, and kV on speed characteristics.
- Use only BEC on one ESC to connect 5 volts, do not use the red wire of the other three ESC. Pulse BEC fails when connected in parallel.
- Results in eCalc should show “over power”. Since there are a lot of screws in the multicopter, the load will be distributed evenly, and the motors will be extremely loaded only at the peak moments of pilotage.
- If the motors stall, increase the system voltage, for example, instead of 3S-use 4S-batteries to increase the torque of the motors. Do not sleep with this.
- Balance the motors using a smartphone or other known method.
- Adjust the gas curve so that, in the middle position of the stick, achieve a certain flat area to simplify control of the flight altitude.
- Limit the gas curve to 90% at the top position of the stick. This will help the controller to adjust your actions even at full speed of the device, because there remains a 10% reserve for automation.
- To make sticks less sensitive closer to the center, in attitude mode use a 30% exponent for roll and pitch, 10% for turns on your remote control, in rate mode use 50% for roll and pitch, 20% for turning
- The center of gravity (CG, CoG) is needed to balance the distribution of the load on the motors
- The flight controller does not have to be located at the center of gravity of the model; on the TBS Discovery, fasten it as shown in the instructions.
- You can place the flight controller wherever you wish, and then in its settings compensate for this misunderstanding.
- If you plan to fly inside the air ducts, achieve jewelry control accuracy when calibrating sticks in Naza Assistant. Before calibration, set the limit of the sticks on the remote control is not 100%, but 140%. This will provide a higher resolution control signal.
- You can adjust any toggle switch on the remote control to switch between different sets of stick stroke limits. For example, 50% management of roll and pitch will provide a much smoother flight, provided that you used 100% or even 140% limits for calibration.
- Cover the soldering points with something so that it does not short out during flight.
- For a long service life of lithium-polymer batteries, set a warning about the discharge so that it works when the voltage on each cell drops to 3.7 volts, for 3S it is 11.1 V. For - 4S 14.8 V
- If while watching a video recording you see the “Jelly” effect, put something soft between the camera and the model.
- If on the video during the flight you see horizontal lines, put something else, but also soft, under the vTX (video transmitter on the model).
- The center of thrust is 15 cm closer to the nose than the model’s center of gravity.
- If the nose is too heavy, this is bad, you are being torn off when flying straight, if the tail is bad too.
- Cover the Naza controller case with black tape on the sides, so that in the bright sun the model does not sag in height when the sun's rays penetrate straight inside.
- If the screws are visible in the frame on the GoPro camera, it is not necessary to cut them, put 1.5 cm under the camera at the back.
- If you broke the heat shrink at ESC to program it, put a new one on it. A 20 mm fit.
- APC screws behave the same as the size of a large graupner
- Watch for voltage during the flight. Ideally, land when the battery reaches its rated voltage.
More help in English is available here .
Of course, Naza is not the only flight controller. But if you collect a copter for the sake of flying today, and not for the sake of multi-week dances with a soldering iron and an oscilloscope, this is probably the best choice.
If the Naza name is not to your liking, the following 32-bit analogs are available for you:
- CC3D OpenPilot Flies well. The setup is heavy. It is difficult to buy.
- Rabbit Flight Controller II Closed System. Sonar is required to maintain altitude. Flies mediocre, yet. According to rumors, they steal code from MultiWii. Some of the controller configuration utility do not really like it.
If you want to take a chance and try the 8-bit system:
- AdruPilot Mega Short APM. It stands as Naza. Some say it flies no worse, others that worse. Currently porting to a 32-bit controller. For normal flight requires a thoughtful setting of many parameters. As I understand, this is a functional analogue of Wookong-M at the cost of Naza, which is more difficult to configure. My opinion is that if you earn money by shooting, you can completely put on Wookong, and sweat and save money by setting up APM. The solution is rather an economic one, since the time you spend setting up your APM can be more expensive than the difference in price of controllers or cheaper. Although, having an expensive copter, you can get more interesting orders. Yes, and confidence in the negotiations you will have more. For FPV, however, the functionality of Wookong / A2 / APM is clearly redundant.
- MultiWii Fly well, but a month after studying the manuals and tuning the PID. In the package you will receive a fee, for which you need to do vibro-isolation and protection of the barodatchik.
- The remaining 8-bit controllers lose to 32-bit systems by definition.
Some professionals recommend first practice on a cheap controller without special modes. I myself have fallen for this bait, having bought Hornet. I explain why this should not be done:
- Buying first a cheap controller, and then a good one, you will overpay for a cheap one. There is absolutely no point in this, because A good controller can work in cheap mode. So, I have an idle controller from Hornet, on which I made only a couple of sorties. Why does he need me?
- You can break (and break) quadrics with a cheap controller (if you don’t buy a normal one in time). This will happen because you will fly without insurance. That is, if you lose control of the device, there will be no magic STOP button. A good controller can forcibly lock the copter in the air with the press of a single button (switching the toggle switch). After a break, you can return to flight directly from this point.
- Practicing in manual modes without stabilization is better for a beginner at high altitude, so that there is a margin of a few seconds in the event of unexpected behavior of the copter. It is better to take off to this height with the help of a stabilizing mode, as well as to descend from it. If there is no such mode in your controller, you will be scared to immediately go up to 20 meters or more. You will fly on the ground or near it, which is dangerous and difficult, since it is more difficult to control the height of the earth (a lower boundary appears), at a low altitude there are many more obstacles, and the surface also has a screen effect that changes control.
- Even if you immediately put the camera on the device, sooner or later, you still will want to learn how to manage visually. Only for this you will have all the necessary tools. You can both turn on stabilization and look at the monitor in case of loss of control over the orientation of the device relative to you.
Summing up, I will say this. One gets the impression that people who have gone through a difficult path do not want easy ways to others. Now in the market, as I understand it, the transition period from enthusiastic engineers to photo and video professionals and FPV lovers. This creates tension between different generations. And this is normal. Within the generation, there is a separation similar to the division into iPhone and Android users. The difference, in my opinion, is that DJI is closer to the iPhone analogy today than the rest to Android. After all, DJI products work fine out of the box, and the rest of the controllers require adjustment for each specific device. It is possible that the manufacturers of the copters will then later release the "shells" for the copters on alternative controllers, simplifying their use, as happened with Android. It is clear that engineers from the first generation cannot try on the closeness and artificial limitations of DJI solutions, therefore, Android is closer to them. After all, who, if not they, will be able to optimize mathematical models of flights, sewn into open controllers.

So the second part of my post came to an end. The questions that are still to be covered mainly concern the video. A complete list of what I plan in the next part is:
- Selection of the control panel and receiver of its signals
- Mechanical part (screws)
- Batteries and Charging
- Video. The number and type of cameras.
- Video. Suspensions and brackets for cameras.
- Video. Transmitter and receiver.
- Video. Glasses and monitors.
- Flight information on the screen. Telemetry. OSD.
- Search for a flown model. GPS tracking.
- Installation. Heat shrink, filters, shielding and ferrite rings.
Appeal to professionals
I would be grateful for efficient comments and comments on the material. If you have experience in building multi-rotor systems, robotics, FPV, video editing, or do sound design, if you have at least some free time, please write in a personal. Who knows what will come of it. At least let's make the next part more interesting.
Thanks
I express my personal gratitude to users:
You helped me with comments, links and kind words. Gathering spirit to write a sequel. Special thanks to the user smit1237 for professional advice on many issues.
Source: https://habr.com/ru/post/197380/
All Articles