The first program for OS X do-it-yourself - the clipboard manager
More than a year has passed since I became interested in programming for the iOS platform. Finally, I found some free time to try my hand on the OS X platform. If you have long been interested in the OS X platform but are not going to start, this article is for you! Under the cat a detailed description of the process of creating an application - the clipboard manager. All sources can be found at github.com/k06a/Clipshare

Without hesitation, I created in Coccode 5 a project like Cocoa Application named "Clipshare". In the newly created project, we can observe the following files:
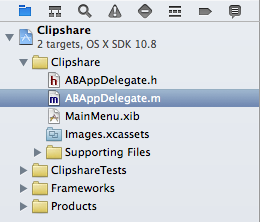
')
The ABAppDelegate.h and ABAppDelegate.m files belong to the application delegate class, and in them we will just write all of our code. In the MainMenu.xib file , we will draw and customize the graphical interface of the application.
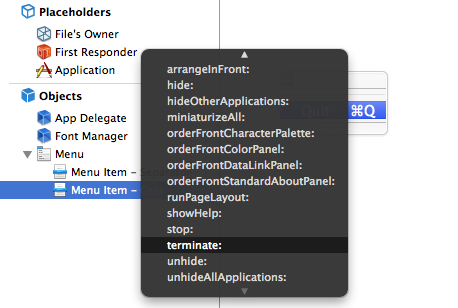
Having thought carefully, we decide that our application should be windowless and should hang in the status bar (near the watch). The first thing we need is to remove the standard menu bar and the window object from the MainMenu.xib file — we will not need them. Next, create a menu object with 2 items: a separator and an exit point from the application. This is done by simply dragging objects from the library onto the canvas. To use the Quit menu item, just hold down the Ctrl key and drag a blue thread from the menu item to the Application object:

After we release the mouse button, a window will appear with a list of selectors (methods) available for the connection. Among the presented methods, we are suitable-
Now you need to be able to access our menu from the code. In order to customize its display in the status line of OS X and a lot more for what. Open the assistant mode, when you see 2 documents in the Xcode window at once, leave the GUI in the first one, and select the application source code in the second: ABAppDelegate.h . And just like last time with the Ctrl key held down, we’ll stretch the blue thread from the menu, but now to the source code. You need to

As soon as we let go of the pressed mouse button, a dialog box pops up with the settings of the Outlet being created (a property in the code that refers to the GUI object). It remains only to specify the name of the property, for example, "menu":

Now we are switching to the source code of the application. In ABAppDelegate.m , we have only 1 method and that one is empty:
Inside this method, it will enter the code, first of all binding our menu to the OS X status bar:
For this code to work, you must also declare the
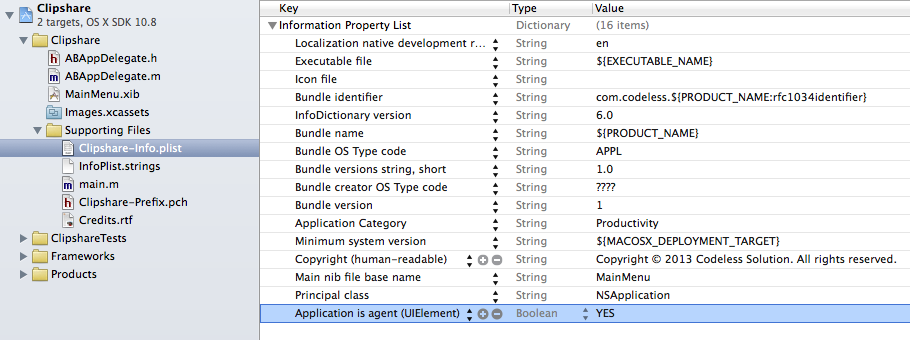
To be able to check our application, you just need to add 1 key with the value
We launch our application and observe it in the status bar of OS X and we can even exit it via Cmd-Q or simply by pointing to the single menu item:

I suggest checking the contents of the clipboard on a timer every half second, and depending on what we find in it, perform certain actions. Apparently, there is no other way to learn about changes in the clipboard, and pity ( stackoverflow.com/a/5033480/440168 ). Ok, set the timer. Create a timer object, tell it what method and how often it should call and add a timer to the message loop:
Now, the timer processing cycle calls the selector (method)
In the body of the method, we refer to the main clipboard, to the last object contained in it and try to extract text data from it. I propose to memorize the changes in the clipboard in the array of previous values, as well as store a parallel array ( ru.wikipedia.org/wiki/Parallel_array ) of the dates and times of the corresponding changes:
Do not forget at the beginning of the program to initialize both properties with empty liabilities:
Now we will implement the following logic: we will search for the text found in the clipboard in the array with previous values and if there is no such one, add it to the beginning of the array and add a new item to the top of the menu:
If such text is already in the array with the previous values, we will tick off the corresponding item of our menu and nothing more. To do this, we will create a new
The
Well, in the case of adding a new item, you must also delete old items, if there are too many of them:
It remains to process the clicks on the menu items:
Now the application works as we wanted! When a text that has been there recently arrives on the clipboard, the check mark jumps down to the desired item. The same happens if we click on this item ourselves:

The application is designed only for text data, and does not work properly with pictures, files and other things that fall into the clipboard, but I myself have been using it for a couple of days. This is the first application I wrote in a couple of hours - which I actually use. Thanks to those who read and looked through all the pictures, I hope you enjoyed it!
For magic numbers and parallel arrays in the code, please do not kick! As it was easier and faster and wrote. Who loves Feng Shui everything - waiting for your pool rekvest!
Sources of the application can be found here: github.com/k06a/Clipshare
The binary can be downloaded from releases: github.com/k06a/Clipshare/releases
PS If you do not skimp on the pros and comments, in the next article we will create an application for iOS and synchronize the clipboard between devices!
PPS Who will find an epic typo in the text, will get a plus in karma!
We prepare the project for work
Without hesitation, I created in Coccode 5 a project like Cocoa Application named "Clipshare". In the newly created project, we can observe the following files:
')
The ABAppDelegate.h and ABAppDelegate.m files belong to the application delegate class, and in them we will just write all of our code. In the MainMenu.xib file , we will draw and customize the graphical interface of the application.
Having thought carefully, we decide that our application should be windowless and should hang in the status bar (near the watch). The first thing we need is to remove the standard menu bar and the window object from the MainMenu.xib file — we will not need them. Next, create a menu object with 2 items: a separator and an exit point from the application. This is done by simply dragging objects from the library onto the canvas. To use the Quit menu item, just hold down the Ctrl key and drag a blue thread from the menu item to the Application object:
After we release the mouse button, a window will appear with a list of selectors (methods) available for the connection. Among the presented methods, we are suitable-
-terminate :Now you need to be able to access our menu from the code. In order to customize its display in the status line of OS X and a lot more for what. Open the assistant mode, when you see 2 documents in the Xcode window at once, leave the GUI in the first one, and select the application source code in the second: ABAppDelegate.h . And just like last time with the Ctrl key held down, we’ll stretch the blue thread from the menu, but now to the source code. You need to
@interface into the @interface code section in the @interface file (the window property I have already deleted from this file as unnecessary):As soon as we let go of the pressed mouse button, a dialog box pops up with the settings of the Outlet being created (a property in the code that refers to the GUI object). It remains only to specify the name of the property, for example, "menu":
Now we are switching to the source code of the application. In ABAppDelegate.m , we have only 1 method and that one is empty:
- (void)applicationDidFinishLaunching:(NSNotification *)aNotification { // ... } Inside this method, it will enter the code, first of all binding our menu to the OS X status bar:
self.statusBar = [[NSStatusBar systemStatusBar] statusItemWithLength:NSVariableStatusItemLength]; self.statusBar.title = @"CS"; self.statusBar.menu = self.menu; self.statusBar.highlightMode = YES; For this code to work, you must also declare the
statusBar property in the @interface section: @property (strong, nonatomic) NSStatusItem *statusBar; To be able to check our application, you just need to add 1 key with the value
YES to the Clipshare-Info.plist file , it will allow our application to work without a window:We launch our application and observe it in the status bar of OS X and we can even exit it via Cmd-Q or simply by pointing to the single menu item:
We introduce the main logic
I suggest checking the contents of the clipboard on a timer every half second, and depending on what we find in it, perform certain actions. Apparently, there is no other way to learn about changes in the clipboard, and pity ( stackoverflow.com/a/5033480/440168 ). Ok, set the timer. Create a timer object, tell it what method and how often it should call and add a timer to the message loop:
NSTimer * timer = [NSTimer timerWithTimeInterval:0.5 target:self selector:@selector(timerFire:) userInfo:nil repeats:YES]; [[NSRunLoop currentRunLoop] addTimer:timer forMode:NSDefaultRunLoopMode]; Now, the timer processing cycle calls the selector (method)
-timerFire: on the self object. Do not forget to implement this method: - (void)timerFire:(id)sender { NSPasteboard * pboard = [NSPasteboard generalPasteboard]; NSPasteboardItem * pboardItem = [[pboard pasteboardItems] lastObject]; NSString * text = [pboardItem stringForType:NSPasteboardTypeString]; // ... } In the body of the method, we refer to the main clipboard, to the last object contained in it and try to extract text data from it. I propose to memorize the changes in the clipboard in the array of previous values, as well as store a parallel array ( ru.wikipedia.org/wiki/Parallel_array ) of the dates and times of the corresponding changes:
@property (strong, nonatomic) NSMutableArray * texts; @property (strong, nonatomic) NSMutableArray * times; Do not forget at the beginning of the program to initialize both properties with empty liabilities:
self.texts = [NSMutableArray array]; self.times = [NSMutableArray array]; Now we will implement the following logic: we will search for the text found in the clipboard in the array with previous values and if there is no such one, add it to the beginning of the array and add a new item to the top of the menu:
NSInteger index = [self.texts indexOfObject:text]; // ... NSMenuItem * menuItem = [[NSMenuItem alloc] initWithTitle:@"" action:@selector(menuItemSelect:) keyEquivalent:@""]; [self.menu insertItem:menuItem atIndex:0]; [self.texts insertObject:text atIndex:0]; [self.times insertObject:[NSDate date] atIndex:0]; If such text is already in the array with the previous values, we will tick off the corresponding item of our menu and nothing more. To do this, we will create a new
selectedIndex property of type BOOL : if (index != NSNotFound) { self.selectedIndex = index; [self updateItemTitlesAndStates]; return; } The
updateItemTitlesAndStates method is used to bypass all menu items and update their names (the names indicate the time elapsed since copying to the clipboard) and setting a check mark to the left of the selectedIndex item: - (void)updateItemTitlesAndStates { for (int i = 0; i < self.menu.itemArray.count-2; i++) { NSDate * time = self.times[i]; NSString * text = self.texts[i]; NSMenuItem * menuItem = self.menu.itemArray[i]; NSString * timeStr = nil; NSTimeInterval secs = MAX(0,[[NSDate date] timeIntervalSinceDate:time]); if (secs < 60) timeStr = [NSString stringWithFormat:@"%ds",(int)(secs)]; else if (secs < 60*60) timeStr = [NSString stringWithFormat:@"%dm",(int)(secs/60)]; else if (secs < 60*60*24) timeStr = [NSString stringWithFormat:@"%dh",(int)(secs/60/60)]; else if (secs < 60*60*24*7) timeStr = [NSString stringWithFormat:@"%dd",(int)(secs/60/60/24)]; else if (secs < 60*60*24*365.75) timeStr = [NSString stringWithFormat:@"%dw",(int)(secs/60/60/24/7)]; else if (secs < 60*60*24*365.75*3) timeStr = [NSString stringWithFormat:@"%dM",(int)(secs/60/60/24/30.5)]; else if (secs < 60*60*24*365.75*100) timeStr = [NSString stringWithFormat:@"%dy",(int)(secs/60/60/24/365.75)]; else timeStr = @".."; menuItem.title = [NSString stringWithFormat:@"(%@) \"%@%@\"", timeStr, [text substringToIndex:MIN(MaxVisibleChars,text.length)], (text.length <= MaxVisibleChars) ? @"" : @"..."]; menuItem.state = (i == self.selectedIndex) ? NSOnState : NSOffState; menuItem.keyEquivalent = [@(i+1) description]; } } Well, in the case of adding a new item, you must also delete old items, if there are too many of them:
while (self.menu.itemArray.count >= MaxVisibleItems+2) { [self.menu removeItemAtIndex:self.menu.itemArray.count-3]; [self.texts removeLastObject]; [self.times removeLastObject]; } It remains to process the clicks on the menu items:
- (void)menuItemSelect:(id)sender { NSInteger index = [self.menu.itemArray indexOfObject:sender]; NSPasteboard * pboard = [NSPasteboard generalPasteboard]; [pboard clearContents]; NSPasteboardItem * pboardItem = [[NSPasteboardItem alloc] init]; [pboardItem setString:self.texts[index] forType:NSPasteboardTypeString]; [pboard writeObjects:@[pboardItem]]; } Now the application works as we wanted! When a text that has been there recently arrives on the clipboard, the check mark jumps down to the desired item. The same happens if we click on this item ourselves:
The application is designed only for text data, and does not work properly with pictures, files and other things that fall into the clipboard, but I myself have been using it for a couple of days. This is the first application I wrote in a couple of hours - which I actually use. Thanks to those who read and looked through all the pictures, I hope you enjoyed it!
For magic numbers and parallel arrays in the code, please do not kick! As it was easier and faster and wrote. Who loves Feng Shui everything - waiting for your pool rekvest!
Sources of the application can be found here: github.com/k06a/Clipshare
The binary can be downloaded from releases: github.com/k06a/Clipshare/releases
PS If you do not skimp on the pros and comments, in the next article we will create an application for iOS and synchronize the clipboard between devices!
PPS Who will find an epic typo in the text, will get a plus in karma!
Source: https://habr.com/ru/post/197348/
All Articles