On bare iron ... VMM 2012 R2 features
Hello!
It's almost the official launch of Windows 8.1 RTM and Windows Server 2012 R2 RTM with other goodies, and I’ve been picking System Center 2012 R2 for quite a long time and would like to share my empirical research on this topic.
The first thing that comes to mind in view of recent changes in the market of virtualization and cloud platforms is simply not to ignore the cloud, and the fact that it is a trend is no longer true, but a real reality. Also, from a professional point of view, I can safely say that the requirements for skills also change and generate new related professions. Even the most inveterate parasite in the market of IT and IT services was not too lazy to add the word “cloud” anywhere.
')
So it's time to upgrade skills - and let's talk to you about the elasticity of the cloud and bare-metal deployment. There are some news on this topic, namely in R2.

So, as I have already managed to briefly touch on, elasticity is a very important characteristic of the cloud, which in particular, along with other characteristics, allows us to speak about the cloud implementation of IT or the traditional one. When we talk about the cloud, we forget about the number of servers when we talk about system resources, we perceive these servers as a set of system resources: computing resources and storage space for data allocation . From an ideological point of view, this is true, however, when we talk about cloud and elasticity, we are talking about the possibility of increasing or decreasing the amount of resources for the execution of tasks of interest to us.
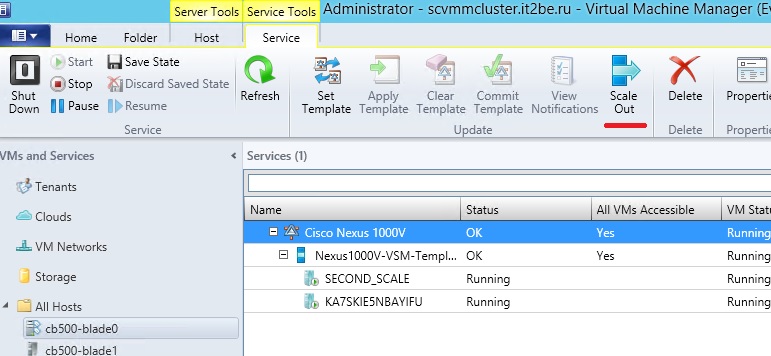
In the context of the service itself, we are talking about the ability to scale service components in VMM , when the service is a ready-made application hosted on one or more interconnected virtual machines. That is, if we do not have enough power of one virtual machine, we add to it an additional one and configure them to work in a cluster, thereby increasing the volume of the provided service, service. This solution to the problem is large, and this model is probably more relevant to the SaaS model, but it applies to all levels of service provision — IaaS, PaaS and SaaS.
From the point of view of the virtual machine, i.e. component of the platform in this case, we have the ability to dynamically approach the issue of resource allocation for a single VM, and therefore the service it provides. Now with the appearance of R2 of our products, WS and SC, we can dynamically change the size of the disks of the VHDX virtual machines on the fly , which is true for any disk connected via SCSI. For virtual machines of the 2nd generation, this statement is also true for system disks, since there only SCSI, without IDE.
If we are talking about the factory, the infrastructure for the cloud - here we have the opportunity to automate the process of deploying and enabling VMM virtualization hosts Hyper-V, storage based on the scalable Windows Server 2012+ file server, and adding storage components via SMI S and SMP .
Those. we get this picture:

Well, let's consider in detail the process of deploying components of a factory, how it happens, what other components are involved in this process.
Before you begin the actual deployment of infrastructure components — virtualization hosts and SMB-based storage , you must meet a number of conditions:
1) You should already have a PXE deployed, which means a DHCP server with an active scope.
2) The VHDX / VHD disk prepared using sysprep with the generalize parameter must be present in the VMM library. It is also necessary to load the drivers for the server hardware into the library if necessary.
3) You also need to create a physical host profile - and you can begin the process. To do this, follow these steps:
3.1) Go to Library-> Physical Computer Profiles-> Create Physical Computer Profile

3.2) Now you need to select the type of host: virtualization host (VM Host) or is it a host for data storage (File Server)
3.3) Next, you need to select a virtual disk to deploy its contents to the server, the disk must be added to the library. ( Browse-> choose image ).
3.4) Next, set the hardware parameters for the host operating system: configure the network and disk parameters.

3.5) And now we will set the parameters of our host’s operating system:
Further in the Summary we confirm all the above operations and complete the process.
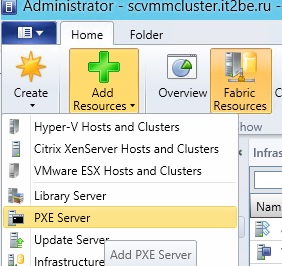
4) Now you need to add a PXE server . To do this, go to the Fabric section and click on Add Resources , where we will select PXE Server .
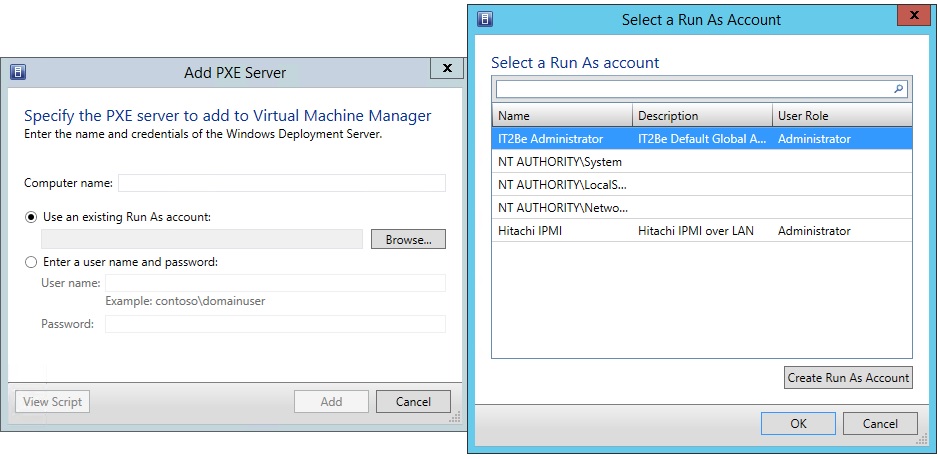
5) Next, we specify the name of our server and set up an account to access the PXE server with admin rights.
At this point, the preparatory process is completed - let's proceed to the deployment itself.
Let's start the deployment itself.
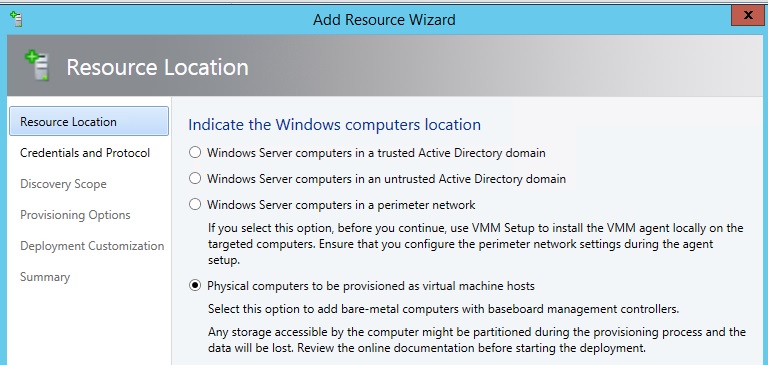
6) Again, we’ll go to Add Resources , but this time we ’ll select Hyper-V Hosts and Clusters , then select the option as in the picture.
7) Next we proceed to the discovery of hosts. At this stage, it is important to understand that VMM must be on the same network as the motherboard's BMC controller, and you must also have server management rights for the BMC. It is important that the server supports one of the communication protocols - IPMI or SMASH , depending on the protocol, select the one you need and select the correct port if it differs from the default value.

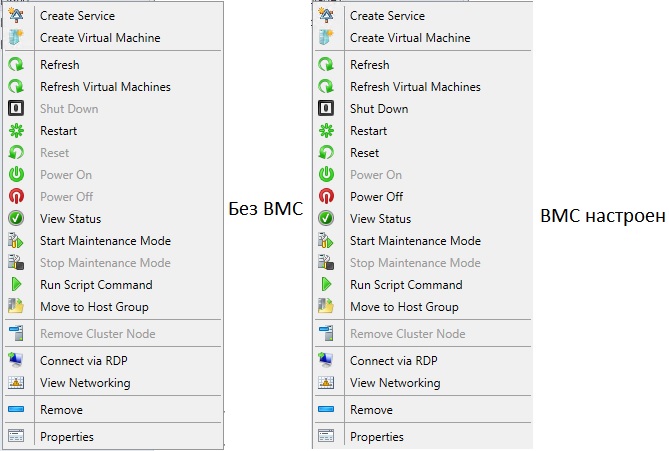
For convenience, you can also create an account for future use with the BMC console. BMC data is useful not only for the bare-metal deployment, but also for the physical management of VMM servers.

And a proof link about the benefits of Out-Of-Band connections in VMM .
8) Now it is time to discover our server with you and begin the process of atsky torment! For this we need the address of its BMC console. A tick about deep discovery can be removed - it leads to an on / off cycle through a remote console using a BMC account (assume that you have logged into the server’s web interface itself, you’ve just done all of the VMM using BMC).

9) Next, select the options for deployment. Set the host name.
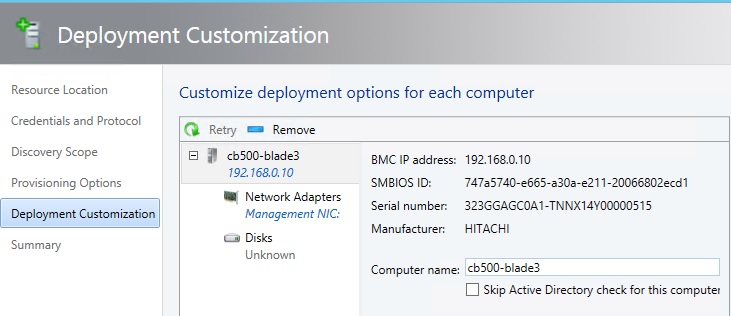
And we will need to configure the parameters of the network adapter - it will be necessary to obtain an IP address for the controlling adapter on the host — either by DHCP or if there is a logical network from a previously created pool of IP addresses.
We also need the MAC address of the target adapter to establish a connection with the PXE server.

10) On the Summary tab, we confirm all the settings and complete the wizard and begin the installation process - it remains to wait for the completion of this process - and now the resources of the new host are available at your service, the infrastructure is increased - and you can further stretch the perimeter of the cloud by adding the host, or this will happen automatically provided that the hosts are added to the group, and it in turn refers to the cloud.
So now we have learned a little more about the elasticity and the capabilities of VMM - now forward to download and try with your hands! Still Preview, but RTM is just around the corner!
Windows Server 2012 R2 Preview - technet.microsoft.com/ru-ru/evalcenter/dn205286
System Center 2012 R2 Preview - technet.microsoft.com/ru-ru/evalcenter/dn205295
With respect and flint in hand,
Fireman,
George A. Gadzhiev.
It's almost the official launch of Windows 8.1 RTM and Windows Server 2012 R2 RTM with other goodies, and I’ve been picking System Center 2012 R2 for quite a long time and would like to share my empirical research on this topic.
The first thing that comes to mind in view of recent changes in the market of virtualization and cloud platforms is simply not to ignore the cloud, and the fact that it is a trend is no longer true, but a real reality. Also, from a professional point of view, I can safely say that the requirements for skills also change and generate new related professions. Even the most inveterate parasite in the market of IT and IT services was not too lazy to add the word “cloud” anywhere.
')
So it's time to upgrade skills - and let's talk to you about the elasticity of the cloud and bare-metal deployment. There are some news on this topic, namely in R2.
Pro elasticity and infrastructure components
So, as I have already managed to briefly touch on, elasticity is a very important characteristic of the cloud, which in particular, along with other characteristics, allows us to speak about the cloud implementation of IT or the traditional one. When we talk about the cloud, we forget about the number of servers when we talk about system resources, we perceive these servers as a set of system resources: computing resources and storage space for data allocation . From an ideological point of view, this is true, however, when we talk about cloud and elasticity, we are talking about the possibility of increasing or decreasing the amount of resources for the execution of tasks of interest to us.
In the context of the service itself, we are talking about the ability to scale service components in VMM , when the service is a ready-made application hosted on one or more interconnected virtual machines. That is, if we do not have enough power of one virtual machine, we add to it an additional one and configure them to work in a cluster, thereby increasing the volume of the provided service, service. This solution to the problem is large, and this model is probably more relevant to the SaaS model, but it applies to all levels of service provision — IaaS, PaaS and SaaS.
From the point of view of the virtual machine, i.e. component of the platform in this case, we have the ability to dynamically approach the issue of resource allocation for a single VM, and therefore the service it provides. Now with the appearance of R2 of our products, WS and SC, we can dynamically change the size of the disks of the VHDX virtual machines on the fly , which is true for any disk connected via SCSI. For virtual machines of the 2nd generation, this statement is also true for system disks, since there only SCSI, without IDE.
If we are talking about the factory, the infrastructure for the cloud - here we have the opportunity to automate the process of deploying and enabling VMM virtualization hosts Hyper-V, storage based on the scalable Windows Server 2012+ file server, and adding storage components via SMI S and SMP .
Those. we get this picture:
Well, let's consider in detail the process of deploying components of a factory, how it happens, what other components are involved in this process.
VMM Factory Component Deployment Process
Before you begin the actual deployment of infrastructure components — virtualization hosts and SMB-based storage , you must meet a number of conditions:
1) You should already have a PXE deployed, which means a DHCP server with an active scope.
2) The VHDX / VHD disk prepared using sysprep with the generalize parameter must be present in the VMM library. It is also necessary to load the drivers for the server hardware into the library if necessary.
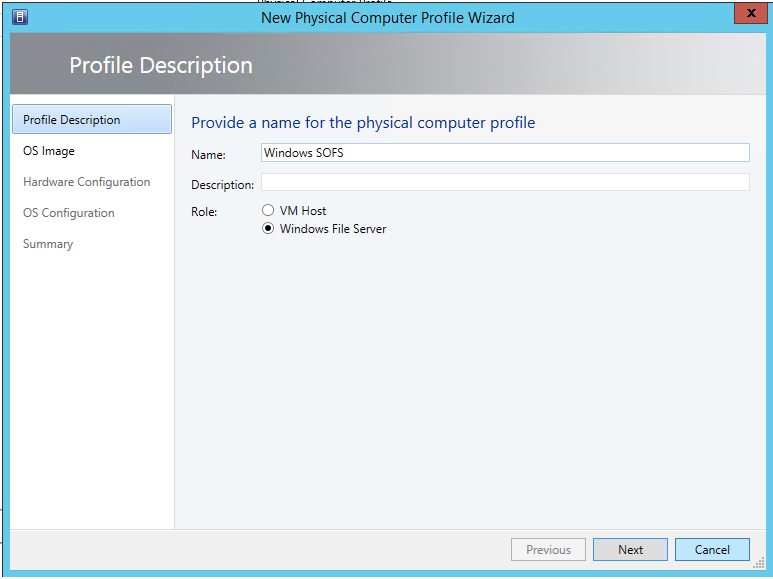
3) You also need to create a physical host profile - and you can begin the process. To do this, follow these steps:
3.1) Go to Library-> Physical Computer Profiles-> Create Physical Computer Profile
3.2) Now you need to select the type of host: virtualization host (VM Host) or is it a host for data storage (File Server)
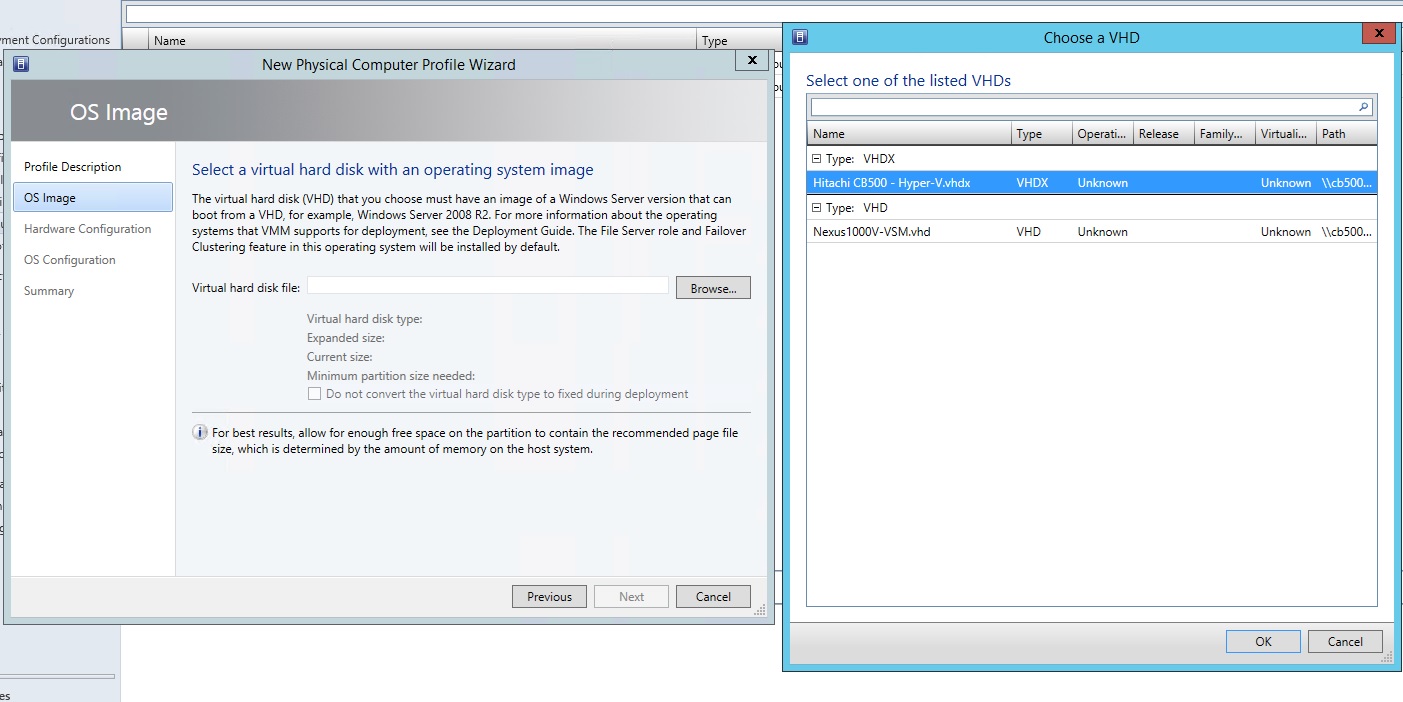
3.3) Next, you need to select a virtual disk to deploy its contents to the server, the disk must be added to the library. ( Browse-> choose image ).
3.4) Next, set the hardware parameters for the host operating system: configure the network and disk parameters.
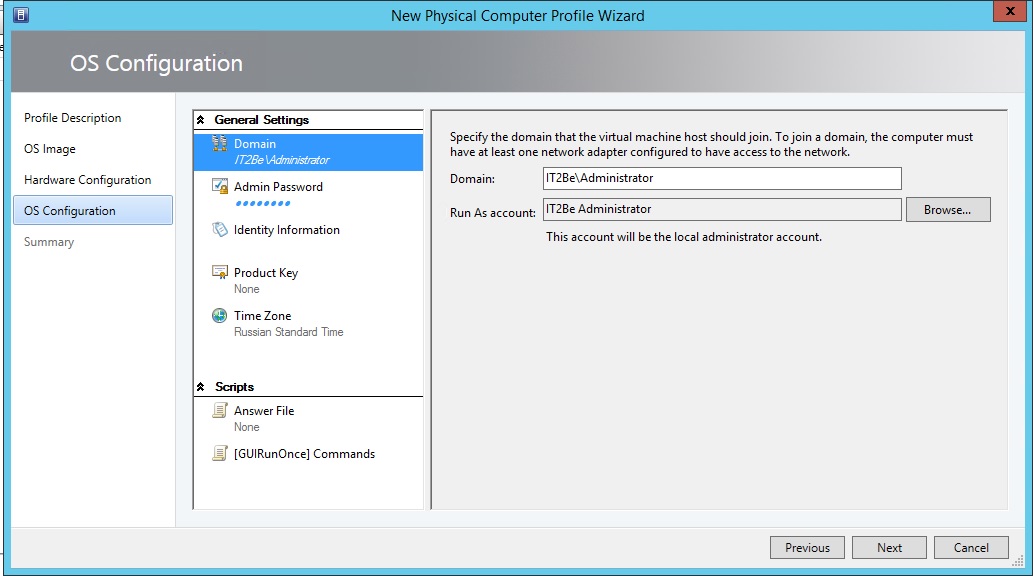
3.5) And now we will set the parameters of our host’s operating system:
Further in the Summary we confirm all the above operations and complete the process.
4) Now you need to add a PXE server . To do this, go to the Fabric section and click on Add Resources , where we will select PXE Server .
5) Next, we specify the name of our server and set up an account to access the PXE server with admin rights.
At this point, the preparatory process is completed - let's proceed to the deployment itself.
Let's start the deployment itself.
6) Again, we’ll go to Add Resources , but this time we ’ll select Hyper-V Hosts and Clusters , then select the option as in the picture.
7) Next we proceed to the discovery of hosts. At this stage, it is important to understand that VMM must be on the same network as the motherboard's BMC controller, and you must also have server management rights for the BMC. It is important that the server supports one of the communication protocols - IPMI or SMASH , depending on the protocol, select the one you need and select the correct port if it differs from the default value.
For convenience, you can also create an account for future use with the BMC console. BMC data is useful not only for the bare-metal deployment, but also for the physical management of VMM servers.
And a proof link about the benefits of Out-Of-Band connections in VMM .
8) Now it is time to discover our server with you and begin the process of atsky torment! For this we need the address of its BMC console. A tick about deep discovery can be removed - it leads to an on / off cycle through a remote console using a BMC account (assume that you have logged into the server’s web interface itself, you’ve just done all of the VMM using BMC).
9) Next, select the options for deployment. Set the host name.
And we will need to configure the parameters of the network adapter - it will be necessary to obtain an IP address for the controlling adapter on the host — either by DHCP or if there is a logical network from a previously created pool of IP addresses.
We also need the MAC address of the target adapter to establish a connection with the PXE server.
10) On the Summary tab, we confirm all the settings and complete the wizard and begin the installation process - it remains to wait for the completion of this process - and now the resources of the new host are available at your service, the infrastructure is increased - and you can further stretch the perimeter of the cloud by adding the host, or this will happen automatically provided that the hosts are added to the group, and it in turn refers to the cloud.
So now we have learned a little more about the elasticity and the capabilities of VMM - now forward to download and try with your hands! Still Preview, but RTM is just around the corner!
Windows Server 2012 R2 Preview - technet.microsoft.com/ru-ru/evalcenter/dn205286
System Center 2012 R2 Preview - technet.microsoft.com/ru-ru/evalcenter/dn205295
With respect and flint in hand,
Fireman,
George A. Gadzhiev.
Source: https://habr.com/ru/post/197190/
All Articles