Linux for professionals: how to prepare a layout for printing in a print shop
Small preamble
Colleagues, I thought some time ago that it would be nice to have something like a collective “Linux for Professionals” heading in which to tell how experts work using Linux for their daily work and, contrary to generally accepted opinion, they don’t who are neither programmers, non-system administrators, nor "technophiles" in general. It would be great if dear readers - Linux users would share their own experiences. To throw a "trial ball", I, with your permission, first try to share my experience in preparing a design layout for printing.
I deliberately do not want to touch upon such complex aspects as image editing and the preparation of three-dimensional visualizations in Blender. I also do not set the task to train the reader to use professional tools. For this there is documentation and lots of user resources. The goals of this series I would outline as follows:
- Eliminate prejudice regarding the impossibility of using * nix systems for professional activities other than the work of a programmer or network administrator;
- To show that due to the modularity of the architecture of * nix systems and the use of open source software that follows POSIX standards, many operations that I spent hours and even days in my usual working environment can be very easily automated or solved in a few minutes;
- Share experiences and show which tools are chosen by experts (in particular, which one I chose during the search) and which solutions may be most appropriate for various tasks.
')
Actually, as the first example, I decided to consider preparing the layout of the booklets for my two projects.
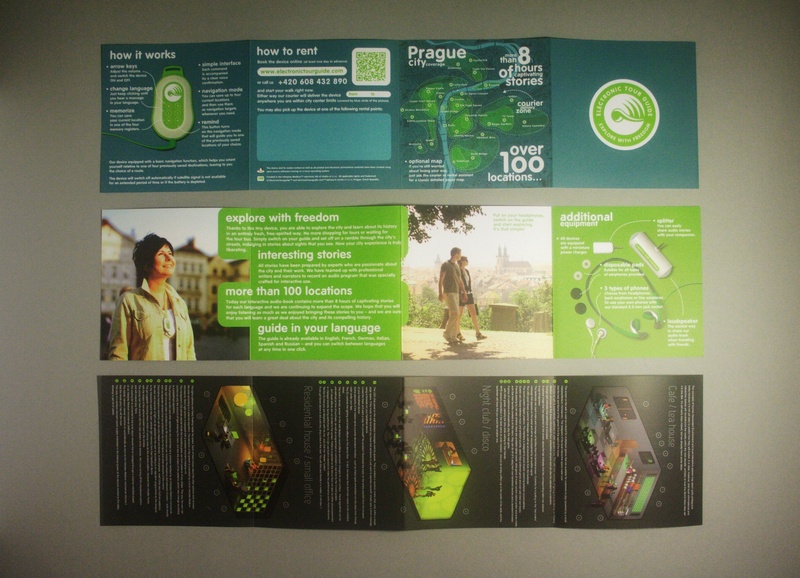
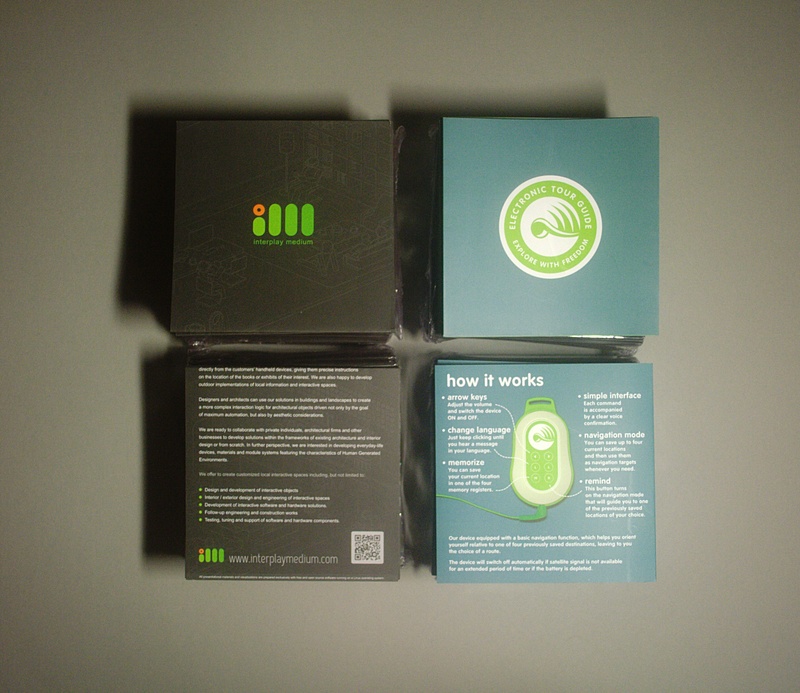
This is the run result. I apologize for the quality of the picture, there was only a reading lamp at hand, if anyone wants to see the original, here is a booklet about GPS audio guide in PDF format with a reduced resolution of raster graphics.
Below I will talk about the key stages and problems that had to be solved in the process.
Preparation of illustrations
In the booklet about the audio guide used four photos. Two of them - shot on location. Two - studio (ie, as usual, at home on the floor). The first photo is a widescreen slide shot by my friend Denis Protsenko. The rest is a digital shot on a Canon D350.
Today, when you connect a digital camera to a computer with the now popular Ubuntu distribution, the device is automatically mounted and a special image viewing application is launched, which is included in the standard package. At the time when I was just starting to experiment with Linux, nothing like this existed. So I ran gphoto and took photos from the camera through it.
gphoto2 -P Paradoxically, I still do so, and the reason is simple. The launch of the application takes 5 seconds, plus the process of pressing buttons and mouse movements is another ten. Running a console command in the terminal is a second action that can be performed directly from the target directory. The very case when the console is many times simpler GUI (and there will be many more such small finds).
Remark. To call frequently used console commands in the terminal, it is convenient to use the keyboard shortcut CTRL-R + command fragment
For editing illustrations, I used Gimp. By default, Gimp does not understand the RAW format, in which all professional and semi-professional cameras are able to save images today. In order to load the original image without compression, you need the UFRaw plugin.
If you work in Gimp, then you probably know that a feature of the editor is the lack of opportunity to work in CMYK. A story discussing the need for CMYK implementation is a long-standing subject for debate in the developer community. I believe that the appearance of the CMYK mode is a matter of time. Since the number of designers choosing Linux as the main operating system has been growing by leaps and bounds, I believe there will definitely be an enthusiast among them who either writes his own implementation or says the decisive word. It is possible that any of the readers will become a distributor.
Anyway. I remember, at first, I was pretty upset about this at first. Without converting all the illustrations into CMYK you cannot prepare any booklet for printing. Went to look for what is advised online on this account. And I found a plugin that does what I need, namely, it converts to CMYK and saves to TIFF. The plugin is installed, everything works. But it was not there. The plugin wonderfully picked up profiles. But converted only into a flat image with a pasted background. Strictly speaking, the problem is not great. Moreover, in order to avoid errors and the bezel caused by differences in the interpretation of the color of the dies and illustrations in some of the output centers, it is generally recommended to avoid CMYK alpha channels. But the problem is that I have one background in the booklet - and the background in the picture when converting is slightly different. A simple solution is to “spit” on accuracy and change the background in the booklet to the one in the picture. But I decided that this was the wrong way, as long as it offered a one-time non-universal solution and began to dig further.
And then I discovered that, it turns out, the popular set of console utilities Image Magic can easily convert to a variety of color spaces, incl. including CMYK. And, of course, with the connection of standard profiles, you want free, you want Adobe-ovsky.
Hooray! solution found. Here is the line, which I now convert all the illustrations.
convert -profile < RGB>/AdobeRGB1998.icc device.tif -profile < CMYK>/ISOcoated_v2_300_eci.icc -density 300 device.cmyk.tif and, of course, it is many times faster than opening a heavy GUI.
And here is the next line, where I change the background to the one I need. (Original illustration with alpha channel.)
convert -colorspace cmyk -density 300 -background "cmyka(127, 0, 25, 28)" -alpha off device.cmyk_newBG.tif So, the pictures are ready. Further, the preparation of vector graphics.
Vector graphics
Beg a small remark. Windows users and Adobe tools (regardless of platform) are used to dealing with monolithic applications that are trying to incorporate all possible functionality. However, in * nix systems there is historically a slightly different practice rooted in the idea of modularity, which is an important feature of POSIX. One application - one task. You begin to comprehend the meaning and universality of this approach when faced with the need to unify and automate non-standard tasks. I will not go into the details now, but I will try to show how powerful this approach is in one of the following publications on video editing. However, for those who are engaged in printing layout for a long time and professionally, this fact is not a discovery at all. All professional web designers prepare vector graphics separately, raster - separately and then only collect everything in a special application for layout. Only this approach gives you the necessary level of flexibility of settings and high quality output.
So. Vector graphics. The ideal, in my opinion, today, in all respects, the vector graphics editor for Linux is Inkscape. In it, I usually do all the graphics for the web and for printing, and in it I also developed symbols for both projects: Inteplay Medium and Electronic Tour Guide.
In the booklets that I have chosen as an example, there is not particularly any vector frills. The only thing I would pay attention to is the aspect related to the preparation of the QR code. Here I used the vectorizer built in inkscape (Path -> Trace Bitmap).
The string to generate the QR code (qrencode utility, the -s option allows you to specify the size of the point).
qrencode -o electronictourguide.com.png -s 5 'http://electronictourguide.com' After that, everything is saved in the SVG. My logo was already ready. And the arrows could be made using Scribus (about it below).
Layout
Here I was incredibly pleased. It turns out for Linux there is a powerful tool for typesetting and preparing documents for output. Scribus!
Scribus is perfect in every way. People make it, apparently, well versed in the details of the print business and knowledgeable in the prepress craft. Ideologically, it is not much different from Quark Express or Page Maker. If you have previously dealt with them, you can easily figure out how and where trapping is configured, how to add numbered colors (if you need them) and how to output the resulting PDF or postscript.
In order to protect myself from mistakes, I decided to look for any publications on PDF export for printing and found this excellent article , which describes the standard procedure and lists the recommended settings.
Remark. If you are importing SVG graphics, do not forget to convert the colors you added after import to CMYK. Conveniences for the sake of color in the list of colors appear warning about the discrepancy of color space marks.
We should also touch on the issue of fonts. For Linux, I have met at least three font managers. And lately, most of the time I stumble upon laudatory reviews about FontMatrix (most likely because the Software Manager recommends it in Ubuntu). So here. I tried FontMatrix and I can say that this is a very raw software with a very uncomfortable interface. We will see how this project will develop, but for the time being it’s impossible to use it for work. Phonty Python seems to me the most interesting. It has everything that a designer needs for quick installation and uninstallation of fonts, including, of course, sensible preview and font groups that you can switch at will (there they are called “pogs”).
So, I prepared the layout, having figured out the Scribus.
Print layout on the printer
If you have previously done design in Linux, then you probably quickly found that using standard CUPS drivers is quite difficult to achieve a quality result, not to mention the possibility of using non-standard paper formats (for example, roll). To make your layout perfect, you will need a Gutenprint driver. Gutenprint was originally designed as a plugin for the Gimp, but later expanded its credentials, and now you can print quality from any application. In fairness, it is worth noting that all the tweaks are still available only in the Gimp plugin, so if you want to get full control, export your work to raster and print from Gimp.
I have a Stylus Photo R285 printer. A4 format. My booklets have a very specific format that is not crammed into the standard. I decided to cheat and cut and then glued long strips of melokovki, corresponding to the width of the booklets. I informed Guttenprint that it was a roll. Exported the booklet to 600 dpi raster images, opened it, set the print parameters to maximum and waited.
I had to wait about an hour. So much took the process of rasterization and printing on one side. The quality was, of course, excellent, but the printing time was somewhat higher than my expectations. In general, by experience, I found out that in order to achieve a high-quality result, it is enough to choose the level of Photo and whether for special aesthetes Super Photo.

Actually everything. I safely forwarded the received PDF along with the printed and glued layouts to the printing house and in a few days I received a color proof.

Well, after coordination - ready circulation.
Standard deal: at the end of the circulation, yellow is underpowered! Hackers! but I, as a polite customer, decided that the trouble was not great and was satisfied.
Links (referred to in the article materials and software)
- Gimp - raster graphics editor
- Scribus - a system for layout and preparation of dummies for printing
- Inkscape - vector graphics editor
- Printing in Scribus (by Bruce Byfield)
- Scribus PDF Export Guide
- dispcalGUI Open Source Display Calibration - GUI for Argyll (monitor calibration system). Not mentioned in the article, I advise you to pay attention
- Gutenprint - a set of drivers and utilities for color printing. Support over 1300 printer types
- Image Magick - a set of console utilities (and libraries) for working with raster graphics
- qrencode is a console utility (+ library for developers) for generating QR codes
- UFRaw - utility and Gimp plugin for working with images in uncompressed format
- Fonty Python - Manage Fonts in Gnu / Linux
- Getting CMYK colors from Inkscape to Scribus for printing is not a useful, but useful link.
All of the software mentioned is in the repositories of all popular "desktop" Linux distributions, including Ubuntu and Linux Mint.
Especially for those who are just thinking about switching to Linux, I note: installing and removing programs in the GNU / Linux operating system is an ordinary procedure that does not require any additional actions and is carried out through a single software manager or directly in the terminal (which is even faster). You in most cases there is no need to search and download anything from the network. You simply enter a short command in the terminal or type the name in the Software Manager search and choose what you need to install. The removal procedure looks exactly the same. Both procedures, as a rule, take only a few seconds, which makes it possible to try many tools, utilities and ready-made solutions for an hour.
Chasing after
The reader will certainly be interested to know that a group of enthusiasts some time ago developed an excellent ColorHug colorimeter, completely open with a full technical description. You can collect your own or buy ready.
Briefly about yourself
It so happened that, due to my unrestrained interest and a number of accompanying circumstances, throughout my long professional activity I was engaged (and, in fact, continue to be engaged until now) all sorts of practices at first glance not related, but, nevertheless, being me "branches of one tree." I started as a graphic designer in a printing house at a drama theater (there is such a unique person in Novosibirsk, with my prepress and printing press), then I made television graphics, edited videos, shot ads, later wrote games and made interactive graphics, developed advertising campaigns, I made films and recently my spectrum of interests has closed in the area that can be described as “new media, visual communication and the development of creative electronics”. For the last 6 years I have been using only Linux OS for work and, I think, the reader who is thinking about switching to this operating system will be curious to find out how my colleagues and I solve such specific tasks and what tools they use.
If readers want to catch up with my modest initiative and tell about their own professional experience of using this excellent operating system in every sense, I think it would be great to use a common prefix in the title and a similar tag "Linux for professionals".
Source: https://habr.com/ru/post/197036/
All Articles