Booting Linux without bootloader
Introduction
Here, if possible, I will try to answer the question in the easiest and most detailed way possible:
"How can I download Linux (for example, ubuntu) without using a bootloader such as GRUB 2, iELILO?"
It will not understand how to run / install Ubuntu in [UEFI only] mode. To do this, please refer here .
and here help.ubuntu.ru/wiki/lubuntu-osinstallation
All actions will be performed on an already running system.
In order to take advantage of this opportunity, you must meet certain requirements.
Requirements
1. UEFI instead of BIOS (set [UEFI only] mode);
2. OS 64-bit;
3. Linux (Kernel> = 3.3);
Input data
Installed distribution kit lubuntu-13.04-desktop-amd64 with [UEFI only] mode set. Disconnected Fast Boot (After completion, you can enable).
')
The resulting partition table
user@pc:~$ sudo parted /dev/sda print Model: ATA mSata Smartbuy 3 (scsi) Disk /dev/sda: 32,0GB Sector size (logical/physical): 512B/512B Partition Table: gpt Number Start End Size File system Name Flags 1 1049kB 99,6MB 98,6MB fat32 boot 2 99,6MB 27,8GB 27,7GB ext4 3 27,8GB 32,0GB 4182MB linux-swap(v1) It is necessary to pay attention to section 1, from which the direct loading of the kernel will be carried out without the participation of a separate loader (for example, GRUB 2), the requirements for it:
- Exposed flag boot;
- The recommended size is up to 512 MB (I met different recommendations for how it should be sized, basically it’s 200-300 MB, I’d note from myself that in fact it will be busy at 5.3 MB);
- The file system fat32 / fat16 / fat12 (UEFI has support);
This section does not have to go first, most importantly, comply with the requirements above (I advise myself to put it first).
The preparatory stages have been completed, we have a working 64-bit operating system with UEFI only mode set and a partition for the kernel (at the moment there is a GRUB located, next we will put the kernel).
Get and configure your kernel
We load OS, we open the console.
In order for the kernel to boot without using the bootloader, it needs to specify the disk that will be mounted as the root, to do this, you need to assemble your kernel and specify the option for it
CONFIG_CMDLINE="root=/dev/sda2 ro" I have an OS installed on the sda2 disk.
Usually this line is passed to the GRUB bootloader along with many other parameters.
If you have another version of the distribution
Make sure the kernel options are set.
CONFIG_EFI = y
CONFIG_RELOCATABLE = y
CONFIG_EFI_STUB = y
CONFIG_EFI_PARTITION = y
CONFIG_EFI_VARS = m #or y works too.
CONFIG_FB_EFI = y
CONFIG_FRAMEBUFFER_CONSOLE = y
CONFIG_EFI = y
CONFIG_RELOCATABLE = y
CONFIG_EFI_STUB = y
CONFIG_EFI_PARTITION = y
CONFIG_EFI_VARS = m #or y works too.
CONFIG_FB_EFI = y
CONFIG_FRAMEBUFFER_CONSOLE = y
Comment
On the Ubuntu developer site, it’s written that if you don’t use the original kernel, but compiled it yourself, it will be difficult for them to give you support and don’t send error reports. ( https://help.ubuntu.com/community/Kernel/Compile )
We will get the necessary tools (it may take a long time)
sudo apt-get install fakeroot build-essential crash kexec-tools makedumpfile kernel-wedge sudo apt-get install libncurses5 libncurses5-dev libelf-dev asciidoc binutils-dev Now we will create a directory in which we will perform all the actions, I will call the folder v2, which will symbolize the modification of the last kernel of the system.
user@pc:~$ mkdir v2 user@pc:~$ cd v2 Get the source code of the latest kernel version and prepare the environment
user@pc:~/v2$ apt-get source linux-image-$(uname -r) user@pc:~/v2$ sudo apt-get build-dep linux-image-$(uname -r) Go to the folder linux-3.8.0
cd linux-3.8.0 Now we are going to modify the kernel configuration
chmod a+x debian/scripts/* chmod a+x debian/scripts/misc/* fakeroot debian/rules clean fakeroot debian/rules editconfigs After the last command is executed, a notification will first be displayed:
Do you want to edit config: amd64/config.flavour.generic? [Y/n] Here it is just indicated that we edit the configuration for the 64-bit kernel, enter Y, press the input and get the window

Now open the search ('/' key), enter cmdline and click on the input and see what is in the screenshot
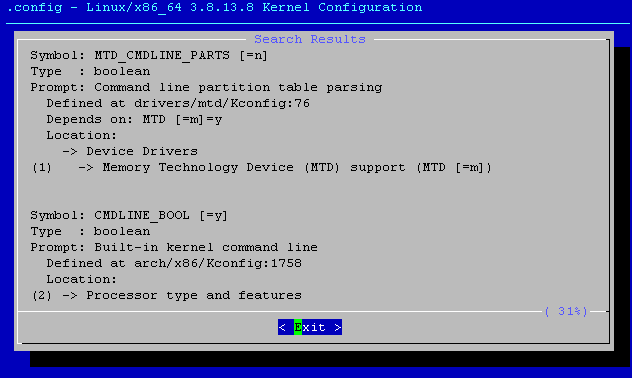
then press the number 2 and go to edit the 'Built-in kernel command line' parameter, press 'y' and put an asterisk in this field, symbolizing that this mode is on, now go to the field which is below, press input and enter into it the cherished
root=/dev/sda2 ro This is the very option for which everything was started (Replace your disk instead of sda2).
We received this config:

Small digression (skip)
At this stage, I stopped, assembled the kernel, was glad that everything was so simple and when loading the newly assembled kernel I received an error that the kernel could not find the root partition (in fact, this is why the whole kernel build process was started). I wondered for a long time what was happening and even tried to specify a disk in UUID format, but I consistently received an error:
In the process of googling, I found out that the disk system driver should be built into the kernel, and it was connected by the module. As a result, the kernel during boot could not find a hard disk at all and reported about this error that the drive could not be mounted.
VFS: Cannot open root device "sda2" or unknown-block(0,0) error -6 Please append a correct "root=" boot option; here are the available partitions: Kernel panic - not syncing: VFS: Unable to mount root fs on unknown-block(0,0) In the process of googling, I found out that the disk system driver should be built into the kernel, and it was connected by the module. As a result, the kernel during boot could not find a hard disk at all and reported about this error that the drive could not be mounted.
Now you need to install some more kernel options.
We drive to the console (start one more)
lspci -n and the resulting output is inserted into the input box on the site
Debian GNU / Linux device driver check page
click check, we get:
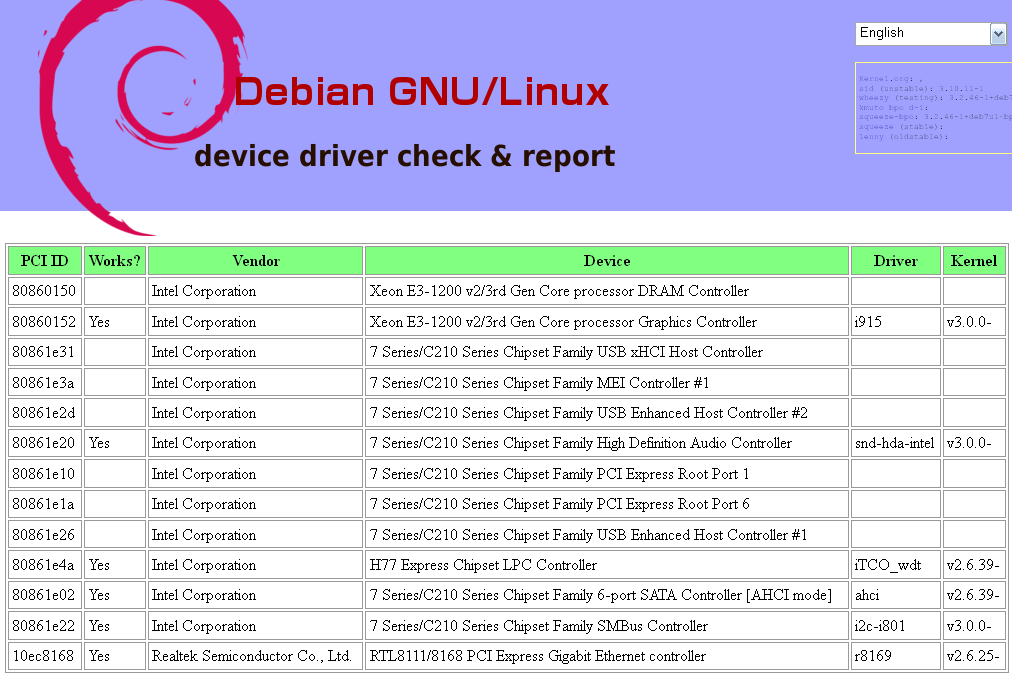
From this list, we need to enable the disk controller driver, in my case, it is ahci (the string 'Sata Controller', the column 'Driver').
Press '/' again to search and enter 'ahci'. For fidelity, we note all three found options for embedding SATA_AHCI_PLATFORM, SATA_ACARD_AHCI and SATA_AHCI.
Now we select everywhere 'exit', at the end we agree, save the settings by choosing Yes. After that, in the console, we refuse to edit configurations for other platforms, because we don’t need them.
Kernel build
user@pc:~/v2/linux-3.8.0$ fakeroot debian/rules clean user@pc:~/v2/linux-3.8.0$ fakeroot debian/rules binary-headers binary-generic Now it only remains to wait until the kernel is assembled. Depending on the power of your computer, the kernel build time depends; on my machine, the build process took just under an hour.
After the build, we copy the resulting kernel to the boot partition in the 'EFI / boot' folder, because the partition is mounted to the / boot / efi folder, as a result we have the path / boot / efi / EFI / boot /
sudo mkdir -p /boot/efi/EFI/boot/ Now you need to copy the kernel to this folder, giving it the name bootx64.efi
user@pc:~/v2/linux-3.8.0$ sudo cp ./debian/build/build-generic/arch/x86_64/boot/bzImage /boot/efi/EFI/boot/bootx64.efi It should be noted that the download using the GRUB bootloader will still be available, you just have to switch to UEFI (press del or F12 when booting). This can be useful if the kernel for some reason does not boot.
Now you need to inform UEFI that we want to make our kernel bootable, for this you need to install a program that can edit the UEFI settings.
sudo apt-get install efibootmgr Make sure you have access to UEFI variables.
sudo modprobe efivars If it worked without errors, we do the final touch. Add our kernel in UEFI with priority on download number 1, the name in quotes after - label you can enter your own. Register in the path to the loader does not matter, because it is not case-sensitive.
sudo efibootmgr --create --part 1 --label "Linux" --loader '\efi\boot\bootx64.efi' Now a new line called 'Linux' has been added to the UEFI boot menu, which performs a direct kernel load. That's all. You can restart the computer and make sure that the kernel boots bypassing the bootloader.
sudo reboot To ensure that the kernel you have loaded is compiled, enter
cat /proc/cmdline You will see a list of parameters passed to the kernel at boot (we ourselves indicated them earlier):
root=/dev/sda2 ro The goal is reached! Thanks for attention!
An article with a similar theme:
Downloading GNU / Linux without a third-party bootloader
Sources of
- help.ubuntu.com/community/UEFI
- www.ondatechnology.org/wiki/index.php?title=Booting_the_Linux_Kernel_without_a_bootloader
- swift.siphos.be/linux_sea/kernelbuilding.html#idm3437981411120
- askubuntu.com/questions/71332/kernel-panics-with-cannot-open-root-device-error-where-do-i-append-the-root
- help.ubuntu.com/community/Kernel/Compile
- wiki.ubuntu.com/Kernel/BuildYourOwnKernel
- www.rodsbooks.com/efi-bootloaders
UPD:
Thanks to ValdikSS for a valuable comment. Reaching the goal can be much easier. There is no need to rebuild the kernel in this case. It can be copied to the FAT partition along with the initrd (from the / boot directory) and indicate to the loader the correct parameters:
sudo efibootmgr --create --disk /dev/sda --part 1 --label "Lubuntu" -u --loader '\efi\boot\vmlinuz.efi' root=/dev/sda2 initrd=/efi/boot/initrd.img rw quiet Source: https://habr.com/ru/post/196926/
All Articles