With a camera in the clouds. Part 1

Many of us thought about installing a camera on an aircraft. So I went this way. Delving into the subtleties of first-person video flight ( FPV ), I share my knowledge with those who also want to experience new sensations.
The post consists of 2 parts. In the first - the answers to basic questions. They are easy to find on the Internet separately, but difficult together: flight range (what is limited and what is the maximum), picture quality, payload, cost and time (from allocating the budget to the first flight).
')
The second part (now in the process) is about collecting a specific system with all the subtleties that I could only find and try. What exactly and where to buy, how to place on the model, why and what to screen, where ferrite rings are required, and where vibration dampers are.
Well, let's get right to the point.

As it turned out, the range of the controlled flight with the broadcast of the video signal can reach tens of kilometers for the gliders (below the flight video for 80 km for the patient)
and 3-7 km for helicopters and multikopter (the battery is consumed faster). That is, even on a small copter, you can easily fly into the clouds (a beautiful video for everyone).
And still it is necessary to present real restrictions:
- The range of video transmission is highly dependent on the amount of interference in the flight zone. In the city center, interference is much greater than anywhere in the field. Therefore, long-distance flights are better off the city, which, of course, less interesting. If there are high-voltage lines, aerodromes, space stations and other signal sources nearby, this can significantly reduce the distance of reliable video reception.
- Different signal transmission systems have different abilities to go around obstacles (in detail in the 2nd part), but you have to understand that it’s impossible to fly to someone through the window and fly around the apartment - you will surely lose the signal. Over the mountain or the forest is also not an option. Real flights, as a rule, take place in the line of sight of the model, albeit at considerable distances. This is best supported by the field.
- In fact, the range is limited only by the battery capacity, but to realize the full potential of modern technology, a ground station is needed, which needs to be pulled out of the car and permanently placed on the surface. That is, as in various advertisements, flying more than 500 meters with a tablet in hand will not work. And there are no problems with radio control, a good remote without any improvements works at a distance of up to 3 km, but with the video everything is not so sweet. Data transfer over Wi-Fi or via cellular networks for FPV, in my opinion, is also not suitable. Too much delays and risks of signal loss turn the model into something dangerous both for others and for the pilot's budget.
- The model is quite difficult to control the camera, so that you do not immediately fly confidently. We need weeks of training in a safe area before you can get closer to living or valuable objects. I would recommend to fly first on a good office micro-helicopter, learn how to make at least a circle and eight. Issue price of 2 thousand rubles, and you can save much more. In the 2nd part I will give references to specific models. The main difficulties that beginner FPV pilots encounter are control of flight altitude and orientation in space relative to the launch site. There are systems that display this information on the screen, but the data may be late or inaccurate. So training is a must.
- Fly with the camera will have to be quite large (from 40 cm.) And weighty (from 1 kg.) Models, since the microclass is not resistant to wind, and indoor flights are not suitable for real pleasure. Considerable weight of the device is associated with a certain responsibility. This must be understood too. Moreover, any aircraft can fall (burned speed governor, engine, electronics), and sometimes the speed reaches 100 km / h, which makes flights in the city extremely dangerous. Flying over people is considered unacceptable.
- One way or another you will depend on the weather. In the cold, batteries are discharged faster, it is extremely uncomfortable to prepare a flight and control a model. In principle, it is possible to fly in the wind, but the control becomes unnatural and “there is no buzz”. After sunset with a good camera, flying is also possible, but again there is no pleasure. It is not customary to fly in the rain, as this increases the risk of electronic failure. Although, of course, it depends on you and on the selected flight zone.
Despite all the limitations, professionals allow themselves to fly everywhere. Here, for example, London.
Obviously, for the longest flight you need an optimal battery. I found an interesting article on this topic. It states that the weight of the battery should be 87% of the weight of the model without a battery. This allows you to realize 83% of the total potential of the flight time of the model, using only 61% of its maximum weight.

You can fly in 2 ways. Using a monitor or glasses.
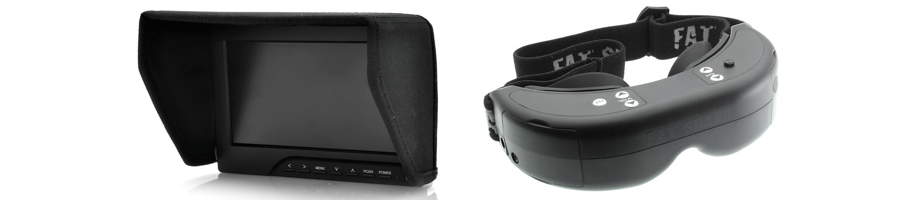
I now have a monitor around 5 inches, mounted right on the remote. For test flights, this is enough. Real immersion is achieved with the help of video glasses, so their characteristics are more important, especially since the choice of the monitor depends more on the pilot's imagination. If you do not take the hi-end, then the modern working version of glasses has a resolution of 800x600, which is more than enough. Specific model points will be disassembled in 2 parts.
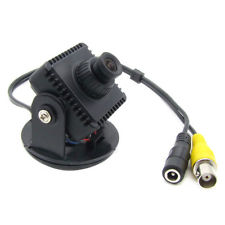
With cameras more difficult. After some research (described in the second part) and listening to conflicting information flows (some will assure you that you need a separate course camera, others that this is not so), I still understood that a separate course analog camera is needed for flights. These are sold with CMOS, CCD and PIXIM-matrices.
Inside, the types differ in the number of television scan lines ( TVL ). I saw sales from 490 to 700. There are differences in dimensions in the boards (32x32 mm. - the most suitable, 38x38 and 42x42). As a result, my choice fell on the best, in my opinion, camera with a PIXIM matrix. The resolution is 690 to 460 (690 HTVL, 490 VTVL). Adjusts the exposure for each pixel separately (something like HDR in photos, only for video), so that the sun can be seen, and the grass at this point can be distinguished. In the dark, she switches to night mode. Easy transfers any vibrations, no effects like “ Jelly ” are detected.
True, at the level of sensations, even on an excellent camera, the detailing is rather low. You don't feel the atmosphere, and there are some noises. That is, the camera works out functionally 100%, and emotionally - this, of course, is not a movie. You can enjoy the beauty of the scenery later in the recording from the second digital HD camera, and not during the flight.
By the way, interference was less than expected. Sometimes something may flash, but in the zone of confident reception everything is more than stable. The video below clearly shows the nature of the noise and their, I would say, maximum frequency.
Of course, the glare on the screen allows you to get information only about noise, and not about the quality of the picture, but did not find anything better - all the other videos, too, without glare, are diluted with the same type and lengthy introductions.

This question worries many beginners, but does not care at all about the initiated. Any stable model itself weighs from 1 kg and can safely lift into the air all that is necessary in flight. For transportation of heavy loads, usually, models are not collected, as the idea is simply not worth it. For any professional task, a more rational option has long been invented. Here is a video, where a multicopter with rays of only 35 cm each lifts more than 20 kg (rise by 3 minutes).
There are special calculators that allow you to calculate the model for the desired parameters. For example, this one . Here are the nuances of its use.

Any model will require a radio receiver and transmitter (RX / TX), and a video receiver and transmitter (vRX / vTX). Radio control kits can be considered from 10 thousand, somewhere. Video system from 5. Add a budget camera and a cheap monitor, this is another 5. As a result, from 20,000 rubles - the equipment, plus the model itself and everything from it to 10. No matter how I tried to save reasonably - quadcopter for FPV came out under 70 thousand, alas .
On the other hand, the copter is not a smartphone. I was assured that the assembled model is not cheaper. You can always sell. But it’s better still to say goodbye mentally to the fact that you launch into the air for kilometers.
As I understood, the cheapest is to assemble a glider (from 8,000 rubles). The most expensive - oktokopter with suspension under the SLR camera (under the 250000 all in the collection). In the second part, when analyzing specific equipment, I will give the cost of components and tell you why and what could be better to buy.

Of course, the easiest option is to buy a finished model. In this case, you pay an extra charge on each part separately, plus an assembly from 5 to 25 thousand on average, and wait for a week or two. Maybe you are lucky, and you buy a model after someone with no extra charge and immediately. True, not the fact that it will be exactly what you need. I decided to approach the issue more consciously and configure everything separately, but buying from us in stores to save time at the expense of saving money. It was about a week or two with debugging. If you order everything from China-Taiwan-America, then we add another 3 weeks for delivery, but it will be cheaper by 20-30 percent.
I will also say that Moscow still has components, and in St. Petersburg, for example, everything is more complicated. We have to focus on availability, rather than desires, and travel to very remote areas. In other regions I do not know, but I think - the Internet remains the only reasonable option.
Add to the time also flights on a training microclass or simulator. Another week, maybe.
So, the first part comes to an end. If you are not cold and would like to further dive into the world of FPV, I offer you the second part, which will highlight the following questions:
- Model selection: airplane, helicopter or multikopter?
- Trainings Developing flight skills.
- The choice of a specific design and size
- Selection of the control panel and receiver of its signals
- Flight controller and autopilot. What is suitable for FPV.
- Mechanical part (screws, motors, etc.)
- Batteries and Charging
- Video. The number and type of cameras.
- Video. Suspensions and brackets for cameras.
- Video. Transmitter and receiver.
- Video. Glasses and monitors.
- Flight information right on the screen. Telemetry. OSD.
- Installation. Heat shrink, filters, shielding and ferrite rings.
I hope it was interesting. Link to the second part below. Here is another goodbye video)
The second part of
Source: https://habr.com/ru/post/196884/
All Articles