Flask Mega-Tutorial, Part 4: Database
This is the fourth article in the series where I describe my experience of writing a Python web application using the Flask mic framework.
The purpose of this guide is to develop a fairly functional microblog application, which I decided to call microblog, in the absence of originality.
')
In the previous section, we created our login form complete with submission and validation.
In this article, we intend to create our database and raise it so that we can write our users there.
To follow this part, your microblog application must be the way we left it at the end of the previous one. Please make sure the application is installed and working.
In this part we are going to write several scripts that will simplify the management of our database. Before we begin, let's look at how Python scripts are executed from the command line.
If you are a Linux or OS X user, then scripts need to be given permissions to execute:
The script has a shebang line ( Note: In Unix, if the first two bytes of the executable file are "#!", The kernel treats the file as a script, and not as machine code. The word after "!" the first space) is used as the path to the interpreter. ), which determines which interpreter should be used. The script with the issued execution rights and the shebang line can be easily run like this:
On Windows, however, this does not work, and instead you should pass the script as an argument to the selected Python interpreter:
To avoid having to enter the path to the interpreter, you can add your microblog \ flask \ Scripts directory to the system PATH, making sure that it [the path to the interpreter] is written to your regular interpreter.
For the sake of brevity, this guide will continue to use the Linux / OS X syntax. If you are a Windows user, do not forget to change the syntax accordingly.
To manage our application, we will use the
ORM allows database applications to work with objects instead of tables or SQL. Operations are performed on objects, and then transparently translated into database commands using ORM. In fact, this means that we will not study SQL in this guide, but let Flask-SQLAlchemy speak SQL for us.
Most of the manuals that I have seen affect the creation and use of the database, but the problems of updating the database due to the growth of the application are not properly addressed. Usually, all this ends with the removal of the old database and the creation of a new one each time you need to update, losing all the data. And if the data cannot be easily recreated, then you may have to write export and import scripts yourself.
Fortunately, we have a much better option.
We are going to use
Enough theory, it's time to get started!
For our small application we will use
We have a couple of items that we add to the configuration file (the config.py file):
Finally, when we initialize our application, we also need to initialize our database. Here is our updated init file (app / __ init__.py file):
Notice the two changes we made in our init script. Now we create a
The data that we will store in our database will be presented with a set of classes that are referred to as a database of models. The ORM layer will make the necessary translations to match the objects created from these classes with the rows in the appropriate database table.
Let's start by creating a model that will describe our users. Using the WWW SQL Designer tool , I made the following charts to draw a table of our users:

The
The
The
Now we have decided on how we want to see our table. To translate all this into code is quite simple (file app / models.py):
The
The
We are done with the configuration and model, now we are ready to create a file with our database. The
Here is the script that creates the database (db_create.py file):
I note that the script is completely universal. All specific paths are imported from the configuration file. When you start your own project, you can simply copy the script to the folder of the new application, and it will immediately work.
To create a database, you just need to run the script (remember that if you are on Windows, then the command is slightly different):
After entering the command, you will receive a new
Now we have defined our model, which we can embed in our database. We will look at any changes in the database structure of the migration application, so this is our first one that will lead us from an empty database to a database that can store users.
To start the migration, I use another helper script (db_migrate.py file):
The script looks complicated, but in fact it does a bit. The way to create a
While I had no problems with the automatic generation of migrations by the above script, I could observe that at times it was difficult to determine just by comparing the old and the new format, what changes were made. To simplify the work of
It goes without saying that you should never try to migrate your database without having a backup, in case something goes wrong. Also, never run migration for the first time on a production base, always make sure that the migration works correctly, on a developer base.
So let's go ahead and record our migration:
And the script will output:
The script shows where the migration script was saved, and also displays the current version of the database. The empty database had version 0, after migration with the inclusion of users, we have version 1.
Now you may be wondering why it is so important to go through additional efforts in recording migrations of the database.
Imagine that you have an application on your work computer, and you also have a copy in use that is deployed on a production server.
Let's say that for the next release of your application, you must enter a change in your models, for example, you need to add a new table. Without migrations, you would need to figure out how to change the format of your database on the work computer, then again on your server, and this would require a lot of work.
If you have support for migrations of DB, when you are ready to release a new version of the application to your production server, then you just need to record a new migration, copy the migration scripts to your server and run a simple script that applies your changes. Upgrading the database can be done with this small Python script (db_upgrade.py file):
This script will lower the database by one revision. You can run it multiple times to revert to multiple revisions.
Relational databases are good at storing links between data items. Consider the case in which a user writes a post to a blog. He will have an entry in the user table, and the post will be added to the post table. The most effective way to write down who wrote this post is to link two related records.
After the connection is established between the user and the post, there are two types of requests that we may need. The most trivial is when you have a post and you need to know which user wrote it. A slightly more complicated question is the opposite of this. If you have a user, then you may need to get all the entries written by him.
Expand our database to store posts so that we can see the connections in action. To do this, we will return to our design tool DB and create a table of records:
In our table of records will be: id, text of the record and date. Nothing new. But the
We decided that we want to link the users and the records they write. The method of implementation is the addition of a field in a post that contains the id of the user who wrote it. This id is called a foreign key. Our design tool DB shows foreign keys as the relationship between the key and the id field to which it refers. This type of communication is called one-to-many (one-to-many), one user writes many posts.
Let's change our model to reflect these changes (app / models.py):
We have added a class
Notice that we also added a new
Let's write another migration with this change. Just run:
And the script will return:
You do not need to record every small change in the database model as a separate migration, usually the migration is recorded at the release points. Here we make more migrations than necessary just to show how the migration system works.
We spent a lot of time determining our database, but have not yet seen how it works. While in our application there is no bd code, we will use our new database in the Python interpreter.
Run Python. On Linux or OS X:
Or on Windows:
We write the following:
This will cause our database and model memory.
Create a new user:
Changes in the database are made in the context of the current session. Multiple changes can be collected in a session, and once they are all registered, you can issue one
Add another user:
Now we can request all our users:
To do this, we used a custom query that is available for all class models. Notice how a user id was automatically set for us.
Here is another query option. If we know the user id, we can find the user’s data as follows:
Now add a blog entry:
Here we set our date in the UTC time zone. All timestamps stored in our database will be in UTC. We can have users from all over the world and need to use a single unit of time. In the future, the guide will show how to display the time in a custom time zone.
You may have noticed that we did not set the
To end this session, let's look at a few more queries to the database, what can we do:
The Flask-SQLAlchemy documentation is the best place to explore the many options available for querying DB.
Before you finish, let's delete the test users and the entries created to start with a clean database in the next chapter:
This is a long guide. We have learned the basics of working with DB, but have not yet embedded it in our application. In the next part, we will apply everything that we have learned about databases, in practice, when we consider our login system.
Meanwhile, if you do not write the application with us, you can download it in the current version:
microblog-0.4.zip
Please note that I did not include the database in the zip archive above, but the repository with the migrations there. To create a new database, simply use db_create.py, then db_upgrade.py, to update the database to the latest revision.
Hope to see you!
Miguel.
The purpose of this guide is to develop a fairly functional microblog application, which I decided to call microblog, in the absence of originality.
Table of contents
Part 1: Hello, World!
Part 2: Templates
Part 3: Forms
Part 4: Database
Part 5: User Login
Part 6: Profile Page and Avatars
Part 7: Unit Testing
Part 8: Subscribers, Contacts and Friends
Part 9: Pagination
Part 10: Full Text Search
Part 11: Email Support
Part 12: Reconstruction
Part 13: Date and Time
Part 14: I18n and L10n
Part 15: Ajax
Part 16: Debugging, Testing, and Profiling
Part 17: Deploying to Linux (even to Raspberry Pi!)
Part 18: Deploying to Heroku Cloud
')
Brief repetition
In the previous section, we created our login form complete with submission and validation.
In this article, we intend to create our database and raise it so that we can write our users there.
To follow this part, your microblog application must be the way we left it at the end of the previous one. Please make sure the application is installed and working.
Run Python scripts from the command line
In this part we are going to write several scripts that will simplify the management of our database. Before we begin, let's look at how Python scripts are executed from the command line.
If you are a Linux or OS X user, then scripts need to be given permissions to execute:
chmod a+x script.py The script has a shebang line ( Note: In Unix, if the first two bytes of the executable file are "#!", The kernel treats the file as a script, and not as machine code. The word after "!" the first space) is used as the path to the interpreter. ), which determines which interpreter should be used. The script with the issued execution rights and the shebang line can be easily run like this:
./script.py <> On Windows, however, this does not work, and instead you should pass the script as an argument to the selected Python interpreter:
flask\Scripts\python script.py <> To avoid having to enter the path to the interpreter, you can add your microblog \ flask \ Scripts directory to the system PATH, making sure that it [the path to the interpreter] is written to your regular interpreter.
For the sake of brevity, this guide will continue to use the Linux / OS X syntax. If you are a Windows user, do not forget to change the syntax accordingly.
Flask Databases
To manage our application, we will use the
Flask-SQLAlchemy extension. This extension provides a wrapper for the SQLAlchemy project, which is an ORM or Object-relational mapping.ORM allows database applications to work with objects instead of tables or SQL. Operations are performed on objects, and then transparently translated into database commands using ORM. In fact, this means that we will not study SQL in this guide, but let Flask-SQLAlchemy speak SQL for us.
Migrations
Most of the manuals that I have seen affect the creation and use of the database, but the problems of updating the database due to the growth of the application are not properly addressed. Usually, all this ends with the removal of the old database and the creation of a new one each time you need to update, losing all the data. And if the data cannot be easily recreated, then you may have to write export and import scripts yourself.
Fortunately, we have a much better option.
We are going to use
SQLAlchemy-migrate to track the database update for us. This will add a bit of work to run the database, but this is a small price to never worry about manually migrating the database.Enough theory, it's time to get started!
Configuration
For our small application we will use
sqlite . These databases are the most suitable choice for small applications, as each database is stored in a separate file.We have a couple of items that we add to the configuration file (the config.py file):
import os basedir = os.path.abspath(os.path.dirname(__file__)) SQLALCHEMY_DATABASE_URI = 'sqlite:///' + os.path.join(basedir, 'app.db') SQLALCHEMY_MIGRATE_REPO = os.path.join(basedir, 'db_repository') SQLALCHEMY_DATABASE_URI required for the Flask-SQLAlchemy extension. This is the path to the file with our database.SQLALCHEMY_MIGRATE_REPO is the folder where we will store the SQLAlchemy-migrate. files SQLAlchemy-migrate.Finally, when we initialize our application, we also need to initialize our database. Here is our updated init file (app / __ init__.py file):
from flask import Flask from flask.ext.sqlalchemy import SQLAlchemy app = Flask(__name__) app.config.from_object('config') db = SQLAlchemy(app) from app import views, models Notice the two changes we made in our init script. Now we create a
db object, which will be our database, and we also import a new module called models . We will write this module further.Database model
The data that we will store in our database will be presented with a set of classes that are referred to as a database of models. The ORM layer will make the necessary translations to match the objects created from these classes with the rows in the appropriate database table.
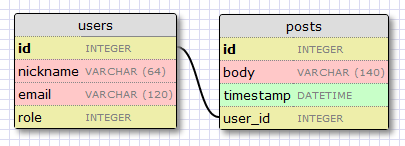
Let's start by creating a model that will describe our users. Using the WWW SQL Designer tool , I made the following charts to draw a table of our users:
The
id field is usually for all models, it is used as the primary key. Each user in the database will be associated with a unique id value stored in this field. Fortunately, this is done for us automatically, we just need to provide the id field.The
nickname and email fields are defined as strings (or VARCHAR in database jargon), and they have a maximum length that allows our database to optimize space utilization.The
role field is an integer number that we will use to keep track of which users are administrators and who are not.Now we have decided on how we want to see our table. To translate all this into code is quite simple (file app / models.py):
from app import db ROLE_USER = 0 ROLE_ADMIN = 1 class User(db.Model): id = db.Column(db.Integer, primary_key = True) nickname = db.Column(db.String(64), index = True, unique = True) email = db.Column(db.String(120), index = True, unique = True) role = db.Column(db.SmallInteger, default = ROLE_USER) def __repr__(self): return '<User %r>' % (self.nickname) The
User class we just created contains several fields defined as class variables. Fields are created as instances of the db.Column class, which takes a field type as an argument, plus other optional arguments that allow us, for example, to specify which fields are unique and indexed.The
__repr__ method tells Python how to output objects of this class. We will use it for debugging.Database creation
We are done with the configuration and model, now we are ready to create a file with our database. The
SQLAlchemy-migrate package comes with command line tools and an API for creating databases that will allow for easy updates in the future, which we will do. I find the command line tools inconvenient to use, so instead of them I wrote my own set of small Python scripts that invoke the migrations API.Here is the script that creates the database (db_create.py file):
#!flask/bin/python from migrate.versioning import api from config import SQLALCHEMY_DATABASE_URI from config import SQLALCHEMY_MIGRATE_REPO from app import db import os.path db.create_all() if not os.path.exists(SQLALCHEMY_MIGRATE_REPO): api.create(SQLALCHEMY_MIGRATE_REPO, 'database repository') api.version_control(SQLALCHEMY_DATABASE_URI, SQLALCHEMY_MIGRATE_REPO) else: api.version_control(SQLALCHEMY_DATABASE_URI, SQLALCHEMY_MIGRATE_REPO, api.version(SQLALCHEMY_MIGRATE_REPO)) I note that the script is completely universal. All specific paths are imported from the configuration file. When you start your own project, you can simply copy the script to the folder of the new application, and it will immediately work.
To create a database, you just need to run the script (remember that if you are on Windows, then the command is slightly different):
./db_create.py After entering the command, you will receive a new
app.db file. This is an empty sqlite database that initially supports migration. You also have a db_repository directory with several files inside. At this point, SQLAlchemy-migrate stores its data files. I note that we do not recreate the repository, if it has already been created. This will allow us to recreate the databases from the existing repository, if necessary.Our first migration
Now we have defined our model, which we can embed in our database. We will look at any changes in the database structure of the migration application, so this is our first one that will lead us from an empty database to a database that can store users.
To start the migration, I use another helper script (db_migrate.py file):
#!flask/bin/python import imp from migrate.versioning import api from app import db from config import SQLALCHEMY_DATABASE_URI from config import SQLALCHEMY_MIGRATE_REPO migration = SQLALCHEMY_MIGRATE_REPO + '/versions/%03d_migration.py' % (api.db_version(SQLALCHEMY_DATABASE_URI, SQLALCHEMY_MIGRATE_REPO) + 1) tmp_module = imp.new_module('old_model') old_model = api.create_model(SQLALCHEMY_DATABASE_URI, SQLALCHEMY_MIGRATE_REPO) exec old_model in tmp_module.__dict__ script = api.make_update_script_for_model(SQLALCHEMY_DATABASE_URI, SQLALCHEMY_MIGRATE_REPO, tmp_module.meta, db.metadata) open(migration, "wt").write(script) api.upgrade(SQLALCHEMY_DATABASE_URI, SQLALCHEMY_MIGRATE_REPO) print 'New migration saved as ' + migration print 'Current database version: ' + str(api.db_version(SQLALCHEMY_DATABASE_URI, SQLALCHEMY_MIGRATE_REPO)) The script looks complicated, but in fact it does a bit. The way to create a
SQLAlchemy-migrate migration is to compare the structure of our database (obtained from the app.db file) and the structure of our model (obtained from the models.py file). The differences between them are recorded as a migration script within the repository. The migration script knows how to apply the migration or cancel it, so it will always be possible to update or “roll back” the database format.While I had no problems with the automatic generation of migrations by the above script, I could observe that at times it was difficult to determine just by comparing the old and the new format, what changes were made. To simplify the work of
SQLAlchemy-migrate in defining changes, I never rename existing fields, limiting changes by adding / removing models or fields, changing the types of fields created. And I always look at the generated migration script to make sure it is correct.It goes without saying that you should never try to migrate your database without having a backup, in case something goes wrong. Also, never run migration for the first time on a production base, always make sure that the migration works correctly, on a developer base.
So let's go ahead and record our migration:
./db_migrate.py And the script will output:
New migration saved as db_repository/versions/001_migration.py Current database version: 1 The script shows where the migration script was saved, and also displays the current version of the database. The empty database had version 0, after migration with the inclusion of users, we have version 1.
Upgrade and Downgrade Database
Now you may be wondering why it is so important to go through additional efforts in recording migrations of the database.
Imagine that you have an application on your work computer, and you also have a copy in use that is deployed on a production server.
Let's say that for the next release of your application, you must enter a change in your models, for example, you need to add a new table. Without migrations, you would need to figure out how to change the format of your database on the work computer, then again on your server, and this would require a lot of work.
If you have support for migrations of DB, when you are ready to release a new version of the application to your production server, then you just need to record a new migration, copy the migration scripts to your server and run a simple script that applies your changes. Upgrading the database can be done with this small Python script (db_upgrade.py file):
#!flask/bin/python from migrate.versioning import api from config import SQLALCHEMY_DATABASE_URI from config import SQLALCHEMY_MIGRATE_REPO v = api.db_version(SQLALCHEMY_DATABASE_URI, SQLALCHEMY_MIGRATE_REPO) api.downgrade(SQLALCHEMY_DATABASE_URI, SQLALCHEMY_MIGRATE_REPO, v - 1) print 'Current database version: ' + str(api.db_version(SQLALCHEMY_DATABASE_URI, SQLALCHEMY_MIGRATE_REPO)) This script will lower the database by one revision. You can run it multiple times to revert to multiple revisions.
Database connections
Relational databases are good at storing links between data items. Consider the case in which a user writes a post to a blog. He will have an entry in the user table, and the post will be added to the post table. The most effective way to write down who wrote this post is to link two related records.
After the connection is established between the user and the post, there are two types of requests that we may need. The most trivial is when you have a post and you need to know which user wrote it. A slightly more complicated question is the opposite of this. If you have a user, then you may need to get all the entries written by him.
Flask-SQLAlchemy will help us with both types of queries.Expand our database to store posts so that we can see the connections in action. To do this, we will return to our design tool DB and create a table of records:
In our table of records will be: id, text of the record and date. Nothing new. But the
user_id field deserves an explanation.We decided that we want to link the users and the records they write. The method of implementation is the addition of a field in a post that contains the id of the user who wrote it. This id is called a foreign key. Our design tool DB shows foreign keys as the relationship between the key and the id field to which it refers. This type of communication is called one-to-many (one-to-many), one user writes many posts.
Let's change our model to reflect these changes (app / models.py):
from app import db ROLE_USER = 0 ROLE_ADMIN = 1 class User(db.Model): id = db.Column(db.Integer, primary_key = True) nickname = db.Column(db.String(64), unique = True) email = db.Column(db.String(120), unique = True) role = db.Column(db.SmallInteger, default = ROLE_USER) posts = db.relationship('Post', backref = 'author', lazy = 'dynamic') def __repr__(self): return '<User %r>' % (self.nickname) class Post(db.Model): id = db.Column(db.Integer, primary_key = True) body = db.Column(db.String(140)) timestamp = db.Column(db.DateTime) user_id = db.Column(db.Integer, db.ForeignKey('user.id')) def __repr__(self): return '<Post %r>' % (self.body) We have added a class
Post , which will represent the blog entries written by users. The user_id field in the Post class will be initialized as a foreign key, so Flask-SQLAlchemy knows that this field will be associated with the user.Notice that we also added a new
posts field to the User class, which is done like a db.relationship field. In fact, this is not a DB field, so it is not on our diagram. For one-to-many db.relationship field db.relationship usually defined on the “one” side. Through this link, we get a user.posts user, which gives us a list of all user entries. The first argument, db.relationship refers to the “many” class in this connection. The backref argument defines a field that will be added to objects of the "many" class, pointing to the "one" object. In our case, this means that we can use post.author to get the User instance that created this record. Do not worry if these details do not make sense to you, we will see examples at the end of this article.Let's write another migration with this change. Just run:
./db_migrate.py And the script will return:
New migration saved as db_repository/versions/002_migration.py Current database version: 2 You do not need to record every small change in the database model as a separate migration, usually the migration is recorded at the release points. Here we make more migrations than necessary just to show how the migration system works.
Start time
We spent a lot of time determining our database, but have not yet seen how it works. While in our application there is no bd code, we will use our new database in the Python interpreter.
Run Python. On Linux or OS X:
flask/bin/python Or on Windows:
flask\Scripts\python We write the following:
>>> from app import db, models >>> This will cause our database and model memory.
Create a new user:
>>> u = models.User(nickname='john', email='john@email.com', role=models.ROLE_USER) >>> db.session.add(u) >>> db.session.commit() >>> Changes in the database are made in the context of the current session. Multiple changes can be collected in a session, and once they are all registered, you can issue one
db.session.commit() that automatically records all changes. If there is an error while working in the session, the call to db.session.rollback() will return the database to the state before the session is started. If neither commit nor rollback are called, the system will, by default, roll back the session. Sessions ensure that the database never stays in an inconsistent state.Add another user:
>>> u = models.User(nickname='susan', email='susan@email.com', role=models.ROLE_USER) >>> db.session.add(u) >>> db.session.commit() >>> Now we can request all our users:
>>> users = models.User.query.all() >>> print users [<User u'john'>, <User u'susan'>] >>> for u in users: ... print u.id,u.nickname ... 1 john 2 susan >>> To do this, we used a custom query that is available for all class models. Notice how a user id was automatically set for us.
Here is another query option. If we know the user id, we can find the user’s data as follows:
>>> u = models.User.query.get(1) >>> print u <User u'john'> >>> Now add a blog entry:
>>> import datetime >>> u = models.User.query.get(1) >>> p = models.Post(body='my first post!', timestamp=datetime.datetime.utcnow(), author=u) >>> db.session.add(p) >>> db.session.commit() Here we set our date in the UTC time zone. All timestamps stored in our database will be in UTC. We can have users from all over the world and need to use a single unit of time. In the future, the guide will show how to display the time in a custom time zone.
You may have noticed that we did not set the
user_id field in the Post class. Instead, we store a User object inside our author field. This virtual field was added by Flask-SQLAlchemy to help with relationships, we defined the name of this field in the backref argument in our model's db.relationship. With this information, the ORM layer will know how to fill in user_id for us.To end this session, let's look at a few more queries to the database, what can we do:
# >>> u = models.User.query.get(1) >>> print u <User u'john'> >>> posts = u.posts.all() >>> print posts [<Post u'my first post!'>] # >>> for p in posts: ... print p.id,p.author.nickname,p.body ... 1 john my first post! # >>> u = models.User.query.get(2) >>> print u <User u'susan'> >>> print u.posts.all() [] # >>> print models.User.query.order_by('nickname desc').all() [<User u'susan'>, <User u'john'>] >>> The Flask-SQLAlchemy documentation is the best place to explore the many options available for querying DB.
Before you finish, let's delete the test users and the entries created to start with a clean database in the next chapter:
>>> users = models.User.query.all() >>> for u in users: ... db.session.delete(u) ... >>> posts = models.Post.query.all() >>> for p in posts: ... db.session.delete(p) ... >>> db.session.commit() >>> Conclusion
This is a long guide. We have learned the basics of working with DB, but have not yet embedded it in our application. In the next part, we will apply everything that we have learned about databases, in practice, when we consider our login system.
Meanwhile, if you do not write the application with us, you can download it in the current version:
microblog-0.4.zip
Please note that I did not include the database in the zip archive above, but the repository with the migrations there. To create a new database, simply use db_create.py, then db_upgrade.py, to update the database to the latest revision.
Hope to see you!
Miguel.
Source: https://habr.com/ru/post/196810/
All Articles