FreeNAS 9.1.1 - we create network storage. Part 1. Installation
Introduction
FreeNAS 9.1.1 is a distribution for fast deployment of network storage, is based on FreeBSD , features integrated ZFS support and is fully customizable via a web interface. FTP, NFS, Samba, AFP, rsync and iSCSI are supported for access to the storage, software RAID (0.1.5) can be used to increase storage reliability, and LDAP / Active Directory support is implemented for client authorization.
The FreeNAS version 9.1.1 is notable for the transition to the FreeBSD 9 code base, (the previous release was based on FreeBSD 8.3), and also the enormous amount of work to improve usability, stability, and performance. Improvements have affected virtually all subsystems of the distribution, from the web interface to the plug-in connection system. The project development infrastructure has been translated to use Git.
FreeNAS can be installed on a hard disk or USB flash drive. In this case, the system occupies the entire volume of the media on which it is installed, regardless of capacity, and all network resources for storing information are placed on other hard drives.
those. The freenas system itself takes 1 hard disk on which you can not store anything, and on the second one all our info can already be stored!
')
I hope I am not very tired of you with such a long introduction, so let's move on to the installation. Pre- download the FreeNAS iso image and burn it for example a CD.
Installation
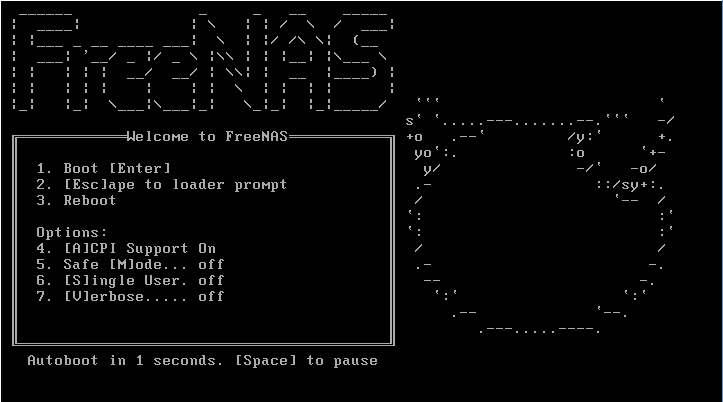
Insert the FreeNAS CD into the drive, and boot from it. We see such a picture
The first thing that will be offered to us is to install FreeNAS on any storage medium, this window will appear:

We agree and proceed to choosing the hard disk where we will install the system. The list will be our two hard drives.
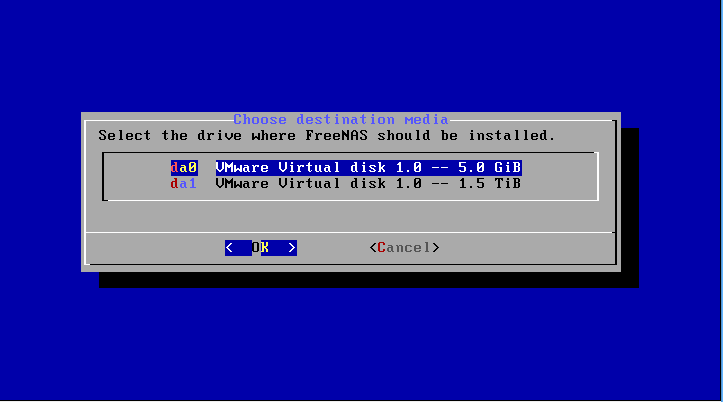
We choose the necessary hdd for installation, then we will be warned that all data on it will be lost.

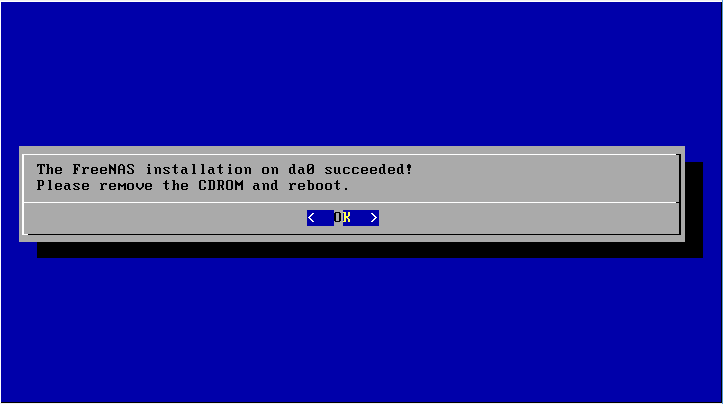
We agree and continue. The installation process is fast, and upon completion we will be offered to remove the CD and reboot.
Initial setup
After restarting, we’ll see the FreeNAS start screen:
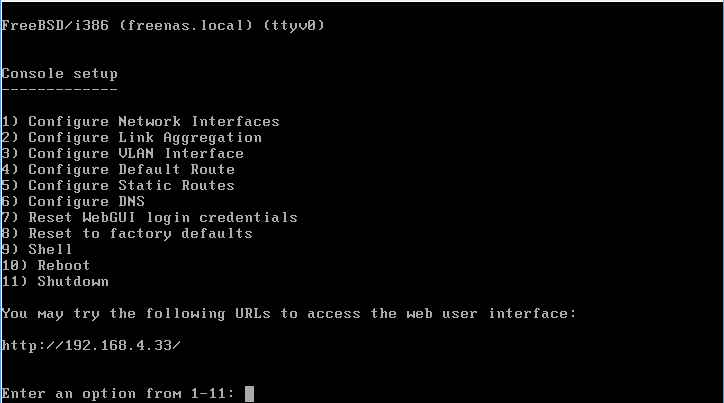
Here you can perform some initial actions (options from 1 to 11), the current IP address of this PC will be displayed just below, if it was able to receive it via DHCP. First of all, we will change the IP address to our own, for this we proceed to the Configure Network Interfaces item by pressing the button 1 and Enter.
Here we will show a list of network cards of our PC.

Since we only have one, then the list will consist of only one position, in my case the adapter em0 will appear at number 1 (as in the screenshot above). Select it by pressing 1 and Enter.
Then FreeNAS will ask - do we want to receive the address automatically via DHCP or not? - we answer no.
Next question - Configure IPv4 - Answer yes.
Next you need to specify the name of the interface - we write the name.
Next, write the desired IP address.
On the next question we enter the subnet mask.
The next question - whether we want to configure IPv6 - say no.
They will tell us that the network is configured, but for complete happiness you need to configure another gateway. Go to the Configure Default Route item by clicking the button 3. They will then ask if we exactly want to configure the gateway for IPv4 - we say yes and the next question is to enter the IP address of our router (if we have one). The next question about configuring IPv6 is negative.
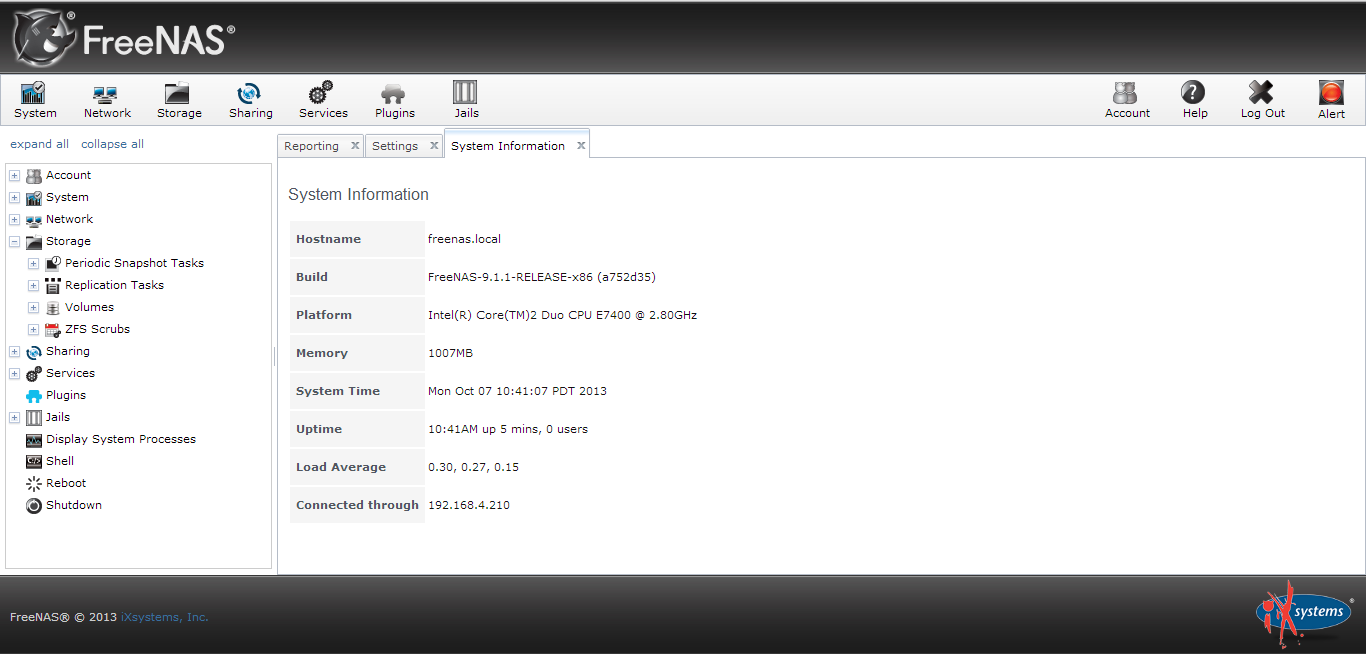
Control Panel
First of all, we go to the FreeNAS WEB-panel over IP which we just assigned.
We see a red flashing traffic light (alert), he asks us to put a password on our WEB panel
We find the account button on the left - change password
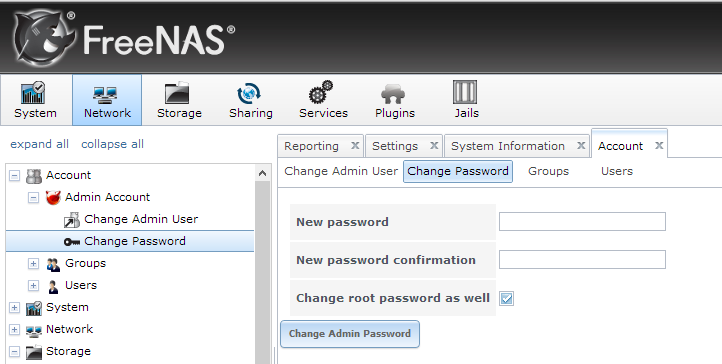
And we change the password, after changing the password, the sphetophore will start to turn green, so everything is fine :)
Then we will go to the Settings tab and change the time zone there so that our FreeNAS logs are correct. Then click OK to save the settings. It would not be superfluous to specify the DNS server in the network settings. To do this, click on the Network button in the top panel and in the Nameserver 1 field and enter the IP address of our router (or a dedicated DNS server, if you have one). Do not forget to save the settings.
Now we need to add hard disks to the system and define the file system. This is done in the Storage section (button in the top panel). Next, click on the ZFS volume manager .

We specify the Volume Name , then click on the plus sign in the Available disks category , and then add volume

We create network resources
FreeNAS can do resources for all platforms: for Apple (AFP), for UNIX-based systems (NFS) and for Windows (CIFS). And this is not counting universal FTP, etc. Now we will consider the creation of a resource for Windows computers.
Go to the section Sharing , Windows and click Add Windows Share

A window will appear in front of us in which we will indicate the name of the resource being created (name) , then in the Path field you should select the one that we made under the file dump. If you want to provide anonymous access to this resource, you can tick the Allow Guest Access down a little.
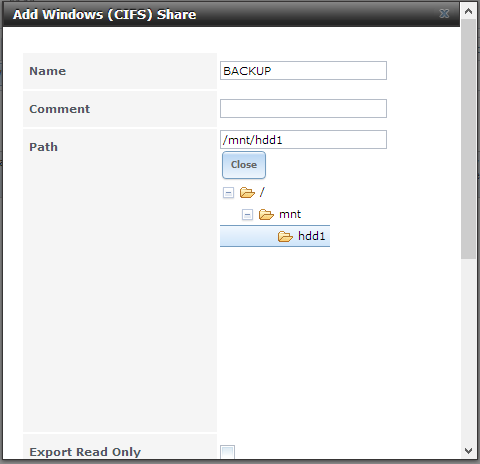
Next, we flush the entire list of options to the end and at the bottom of the window press the OK button. Our resource is ready.
Just in case, here is another list of interesting parameters that can be specified when creating a resource:
Export Read Only - make the resource read-only.
Browsable to Network Clients - Resource visibility in a networked environment. If you uncheck the box, we will make a hidden ball.
Inherit permissions - inherit permissions
Export Recycle Bin - add a basket, i.e. data from the balls will be deleted first in the basket
Show Hidden Files - show hidden files
Guest Account - guest account. Better to leave as is.
Allow Guest Access - allow guest input (i.e. it will be possible to enter the ball without any passwords, etc.).
Only Allow Guest Account - only guest input. You will not be able to separately enter a password when entering the ball to enhance their rights.
Host Allow - a list of IP addresses from which you can enter the ball. You can use a space as a separator.
Host Deny - a list of IP addresses from which you can not enter the ball. You can use a space as a separator.
Now let's move on to setting up a CIFS service. Go to the Services section, and then click on the wrench icon in front of the CIFS service

In the window that appears, we need to specify a number of parameters:
Authentication Model - access scheme. The options are: anonymous access (Anonymous) and login (Local User). Choose the right.
NetBIOS Name - the name of the computer on the network.
Workgroup is the name of the workgroup. It should be set the same as your other computers on the network.
Description - if this field is not filled out at all, then FreeNAS instead substitutes for non-informative official information. Therefore, we recommend that you write at least a space in this field.
The choice of encodings (DOS charset and UNIX charset) - you can set everything as shown in the screenshot above.
Local Master - define FreeNAS as the host computer in the workgroup.
Time Server for Domain - make FreeNAS an exact time server for computers on the network.
Guest Account - a guest account, you can leave it as is.
Allow Guest Access - allow guest access to network resources. Do not set this checkbox if you use the access scheme by login and password (Local User).
File Mask - access mask for created files. At first, it is better to set this value to 0777
Directory Mask is the same as File Mask , only for directories.
The remaining parameters can be left as is. Scroll to the bottom of the page and click OK. It remains only to enable the CIFS service; to do this, click the OFF icon opposite the service name. After a couple of seconds, his status will change to ON .
Now you can try to enter our created folder from any computer on the network.
upd. completely forgot, you may need to set permissions on the created ball to calmly upload files. (storage - active volumes - change premission)
In the following parts I will tell you more about how to configure access restriction to the balls, create quotas, raise the torrent rocking chair, dlna mediatomb server for connecting to a TV set, and many more interesting trivia.
Part 2. Installation transmission
Source: https://habr.com/ru/post/196744/
All Articles