An example of developing a simple blog on CleverStyle CMS
ATTENTION: The article is relevant at the time of writing, the current state of affairs may differ slightly less than completely.
I have long wondered how, sometimes, modern frameworks make it difficult to develop. Of course, I have no right to say that they are bad, but I cannot call them good either. And that's why: their goal is to simplify and speed up development, as well as somehow standardize and structure the project. But, in my humble subjective opinion, with the first half the opposite effect is sometimes obtained, a lot of code is written, which in itself does nothing, but only serves the main code. This article is an example of a different approach to the development of a simple blog, using not the Zend Framework 2, as rrromka did , but the own development of CleverStyle CMS.
I have been developing CleverStyle CMS for 3 years already. The need arose precisely because of the complexity and inconvenience of what I was trying to work with. Development is carried out in free time, as well as in parallel with projects that use CMS (added functionality that is not enough). This means that the necessary functions are actually added, for which there are tasks, as well as in the form in which they will be most convenient to use. The basic idea is to make the work of the obvious things automatic, and not quite obvious ones - extremely simple, while there is always the opportunity to influence the standard behavior and adjust it in any appropriate way. And finally - a huge thanks to the habrasoobshchestvu for constructive criticism of the previous article : you helped me reconsider my views on some things, become the best programmer and change CleverStyle CMS for the better.
Obviously, you need a web server and a database with access details.
Installation does not require composer or any other tools, even the archiver does not need to be used. Throw the distribution in the root of the future site and open it through a browser. You get this window:
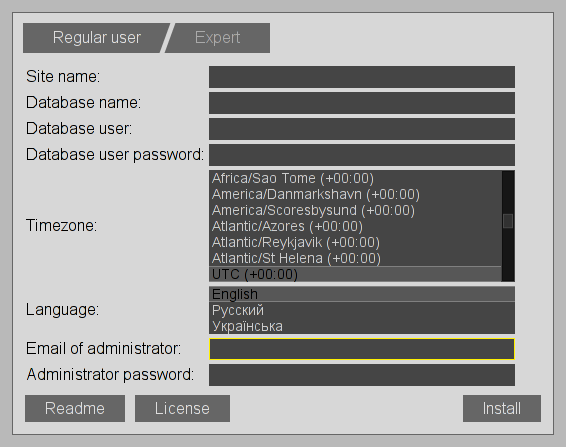
Filling in all the fields, you get a ready-to-use environment. The distribution kit will unpack itself, set the default settings where necessary and delete itself for security reasons. Already from this stage, you can notice the simplicity, do not need to copy a few tens of thousands of small files on ftp / ssh.
')
The structure of the system can be found in the wiki , but we will get acquainted with the parts used in the course of the article.
The module itself will consist of the Posts class, which will be a wrapper over the database and will provide a simple interface for managing posts. There will also be the actual pages available to the user, the API, and in the end there will be several meta-files that will explain some of the details to the engine and allow the module to be assembled into a self-distributed distribution.
First, create the components / modules / MyBlog directory for our future module.
The blog post will have the title, content, author and date of writing. As an adherent of graphic tools - I prepare the structure in PhpMyAdmin and export:
The prefix of the table is replaced by
Create the components / modules / MyBlog / meta / install_db / posts / MySQLi.sql file and insert the resulting SQL there. Thus, when the module is installed in the admin panel, the necessary table in the database will be created. Similarly, create the file components / modules / MyBlog / meta / uninstall_db / posts / MySQLi.sql :
MySQLi - the name of the database engine, it is the only one
posts is an arbitrary name with which the database is associated (maybe several for different purposes, to the extent that some of the tables will be on one server in MySQL / MariaDB, and the second on another server in PostgreSQL).
The title of posts is written in components / modules / MyBlog / meta / db.json :
On this from a DB all. The table will be created when the module is installed and deleted when the module is removed.
Place the class in the components / modules / MyBlog / Posts.php file and place it in the namespace cs \ modules \ MyBlog - this will allow the CMS to find it if necessary.
The class is a wrapper over the database with caching of posts and their total number. This class is a loner , and has the following public methods:
The class itself is not engaged in checking access rights, but only the correctness of the input data.
The code is simply written and well commented, and IDE is also well picked up.
In general, a simple json structure is used for routing, which describes the addresses of pages inside the module. Create a file components / modules / MyBlog / index.json which describes the routing of the user part:
Thus, the paths will look like this:
Accordingly, in the module directory we create the following file structure:
Due to the fact that they are described above - CMS will call them on the relevant pages.
Example file list.php :
The namespace is the same in almost all module files.
Yes, we will not use the external API in the module itself, but we will still do it (it may be useful to someone). Let's do the simplest thing - managing specific posts (for example, to edit posts without reloading the page). Create several files in components / modules / MyBlog / api :
I think the file names tell a lot about themselves. In the simplest case, we don’t have any structure and we don’t need index.json - we simply create a pack of index files for each type of DELETE / GET / POST / PUT request and the CMS will find these files itself. Suffixes can be used in the API in a similar way and with a nested structure with index.json. An example API request:
You can send JSON if you remember to specify Content-type: application / json.
In response, either:
Either the code and the error message.
Here is the index.post.php file that does this:
In order to build the installation distribution of our module, create a file components / modules / MyBlog / meta.json with some service information:
As expected, we add components / modules / MyBlog / license.txt , as well as components / modules / MyBlog / prepare.php and components / modules / MyBlog / languages / Russian.json in order to make the title of the post page beautiful and localize the name module.
Well, when everything is ready - we take CleverStyle CMS from the repository and add it to the root of the site:
We add several lines to .htaccess (so that the engine does not intercept calls to this file):
Go to the
At the root of the site we get the file
If you need styling posts:
A special test repository has been created for this article.
I hope that such an approach, when the minimum of the accompanying code is used and the structure is simply nowhere easier, will appeal not only to me.
Thank you for your attention, I will be glad to questions and constructive criticism.
UPD pair of screenshots:
UPD 11.11.2013: In the new version of the engine, the CRUD trait appeared, the Posts class was edited, and it became easier with its use.
I have long wondered how, sometimes, modern frameworks make it difficult to develop. Of course, I have no right to say that they are bad, but I cannot call them good either. And that's why: their goal is to simplify and speed up development, as well as somehow standardize and structure the project. But, in my humble subjective opinion, with the first half the opposite effect is sometimes obtained, a lot of code is written, which in itself does nothing, but only serves the main code. This article is an example of a different approach to the development of a simple blog, using not the Zend Framework 2, as rrromka did , but the own development of CleverStyle CMS.
A bit of history
I have been developing CleverStyle CMS for 3 years already. The need arose precisely because of the complexity and inconvenience of what I was trying to work with. Development is carried out in free time, as well as in parallel with projects that use CMS (added functionality that is not enough). This means that the necessary functions are actually added, for which there are tasks, as well as in the form in which they will be most convenient to use. The basic idea is to make the work of the obvious things automatic, and not quite obvious ones - extremely simple, while there is always the opportunity to influence the standard behavior and adjust it in any appropriate way. And finally - a huge thanks to the habrasoobshchestvu for constructive criticism of the previous article : you helped me reconsider my views on some things, become the best programmer and change CleverStyle CMS for the better.
Environment
Obviously, you need a web server and a database with access details.
Installation does not require composer or any other tools, even the archiver does not need to be used. Throw the distribution in the root of the future site and open it through a browser. You get this window:
Filling in all the fields, you get a ready-to-use environment. The distribution kit will unpack itself, set the default settings where necessary and delete itself for security reasons. Already from this stage, you can notice the simplicity, do not need to copy a few tens of thousands of small files on ftp / ssh.
')
The structure of the future module
The structure of the system can be found in the wiki , but we will get acquainted with the parts used in the course of the article.
The module itself will consist of the Posts class, which will be a wrapper over the database and will provide a simple interface for managing posts. There will also be the actual pages available to the user, the API, and in the end there will be several meta-files that will explain some of the details to the engine and allow the module to be assembled into a self-distributed distribution.
First, create the components / modules / MyBlog directory for our future module.
DB
The blog post will have the title, content, author and date of writing. As an adherent of graphic tools - I prepare the structure in PhpMyAdmin and export:
CREATE TABLE IF NOT EXISTS `[prefix]myblog_posts` ( `id` int(10) unsigned NOT NULL AUTO_INCREMENT, `user` int(10) unsigned NOT NULL, `title` varchar(1024) NOT NULL, `text` text NOT NULL, `date` bigint(20) unsigned NOT NULL, PRIMARY KEY (`id`) ) ENGINE=InnoDB DEFAULT CHARSET=utf8; The prefix of the table is replaced by
[prefix] for universality, the CMS will substitute the necessary one itself instead.Create the components / modules / MyBlog / meta / install_db / posts / MySQLi.sql file and insert the resulting SQL there. Thus, when the module is installed in the admin panel, the necessary table in the database will be created. Similarly, create the file components / modules / MyBlog / meta / uninstall_db / posts / MySQLi.sql :
DROP TABLE `[prefix]myblog_posts`; MySQLi - the name of the database engine, it is the only one
posts is an arbitrary name with which the database is associated (maybe several for different purposes, to the extent that some of the tables will be on one server in MySQL / MariaDB, and the second on another server in PostgreSQL).
The title of posts is written in components / modules / MyBlog / meta / db.json :
[ "posts" ] On this from a DB all. The table will be created when the module is installed and deleted when the module is removed.
Posts class
Place the class in the components / modules / MyBlog / Posts.php file and place it in the namespace cs \ modules \ MyBlog - this will allow the CMS to find it if necessary.
Hidden text
<?php /** * @package MyBlog * @category modules * @author Nazar Mokrynskyi <nazar@mokrynskyi.com> * @copyright Copyright (c) 2013, Nazar Mokrynskyi * @license MIT License, see license.txt */ namespace cs\modules\MyBlog; use cs\Config, cs\Cache\Prefix, cs\DB\Accessor, cs\Language, cs\User, cs\CRUD, cs\Singleton; /** * Class Posts for posts manipulation * * @method static \cs\modules\MyBlog\Posts instance($check = false) */ class Posts { use CRUD, Singleton; /** * Cache object instance * * @var Prefix */ protected $cache; protected $table = '[prefix]myblog_posts'; protected $data_model = [ 'id' => 'int', 'user' => 'int', 'title' => 'text', 'text' => 'html', 'date' => 'int' ]; protected function construct () { /** * Save instance of cache object with prefix MyBlog (will be added to every item) */ $this->cache = new Prefix('MyBlog'); } /** * Required by abstract Accessor class * * @return int Database index */ protected function cdb () { return Config::instance()->module('MyBlog')->db('posts'); } /** * Get post * * @param int|int[] $id * * @return array|bool */ function get ($id) { if (is_array($id)) { foreach ($id as &$i) { $i = $this->get($i); } return $id; } $id = (int)$id; /** * Try to get item from cache, if not found - get it from database and save in cache */ return $this->cache->get("posts/$id", function () use ($id) { $data = $this->read_simple($id); if ($data) { $L = Language::instance(); $data['datetime'] = $L->to_locale(date($L->_datetime_long, $data['date'])); $data['username'] = User::instance()->username($data['user']); } return $data; }); } /** * Add post * * @param string $title * @param string $text * * @return bool|int Id of created post or <b>false</b> on failure */ function add ($title, $text) { $id = $this->create_simple([ User::instance()->id, $title, $text, TIME ]); if ($id) { /** * Delete total count of posts */ unset($this->cache->total_count); return $this->db_prime()->id(); } return false; } /** * Edit post * * @param int $id * @param string $title * @param string $text * * @return bool */ function set ($id, $title, $text) { $data = $this->get($id); $data['title'] = $title; $data['text'] = $text; if ($this->update_simple($data)) { /** * Delete cached item if any */ unset($this->cache->{"posts/$id"}); return true; } return false; } /** * Delete post * * @param int $id * * @return bool */ function del ($id) { if ($this->delete_simple($id)) { /** * Delete cached item if any, and total count of posts */ unset( $this->cache->{"posts/$id"}, $this->cache->total_count ); return true; } return false; } /** * Get posts * * @param $page * * @return int[] */ function posts ($page = 1) { $from = ($page - 1) * 10 ?: 0; return $this->db()->qfas( //Readable database, Query, Fetch, Single, Array "SELECT `id` FROM `[prefix]myblog_posts` ORDER BY `id` DESC LIMIT $from, 10" ) ?: []; } /** * Get total count of posts * * @return int */ function total_count () { return $this->cache->get('total_count', function () { return $this->db()->qfs( //Readable database, Query, Fetch, Single "SELECT COUNT(`id`) FROM `[prefix]myblog_posts`" ) ?: 0; }); } } The class is a wrapper over the database with caching of posts and their total number. This class is a loner , and has the following public methods:
- get
- add
- set
- del
- posts
- total_count
The class itself is not engaged in checking access rights, but only the correctness of the input data.
The database is used in both read mode and write mode.
in this example, this is not important, but the initial separation of operations will allow using the replication to use the main database for writing, and the rest for reading; this small separation is made with perspective
The code is simply written and well commented, and IDE is also well picked up.
User interface
In general, a simple json structure is used for routing, which describes the addresses of pages inside the module. Create a file components / modules / MyBlog / index.json which describes the routing of the user part:
{ "list" : [], "post" : [ "view", "add", "edit", "delete" ] } Thus, the paths will look like this:
- MyBlog / list
- MyBlog / list / {page}
- MyBlog / post / add
- MyBlog / post / view / {id}
Accordingly, in the module directory we create the following file structure:
- list.php
- post / add.php
- post / delete.php
- post / edit.php
- post / view.php
Due to the fact that they are described above - CMS will call them on the relevant pages.
Example file list.php :
Hidden text
namespace cs\modules\MyBlog; use cs\Config, cs\Page, h; $rc = Config::instance()->route; $page = 1; if (isset($rc[1]) && $rc[1]) { $page = (int)$rc[1]; } $Page = Page::instance(); $Posts = Posts::instance(); $total_count = $Posts->total_count(); $Page->content( h::{'a.cs-button-compact'}( h::icon('plus').' ', [ 'href' => 'MyBlog/post/add' ] ) ); if (!$total_count) { $Page->content( h::{'p.cs-center.uk-text-info'}(' ') ); return; } $Page->title(' '); if ($page > 1) { $Page->title(" $page"); } $Page->content( h::{'section article.cs-myblog-posts'}( h::{'h1 a[href=MyBlog/post/$i[id]]'}('$i[title]'). h::div('$i[text]'). h::footer('$i[datetime], $i[username]'), [ 'insert' => $Posts->get($Posts->posts($page)) ] ). ( $total_count > 10 ? h::{'div.cs-center'}(pages($page, ceil($total_count / 10), function ($page) { return $page < 2 ? 'MyBlog' : "MyBlog/list/$page"; })) : '' ) ); The namespace is the same in almost all module files.
Config::instance()->route - allows you to get an indexed array of page path elements without taking into account the module name. In this case, it is used to determine which page the user opens, for example, for MyBlog/list/3 we get the array ['list', 3] . In general, the files mentioned above are views + authorization checks.API
Yes, we will not use the external API in the module itself, but we will still do it (it may be useful to someone). Let's do the simplest thing - managing specific posts (for example, to edit posts without reloading the page). Create several files in components / modules / MyBlog / api :
- index.delete.php
- index.get.php
- index.post.php
- index.put.php
I think the file names tell a lot about themselves. In the simplest case, we don’t have any structure and we don’t need index.json - we simply create a pack of index files for each type of DELETE / GET / POST / PUT request and the CMS will find these files itself. Suffixes can be used in the API in a similar way and with a nested structure with index.json. An example API request:
POST api / MyBlog
{
"Title": "Blog post title",
"Text": "Blog post content"
}
You can send JSON if you remember to specify Content-type: application / json.
In response, either:
201 Created
...
{
"Id": "5"
}
Either the code and the error message.
Here is the index.post.php file that does this:
namespace cs\modules\MyBlog; use cs\Page; if (!isset($_POST['title'], $_POST['text'])) { error_code(400); return; } if ($post = Posts::instance()->add($_POST['title'], $_POST['text'])) { code_header(201); Page::instance()->json([ 'id' => $post ]); } else { error_code(500); } Page::instance()->json() allows you to send data as it is (for example, arrays), and the method will make the JSON string itself and add the necessary headers. The same goes to error_code() , just pass the error code - everything else will be done automatically.At last
In order to build the installation distribution of our module, create a file components / modules / MyBlog / meta.json with some service information:
{ "package" : "MyBlog", "category" : "modules", "version" : "0.0.2", "description" : "Simple demo blog module", "author" : "Nazar Mokrynskyi", "website" : "cleverstyle.org/cms", "license" : "MIT License", "db_support" : [ "MySQLi" ], "provide" : "myblog", "optional" : [ "editor" ], "languages" : [ "" ] } As expected, we add components / modules / MyBlog / license.txt , as well as components / modules / MyBlog / prepare.php and components / modules / MyBlog / languages / Russian.json in order to make the title of the post page beautiful and localize the name module.
Well, when everything is ready - we take CleverStyle CMS from the repository and add it to the root of the site:
- build
- install
- build.php
- install.php
We add several lines to .htaccess (so that the engine does not intercept calls to this file):
<Files build.php>
RewriteEngine Off
</ Files>
Go to the
build.php address, select the Module, select MyBlog from the list, click Build.At the root of the site we get the file
MyBlog_0.0.2.phar.php , which can be used to install on another copy of the system.What else can you do?
If you need styling posts:
- create components / modules / MyBlog / includes / .htaccess
Allow from all
RewriteEngine Off - put the required style files in components / modules / MyBlog / includes / css, the system will pick them up (similar to JavaScript in components / modules / MyBlog / includes / js) andwill processfiles in production are merged and compressed using gzip, and css files additionally clear comments and embed inclusions such as imported css styles, fonts, images, so everything is in one file
A special test repository has been created for this article.
I hope that such an approach, when the minimum of the accompanying code is used and the structure is simply nowhere easier, will appeal not only to me.
Thank you for your attention, I will be glad to questions and constructive criticism.
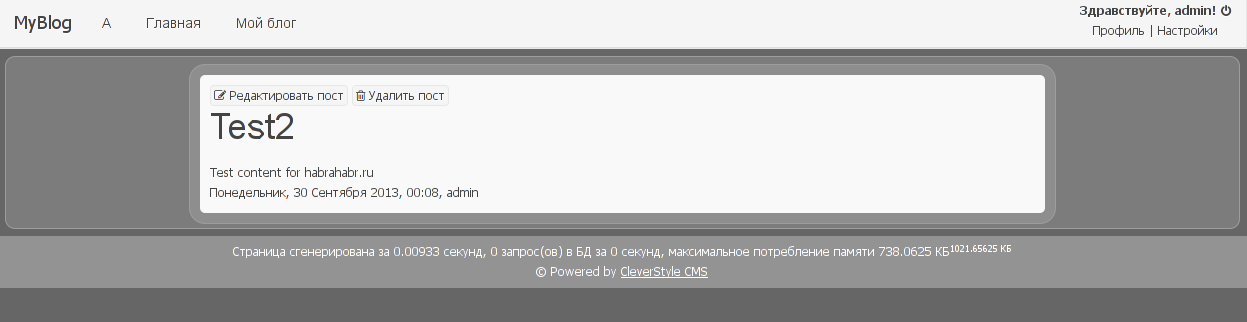
UPD pair of screenshots:
Hidden text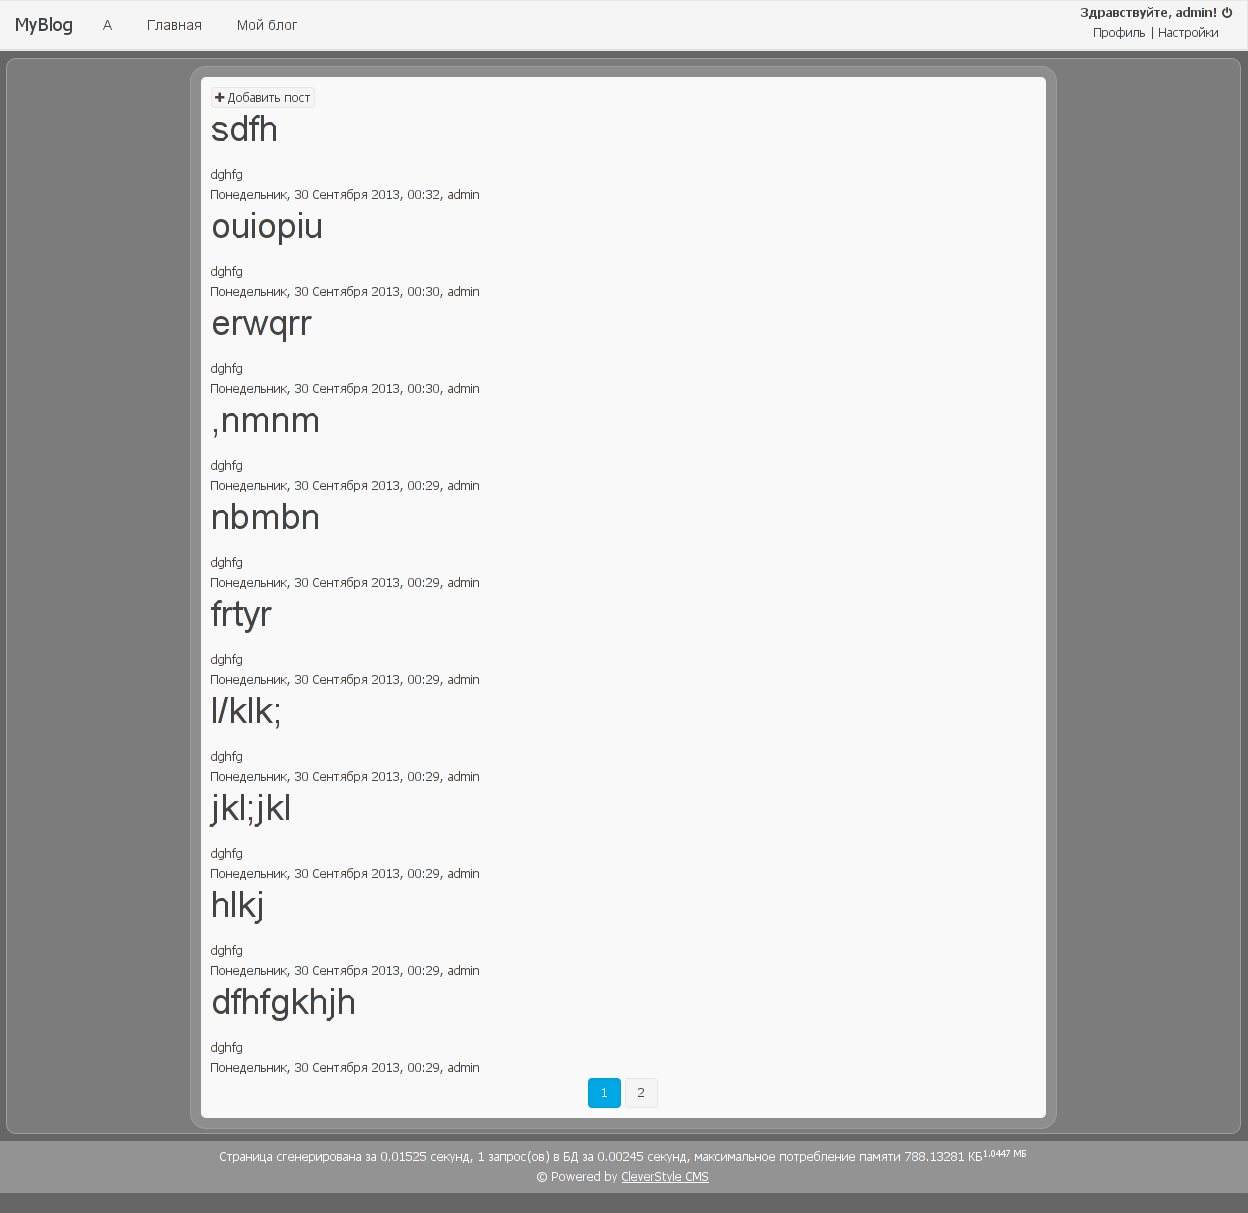
UPD 11.11.2013: In the new version of the engine, the CRUD trait appeared, the Posts class was edited, and it became easier with its use.
Source: https://habr.com/ru/post/196712/
All Articles