Introduction to developing and testing applications in the Cloud
At the beginning of June 2013, at the TechEd conference (North America), Microsoft Technical Council member and leading specialist in the development of ALM direction Brian Harry announced Visual Studio 2013 and Team Foundation Server 2013 together with .Net Framework 4.5.1. A few weeks later, at the Build 2013 conference in San Francisco, the availability of pre-release versions of these products was announced. In addition to numerous improvements to the development environment, the ability to create applications for any Windows-based device, including Windows 8.1, web applications and services for on-premises and cloud environments using new additions to Visual Studio and ASP.NET that simplify the web development for various browsers and devices, flexible management of project portfolios, real-time interaction, as well as simplifying access to necessary information directly from the code editor, Visual Studio 2013 is a complete tool for developing, diagnosing iki, and debug your applications in the cloud.
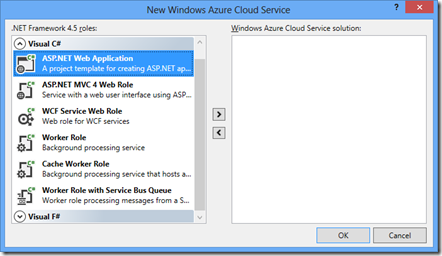
This article is the first in a cycle that will allow novice developers to get an idea of building from scratch applications for Windows Azure and their deployment using Visual Studio 2013 Preview, testing and management in cloud environments. To work, we need, in fact, Visual Studio 2013 Preview and a subscription to Windows Azure. You can install a free preview version of Visual Studio 2013 Preview from the Microsoft Download Center . There are several editions available, we will need the Ultimate edition. After installation, you can see the project template for creating applications in the Cloud.

Pic1
')
Initially this template is empty. It requires the installation of Windows Azure SDK 2.1 for VS2013 , which can also work with VS2012 and 2010 SP1. When you open a new project of this type, the installation will begin automatically. Like other advanced tools, such as SQL Server Data Tools, the default installation is through the Web Platform Installer. It is logical to assume that the developer’s machine on which the creation of cloud applications will take place has access to the Internet. However, there are situations in which development and testing is done locally, and placement in the Cloud is carried out from several dedicated machines in a unit. In this case, you should install the Windows Azure SDK “manually” on the local machine in accordance with the instructions (see the Install Instructions section). System prerequisites are listed there in the System Requirements section. You can download WindowsAzureAuthoringTools-x64.msi, WindowsAzureEmulator-x64.exe, WindowsAzureTools.vs120.exe and other components separately here .
After installing the Windows Azure SDK, the Get Windows Azure SDK caption in the project template (Figure 1) changes to the Windows Azure Cloud Service. Add an ASP.NET web role to the created application:
Pic2
and in it - the default web form:

Pic.3
To consider the further process of local testing of an application and its placement in the Cloud, you need to create the simplest user code that can be borrowed, for example, here :
Pic.4
By default, the launch is performed in the local Windows Azure emulator installed in the Windows Azure SDK. If User Access Control is enabled on the system, a message will be displayed.

Pic.5
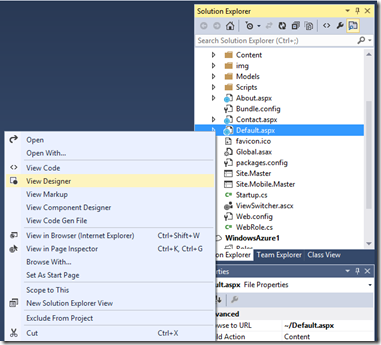
To run Visual Studio with administrative privileges, go to the directory where it is installed. In Windows 8, find the Visual Studio icon on the start screen, right-click on it and select Run as administrator in the bottom menu bar.
Pic.6
Or click on the menu item Open file location, in your browser, enter the properties of the Visual Studio 2013 Preview shortcut, click on the Advanced button and check the Run as administrator checkbox:

Fig.7
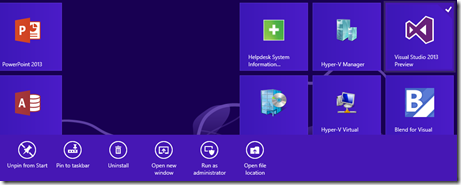
Restart Visual Studio, re-open the previously created application and start it.
Fig.8
Click on the Button. In the event handler for clicking on this button, the creation of a blob in Azure Storage and a line of code for debugging that was added there will work
Script 1
In the Output window we will see the corresponding inscription.
In addition, for testing purposes, our Button1_Click procedure contains the setup of a diagnostic monitor for transferring to another blob of logs with a certain periodicity, in this case every half minute.
Script 2
Stop the application from VS or close the browser window. Open Server Explorer. Please note that the Windows Azure emulator contains two Blob containers in the Storage \ Blobs section. The first is the testblob created by us (Script 1). The second is wad-control-container - a container that was created to write logs using a diagnostic monitor (Script 2).
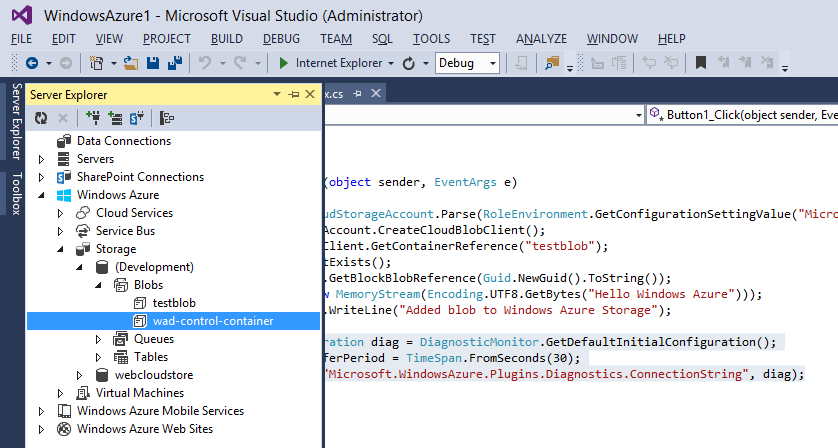
Fig.9
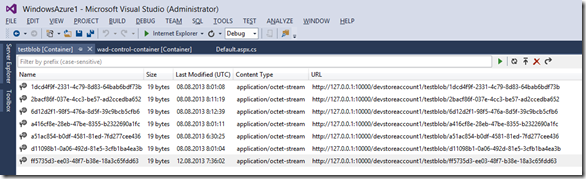
Double-clicking on the testblob container, you can see that it contains blobs with the names of guides created (Script 1) each time the application is launched and the Button is pressed on the web page (Fig. 8).
Pic.10
Double-clicking on each of the lines opens the contents of the corresponding blob in the window, say, IE. There lies the trace line Hello Windows Azure.
The second container contains Windows Azure logs collected using a diagnostic monitor:
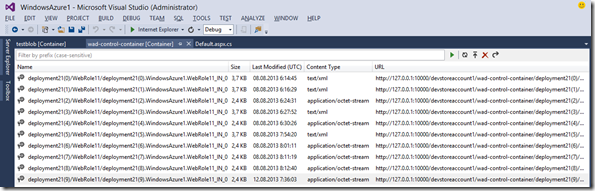
Figure 11
Each blob can also be opened in the browser and read the log saved at one time or another:
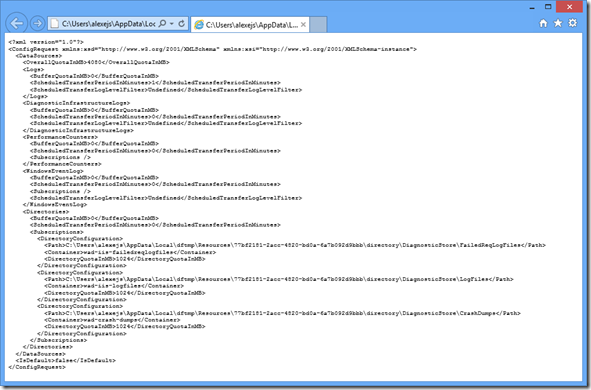
Fig.12
Making sure the application is working, let's move on to its placement and launch in the Cloud. Previously, to launch web roles in Windows Azure. You will need to create a cloud service, for which we go to the Windows Azure Management Portal, click the + icon in the lower left corner and select Cloud Service in the menu that appears. The Custom Create option allows you to immediately publish the cloud service by specifying a configuration file (CSCFG), a package (CSPKG), and a certificate. Since we are going to publish the application from the Visual Studio project, we will need only the Quick Create option. In this case, you only need to think of the name of the service and set the data center in which it will work. A data center is usually chosen for reasons of minimizing the cost of traffic, which is free within the same data center. For example, if our application works with a SQL Azure database created in a North Europe data center, then it makes sense to place the service in the same place.
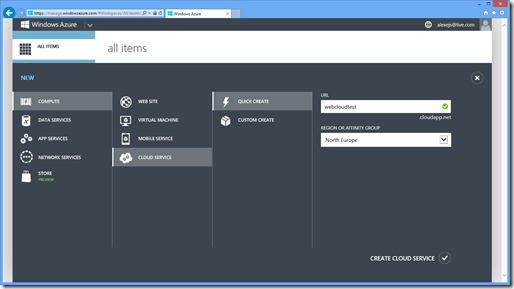
Fig.13
Our application uses a storage account that was previously emulated by Windows Azure Tools installed locally. Now you need to create it in the Cloud:
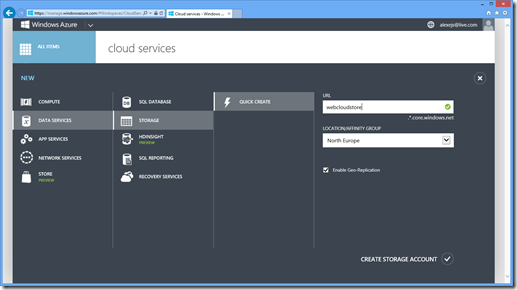
Fig.14
It remains to reconfigure the project in Visual Studio c emulator to use "fair" cloud service and storage account. To do this, in the solution browser in the Windows Azure project, select the Properties of the role that accesses storage services and go to the Settings tab. Now the connection string is configured on the local emulator: UseDevelopmentStorage = true.
Fig.15
Required to send it to Azure. The easiest way to do this is to not manually enter your account and primary key - click on the dots on the right and select Download Publish Settings:
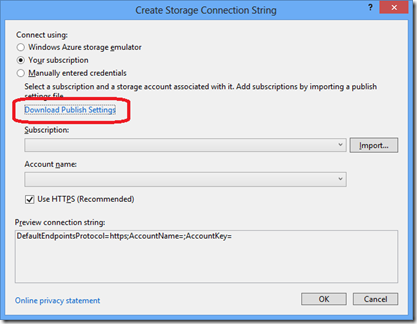
Figure 16
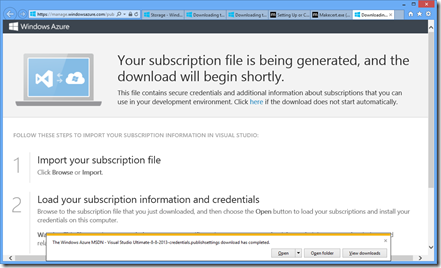
A file will be downloaded for the current subscription, allowing Visual Studio to automatically obtain the above information. It contains information about the certificate, so it should be kept in a safe place. We specify this file by clicking the Import button.
Pic.17
The application is ready for publication. It can be done from the Windows Azure Management Portal by creating a service package and a service configuration file, or directly from Visual Studio using the publishing wizard. To launch it, select the Publish item from the context menu of the Windows Azure project.
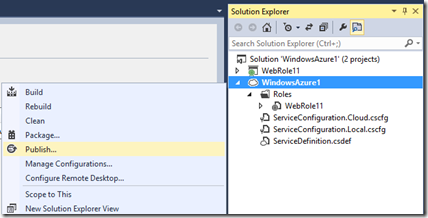
Pic.18
The application is published successfully.

Figure 19
If you now run it in the cloud, indicating the address of the service created in Fig.13
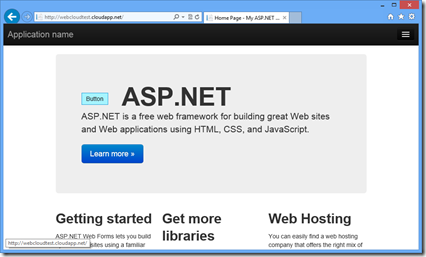
Pic.20
Diagnostic information for testing purposes (Fig.10-12) will be added to the container Fig.14 in the same way as in the case of the emulator. You can view the collected diagnostics in various ways, including through Server Explorer, as was done in Fig.9. However, now he will point to the Cloud, since we changed the project configuration and connection string (Fig.15-17).

Pic.21
In the next article we will talk about debugging and testing applications directly in the Cloud.
This article is the first in a cycle that will allow novice developers to get an idea of building from scratch applications for Windows Azure and their deployment using Visual Studio 2013 Preview, testing and management in cloud environments. To work, we need, in fact, Visual Studio 2013 Preview and a subscription to Windows Azure. You can install a free preview version of Visual Studio 2013 Preview from the Microsoft Download Center . There are several editions available, we will need the Ultimate edition. After installation, you can see the project template for creating applications in the Cloud.
Pic1
')
Initially this template is empty. It requires the installation of Windows Azure SDK 2.1 for VS2013 , which can also work with VS2012 and 2010 SP1. When you open a new project of this type, the installation will begin automatically. Like other advanced tools, such as SQL Server Data Tools, the default installation is through the Web Platform Installer. It is logical to assume that the developer’s machine on which the creation of cloud applications will take place has access to the Internet. However, there are situations in which development and testing is done locally, and placement in the Cloud is carried out from several dedicated machines in a unit. In this case, you should install the Windows Azure SDK “manually” on the local machine in accordance with the instructions (see the Install Instructions section). System prerequisites are listed there in the System Requirements section. You can download WindowsAzureAuthoringTools-x64.msi, WindowsAzureEmulator-x64.exe, WindowsAzureTools.vs120.exe and other components separately here .
After installing the Windows Azure SDK, the Get Windows Azure SDK caption in the project template (Figure 1) changes to the Windows Azure Cloud Service. Add an ASP.NET web role to the created application:
Pic2
and in it - the default web form:
Pic.3
To consider the further process of local testing of an application and its placement in the Cloud, you need to create the simplest user code that can be borrowed, for example, here :
Pic.4
By default, the launch is performed in the local Windows Azure emulator installed in the Windows Azure SDK. If User Access Control is enabled on the system, a message will be displayed.
Pic.5
To run Visual Studio with administrative privileges, go to the directory where it is installed. In Windows 8, find the Visual Studio icon on the start screen, right-click on it and select Run as administrator in the bottom menu bar.
Pic.6
Or click on the menu item Open file location, in your browser, enter the properties of the Visual Studio 2013 Preview shortcut, click on the Advanced button and check the Run as administrator checkbox:
Fig.7
Restart Visual Studio, re-open the previously created application and start it.
Fig.8
Click on the Button. In the event handler for clicking on this button, the creation of a blob in Azure Storage and a line of code for debugging that was added there will work
var storageAccount = CloudStorageAccount.Parse(RoleEnvironment.GetConfigurationSettingValue("Microsoft.WindowsAzure.Plugins.Diagnostics.ConnectionString")); var blobClient = storageAccount.CreateCloudBlobClient(); var blobContainer = blobClient.GetContainerReference("testblob"); blobContainer.CreateIfNotExists(); var blob = blobContainer.GetBlockBlobReference(Guid.NewGuid().ToString()); blob.UploadFromStream(new MemoryStream(Encoding.UTF8.GetBytes("Hello Windows Azure"))); System.Diagnostics.Trace.WriteLine("Added blob to Windows Azure Storage"); Script 1
In the Output window we will see the corresponding inscription.
In addition, for testing purposes, our Button1_Click procedure contains the setup of a diagnostic monitor for transferring to another blob of logs with a certain periodicity, in this case every half minute.
DiagnosticMonitorConfiguration diag = DiagnosticMonitor.GetDefaultInitialConfiguration(); diag.Logs.ScheduledTransferPeriod = TimeSpan.FromSeconds(30); DiagnosticMonitor.Start("Microsoft.WindowsAzure.Plugins.Diagnostics.ConnectionString", diag); Script 2
Stop the application from VS or close the browser window. Open Server Explorer. Please note that the Windows Azure emulator contains two Blob containers in the Storage \ Blobs section. The first is the testblob created by us (Script 1). The second is wad-control-container - a container that was created to write logs using a diagnostic monitor (Script 2).
Fig.9
Double-clicking on the testblob container, you can see that it contains blobs with the names of guides created (Script 1) each time the application is launched and the Button is pressed on the web page (Fig. 8).
Pic.10
Double-clicking on each of the lines opens the contents of the corresponding blob in the window, say, IE. There lies the trace line Hello Windows Azure.
The second container contains Windows Azure logs collected using a diagnostic monitor:
Figure 11
Each blob can also be opened in the browser and read the log saved at one time or another:
Fig.12
Making sure the application is working, let's move on to its placement and launch in the Cloud. Previously, to launch web roles in Windows Azure. You will need to create a cloud service, for which we go to the Windows Azure Management Portal, click the + icon in the lower left corner and select Cloud Service in the menu that appears. The Custom Create option allows you to immediately publish the cloud service by specifying a configuration file (CSCFG), a package (CSPKG), and a certificate. Since we are going to publish the application from the Visual Studio project, we will need only the Quick Create option. In this case, you only need to think of the name of the service and set the data center in which it will work. A data center is usually chosen for reasons of minimizing the cost of traffic, which is free within the same data center. For example, if our application works with a SQL Azure database created in a North Europe data center, then it makes sense to place the service in the same place.
Fig.13
Our application uses a storage account that was previously emulated by Windows Azure Tools installed locally. Now you need to create it in the Cloud:
Fig.14
It remains to reconfigure the project in Visual Studio c emulator to use "fair" cloud service and storage account. To do this, in the solution browser in the Windows Azure project, select the Properties of the role that accesses storage services and go to the Settings tab. Now the connection string is configured on the local emulator: UseDevelopmentStorage = true.
Fig.15
Required to send it to Azure. The easiest way to do this is to not manually enter your account and primary key - click on the dots on the right and select Download Publish Settings:
Figure 16
A file will be downloaded for the current subscription, allowing Visual Studio to automatically obtain the above information. It contains information about the certificate, so it should be kept in a safe place. We specify this file by clicking the Import button.
Pic.17
The application is ready for publication. It can be done from the Windows Azure Management Portal by creating a service package and a service configuration file, or directly from Visual Studio using the publishing wizard. To launch it, select the Publish item from the context menu of the Windows Azure project.
Pic.18
The application is published successfully.
Figure 19
If you now run it in the cloud, indicating the address of the service created in Fig.13
Pic.20
Diagnostic information for testing purposes (Fig.10-12) will be added to the container Fig.14 in the same way as in the case of the emulator. You can view the collected diagnostics in various ways, including through Server Explorer, as was done in Fig.9. However, now he will point to the Cloud, since we changed the project configuration and connection string (Fig.15-17).
Pic.21
In the next article we will talk about debugging and testing applications directly in the Cloud.
Source: https://habr.com/ru/post/196618/
All Articles