Photo surveillance or timelapse video on Raspberry Pi

Recently, I had the need to build some kind of video surveillance. The requirements were quite simple:
- opportunity to watch via the Internet
- Real-time mode is not necessary, it is enough to see the main events of the day in the evening (let's say, find out if someone is sitting at your favorite computer while you are at work)
- no need to spend hours watching results
- highest possible picture quality
- minimum cost
Based on the criteria, one could dwell on ready-made solutions in the form of IP cameras. However, a quick analysis of the market showed that in devices worth up to $ 100, the size of the picture rarely exceeds 640x480 pixels, and, at the same time, they cannot boast of good possibilities for setting up software. That is, it is quite possible that having bought such a camera, you will have to put up with the curvature of the factory firmware and the inability to fully realize your intentions.
In contrast to ready-made solutions, home-made on the Raspberry Pi is quite inexpensive, much more exciting, and much more flexible, thanks to a full OS on board and terabytes of ready-made software for every taste.
To solve the problems described, the following algorithm was invented:
At the beginning of the day (as scheduled), the system starts a process that takes photographs at a certain interval (say, once a minute), saves them locally to a memory card and immediately uploads it to some cloud disk using the WebDAV protocol. This provides some sort of “live” observation, which, although not required by the conditions, is a pleasant bonus. At the end of the day (also according to the schedule) the process of photography is interrupted and the assembly of the video file from the photos starts. At the end of the assembly, the video is laid out on the same cloud disk, which makes it possible to quickly watch the whole avi-shki remotely, without having to switch between photo files (10 hours of work, one frame per minute, the total video timing is only about a minute, 10 fps).
')
In this approach, of course, video surveillance is not implemented in its usual form, but all the tasks are being solved. In addition, there is no need to buy a dedicated IP from the provider in order to connect to the camera directly, and there is no need to start a separate video surveillance server, because its functions of storing and accessing data are shifted to a free service (for example, Yandex.Disk ).
So iron:
- Raspberry Pi ($ 50- $ 60 in our area): I used model B, the one with Ethernet, two USB and 256 MB of RAM
- Logitech C270 ($ 20): a relatively cheap and popular HD (1280x720) webcam that conforms to the UVC specification (as a result, works seamlessly in Linux systems)
- Charging from the iPhone ($ 10): in fact, the iPhone, of course, nothing to do with, any power source with an output current of 1A and a micro-USB connector. You can find Chinese pulse charging no more than $ 2 apiece, just check them carefully.
- SD card 4 GB ($ 6): four gigabytes - the minimum amount of cards for comfortable work.
- Case for raspberry ($ 1): made with the help of Dremel from a more or less suitable box, purchased in the building hypermarket.
Assembled, it looks like this:

Since this is my first experience with Raspberry, I’ll dwell on things that are already known to more advanced users.
The first nuance is powering peripheral devices. The fact is that when you turn on the Raspberry from a single-amp source, the USB ports get quite a bit of current. As a result, I could not connect a webcam and a USB Wi-Fi dongle at the same time, or two webcams: one of the devices worked stably, and the other seemed to start up in the system, but after a minute it simply refused to work.
The second nuance is the number of USB ports. There are only two of them in the Malinka, which means connecting the camera, keyboard and wi-fi at the same time will not work. However, there are a couple of solutions.
First of all, you can connect a USB hub to the Raspberry, and insert all the necessary peripherals into it. For example, everything worked for me with this :

This will increase the number of available ports and give them all enough current, although it will require taking another 220V socket.
Secondly, it makes sense to control raspberries over SSH - then you do not need to connect either the keyboard, or the mouse, or the monitor. And if you really want to see the graphical shell, then you can install a VNC server and get remote access to the desktop. This is done like this:
installation:
sudo apt-get install tightvncserver starting the server on the first port:
vncserver :1 -geometry 1200x700 -depth 16 Now you can connect to the "crimson" VNC client from under the operating system (under Windows, for example, UltraVNC works fine)
Selection and installation of software:
As an OS, I used Raspbian, as the most suitable for non-advanced users. You need to download the system image and install it on a memory card using a special utility (Win32DiskImager under Windows). All this is described in detail on the download page of the official Raspberry website: www.raspberrypi.org/downloads
After the first start of the system, it makes sense to configure the time zone so that the time taken to take snapshots is displayed correctly.

Of course, this can be done later with the command
sudo dpkg-reconfigure tzdata I strongly recommend using mjpg-streamer to capture photos from a webcam. This utility - the only one among those tested on this configuration of iron, was able to produce a photo in the "correct" resolution. The rest of the tools that I had to try (motion, ffmpeg, streamer), did not give the HD image at all, offering at best only 640x480, or even refused to start. Unfortunately, in the form of executable files mjpg-streamer is not common, but compiling it is not more difficult than installing a ready-made package. What we do (it is assumed that all operations are performed on behalf of user pi).
The first step is to update the local index of the packages available for installation:
sudo apt-get update You can also run an upgrade of packages already installed in the system, if necessary, although in practice everything works without it:
sudo apt-get upgrade In order to display the date and time of their creation in photographs, we will need the imagemagick package, which includes the convert utility. It has truly unlimited possibilities for changing images, so it is completely easy to write dozens of numbers in the corner with its help. The same package will be needed to compile mjpg-streamer, so we install it without thinking:
sudo apt-get install imagemagick Gluing together a video from a set of photos is done by the aviconv program, which we also install not on our own, but along with the libav-tools package, without which the compilation of mjpg-streamer will not be successful. We put:
sudo apt-get install libav-tools You also need the libjpeg8-dev package, which also contains the necessary libraries for mjpg-streamer:
sudo apt-get install libjpeg8-dev To download source codes from sourceforge, you will need a subversion:
sudo apt-get install subversion And downloading and compiling mjpg-streamer itself is done like this:
sudo svn co https://svn.code.sf.net/p/mjpg-streamer/code/mjpg-streamer/ mjpg-streamer cd mjpg-streamer make The last step is to install the package to work with the remote file system via WebDAV and, in fact, to mount it:
sudo apt-get install davfs2 sudo mkdir /mnt/dav sudo mount -t davfs https://webdav.yandex.ru /mnt/dav -o uid=pi,gid=pi During the mount process, you will need to enter a username and password.
Workflow step by step:
Now we have everything necessary for further work. In brief, I will describe the main commands, not especially leaning on bash, in order not to overload the article. I think that the description of automated scripts to run individual operations may be the reason for a separate essay.
So, run mjpg-streamer:
cd mjpg-streamer ./mjpg_streamer -i "./input_uvc.so -r 1280x720 -f 1" -o "./output_file.so -f ./ -d 60000" In this mode, it will once a minute (-d 60000) in the current directory (-f ./) create a file with a beautiful name, like this: 2013_10_04_12_11_30_picture_000000000.jpg.
To draw the timestamp on the image, use a script of the following form:
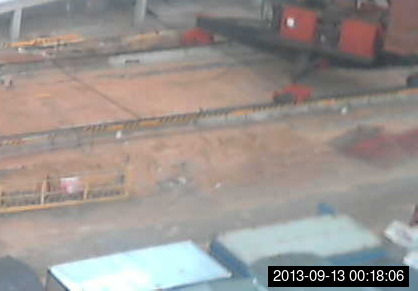
filename="2013_10_04_12_11_30_picture_000000000.jpg" timestamp=`stat -c %y $filename` convert $filename -fill black -draw "rectangle 1130,695 1270,715" -fill white -pointsize 15 -draw "text 1135,710 '${timestamp:0:19}'" ./out.jpg. He will put a mark in the lower right corner of the image and write the result in out.jpg. It turns out like this:
To write to Yandex.Disk, simply copy the desired file to / mnt / dav:
cp out.jpg /mnt/dav It should be noted that the copying itself to the remote file system is carried out in 2 stages: first, the file is copied to the local cache somewhere in / var / cache / davfs2, and then davfs is already engaged in the actual transfer of the file over the network. This means that the copy command will complete before the file is physically available in Yandex.Disk. Therefore, do not be discouraged if you do not find the newly copied file on Yandex - most likely you need to wait a bit.
Creating a video from a set of jpegs requires preparation: file names should be a sequence of increasing numbers, following a specific pattern. Here is a script that renames all jpg files in the current directory by increasing the time of their modification, and then runs the conversion to avi:
i=0 for f in `ls -tr *.jpg 2>/dev/null` do newf=`printf %06d $i`.jpg echo $f "-->" $newf mv $f $newf i=$((i+1)) done avconv -r 10 -i %06d.jpg -r 10 -vcodec mjpeg -qscale 1 out.avi I must say that avconv is also a very powerful utility, which can encode almost anything into anything with a hundred parameters. However, you should take into account the rather modest possibilities for soft encoding-decoding video from Raspberry, so as not to place too much hope on it. For example, converting a set of approximately 600 files into a movie compressed in H.264 took me about two hours. Therefore, in the example above, I use coding in MJPEG, which in fact does not compress anything, but only sticks jpg together with each other. Such a conversion is performed in a few minutes and does not lose the original quality of the images.
Further, with some skill and development skills of bash scripts, you can set up a fully automated system that will turn on and off on a schedule, clean up trash, track the availability of free space on a remote disk, etc. Also through the disk, you can organize remote control of Raspberry, for example, laying out in a specific directory scripts that Malinka will take and execute.
In conclusion, I offer an example of a homemade timelapse video. Please note that the time in the lower right corner is incorrect. This is due to the fact that Raspberry does not have a real time clock, and if it is turned on without an internet connection, then the last time will be used, without taking into account the time zone.
Source: https://habr.com/ru/post/196598/
All Articles