The epic of the WD My Book Live, or "device-sweetie" with "cookies"
Hi% username %! At the beginning of this year, I finally turned quarter. Realizing that I had become an adult child and I need adult toys, I bought myself a WD My Book Live on 3Tb capacity, which in our happy family immediately killed N birds with one stone. My happiness knew no bounds. The device bribed its price, hardware and the presence of a full-fledged Linux on board. However, as it turned out later, Linux Debian was not very complete, quite neutered and, judging by the reviews of ordinary owners, a lover of scorching. However, thanks to the engineers from WD, the device rises quite easily from the state of a brick to the state of a working device ( proof 1 and proof 2 ). But you must admit, the times of hard reset with hoesmaga pliers from around the corner are long gone. Still, the era of nano-polymers and innovation. And that means the device would like no longer killed.
I am not a Linux user and for me Linux is, in essence, a dark forest! Therefore, for a start, having studied the Internet for a long time, I only washed down mc and transmission, which for the first time was enough for my eyes. And I was amazed how I, the person who first launched SSH, easily succeeded! Six months have passed, I read the forums dedicated to the device. The day came “D” and I, rolling up my sleeves, began to make “candy” out of my device. And not simple, but “candy” with “cookies” , namely:
- The device is specific in that after the firmware for a newer version, almost all of the software and system settings are lost, which were carefully and painstakingly entered by you,% username %. But this problem is happily solved by chroot. And all subsequent software should spin only on it.
- The device works fine as a file server over the network. It would be too cynical to have such a resource and not use it to implement home dropbox.
- In addition, the device should be able to cast itself with torrents, and the maximum that is required of me is to download .torrent to a specific directory, and everything else should be done by itself!
- The built-in media server Twonky 5 works ... and thank God! But I would like to have something with a web-muzzle, eating more media and having the ability to configure. Twonky6 \ 7 is swept aside because of its unselfishness.
- Have an interface to monitor the state of the device to know what it is “breathing”.
- To whom as, and to me, as a web developer, I would like to have my home web server for my personal mini-projects and developments (as an alternative to Denwer), but we will work on setting it up later when I have significantly more time.
Why did I just start it all ... It is worth remembering that all these bells and whistles create a significant load on the device, so it is better to decide in advance whether you need it? But oh well, roll up your sleeves and start!
')
Begin to transform
My enthusiasm was at its limit, as I remembered the first successful experience of communicating with my Debian terminal. The first thing I have long dreamed of doing is updating the firmware version of my MBL. At the time of purchase of the device, firmware 02.41.05-034 was installed on it. The latest to date is 02.42.03-027 . It was not updated solely due to the fact that this procedure inevitably leads to erasing all the software I have installed. But now I set the chroot and everything will be fine! I stocked up with two external USB-HDDs of 750Gb each and transferred all the necessary data from the MBL, which I highly recommend to you, %% username . In the process, I managed to rub a couple of files on the MBL (solely because of my own carelessness), so I won’t be superfluous!
Copying all the data, I began to flash. From the web interface it was quite easy to do, but if you really do something, then do it for an adult. Therefore, I preferred to increase my level of knowledge by updating the firmware through the terminal. In this case, any firmware version can be downloaded from the WD site .
If someone else does not have SSH enabled on the device, this can be easily done by following the link http: // mybooklive / UI / ssh or by accessing the device’s IP address, in my case it is http://192.168.0.41/ ui / ssh . Tick “SSH Access”.

To connect to the device via SSH, you need to download any ssh client. I prefer to use PUTTY . In its settings, simply enter the host name or MBL IP address and click the “ Connect ” button. When requesting a login and password, specify the standard login root and password welc0me (with zero instead of O). If everything is in order, then the console will respond with a welcome message and a line:
MyBookLive:~# 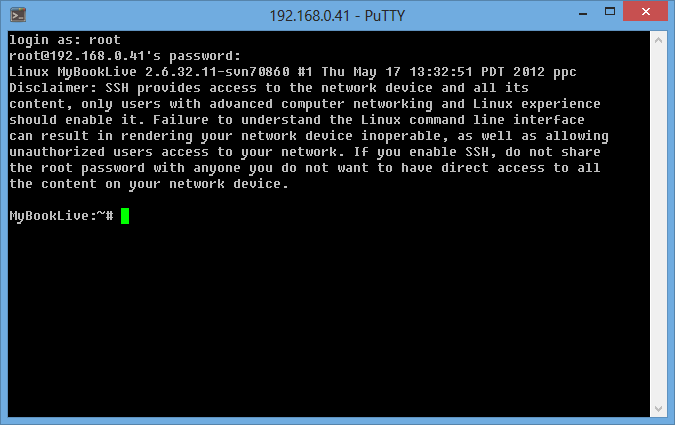
In the future, I will use this input line to understand what environment we are in now and, accordingly, where to write these or other commands:
“MyBookLive:~# ” – . “(chroot-debian)/# ” – chroot. To begin with, if you have never done this, you should remove the full backup MBR and partitions:
MyBookLive:~# dd if=/dev/sda bs=15728640 count=1 | bzip2 > /DataVolume/shares/Public/SDA_MBR_FREESPACE.bz2 MyBookLive:~# dd if=/dev/sda1 | bzip2 > /DataVolume/shares/Public/SDA1_IMAGE.bz2 MyBookLive:~# dd if=/dev/sda2 | bzip2 > /DataVolume/shares/Public/SDA2_IMAGE.bz2 Now it remains only to download the received files from the / DataVolume / shares / Public / directory to another medium. And in case of a problem, we have something to roll back. This is best done if the MBL is still empty.
And now I strongly recommend changing the password to a more complex one:
MyBookLive:~# passwd [ ] The password must be entered 2 times in a row (after the first time, the system will ask you to enter the password again) for the system to accept it. For reference, you can paste Shift + Ins commands copied from the clipboard into the PUTTY console in order not to type all commands manually and get rid of errors.
Stitching
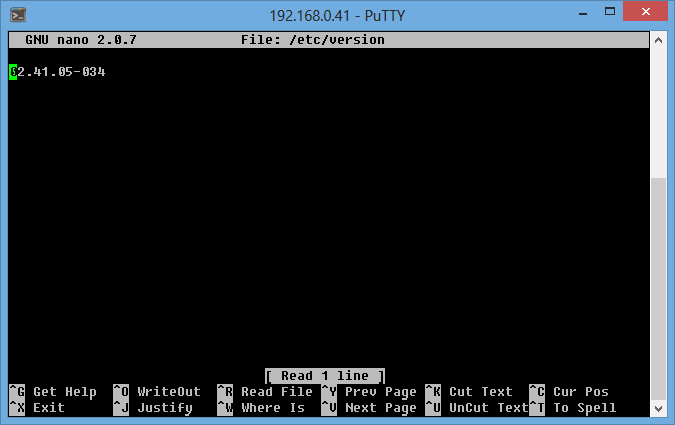
Now that we have full SSH, we can do anything (reasonably, of course). The step with the firmware is not necessary, but it is highly desirable, because it is more pleasant to work with a bare system (anyway, with the next update, we will lose everything). If you have the latest version of the update installed, but you want to install the same firmware from scratch, then this will work for you. First you need to look at the current firmware version in the / etc / version file. To do this, type in the console:
MyBookLive:~# nano /etc/version The Nano editor opens. The firmware version will be written in its textbox at the very top. In my case, this is 02.41.05-034 .
Press Ctrl + X to exit the editor. If you have the latest firmware version (i.e., today it is 02.42.03-027 ), then without any problems, change the firmware number to any previous one (as an option, you can enter mine - in the screenshot above). In this case, to save the changes, you need to press Ctrl + O , then accept by pressing the Enter key, and then exit the editor Ctrl + X.
And so, everything suits us, we begin to update the firmware. I download and install the latest (today) firmware apnc-024203-027-20130529.deb from the mirror and move it to the / DataVolume / shares / Public / directory of my MBL. Next, in the console you need to write:
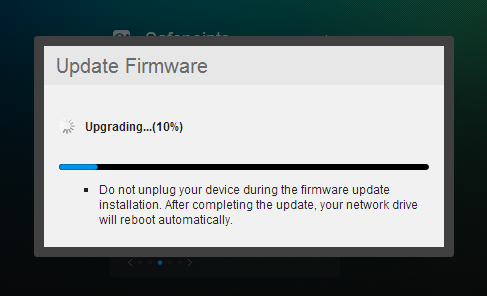
MyBookLive:~# updateFirmwareFromFile.sh /DataVolume/shares/Public/apnc-024203-027-20130529.deb The firmware will destroy all the programs installed on your device, but will not affect the user files stored on the device. However, I highly recommended it earlier and will repeat it now - it’s better to have a copy of these files on your hard drive than to tear the hair on your head! .. The firmware process will not be fast. In no case do not close the session in the SSH console and be sure to wait for its response with the message:
The system is going down for reboot NOW! If in the process of updating the firmware, a window with the MBL web-interface is opened in your browser, you most likely noticed in it the status window of the update process. Bug
The first thing after the firmware is to freeze udev ... Out of harm's way!
MyBookLive:~# aptitude hold udev It is better not to modify the list of repositories, for it is fraught! Run the following in the console:
MyBookLive:~# sudo apt-get update Most likely the console swears something like this:
W: GPG error: http://ftp.us.debian.org wheezy Release: The following signatures couldn't be verified because the public key is not available: NO_PUBKEY AED4B06F473041FA A similar situation arises after updating the sheet of repositories that are specified in /etc/apt/sources.list and on a subsequent attempt to install something from there. The reason is that the system simply does not have the public GPG-keys of the repository from which the package is installed. And this very key (in my case - AED4B06F473041FA ) needs to be added to the apt system base. Perform the following:
MyBookLive:~# gpg --keyserver subkeys.pgp.net --recv AED4B06F473041FA MyBookLive:~# gpg --export --armor AED4B06F473041FA | sudo apt-key add - If everything went well, the system will respond:
OK Now try again:
MyBookLive:~# sudo apt-get update Now everything is fine and this is enough for a start! Does it make sense to further customize the bare system for yourself? Everyone will answer this question for himself, I don’t see the point, so I will immediately proceed to the next salivating point of the program!
Install chroot
Now with a clear conscience, you can proceed to the installation of chroot. All the necessary information is on the Code.Google project. From the instructions for the link and descriptions from the Internet, the process is not complicated. Well, let's get started?
First, download the installation script.
MyBookLive:~# wget http://mbl-common.googlecode.com/svn/chroot-install/install.sh It is possible that someone will go on the run, but at me he quarreled, spat, frowned, puffed out his cheeks and refused to do anything. The reason for all was the link to the outdated repository in line 55 (we change the link ftp.debian.org/debian to mirror.yandex.ru/debian via the nano editor). It also turned out that it is fundamentally important to screen the triangular brackets “ < ” and “ > ” in line 36, appending the “ \ ” symbol in front of each one, since the installer swore at them. For the lazy, I provide a link to the installer that I have already corrected. Now run the installation process:
MyBookLive:~# sudo sh /root/install.sh We answer all questions of the system with a positive “ y ”. The installation process itself should take from 20 to 40 minutes. The process should install miniDLNA server, Transmission and chroot itself (although I chose to install only chroot and deliver the rest of the buns myself). If you, nevertheless, decided to install the installer from the stock and you got out of the problem (as in the screenshots below), then the installer is inevitably right, or download the link above!

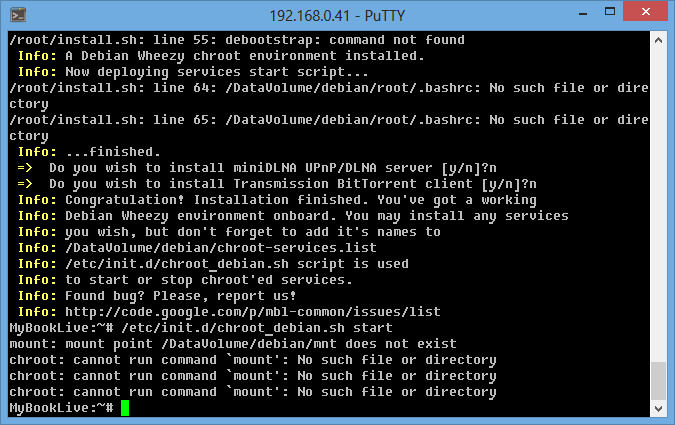
But before starting a new installation, you need to correctly remove the chroot so as not to grind user files from the mounted directories:
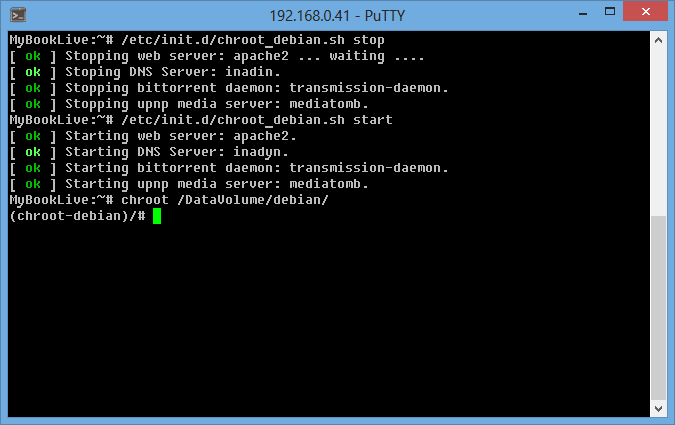
MyBookLive:~# /etc/init.d/chroot_debian.sh stop MyBookLive:~# /etc/init.d/chroot_debian.sh remove reboot MyBookLive:~# rm -fr /DataVolume/debian/ Now you can start the installation again. It is important to note that it is better to do this with the sudo command, otherwise the chroot does not install all the packages and, as a result, it also does not start. If you did everything as I wrote, then in the end we get a ready-made sandbox and a fantasy stimulator. How to manage it is described in detail here , but still, I will try to explain.
To run chroot you need to write in the console:
MyBookLive:~# /etc/init.d/chroot_debian.sh start By itself, the chroot starts automatically during the MBL startup, but still ... During the start, the services specified in /DataVolume/debian/chroot-services.list are also launched. It is important to note that the names of the applications in this file correspond to the names of the files in the /DataVolume/debian/etc/init.d/ directory.
After starting, you must enter the chroot environment:
MyBookLive:~# chroot /DataVolume/debian/ While you are in the chroot environment, you can install anything and experiment without fear! The environment has a complete Debian Wheezy distribution. This is truly the most real sandbox for the imagination! To exit the chroot environment and return to the MBL environment, you must enter the exit command:
(chroot-debian)/# exit To stop the environment, enter:
MyBookLive:~# /etc/init.d/chroot_debian.sh stop Most interesting, as I wrote above, chroot is good because when you change the MBL firmware, the chroot itself and the software installed in it are not deleted. As soon as you update the firmware of the device, you can immediately enter the command to restore the chroot and return everything as it was:
MyBookLive:~# /DataVolume/debian/chroot_debian.sh install You can delete the environment by stopping it, and then deleting the environment autorun script. After that, you need to restart the MBL and clean out the / DataVolume / debian / directory:
MyBookLive:~# /etc/init.d/chroot_debian.sh stop MyBookLive:~# /etc/init.d/chroot_debian.sh remove MyBookLive:~# reboot MyBookLive:~# rm -fr /DataVolume/debian/ Actually, this method I deleted the result of the installation of the chroot last time.
Setting up chroot
Now it’s worthwhile to tune the chroot environment to your needs. Here for everyone there is an incentive to roam their imagination. I will only give an example of how I did it, so this section is more of a recommendation. If we are not already in chroot, then it's time to enter it:
MyBookLive:~# chroot /DataVolume/debian/ For a start, I would recommend installing 3 important packages that were not in the chroot environment (sudo, wget and cron). They will be useful to us. Therefore:
(chroot-debian)/# apt-get install sudo wget cron Now you can expand the list of system repositories. For this you need to add repositories to our /etc/apt/sources.list . However, in the chroot environment, we have only one editor and its name is mcedit:
(chroot-debian)/# mcedit /etc/apt/sources.list You need to add these repositories to the list, replacing the already existing set:
deb http://mirror.yandex.ru/debian/ wheezy main deb http://mirror.yandex.ru/debian/ stable main contrib non-free deb-src http://mirror.yandex.ru/debian/ stable main contrib non-free deb http://archive.debian.org/debian/ lenny main deb-src http://archive.debian.org/debian/ lenny main deb http://ftp.us.debian.org/debian/ squeeze main deb-src http://ftp.us.debian.org/debian/ squeeze main After that, you need to update the list of packages. Unlike the root system, it handles such a list of repositories perfectly. By the way, instead of my list, you can add any of your own at will. Run in console:
(chroot-debian)/# sudo apt-get update If you have problems with GPG public keys, you already know what to do (we did this when setting up the MBL root environment).
The default text editor is mcedit and it suits me personally, but you can optionally set nano, vim, ed, and others to your taste. In this case, you need to select the default editor:
(chroot-debian)/# update-alternatives --config editor In the dialogue, you must enter the number of the editor, which will be used by default.
Now, perhaps, you can install the Russian language in the chroot environment. Personally, I prefer to use English, but if it's easier for you to communicate with the device in Cyrillic, there are no problems. Nevertheless, I recommend to do this in order to avoid problems with the names of files in Cyrillic. We do this as follows:
(chroot-debian)/# sudo apt-get update (chroot-debian)/# sudo apt-get install locales (chroot-debian)/# sudo dpkg-reconfigure locales After executing the last command, a list of locales appears on the screen. You must press the Enter key until the screen for entering the locale number appears. Russian locale is at number 349 (package ru_RU.UTF-8 ). Next, a choice of default locale options will be provided. I had these:
1. None 2. ru_RU.UTF-8 We choose the second and agree with the system. Now you need to leave the chroot environment and return to the MBL:
(chroot-debian)/# exit We add to the files (via the nano editor, as we have done above, when we changed the MBL firmware version) /DataVolume/debian/root/.bashrc and /DataVolume/debian/root/.profile at the end of 2 lines:
export LANG='ru_RU.UTF-8' export LC_ALL='ru_RU.UTF-8' We save the changes and again we can go into chroot and check that the console has become to us to respond with Russian text. If there are problems with the display of Russian letters, then it is worth setting the UTF-8 encoding in the PUTTY settings: Settings -> Sections -> Window -> Encoding -> Encoding -> UTF-8 :

As a nice addition, you can also install an application for monitoring the temperature of the hard disk. Personally, I thought that I might need it in the future:
(chroot-debian)/# sudo apt-get install hddtemp (chroot-debian)/# hddtemp /proc/1/cwd/dev/sda Thanks to this package, I now know that the temperature of the hard disk is 63 degrees Celsius.
In principle, for me personally, these settings are enough! Moving on?
Installing ownCloud cloud storage
Well,% username %, right now begins, perhaps, the most interesting. I have long dreamed of having my own cloud, which does not limit the amount of hard disk. And the subject is suitable for all my Wishlist more than - there is a client for Windows and Android! We can easily find the necessary documentation and distributions on the site of the ownCloud project.
I will not describe the installation process in detail. The whole process is based on this tutorial and post . Before starting the installation, you need to understand the dependent packages that need to be installed:
(chroot-debian)/# sudo apt-get install apache2 php5 php5-gd php-xml-parser php5-intl (chroot-debian)/# sudo apt-get install php5-sqlite php5-mysql php5-pgsql smbclient curl libcurl3 php5-curl Earlier we have already installed the wget package and we will need it now. We start with it using the download and installation of ownCloud:
(chroot-debian)/# wget http://download.opensuse.org/repositories/isv:/ownCloud:/community/xUbuntu_12.04/all/owncloud_5.0.11-0_all.deb (chroot-debian)/# sudo dpkg -i /owncloud_5.0.11-0_all.deb If you have problems with the NTP server, simply execute the command:
(chroot-debian)/# sudo apt-get -f install We already have the apache2 package installed. But it does not start for the reason that it requires port 80 for itself. However, this port is already occupied by the Apache of the root system and there hangs on it, not a lot, not a little, but the web-interface MBL. Personally, I didn’t want to lose the web interface, so I decided that ownCloud would work quite successfully for my benefit on port 81. However, it is worth remembering that in order to access ownCloud from the cloud, it will be necessary to forward port 80 of the router to port 81 of the MBL. Stop Apache and edit the configuration of its ports /etc/apache2/ports.conf :
(chroot-debian)/# /etc/init.d/apache2 stop (chroot-debian)/# mcedit /etc/apache2/ports.conf In the file at the directive Listen we change the port from 80 to 81 . Press F2 to save and F10 to exit the editor:
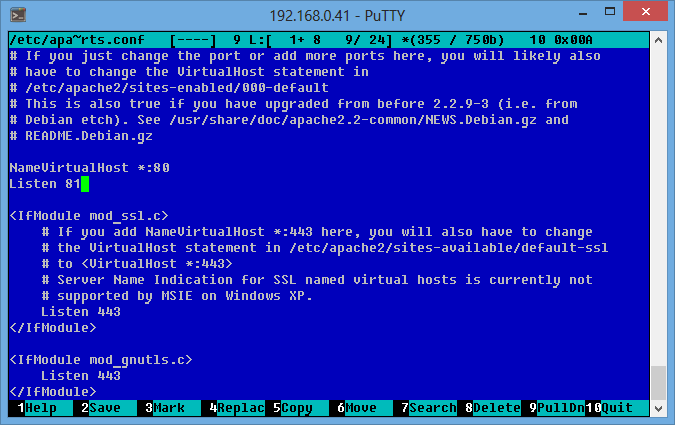
Now it’s worth running Apache again:
(chroot-debian)/# /etc/init.d/apache2 start If we did everything correctly, then the link http: // mybooklive: 81 / owncloud / ownCloud page should open! Hooray!
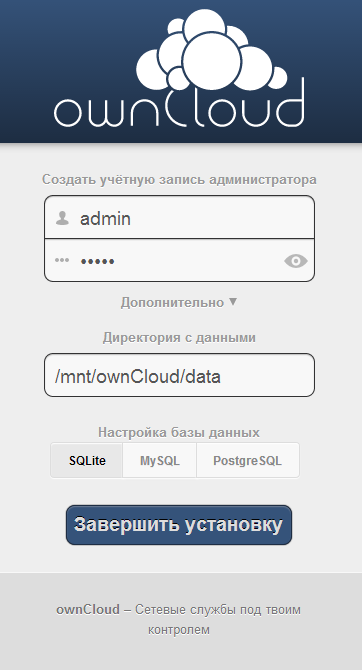
Now we need to create a directory for storing cloud files. I recommend creating a directory outside the / mnt / Public / directory so that there is no public access to cloud data. However, you yourself have the right to decide, based on your requirements, where this directory should be located. Let's start:
(chroot-debian)/# mkdir -p /mnt/ownCloud/data (chroot-debian)/# chmod -R a+rwx /mnt/ownCloud Also, if it is necessary to give access to a directory on a network, then it is necessary to create a similar directory through the MBL web interface.
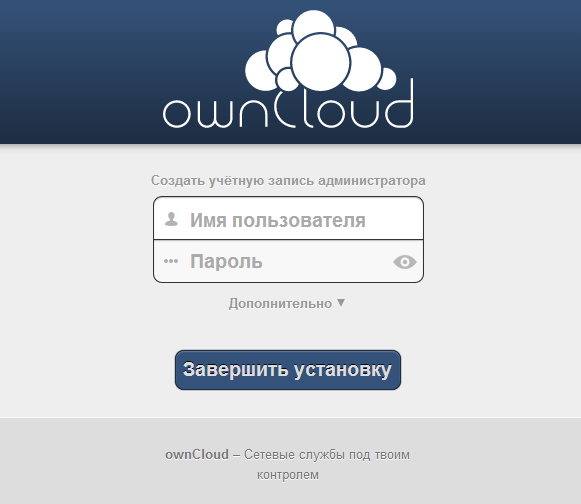
Let's start setting up a web interface. We need to come up with the username / password of the cloud administrator, assign the data directory we created above, as well as select the database. I usually prefer MySQL, but this time I decided to experiment with SQLite. In other matters, when choosing MySQL as a database, be prepared to enter the name of the database for your ownCloud, as well as the login and password of the MySQL user. If everything is ready, click “ Finish installation ”.
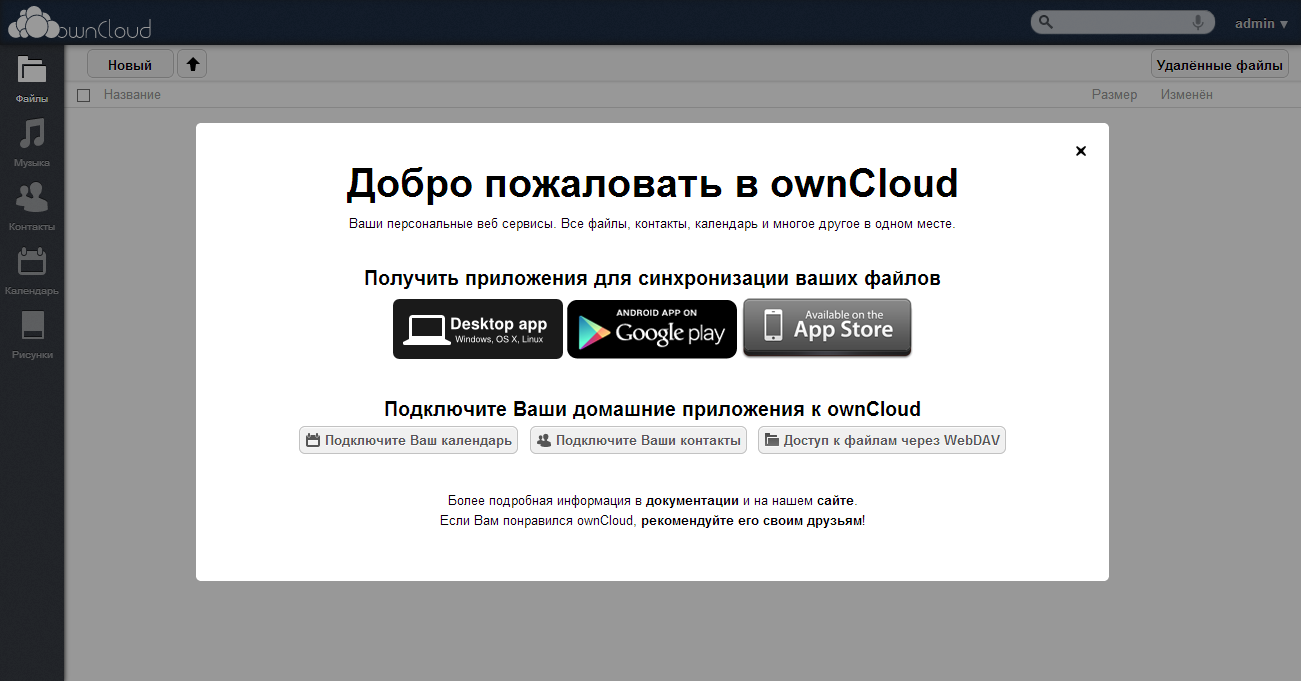
Hooray, it was worth it! It remains now to download the client for Windows, OS X, Linux , Android or iOS . Documentation is available here . However, this is not all. For successful work, we also need to add the apache2 daemon to the startup file of the chroot environment. To do this, edit the file /chroot-services.list :
(chroot-debian)/# mcedit /chroot-services.list And add to it a line with the name of the service:
apache2 Fine. It is worth recalling that ownCloud is nice, but it loads the device not bad! At least with me.
Install Inadyn
A cloud is good when it is visible not only in the home network, otherwise there’s not much use for it! In addressing this issue, I used the experience of a respected comrade phoenixweiss in his tutorial . However, I want to note one important point, so please first read the material on the link! It is necessary that inadyn starts when the chroot environment is started. In principle, it is not difficult to do this by registering it in Crontab with the reboot directive, so that it rises automatically when the system boots. However, installing the cron package and writing inadyn to it in this way, I got the understanding that the reboot directive does not work at all in chroot.
I thought Invented! Why reinvent the wheel, because we already have a very kosher method of autoloading important packages for us through /chroot-services.list . I decided to use it. However, in order for our package to start, the launching file for the package must have the location /etc/init.d/inadyn and respond to the parameters start / stop / restart / reload / status . It remains, however, to learn how to write Bash scripts, but that’s for me (the person who sees the Linux console live for the second time in my life) was not difficult, a couple of hours of googling and I gave birth to my first script:
Contents of the /etc/init.d/inadyn file
#!/bin/sh # case $1 in start) # # , PID if [ -z "$(pidof inadyn)" ]; then # PID , ! /usr/sbin/inadyn echo "[ \033[1;32mok\033[0m ] Starting DNS Server: inadyn." Else # ! echo "[ \033[1;31mfailure\033[0m ] Starting DNS Server: inadyn already running." fi ;; stop) # # , PID if [ -z "$(pidof inadyn)" ]; then # PID , echo "[ \033[1;31mfailure\033[0m ] Stoping DNS Server: inadin is not running." Else # . PID for pid in $(pidof inadyn) do kill -9 "$pid" done echo "[ \033[1;32mok\033[0m ] Stoping DNS Server: inadin." fi ;; restart|reload) # $0 stop sleep 3 $0 start ;; status) # # , if [ -z "$(pidof inadyn)" ]; then echo "[ \033[1;33minfo\033[0m ] Status DNS Server: inadin is not runned." else echo "[ \033[1;33minfo\033[0m ] Status DNS Server: inadin is runned." fi ;; *) echo "Usage: $0 {start|stop|restart|reload|status}" exit 1 ;; esac exit 0 Save this code in the /etc/init.d/inadyn file. Again, lazy without any problems can download the finished script by reference . Now we can add a line with the package name to the /chroot-services.list file and check by stopping and running the chroot environment. Excellent!

Installing the Transmission torrent client
Perhaps the best torrent client for MBL is Transmission. Let's install it faster:
(chroot-debian)/# sudo apt-get install transmission-daemon If the installation is successful, then at its end the transmission-daemon daemon will be launched. The following commands are used to control the daemon:
(chroot-debian)/# /etc/init.d/transmission-daemon start (chroot-debian)/# /etc/init.d/transmission-daemon stop (chroot-debian)/# /etc/init.d/transmission-daemon reload It's not difficult to understand what is needed for. It is also necessary to correct the transmission-daemon settings, which are located in the /etc/transmission-daemon/settings.json file. The file is in JSON format. You can set it up yourself, or you can download my configuration file by reference , after forwarding the links to the directories. The description of all directives can be found at the link . In my config, autocatch of .torrent files from the / mnt / Torrents / Init / directory is already configured and the torrent download starts automatically.
Also, in order for the transmission daemon to automatically start with the start of chroot, you need to add the line “transmission-daemon” to the /chroot-services.list file relative to the chroot directory root.
To check the result, we will restart the chroot environment. If everything went fine, we will see it:

To access the web-interface, go to http: // mybooklive: 9091 / transmission / web / . For detailed information, I suggest visiting the project site , and if someone is looking for where the gui will be pulled, then we’ll like it here !
Now our MBL is a bit cooler than a simple box with Linux on board. But that is not all!
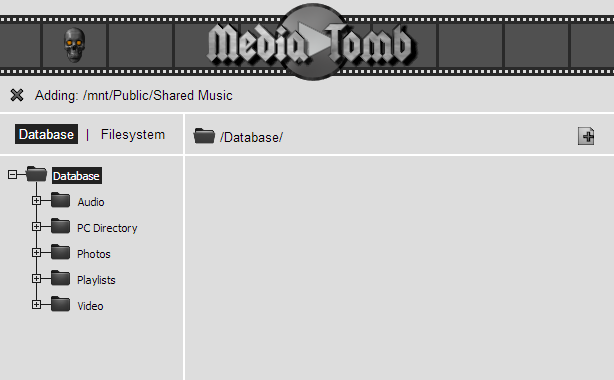
MediaTomb media server installation
Everyone, of course, decides for himself which media server to use, however Twonky is not enough for me personally! There was a choice between installing miniDLNA and MediaTomb. Made a choice in favor of the second.
First, we stop the Twonky server service on MBL. In principle, he should not harm us, but still, it is better to disable it as useless:
MyBookLive:~# /etc/init.d/twonky stop And also in the section Settings-> Media-> Twonky Service in the MBL web shell.

Next, switch to the chroot environment and launch the MediaTomb installation:
(chroot-debian)/# sudo apt-get install mediatomb The system should inform that many dependent packages will be installed, to which we agree. It would not be superfluous to also install the ffmpegthumbnailer and ffmpeg packages to display the tumblers:
(chroot-debian)/# sudo apt-get install ffmpegthumbnailer ffmpeg For Mediatomb to work correctly, however, I recommend setting the Russian locale, otherwise the Cyrillic file names in the system and the web interface will look like this: “ ????????????. Avi ”. To control the application, use the commands:
(chroot-debian)/# /etc/init.d/mediatomb start (chroot-debian)/# /etc/init.d/mediatomb stop (chroot-debian)/# /etc/init.d/mediatomb restart By analogy with Transmission, everything is easy. , /etc/mediatomb/config.xml . . , , 14- “ uuid:88be34d6-51bd-4cd4-a4a3-a663dd068969 ” ( – ). -, mkv . 91 :
<map from="mkv" to="video/x-mkv"/> <map from="mkv" to="video/x-msvideo"/> web- http://mybooklive:49152/ .
web- , ! -. mediatomb /chroot-services.list ( , transmission-daemon, mediatomb). chroot apache2, inadyn, transmission mediatomb – !
, , , . faq mediatomb , mediatomb ( 1 , 2 ). , DLNA ( ), , , .
Monitorix
Monitorix , , . , MBL , web- . , ? :
(chroot-debian)/# sudo apt-get install rrdtool librrds-perl libwww-perl libdbi-perl libemail-date-format-perl libmime-lite-perl libmime-types-perl libnet-daemon-perl libplrpc-perl nullmailer - , - – ! Monitorix:
(chroot-debian)/# sudo wget -P / http://www.monitorix.org/monitorix_3.3.0-izzy1_all.deb (chroot-debian)/# sudo dpkg -i /monitorix_3.3.0-izzy1_all.deb , :
(chroot-debian)/# sudo apt-get -f install (chroot-debian)/# sudo dpkg -i /monitorix_3.3.0-izzy1_all.deb , , /etc/apache2/conf.d/monitorix.conf :
<Directory /usr/share/monitorix/cgi-bin/> DirectoryIndex monitorix.cgi Options ExecCGI order deny,allow deny from all allow from all # IP-, web- </Directory> apache2 monitorix:
(chroot-debian)/# /etc/init.d/monitorix restart (chroot-debian)/# /etc/init.d/apache2 restart And we check the work of the package through the web interface http: // mybooklive: 81 / monitorix / .
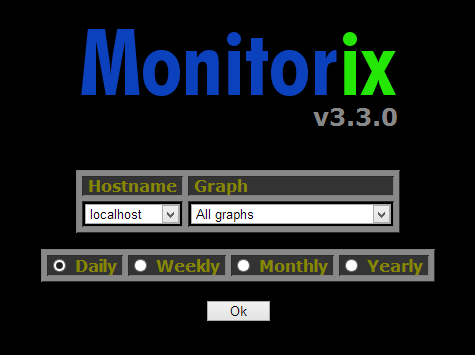
If everything is done correctly, then you will see, too, that on the screenshots above. It is also worth remembering that the program settings are in the /etc/monitorix.conf files . Armed with documentation from the project site, you can configure it yourself, or download my configuration file .
Conclusion
, % username %, , , . MBL , ! Chroot , , , ! . , !
useful links
- «WD My Book Live» — cmepthuk .
- 3 — OwnCloud phoenixweiss .
- WD MyBook Live — — ZimniY .
- DNLA- WD My Book Live — gorynych_zmey .
- NAS Western Digital My Book Live — ixbt.
- , WD MyBook Live — .
- Backup Images Of MyBook (MyBook Live At End Of Page) — .
- Debricking Script That Can Keep Data — .
- — , .
- reinstall scripts (updateFirmwareFromFile.sh, share-param.sh, etc.) — . , !
Source: https://habr.com/ru/post/196384/
All Articles