We are building a stand to prepare for the CCIE with the help of the IOU Web Interface
This article is devoted to creating your own virtual stand to prepare for the laboratory work of the CCIE RS.
As you know, preparing for the CCIE exam is a kind of feat in the networked world. For the successful delivery of the candidate must invest a lot of resources: time and money. In addition to paying for the exam itself, it is necessary to pay for study materials, pay for the trip, etc. One of the cost items is the organization of a training stand for preparation. Considering the popular INE topology from the workbook of the same name, it is clear that you need 9 routers and 4 switches. I will list the classical methods of implementation in descending order of value:
1. Buying a full stand home from old iron on ebay.
2. Rent a rack.
3. A mixture of virtual routers from GNS3 and real switches.
4. IOU.
')
About the pros and cons of each of the methods have already been written on Habré. Let's stop at the cheapest (which is beneficial if your employer does not pay you for training).
Before setting a task and starting it, it is worth mentioning that using an IOU is not legal if you are not a Cisco employee. Even for training.
The task of the article: to organize a training stand using the INE topology and web interface for IOU.


Such an operation must be done in a similar way with L3.


Useful links and materials used:
Site developer IOU Web Interface .
Personal blog of the creator of the INE topology under the IOU Web Interface. .
Useful FAQ on IOU .
Network configuration on CentOS .
As you know, preparing for the CCIE exam is a kind of feat in the networked world. For the successful delivery of the candidate must invest a lot of resources: time and money. In addition to paying for the exam itself, it is necessary to pay for study materials, pay for the trip, etc. One of the cost items is the organization of a training stand for preparation. Considering the popular INE topology from the workbook of the same name, it is clear that you need 9 routers and 4 switches. I will list the classical methods of implementation in descending order of value:
1. Buying a full stand home from old iron on ebay.
2. Rent a rack.
3. A mixture of virtual routers from GNS3 and real switches.
4. IOU.
')
About the pros and cons of each of the methods have already been written on Habré. Let's stop at the cheapest (which is beneficial if your employer does not pay you for training).
Before setting a task and starting it, it is worth mentioning that using an IOU is not legal if you are not a Cisco employee. Even for training.
The task of the article: to organize a training stand using the INE topology and web interface for IOU.
We put the virtual machine
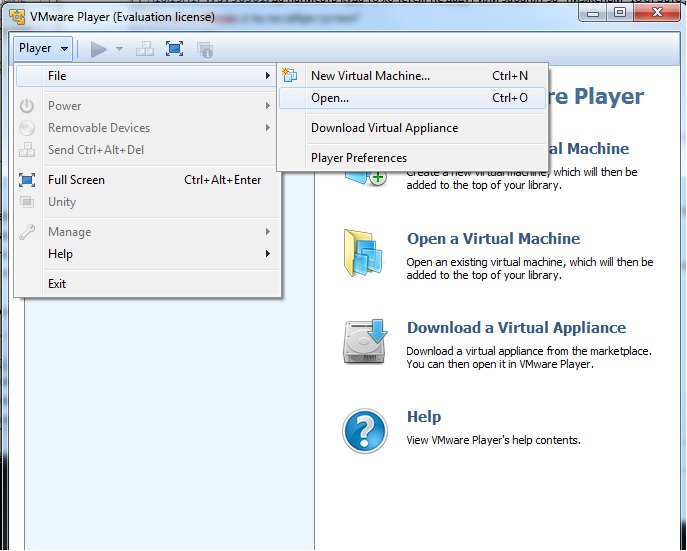
- First we need the vmware player to install our virtual machine. You can download from the site vmware here . Workstation or vsphere will also work.
- After installing the vmware player, you need to download the WEB-IOU virtual machine, which the developer posted here .
- Unpack the archive.
- Using the Player, open the ovf file from the unpacked archive.
- Click Import and agree to the license.
- Now we need to increase the amount of RAM in our virtual machine. The default is 1GB. For the INE stand of thirteen devices, 4GB is needed. This is done in the settings of the imported virtual machine.
- We start a virtualka. As seen in the boot screen, Centos 6.4 greets us.
- Upon request, we invent and enter a password for the root user and network settings that can be entered now. We will do this in the next steps.
- Log in. Login: root Password from the last item.
- Configure the network. In the file / etc / sysconfig / network-scripts / ifcfg-eth0 we prescribe:
BOOTPROTO = "none" (it was by default dhcp)
IPADDR = 192.168.33.200
NETMASK = 255.255.255.0
GATEWAY = 192.168.33.1
We select the address from the local subnet of our computer.
Restart network service: /etc/init.d/network restart - Now using the browser, you can go to our web interface. Enter in the browser line 192.168.33.200
Add IOU images.
- We need two ways to work. L2 and L3. The author of the topology used:
L2 - i86bi_linux_l2-ipbasek9-ms.jan24-2013-B
L3 - i86bi_linux-adventerprisek9-ms.152-4.M1
Images are added to the Manage-> Manage IOSes tab.
Filename is the name of the image file. For example, i86bi_linux_l2-ipbasek9-ms.jan24-2013-B.
Alias - Specify a short name for convenience. For example L2 15. - Select IOU from the hard disk on our computer (not on the virtual machine) and click the “upload” button. A successfully imported image should appear at the bottom of the screen.
Such an operation must be done in a similar way with L3.
- Download the download script. Using the convenient winscp utility, we copy the script on the virtual machine to the / opt / iou / bin folder with SSH.
Further:
[root @ iou bin] # cd / opt / iou / bin
[root @ iou bin] #chmod 0755 CiscoIOUKeygen.py set permissions on the script
[root @ iou bin] # ./CiscoIOUKeygen.py run
We get the output of the form:Cisco IOU License Generator - Kal 2011, python port of 2006 C version
hostid = 007f0200, hostname = iou.example.com, ioukey = 7f07d4
Add the following text to ~ / .iourc:
[license]
iou.example.com = 145ef75ad4ea0ebd;
Selected bold paste into the file iourc.
[root @ iou bin] # vi iourc - Since IOU sends some information about its launch to xml.cisco.com, we will save Cisco Systems from unnecessary spam.
[root @ iou bin] # echo '127.42.42.42 xml.cisco.com' >> / etc / hosts
Import the INE topology.
- Download the archive here .
- On the manage-> import labs tab we pop up the archive (do not unpack!).
- Now on the main page we are available laboratory work INE RS Rack. Click the Edit button on the right and add IOU images to the topology in the IOS field. Here you can also change the startup config on devices .:
- On the Devices tab, click the "start all devices" button. Green color on the devices will show us that everything went well.
- Hooray!!! Now you can access all devices using Putty.
Useful links and materials used:
Site developer IOU Web Interface .
Personal blog of the creator of the INE topology under the IOU Web Interface. .
Useful FAQ on IOU .
Network configuration on CentOS .
Source: https://habr.com/ru/post/196228/
All Articles