10 rules for preparing a model for 3D printing
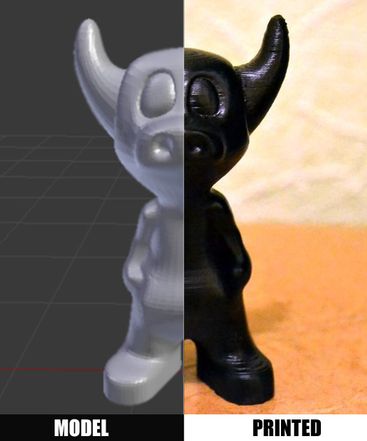
I downloaded the model, printed it out, use it - what could be easier!? But, if we talk about FDM 3D printers, then not every model can be printed, and almost every model (not prepared for 3D printing) has to be prepared, and for this you need to be aware of how this 3D printing works.
First, a couple of definitions:
Slicer is a program for translating a 3D model into a control code for a 3D printer. (There are plenty to choose from: Kisslacer, Slic3r, Skineforge, etc.). It is necessary because the printer will not be able to eat immediately the 3D model (at least not the printer in question).
Slicing (slice) - the process of translating a 3D model into control code.
')
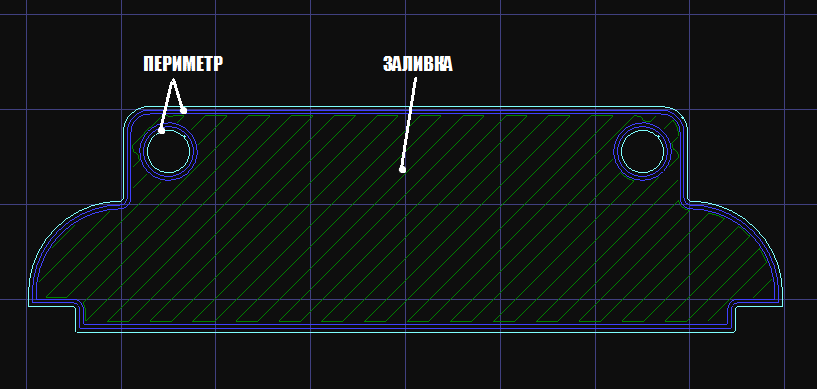
The model is cut (slips) in layers. Each layer consists of a perimeter and / or fill. A model may have different percentages of fill filling, and there may be no fill (hollow model).
On each layer, displacements occur along the XY axes with the application of plastic melt. After printing one layer, the Z axis moves to a layer above, the next layer is printed, and so on.
1. Grid
Intersecting faces and edges can lead to funny slice artifacts. Therefore, if the model consists of several objects, then they must be reduced to one.

But I must say that not all slicers are sensitive to the grid (for example, Slic3er).
And even if the grid is crooked, it’s too lazy to correct it with your own hands, that is, a wonderful free cloud service loud.nettfab.com , which will help in most cases.
2. Flat base
Desirable, but not mandatory rule. A flat base will help the model better stay on the printer table. If the model comes off (this process is called delamination), then the geometry of the model's base will break, and this may lead to a shift of the XY coordinates, which is even worse.

If the model does not have a flat base or the base area is small, then it is printed on a raft - a printed substrate. Raft spoils the surface of the model with which it is in contact. Therefore, if possible, it is better to do without it.
3. Wall thickness
The walls must be equal or thicker than the diameter of the nozzle. Otherwise, the printer simply cannot print them. Wall thickness depends on how many perimeters will be printed. So with 3 perimeters and a nozzle of 0.5mm, the wall thickness should be from 0.5, 1, 1.5, 2, 2.5, 3mm, and there can be more than that. Ie the wall thickness should be a multiple of the diameter of the nozzle if it is less than N * d, where N is the number of perimeters, d is the diameter of the nozzle.
4. Minimum overhanging elements
For each overhanging element, a supporting structure is needed - support. The smaller the overhanging elements, the less supports you need, the less you need to spend material and printing time on them and the cheaper it will be to print.
In addition, the support spoils the surface in contact with it.
Allowed to print without the support of the walls, which have a slope of no more than 70 degrees.

5. Accuracy
Accuracy in XY axes depends on the backlash, rigidity of the structure, belts, in general, on the mechanics of the printer. And is about 0.3 mm for hobby printers.
Accuracy along the Z axis is determined by the height of the layer (0.1-0.4 mm). From here and the height of the model will be a multiple of the layer height.
It is also necessary to take into account that after cooling the material shrinks, and with it the geometry of the object changes.
There is also the software side of the problem - not every slicer correctly processes the internal dimensions, so it is better to increase the diameter of the holes by 0.1-0.2 mm.
6. Small parts
Small details are quite difficult to reproduce on an FDM printer. They generally can not be reproduced if they are smaller than the diameter of the nozzle. In addition, when processing the surface, small details will become less noticeable or disappear altogether.
7. Bottlenecks
Bottlenecks are very difficult to handle. If possible, avoid such places that require treatment, which is impossible to get with a skin or a microdrill. Of course, it is possible to treat the surface in a bath with a solvent, but then small elements will melt.

8. Big models
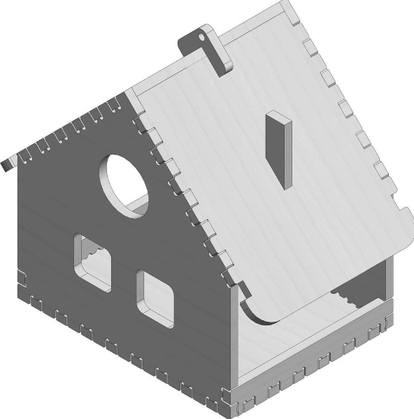
When modeling it is necessary to consider the maximum possible print dimensions. If the model is larger than these dimensions, then it must be cut to be printed in parts. And since these parts will be glued together, it would be nice to immediately provide for connections, for example, “dovetail”.
9. Location on the desktop
How to place the model on the desktop depends on its strength.
The load must be distributed across the printing layers, not along. Otherwise, the layers may disperse, because adhesion between the layers is not 100%.
To be clear, take a look at the two L-shaped models. Lines show the layers of print.

The strength of the printed part depends on how the force is applied to the layers. In this case, for the right “G”, a small force will be enough to break it.
10. File format
Slicers work with the STL file format. Therefore, you need to save the model for printing in this format. Almost any 3D editor can export to this format on its own or using plug-ins.
PS:
Now you know the subtleties of modeling for FDM 3D printing and, I hope, they will be useful to you. Successful 3D modeling!
Source: https://habr.com/ru/post/196182/
All Articles