We write a game development framework - Mechanic Framework
Good afternoon, residents of Habr!
Today we will write a framework called Mechanic Framework for convenient development of games for android.

')
To begin, create a project.
File - New - Other - Android Application Project
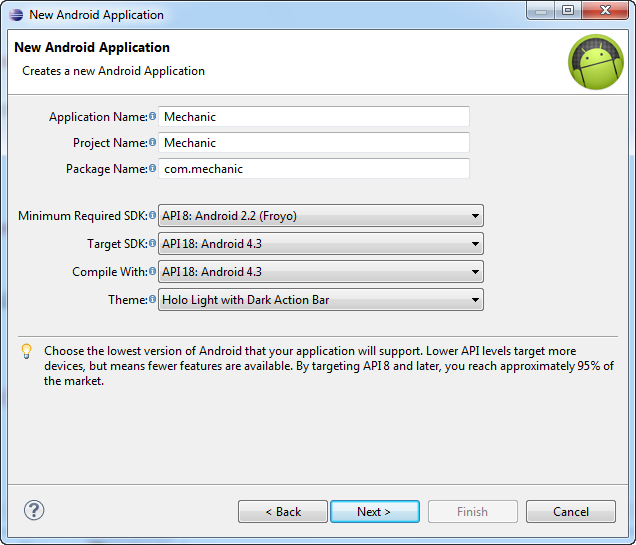
A new Android Application window appears. Enter any name (for example, Mechanic), call the package by its name, select the minimum possible version of the android for the application and the target version, click Next.
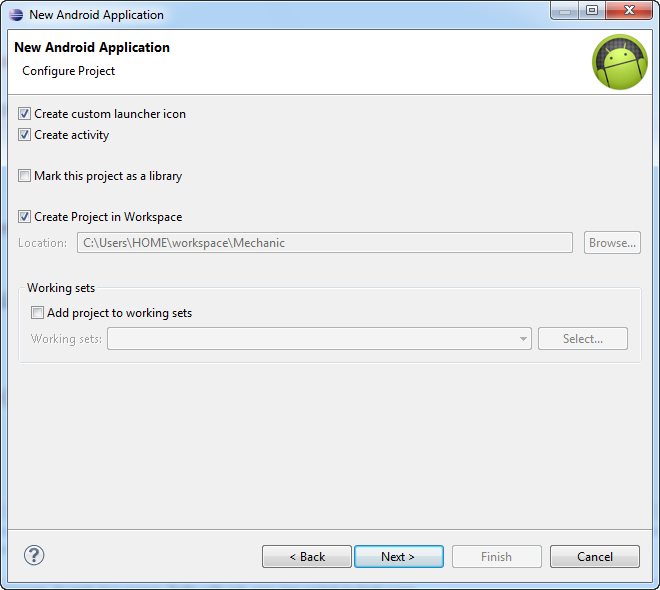
Click Next.
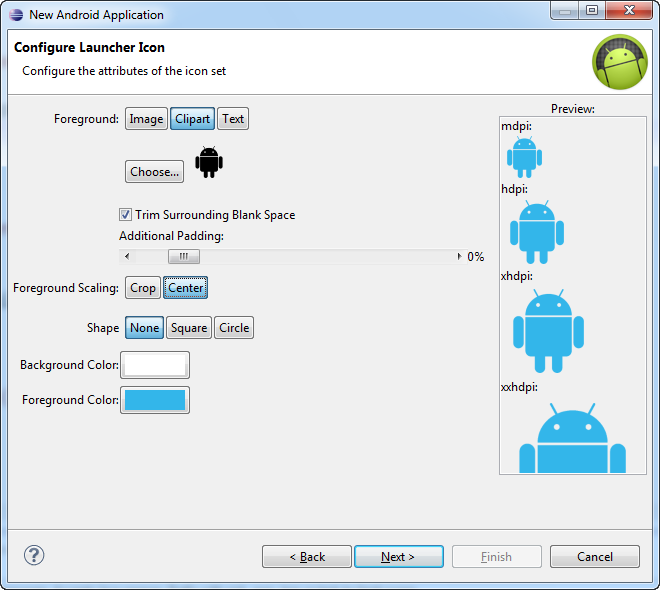
Choose an icon (if you don’t like the android icon, click Clipart - Choose and choose something, or put your icon).

Click Next.
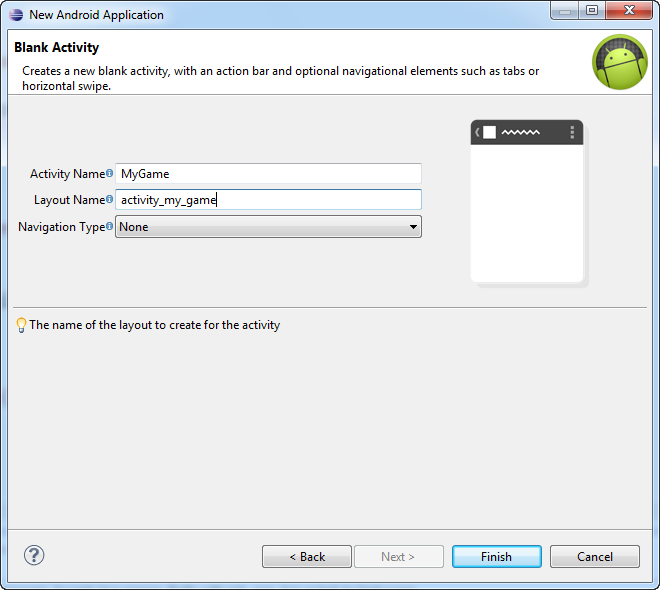
Choose a name for the Activity, for example, MyGame, click Finish.
A .xml visual editing window will open, close it.
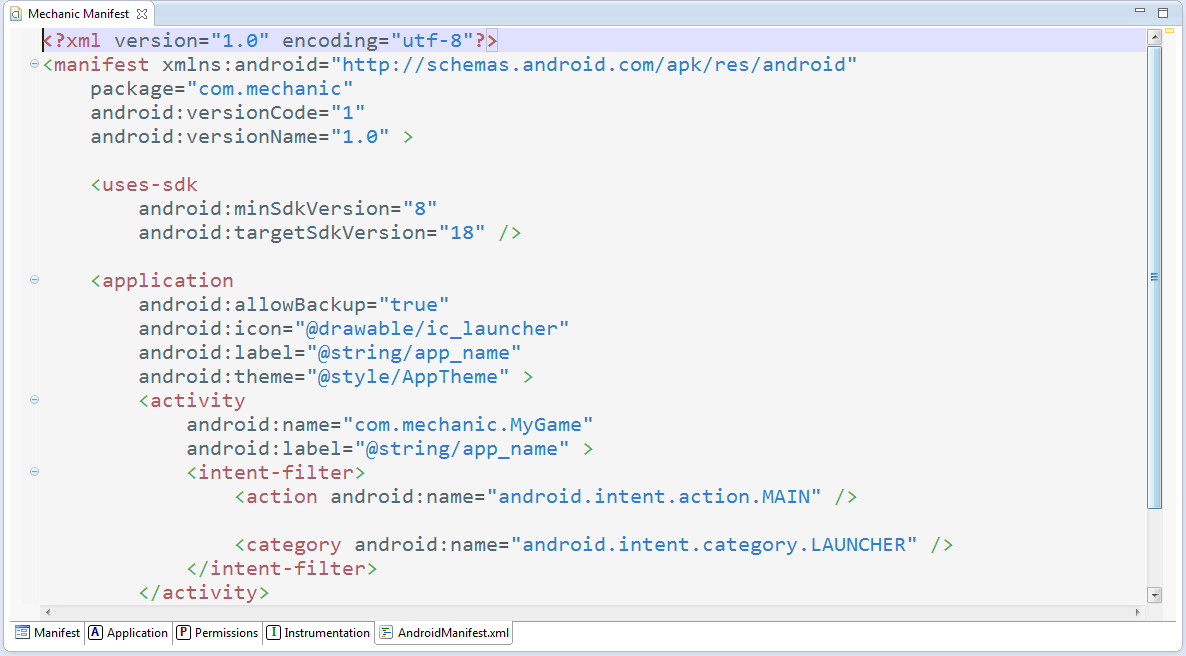
Open AndroidManifest.xml and customize it to your needs.
In order to install the game on the memory card, when it is possible, and not to pollute the internal memory of the device, in the field manifest we write
In order for the application to be available for debugging, we write in the application field
In order for the application to be fixed in portrait or landscape mode (in this case, landscape mode), in the activity field we write
In order for the application on the emulator to handle keyboard actions, we write in the same field
When you download an application from Google Play, you notice that applications require access to a memory card / to the Internet and other things, so, in order to gain control over the memory card and prevent the screen from locking when idle, we write
The manifesto will look like this
Close the manifest
Now you need to create a framework framework - interfaces that control the input, drawing graphics and other things, and later implement all the interfaces.
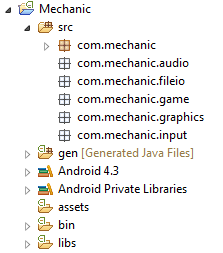
Create a new package called com.mechanic.input
Create the Input interface in this package, and bring it to this form.
GetKeyDown is a boolean value, takes the key code and returns true if the button is pressed
GetTouchDown is a boolean value, returns true if the screen is pressed, and this function takes the number of the finger that pressed the screen. Older android versions do not support Multitouch.
GetTouchX - returns the x-coordinate of the pressed key
GetTouchY - returns the Y-coordinate of the pressed key
Both of the latter functions take a finger number.
GetAccelX, GetAccelY, GetAccelZ - returns the acceleration at any coordinate of the accelerometer. When we hold the phone in portrait mode vertically upwards, the acceleration along the Y axis will be 9.6 m / s2, along the X and Z axes 0 m / s2.
Notice MechanicKeyEvent and MechanicTouchEvent
The first class stores key event information. Type will always be either KEY_DOWN or KEY_UP. KeyCode and KeyChar store the value of the key in the numeric and character types, respectively.
In the second class X and Y are the coordinates of the finger pressing the screen, Pointer is the number of the finger. TOUCH_DRAGGED means moving a finger.
It is worth being distracted and talking about how the Input interface is adjusted.
Accelerometer, keyboard and screen clicks are not answered by the class that implements Input, but by those classes that will implement Accelerometer, Keyboard and Touch interfaces, respectively. Input will simply store instances of these classes. If you are familiar with the design patterns, you should know that this is how the simple “Facade” pattern is realized.
Here are these interfaces
It is not hard to guess that Input simply redirects methods to other classes, and those work honestly and post the results.
It's time to work with files. Our interface will be called FileIO, since the File class already exists.
Create a new package com.mechanic.fileio and a new interface in it.
Usually we store all the pictures, sounds and other files in the assets folder of the project. The first function opens a file with the specified name from assets, allowing you to avoid unnecessary trouble with AssetsManager. The last 2 functions are needed, for example, to save records. When we save data, we write a text file with information in the device storage, and then we read it. Just in case, try to think of a file name more original than “file.txt”, for example, “.mechanicsave” - this is also possible.
Create package com.mechanic.audio and new Audio interface
We have 2 options for storing and playing sound. The first option is the usual one, when we load the sound and play it, but in most cases this approach is suitable for small sounds like shots and explosions, and for large sound files like background music, it is meaningless to completely load the sound, so we use streaming sound , dynamically loading sounds and playing them. For the first and second options are responsible, respectively, interfaces Sound and Music. Here are their definitions.
Create a package com.mechanic.graphics
Graphics is mainly responsible for graphics.
Here is his definition
ImageFormat is an enumeration that makes it easier to choose how to load an image Actually, it does not do anything special, but the enumeration where the format should be transferred has a bunch of unnecessary methods and an unnecessary name Config, so let it be so.
NewImage returns a new image, we will save it in a variable and draw
Methods with the names Draw ... speak for themselves, and the first method DrawImage draws only part of the image, and the second - the image completely.
GetWidth and GetHeight return the size of the "canvas", where we draw pictures
There is another interface - for images
Everything is quite eloquent.
Create package com.mechanic.game
The last but one important interface remained that will support the work of the entire application - Game
We just shove the interfaces there - the topics of the past chapters.
But what is a screen?
Let me take a break. Almost every game consists of several “states” - the main menu, settings menu, highscores screen, all levels, etc. etc. It is not surprising that the support of at least 5 states can plunge us into the depths of the code. The abstract Screen class saves us
Each successor to Screen (MainMenuScreen, SettingsScreen) is responsible for such a “state”. He has several features.
Update - update
Present - display graphics (introduced for convenience, in fact, this function is called the same as the previous one)
Pause - called every time the game is paused (screen block)
Resume - continuation of the game after a pause
Dispose - the release of all resources, for example, downloaded images
It is worth telling a little about deltaTime, transferred in 2 functions.
More sophisticated game developers know the problem when the speed of the game (say, player movement) depends directly on the speed of the device, i.e. if we increase the variable x by 1 each cycle, then there will never be such that the game works the same on a netbook and on a computer with a huge RAM.
Thus, the Tru option:
Not a trump option:
There is one elementary error - very often, increasing x by 1.0f * deltaTime, it is not always possible to notice that adding an integer with a non-integer from 0 to 1 does not give any result, x should be float
How are we going to change screens? Return to the Game interface.
The SetScreen function is responsible for everything. There are also functions for getting the current and start screen.
It is time to realize this entire collection!
You noticed that in the Input interface there are functions GetKeyEvents and GetTouchEvents, which return a list of events, that is, on the occasion of an event, the program creates a set of objects, which then cleans the garbage collector. Tell me, what is the main reason for the application brakes for android? That's right - it's overloading the garbage collector! We need to somehow control the problem. Before continuing, let's create the Pool class, implement object pooling, the method proposed in Mario Zechner’s excellent book, “Game programming for Android”.
Its meaning is that we do not allow the garbage collector to interfere with the application and do not waste the necessary resources
Suppose we have a pool pool object. That's how we use it
Pool announcement
Saving an event to the pool
Get the event from the pool. If the list is empty, then it is not scary, because after using the event, we will put it back into the pool until the next call.
Very good thing!
MechanicAccelerometer
In addition to Accelerometer, this class also implements a SensorEventListener - it is needed to gain control not only over the accelerometer, but also over other toys - a compass, a flashlight, something else. So far we are only doing an accelerometer.
In the constructor, we get the sensor manager and check if there is access to the accelerometer. In general, theoretically, accelerometers can be not 1, but several (this is a List, and not one object), in practice it is always one. If the number of accelerometers is greater than 0, we get the first one and register it, exposing this class as a listener. OnAccuracyChanged is needed, if the accuracy of the sensor is lost, we do not use it. onSensorChanged is always called, when the accelerometer value changes, this is where we take readings.
MechanicTouch
In addition to Touch, we also implement OnTouchListener.
EnableMultiTouch is needed to determine if a device supports simultaneous pressing of multiple fingers. If VERSION.SDK is less than 5 (for some reason this variable is represented as a string), then it does not support.
MaxTouchers - the maximum number of fingers. There are 20 of them, maybe more or less.
In the onTouch function, we get the finger number and the action (press, tear, move), which we record in the event and add the event to the list.
In GetTouchEvents, we return a list of events, which we then clear. For the return of the list of events is responsible another list.
You may ask, what is ScaleX and ScaleY responsible for? This will be discussed later in the graphics section.
MechanicKeyboard
Create an array of 128 boolean variables that will hold information about 128 keys pressed or not pressed. We also create a pool of objects and 2 lists. Everything is simple
MechanicInput
We realize a pattern "Facade".
Now it's time to work with the files!
MechanicFileIO
We get an asset manager for removing files from the assets folder, it is used by the first function, and the second 2 functions take files from the device’s special folder on the android, where we write and read all the data about the game - records, settings, and so on. The path to this folder is taken in the constructor.
Now create sounds
MechanicSound
In MechanicAudio we use SoundPool to keep small sound effects. In MechanicSound, we pass in the sound effect number and the SoundPool object itself, from which we produce sound.
MechanicMusic
We put a sound file on a stream and play it.
IsPrepared shows if the sound is ready for the piece.
I recommend myself to understand this class.
We got to MechanicAudio
In the constructor, we make it possible to adjust the music with the device, take the asset manager, and create a SoundPool that can play no more than 20 sound effects at a time. I think in most games this is enough.
In Music creation, we pass a file handle to the MechanicMusic constructor, in Sound creation, we load the sound into soundPool and pass the pool itself and the sound number to the MechanicSound constructor, if something goes wrong, an exception is made.
Making a draftsman
MechanicImage
This class is an image holder. It does nothing special, introduced for convenience.
MechanicGraphics
Note!We do not create Paint and Rect objects every time we draw, as this is a crime against the garbage collector.
In the constructor, we take Bitmap, the buffer on which we will draw everything, it uses canvas.
By loading the image, we read the image from the assets, and then decode it into a Bitmap. An exception is thrown if the uploaded file is not a picture or if it does not exist, then the file is closed. Finally, we take the format of the image and return the new MechanicImage, passing Bitmap and ImageFormat to the constructor. Also noteworthy is the first method DrawImage, which draws a part of the picture. This is used when instead of individual images in the game, a group of images is used, called an atlas. Here is an example of such an atlas
(image taken from the web resource interesnoe.info)
Suppose we needed to draw a part of the picture from 32.32 to 48.48, at position 1.1; then we do it
The remaining methods are easily understood and do not represent interest.
It's time for the Game and Screen interfaces!
Before continuing, we need to draw graphics in a separate stream and not load a custom stream.
Meet the SurfaceView class, which offers drawing graphics in a separate thread. Create a runner class
The MechanicGame class will be soon, do not worry.
To draw graphics not in the user interface, we need a SurfaceHolder object. Its main functions are lockCanvas and unlockCanvasAndPost. The first function locks Surface and returns Canvas, on which you can draw something (in our case, the Bitmap buffer, which acts as a canvas).
In the Resume function, we launch a new thread with this class.
In the run function, while the application is running, the last gap from the last cycle is taken (System.nanoTime returns nanoseconds) and the Update and Present functions of the current Screen of the application are called, after which the buffer is drawn.
Here is the class MechanicGame
This class has Runner objects, all of our interfaces and classes, and a WakeLock object (needed to prevent the phone from falling asleep when the game is running).
It also has 2 constants - SCREEN_WIDTH and SCREEN_HEIGHT, which are very important!
Devices have a lot of permissions, and it’s almost impossible and pointless for each device to adjust the size of pictures, calculate location, etc. etc.Imagine that we have a window of 80x128 pixels (of the two constants mentioned above). We in this window draw small pictures. But suddenly the screen size of the device does not fit the size of this window. What to do? It's very simple - we take the ratio of the width and length of our window to the width and length of the device and draw all the pictures, taking into account this ratio.
As a result, the application itself stretches the images under the device screen.
This class includes an Activity and it has onCreate, onResume, and onPause methods.
In onCreate, the application first goes into full-screen mode (so that charging and time are not visible at the top). Then it turns out the orientation of the phone - landscape or portrait (which is already written in the .xml file at the beginning of the article). Then a long-awaited buffer is created with the size of this window of 80x128 pixels, the ratio of this window to the size of the device is determined, which is transferred to the MechanicInput constructor, which, in turn, transfers the relation to MechanicTouch. And then - bingo! The resulting touch points on the screen are multiplied by this ratio, so that the coordinates of the press do not depend on the size of the device.
Then we create our interfaces, register Runner and WakeLock.
In the SetScreen method, we release the current Screen and write another Screen.
The remaining methods of interest do not provide.
Is that all?
Yes, gentlemen, the framework is ready!
When it's done.
And how now to connect the framework with the main class, say, with MyGame?
The “main” class looks something like this.
We modify it to this class.
Java perceives this class as an heir from the Activity, since MechanicGame itself is an heir from the Activity. onCreate is already registered, and the only thing we need to do is to override GetStartScreen (), since this method returns null in MechanicGame, and this throws an error.
Don't forget to implement the GameScreen class :)
This is a simple example of the implementation of Screen, which loads the Wikipotent image and moves it by clicking on the screen.

(Image taken from the web resource ru.wikipedia.org)
Result

The variable x is represented as a float, since adding numbers from 0 to 1 yields nothing, rounding is in progress.
Wikipan is drawn with zoom, since the size of our canvas is 80x128 pixels
- My picture is incorrectly drawn - rotated 90 degrees!
- This is all because we gave the command in the xml file to work only in landscape mode. To switch the mode, press the key 7 on the right side of the keyboard
- I honestly change x + = 1.0f * deltaTime, but the picture does not move or slowly moves. What to do?
- The emulator is a very slow thing. Check the performance of the application on the device.
Have fun!
Sources:
rghost.ru/49052713
github.com/Izaron/MechanicFramework
Literature:
developer.alexanderklimov.ru/android
habrahabr.ru/post/109944
The book by Mario Zechner "Programming games for Android"
Today we will write a framework called Mechanic Framework for convenient development of games for android.
What we need:
- Installed Eclipse and Android SDK
- Decent knowledge of Java or another C-like language. The best example is C #
- Patience
')
To begin, create a project.
File - New - Other - Android Application Project
A new Android Application window appears. Enter any name (for example, Mechanic), call the package by its name, select the minimum possible version of the android for the application and the target version, click Next.
Click Next.
Choose an icon (if you don’t like the android icon, click Clipart - Choose and choose something, or put your icon).
Click Next.
Choose a name for the Activity, for example, MyGame, click Finish.
A .xml visual editing window will open, close it.
Open AndroidManifest.xml and customize it to your needs.
In order to install the game on the memory card, when it is possible, and not to pollute the internal memory of the device, in the field manifest we write
android:installLocation="preferExternal" In order for the application to be available for debugging, we write in the application field
android:debuggable="true" In order for the application to be fixed in portrait or landscape mode (in this case, landscape mode), in the activity field we write
android:screenOrientation="landscape" In order for the application on the emulator to handle keyboard actions, we write in the same field
android:configChanges="keyboard|keyboardHidden|orientation" When you download an application from Google Play, you notice that applications require access to a memory card / to the Internet and other things, so, in order to gain control over the memory card and prevent the screen from locking when idle, we write
<uses-permission android:name="android.permission.WRITE_EXTERNAL_STORAGE"/> <uses-permission android:name="android.permission.WAKE_LOCK"/> The manifesto will look like this
<?xml version="1.0" encoding="utf-8"?> <manifest xmlns:android="http://schemas.android.com/apk/res/android" package="com.frame" android:versionCode="1" android:versionName="1.0" android:installLocation="preferExternal"> <uses-sdk android:minSdkVersion="8" android:targetSdkVersion="18" /> <application android:allowBackup="true" android:icon="@drawable/ic_launcher" android:label="@string/app_name" android:theme="@style/AppTheme" android:debuggable="true" > <activity android:name="com.frame.MyGame" android:screenOrientation="landscape" android:configChanges="keyboard|keyboardHidden|orientation" android:label="@string/app_name" > <intent-filter> <action android:name="android.intent.action.MAIN" /> <category android:name="android.intent.category.LAUNCHER" /> </intent-filter> </activity> </application> <uses-permission android:name="android.permission.WRITE_EXTERNAL_STORAGE"/> <uses-permission android:name="android.permission.WAKE_LOCK"/> </manifest> Close the manifest
Now you need to create a framework framework - interfaces that control the input, drawing graphics and other things, and later implement all the interfaces.
Input
Create a new package called com.mechanic.input
Create the Input interface in this package, and bring it to this form.
public interface Input { public static class MechanicKeyEvent { public static final int KEY_DOWN = 0, KEY_UP = 1; public int Type; public int KeyCode; public char KeyChar; } public static class MechanicTouchEvent { public static final int TOUCH_DOWN = 0, TOUCH_UP = 1, TOUCH_DRAGGED = 2; public int Type; public int X, Y; public int Pointer; } public boolean IsKeyPressed(int KeyCode); public boolean IsKeyPressed(char KeyChar); public boolean IsTouchDown(int pointer); public int GetTouchX(int pointer); public int GetTouchY(int pointer); public float GetAccelX(); public float GetAccelY(); public float GetAccelZ(); public List<MechanicTouchEvent> GetTouchEvents(); public List<MechanicKeyEvent> GetKeyEvents(); } GetKeyDown is a boolean value, takes the key code and returns true if the button is pressed
GetTouchDown is a boolean value, returns true if the screen is pressed, and this function takes the number of the finger that pressed the screen. Older android versions do not support Multitouch.
GetTouchX - returns the x-coordinate of the pressed key
GetTouchY - returns the Y-coordinate of the pressed key
Both of the latter functions take a finger number.
GetAccelX, GetAccelY, GetAccelZ - returns the acceleration at any coordinate of the accelerometer. When we hold the phone in portrait mode vertically upwards, the acceleration along the Y axis will be 9.6 m / s2, along the X and Z axes 0 m / s2.
Notice MechanicKeyEvent and MechanicTouchEvent
The first class stores key event information. Type will always be either KEY_DOWN or KEY_UP. KeyCode and KeyChar store the value of the key in the numeric and character types, respectively.
In the second class X and Y are the coordinates of the finger pressing the screen, Pointer is the number of the finger. TOUCH_DRAGGED means moving a finger.
It is worth being distracted and talking about how the Input interface is adjusted.
Accelerometer, keyboard and screen clicks are not answered by the class that implements Input, but by those classes that will implement Accelerometer, Keyboard and Touch interfaces, respectively. Input will simply store instances of these classes. If you are familiar with the design patterns, you should know that this is how the simple “Facade” pattern is realized.
Here are these interfaces
public interface Accelerometer extends SensorEventListener { public float GetAccelX(); public float GetAccelY(); public float GetAccelZ(); } public interface Keyboard extends OnKeyListener { public boolean IsKeyPressed(int keyCode); public List<KeyEvent> GetKeyEvents(); } public interface Touch extends OnTouchListener { public boolean IsTouchDown(int pointer); public int GetTouchX(int pointer); public int GetTouchY(int pointer); public List<TouchEvent> GetTouchEvents(); } It is not hard to guess that Input simply redirects methods to other classes, and those work honestly and post the results.
Files
It's time to work with files. Our interface will be called FileIO, since the File class already exists.
Create a new package com.mechanic.fileio and a new interface in it.
public interface FileIO { public InputStream ReadAsset(String name) throws IOException; public InputStream ReadFile(String name) throws IOException; public OutputStream WriteFile(String name) throws IOException; } Usually we store all the pictures, sounds and other files in the assets folder of the project. The first function opens a file with the specified name from assets, allowing you to avoid unnecessary trouble with AssetsManager. The last 2 functions are needed, for example, to save records. When we save data, we write a text file with information in the device storage, and then we read it. Just in case, try to think of a file name more original than “file.txt”, for example, “.mechanicsave” - this is also possible.
Sounds
Create package com.mechanic.audio and new Audio interface
public interface Audio { public Music NewMusic(String name); public Sound NewSound(String name); } We have 2 options for storing and playing sound. The first option is the usual one, when we load the sound and play it, but in most cases this approach is suitable for small sounds like shots and explosions, and for large sound files like background music, it is meaningless to completely load the sound, so we use streaming sound , dynamically loading sounds and playing them. For the first and second options are responsible, respectively, interfaces Sound and Music. Here are their definitions.
public interface Sound { public void Play(float volume); public void Close(); } public interface Music extends OnCompletionListener { public void Close(); public boolean IsLooping(); public boolean IsPlaying(); public boolean IsStopped(); public void Play(); public void SetLooping(boolean loop); public void SetVolume(float volume); public void Stop(); } Graphics
Create a package com.mechanic.graphics
Graphics is mainly responsible for graphics.
Here is his definition
public interface Graphics { public static enum ImageFormat { ARGB_8888, ARGB_4444, RGB_565 } public Image NewImage(String fileName); public void Clear(int color); public void DrawPixel(int x, int y, int color); public void DrawLine(int x, int y, int x2, int y2, int color); public void DrawRect(int x, int y, int width, int height, int color); public void DrawImage(Image image, int x, int y, int srcX, int srcY, int srcWidth, int srcHeight); public void DrawImage(Image image, int x, int y); public int GetWidth(); public int GetHeight(); } ImageFormat is an enumeration that makes it easier to choose how to load an image Actually, it does not do anything special, but the enumeration where the format should be transferred has a bunch of unnecessary methods and an unnecessary name Config, so let it be so.
NewImage returns a new image, we will save it in a variable and draw
Methods with the names Draw ... speak for themselves, and the first method DrawImage draws only part of the image, and the second - the image completely.
GetWidth and GetHeight return the size of the "canvas", where we draw pictures
There is another interface - for images
public interface Image { public int GetWidth(); public int GetHeight(); public ImageFormat GetFormat(); public void Dispose(); } Everything is quite eloquent.
Centralized game control
Create package com.mechanic.game
The last but one important interface remained that will support the work of the entire application - Game
public interface Game { public Input GetInput(); public FileIO GetFileIO(); public Graphics GetGraphics(); public Audio GetAudio(); public void SetScreen(Screen screen); public Screen GetCurrentScreen(); public Screen GetStartScreen(); } We just shove the interfaces there - the topics of the past chapters.
But what is a screen?
Let me take a break. Almost every game consists of several “states” - the main menu, settings menu, highscores screen, all levels, etc. etc. It is not surprising that the support of at least 5 states can plunge us into the depths of the code. The abstract Screen class saves us
public abstract class Screen { protected final Game game; public Screen(Game game) { this.game = game; } public abstract void Update(float deltaTime); public abstract void Present(float deltaTime); public abstract void Pause(); public abstract void Resume(); public abstract void Dispose(); } Each successor to Screen (MainMenuScreen, SettingsScreen) is responsible for such a “state”. He has several features.
Update - update
Present - display graphics (introduced for convenience, in fact, this function is called the same as the previous one)
Pause - called every time the game is paused (screen block)
Resume - continuation of the game after a pause
Dispose - the release of all resources, for example, downloaded images
It is worth telling a little about deltaTime, transferred in 2 functions.
More sophisticated game developers know the problem when the speed of the game (say, player movement) depends directly on the speed of the device, i.e. if we increase the variable x by 1 each cycle, then there will never be such that the game works the same on a netbook and on a computer with a huge RAM.
Thus, the Tru option:
@Override public void Update(float deltaTime) { x += 150 * deltaTime; } Not a trump option:
@Override public void Update(float deltaTime) { x += 150; } There is one elementary error - very often, increasing x by 1.0f * deltaTime, it is not always possible to notice that adding an integer with a non-integer from 0 to 1 does not give any result, x should be float
How are we going to change screens? Return to the Game interface.
The SetScreen function is responsible for everything. There are also functions for getting the current and start screen.
It is time to realize this entire collection!
Start by typing
You noticed that in the Input interface there are functions GetKeyEvents and GetTouchEvents, which return a list of events, that is, on the occasion of an event, the program creates a set of objects, which then cleans the garbage collector. Tell me, what is the main reason for the application brakes for android? That's right - it's overloading the garbage collector! We need to somehow control the problem. Before continuing, let's create the Pool class, implement object pooling, the method proposed in Mario Zechner’s excellent book, “Game programming for Android”.
Its meaning is that we do not allow the garbage collector to interfere with the application and do not waste the necessary resources
public class Pool<T> { public interface PoolFactory<T> { public T Create(); } private final List<T> Objects; private final PoolFactory<T> Factory; private final int MaxSize; public Pool(PoolFactory<T> Factory, int MaxSize) { this.Factory = Factory; this.MaxSize = MaxSize; Objects = new ArrayList<T>(MaxSize); } public T NewObject() { T obj = null; if (Objects.size() == 0) obj = Factory.Create(); else obj = Objects.remove(Objects.size() - 1); return obj; } public void Free(T object) { if (Objects.size() < MaxSize) Objects.add(object); } } Suppose we have a pool pool object. That's how we use it
PoolFactory<MechanicTouchEvent> factory = new PoolFactory<MechanicTouchEvent>() { @Override public MechanicTouchEvent Create() { return new MechanicTouchEvent(); } }; TouchEventPool = new Pool<MechanicTouchEvent>(factory, 100); Pool announcement
TouchEventPool.Free(event); Saving an event to the pool
event = TouchEventPool.NewObject(); Get the event from the pool. If the list is empty, then it is not scary, because after using the event, we will put it back into the pool until the next call.
Very good thing!
MechanicAccelerometer
package com.mechanic.input; import android.content.Context; import android.hardware.Sensor; import android.hardware.SensorEvent; import android.hardware.SensorManager; public class MechanicAccelerometer implements Accelerometer { float accelX, accelY, accelZ; public MechanicAccelerometer(Context context) { SensorManager manager = (SensorManager) context.getSystemService(Context.SENSOR_SERVICE); if(manager.getSensorList(Sensor.TYPE_ACCELEROMETER).size() > 0) { Sensor accelerometer = manager.getSensorList(Sensor.TYPE_ACCELEROMETER).get(0); manager.registerListener(this, accelerometer, SensorManager.SENSOR_DELAY_GAME); } } @Override public void onAccuracyChanged(Sensor sensor, int accuracy) { } @Override public void onSensorChanged(SensorEvent event) { accelX = event.values[0]; accelY = event.values[1]; accelZ = event.values[2]; } @Override public float GetAccelX() { return accelX; } @Override public float GetAccelY() { return accelY; } @Override public float GetAccelZ() { return accelZ; } } In addition to Accelerometer, this class also implements a SensorEventListener - it is needed to gain control not only over the accelerometer, but also over other toys - a compass, a flashlight, something else. So far we are only doing an accelerometer.
In the constructor, we get the sensor manager and check if there is access to the accelerometer. In general, theoretically, accelerometers can be not 1, but several (this is a List, and not one object), in practice it is always one. If the number of accelerometers is greater than 0, we get the first one and register it, exposing this class as a listener. OnAccuracyChanged is needed, if the accuracy of the sensor is lost, we do not use it. onSensorChanged is always called, when the accelerometer value changes, this is where we take readings.
MechanicTouch
package com.mechanic.input; import java.util.ArrayList; import java.util.List; import com.mechanic.input.Input.MechanicTouchEvent; import com.mechanic.input.Pool.PoolFactory; import android.os.Build.VERSION; import android.view.MotionEvent; import android.view.View; public class MechanicTouch implements Touch { boolean EnableMultiTouch; final int MaxTouchers = 20; boolean[] IsTouched = new boolean[MaxTouchers]; int[] TouchX = new int[MaxTouchers]; int[] TouchY = new int[MaxTouchers]; Pool<MechanicTouchEvent> TouchEventPool; List<MechanicTouchEvent> TouchEvents = new ArrayList<MechanicTouchEvent>(); List<MechanicTouchEvent> TouchEventsBuffer = new ArrayList<MechanicTouchEvent>(); float ScaleX; float ScaleY; public MechanicTouch(View view, float scaleX, float scaleY) { if(Integer.parseInt(VERSION.SDK) < 5) EnableMultiTouch = false; else EnableMultiTouch = true; PoolFactory<MechanicTouchEvent> factory = new PoolFactory<MechanicTouchEvent>() { @Override public MechanicTouchEvent Create() { return new MechanicTouchEvent(); } }; TouchEventPool = new Pool<MechanicTouchEvent>(factory, 100); view.setOnTouchListener(this); this.ScaleX = scaleX; this.ScaleY = scaleY; } @Override public boolean onTouch(View v, MotionEvent event) { synchronized (this) { int action = event.getAction() & MotionEvent.ACTION_MASK; @SuppressWarnings("deprecation") int pointerIndex = (event.getAction() & MotionEvent.ACTION_POINTER_ID_MASK) >> MotionEvent.ACTION_POINTER_ID_SHIFT; int pointerId = event.getPointerId(pointerIndex); MechanicTouchEvent TouchEvent; switch (action) { case MotionEvent.ACTION_DOWN: case MotionEvent.ACTION_POINTER_DOWN: TouchEvent = TouchEventPool.NewObject(); TouchEvent.Type = MechanicTouchEvent.TOUCH_DOWN; TouchEvent.Pointer = pointerId; TouchEvent.X = TouchX[pointerId] = (int)(event.getX(pointerIndex) * ScaleX); TouchEvent.Y = TouchY[pointerId] = (int)(event.getY(pointerIndex) * ScaleY); IsTouched[pointerId] = true; TouchEventsBuffer.add(TouchEvent); break; case MotionEvent.ACTION_UP: case MotionEvent.ACTION_POINTER_UP: case MotionEvent.ACTION_CANCEL: TouchEvent = TouchEventPool.NewObject(); TouchEvent.Type = MechanicTouchEvent.TOUCH_UP; TouchEvent.Pointer = pointerId; TouchEvent.X = TouchX[pointerId] = (int)(event.getX(pointerIndex) * ScaleX); TouchEvent.Y = TouchY[pointerId] = (int)(event.getY(pointerIndex) * ScaleY); IsTouched[pointerId] = false; TouchEventsBuffer.add(TouchEvent); break; case MotionEvent.ACTION_MOVE: int pointerCount = event.getPointerCount(); for (int i = 0; i < pointerCount; i++) { pointerIndex = i; pointerId = event.getPointerId(pointerIndex); TouchEvent = TouchEventPool.NewObject(); TouchEvent.Type = MechanicTouchEvent.TOUCH_DRAGGED; TouchEvent.Pointer = pointerId; TouchEvent.X = TouchX[pointerId] = (int)(event.getX(pointerIndex) * ScaleX); TouchEvent.Y = TouchY[pointerId] = (int)(event.getY(pointerIndex) * ScaleY); TouchEventsBuffer.add(TouchEvent); } break; } return true; } } @Override public boolean IsTouchDown(int pointer) { synchronized(this) { if(pointer < 0 || pointer >= MaxTouchers) return false; else return IsTouched[pointer]; } } @Override public int GetTouchX(int pointer) { synchronized(this) { if (pointer < 0 || pointer >= MaxTouchers) return 0; else return TouchX[pointer]; } } @Override public int GetTouchY(int pointer) { synchronized(this) { if (pointer < 0 || pointer >= 20) return 0; else return TouchY[pointer]; } } @Override public List<MechanicTouchEvent> GetTouchEvents() { synchronized (this) { for (int i = 0; i < TouchEvents.size(); i++) TouchEventPool.Free(TouchEvents.get(i)); TouchEvents.clear(); TouchEvents.addAll(TouchEventsBuffer); TouchEventsBuffer.clear(); return TouchEvents; } } } In addition to Touch, we also implement OnTouchListener.
EnableMultiTouch is needed to determine if a device supports simultaneous pressing of multiple fingers. If VERSION.SDK is less than 5 (for some reason this variable is represented as a string), then it does not support.
MaxTouchers - the maximum number of fingers. There are 20 of them, maybe more or less.
In the onTouch function, we get the finger number and the action (press, tear, move), which we record in the event and add the event to the list.
In GetTouchEvents, we return a list of events, which we then clear. For the return of the list of events is responsible another list.
You may ask, what is ScaleX and ScaleY responsible for? This will be discussed later in the graphics section.
MechanicKeyboard
package com.mechanic.input; import java.util.ArrayList; import java.util.List; import android.view.KeyEvent; import android.view.View; import com.mechanic.input.Input.MechanicKeyEvent; import com.mechanic.input.Pool.PoolFactory; import com.mechanic.input.Pool; public class MechanicKeyboard implements Keyboard { boolean[] PressedKeys = new boolean[128]; Pool<MechanicKeyEvent> KeyEventPool; List<MechanicKeyEvent> KeyEventsBuffer = new ArrayList<MechanicKeyEvent>(); List<MechanicKeyEvent> KeyEvents = new ArrayList<MechanicKeyEvent>(); public MechanicKeyboard(View view) { PoolFactory<MechanicKeyEvent> pool = new PoolFactory<MechanicKeyEvent>() { @Override public MechanicKeyEvent Create() { return new MechanicKeyEvent(); } }; KeyEventPool = new Pool<MechanicKeyEvent>(pool,100); view.setOnKeyListener(this); view.setFocusableInTouchMode(true); view.requestFocus(); } public boolean IsKeyPressed(int KeyCode) { if(KeyCode < 0 || KeyCode > 127) return false; return PressedKeys[KeyCode]; } public List<MechanicKeyEvent> GetKeyEvents() { synchronized(this) { for(int i = 0; i < KeyEvents.size(); i++) KeyEventPool.Free(KeyEvents.get(i)); KeyEvents.clear(); KeyEvents.addAll(KeyEventsBuffer); KeyEventsBuffer.clear(); return KeyEvents; } } @Override public boolean onKey(View v, int keyCode, KeyEvent event) { if(event.getAction() == KeyEvent.ACTION_MULTIPLE) return false; synchronized(this) { MechanicKeyEvent key = KeyEventPool.NewObject(); key.KeyCode = keyCode; key.KeyChar = (char)event.getUnicodeChar(); if(event.getAction() == KeyEvent.ACTION_DOWN) { key.Type = MechanicKeyEvent.KEY_DOWN; if(keyCode > 0 && keyCode < 128) PressedKeys[keyCode] = true; } if(event.getAction() == KeyEvent.ACTION_UP) { key.Type = MechanicKeyEvent.KEY_UP; if(keyCode > 0 && keyCode < 128) PressedKeys[keyCode] = false; } KeyEventsBuffer.add(key); } return false; } } Create an array of 128 boolean variables that will hold information about 128 keys pressed or not pressed. We also create a pool of objects and 2 lists. Everything is simple
MechanicInput
package com.mechanic.input; import java.util.List; import android.content.Context; import android.view.View; public class MechanicInput implements Input { MechanicKeyboard keyboard; MechanicAccelerometer accel; MechanicTouch touch; public MechanicInput(Context context, View view, float scaleX, float scaleY) { accel = new MechanicAccelerometer(context); keyboard = new MechanicKeyboard(view); touch = new MechanicTouch(view, scaleX, scaleY); } @Override public boolean IsKeyPressed(int keyCode) { return keyboard.IsKeyPressed(keyCode); } @Override public boolean IsKeyPressed(char keyChar) { return keyboard.IsKeyPressed(keyChar); } @Override public boolean IsTouchDown(int pointer) { return touch.IsTouchDown(pointer); } @Override public int GetTouchX(int pointer) { return touch.GetTouchX(pointer); } @Override public int GetTouchY(int pointer) { return touch.GetTouchY(pointer); } @Override public float GetAccelX() { return accel.GetAccelX(); } @Override public float GetAccelY() { return accel.GetAccelY(); } @Override public float GetAccelZ() { return accel.GetAccelZ(); } @Override public List<MechanicTouchEvent> GetTouchEvents() { return touch.GetTouchEvents(); } @Override public List<MechanicKeyEvent> GetKeyEvents() { return keyboard.GetKeyEvents(); } } We realize a pattern "Facade".
Now it's time to work with the files!
Work with files
MechanicFileIO
package com.mechanic.fileio; import java.io.File; import java.io.FileInputStream; import java.io.FileOutputStream; import java.io.IOException; import java.io.InputStream; import java.io.OutputStream; import android.content.res.AssetManager; import android.os.Environment; public class MechanicFileIO implements FileIO { AssetManager assets; String ExternalStoragePath; public MechanicFileIO(AssetManager assets) { this.assets = assets; ExternalStoragePath = Environment.getExternalStorageDirectory().getAbsolutePath() + File.separator; } public InputStream ReadAsset(String name) throws IOException { return assets.open(name); } public InputStream ReadFile(String name) throws IOException { return new FileInputStream(ExternalStoragePath + name); } public OutputStream WriteFile(String name) throws IOException { return new FileOutputStream(ExternalStoragePath + name); } } We get an asset manager for removing files from the assets folder, it is used by the first function, and the second 2 functions take files from the device’s special folder on the android, where we write and read all the data about the game - records, settings, and so on. The path to this folder is taken in the constructor.
Now create sounds
Work with sounds
MechanicSound
package com.mechanic.audio; import android.media.SoundPool; public class MechanicSound implements Sound { int id; SoundPool pool; public MechanicSound(SoundPool pool, int id) { this.pool = pool; this.id = id; } public void Play(float volume) { pool.play(id, volume, volume, 0, 0, 1); } public void Close() { pool.unload(id); } } In MechanicAudio we use SoundPool to keep small sound effects. In MechanicSound, we pass in the sound effect number and the SoundPool object itself, from which we produce sound.
MechanicMusic
package com.mechanic.audio; import java.io.IOException; import android.content.res.AssetFileDescriptor; import android.media.MediaPlayer; public class MechanicMusic implements Music { MediaPlayer Player; boolean IsPrepared = false; public MechanicMusic(AssetFileDescriptor descriptor) { Player = new MediaPlayer(); try { Player.setDataSource(descriptor.getFileDescriptor(), descriptor.getStartOffset(), descriptor.getLength()); Player.prepare(); IsPrepared = true; } catch(Exception ex) { throw new RuntimeException(" "); } } public void Close() { if(Player.isPlaying()) Player.stop(); Player.release(); } public boolean IsLooping() { return Player.isLooping(); } public boolean IsPlaying() { return Player.isPlaying(); } public boolean IsStopped() { return !IsPrepared; } public void Play() { if(Player.isPlaying()) return; try { synchronized(this) { if(!IsPrepared) Player.prepare(); Player.start(); } } catch(IllegalStateException ex) { ex.printStackTrace(); } catch(IOException ex) { ex.printStackTrace(); } } public void SetLooping(boolean loop) { Player.setLooping(loop); } public void SetVolume(float volume) { Player.setVolume(volume, volume); } public void Stop() { Player.stop(); synchronized(this) { IsPrepared = false; } } @Override public void onCompletion(MediaPlayer player) { synchronized(this) { IsPrepared = false; } } } We put a sound file on a stream and play it.
IsPrepared shows if the sound is ready for the piece.
I recommend myself to understand this class.
We got to MechanicAudio
package com.mechanic.audio; import java.io.IOException; import android.app.Activity; import android.content.res.AssetFileDescriptor; import android.content.res.AssetManager; import android.media.AudioManager; import android.media.SoundPool; public class MechanicAudio implements Audio { AssetManager assets; SoundPool pool; public MechanicAudio(Activity activity) { activity.setVolumeControlStream(AudioManager.STREAM_MUSIC); this.assets = activity.getAssets(); pool = new SoundPool(20, AudioManager.STREAM_MUSIC, 0); } public Music NewMusic(String name) { try { AssetFileDescriptor descriptor = assets.openFd(name); return new MechanicMusic(descriptor); } catch(IOException ex) { throw new RuntimeException(" " + name); } } public Sound NewSound(String name) { try { AssetFileDescriptor descriptor = assets.openFd(name); int id = pool.load(descriptor, 0); return new MechanicSound(pool, id); } catch(IOException ex) { throw new RuntimeException(" " + name); } } } In the constructor, we make it possible to adjust the music with the device, take the asset manager, and create a SoundPool that can play no more than 20 sound effects at a time. I think in most games this is enough.
In Music creation, we pass a file handle to the MechanicMusic constructor, in Sound creation, we load the sound into soundPool and pass the pool itself and the sound number to the MechanicSound constructor, if something goes wrong, an exception is made.
Making a draftsman
Work with graphics
MechanicImage
package com.mechanic.graphics; import com.mechanic.graphics.Graphics.ImageFormat; import android.graphics.Bitmap; public class MechanicImage implements Image { Bitmap bitmap; ImageFormat format; public MechanicImage(Bitmap bitmap, ImageFormat format) { this.bitmap = bitmap; this.format = format; } @Override public int GetWidth() { return bitmap.getWidth(); } @Override public int GetHeight() { return bitmap.getHeight(); } @Override public ImageFormat GetFormat() { return format; } @Override public void Dispose() { bitmap.recycle(); } } This class is an image holder. It does nothing special, introduced for convenience.
MechanicGraphics
package com.mechanic.graphics; import java.io.IOException; import java.io.InputStream; import android.content.res.AssetManager; import android.graphics.Bitmap; import android.graphics.Bitmap.Config; import android.graphics.BitmapFactory; import android.graphics.Canvas; import android.graphics.Paint; import android.graphics.Paint.Style; import android.graphics.Rect; public class MechanicGraphics implements Graphics { AssetManager assets; Bitmap buffer; Canvas canvas; Paint paint; Rect srcRect = new Rect(), dstRect = new Rect(); public MechanicGraphics(AssetManager assets, Bitmap buffer) { this.assets = assets; this.buffer = buffer; this.canvas = new Canvas(buffer); this.paint = new Paint(); } @Override public Image NewImage(String fileName) { ImageFormat format; InputStream file = null; Bitmap bitmap = null; try { file = assets.open(fileName); bitmap = BitmapFactory.decodeStream(file); if (bitmap == null) throw new RuntimeException(" '" + fileName + "'"); } catch (IOException e) { throw new RuntimeException(" '" + fileName + "'"); } finally { try { if(file != null) file.close(); } catch(IOException e) { } } if (bitmap.getConfig() == Config.RGB_565) format = ImageFormat.RGB_565; else if (bitmap.getConfig() == Config.ARGB_4444) format = ImageFormat.ARGB_4444; else format = ImageFormat.ARGB_8888; return new MechanicImage(bitmap, format); } @Override public void Clear(int color) { canvas.drawRGB((color & 0xff0000) >> 16, (color & 0xff00) >> 8, (color & 0xff)); } @Override public void DrawPixel(int x, int y, int color) { paint.setColor(color); canvas.drawPoint(x, y, paint); } @Override public void DrawLine(int x, int y, int x2, int y2, int color) { paint.setColor(color); canvas.drawLine(x, y, x2, y2, paint); } @Override public void DrawRect(int x, int y, int width, int height, int color) { paint.setColor(color); paint.setStyle(Style.FILL); canvas.drawRect(x, y, x + width - 1, y + width - 1, paint); } @Override public void DrawImage(Image image, int x, int y, int srcX, int srcY, int srcWidth, int srcHeight) { srcRect.left = srcX; srcRect.top = srcY; srcRect.right = srcX + srcWidth - 1; srcRect.bottom = srcY + srcHeight - 1; dstRect.left = x; dstRect.top = y; dstRect.right = x + srcWidth - 1; dstRect.bottom = y + srcHeight - 1; canvas.drawBitmap(((MechanicImage)image).bitmap, srcRect, dstRect, null); } @Override public void DrawImage(Image image, int x, int y) { canvas.drawBitmap(((MechanicImage)image).bitmap, x, y, null); } @Override public int GetWidth() { return buffer.getWidth(); } @Override public int GetHeight() { return buffer.getHeight(); } } Note!We do not create Paint and Rect objects every time we draw, as this is a crime against the garbage collector.
In the constructor, we take Bitmap, the buffer on which we will draw everything, it uses canvas.
By loading the image, we read the image from the assets, and then decode it into a Bitmap. An exception is thrown if the uploaded file is not a picture or if it does not exist, then the file is closed. Finally, we take the format of the image and return the new MechanicImage, passing Bitmap and ImageFormat to the constructor. Also noteworthy is the first method DrawImage, which draws a part of the picture. This is used when instead of individual images in the game, a group of images is used, called an atlas. Here is an example of such an atlas
(image taken from the web resource interesnoe.info)
Suppose we needed to draw a part of the picture from 32.32 to 48.48, at position 1.1; then we do it
DrawImage(image, 1, 1, 32, 32, 16, 16); The remaining methods are easily understood and do not represent interest.
It's time for the Game and Screen interfaces!
Before continuing, we need to draw graphics in a separate stream and not load a custom stream.
Meet the SurfaceView class, which offers drawing graphics in a separate thread. Create a runner class
package com.mechanic.game; import android.graphics.Bitmap; import android.graphics.Canvas; import android.graphics.Rect; import android.view.SurfaceHolder; import android.view.SurfaceView; public class Runner extends SurfaceView implements Runnable { MechanicGame game; Canvas canvas; Bitmap buffer; Thread thread = null; SurfaceHolder holder; volatile boolean running = false; public Runner(Object context, MechanicGame game, Bitmap buffer) { super(game); this.game = game; this.buffer = buffer; this.holder = getHolder(); } public void Resume() { running = true; thread = new Thread(this); thread.start(); } public void run() { Rect dstRect = new Rect(); long startTime = System.nanoTime(); while(running) { if(!holder.getSurface().isValid()) continue; float deltaTime = (System.nanoTime()-startTime) / 1000000000.0f; startTime = System.nanoTime(); game.GetCurrentScreen().Update(deltaTime); game.GetCurrentScreen().Present(deltaTime); canvas = holder.lockCanvas(); canvas.getClipBounds(dstRect); canvas.drawBitmap(buffer, null, dstRect, null); holder.unlockCanvasAndPost(canvas); } } public void Pause() { running = false; while(true) { try { thread.join(); break; } catch (InterruptedException e) { } } } } The MechanicGame class will be soon, do not worry.
To draw graphics not in the user interface, we need a SurfaceHolder object. Its main functions are lockCanvas and unlockCanvasAndPost. The first function locks Surface and returns Canvas, on which you can draw something (in our case, the Bitmap buffer, which acts as a canvas).
In the Resume function, we launch a new thread with this class.
In the run function, while the application is running, the last gap from the last cycle is taken (System.nanoTime returns nanoseconds) and the Update and Present functions of the current Screen of the application are called, after which the buffer is drawn.
Here is the class MechanicGame
package com.mechanic.game; import com.mechanic.audio.Audio; import com.mechanic.audio.MechanicAudio; import com.mechanic.fileio.FileIO; import com.mechanic.fileio.MechanicFileIO; import com.mechanic.graphics.Graphics; import com.mechanic.graphics.MechanicGraphics; import com.mechanic.input.Input; import com.mechanic.input.MechanicInput; import android.app.Activity; import android.content.Context; import android.content.res.Configuration; import android.graphics.Bitmap; import android.graphics.Bitmap.Config; import android.os.Bundle; import android.os.PowerManager; import android.os.PowerManager.WakeLock; import android.view.Window; import android.view.WindowManager; public abstract class MechanicGame extends Activity implements Game { Runner runner; Graphics graphics; Audio audio; Input input; FileIO fileIO; Screen screen; WakeLock wakeLock; static final int SCREEN_WIDTH = 80; static final int SCREEN_HEIGHT = 128; @Override public void onCreate(Bundle savedInstanceState) { super.onCreate(savedInstanceState); requestWindowFeature(Window.FEATURE_NO_TITLE); getWindow().setFlags(WindowManager.LayoutParams.FLAG_FULLSCREEN, WindowManager.LayoutParams.FLAG_FULLSCREEN); boolean IsLandscape = (getResources().getConfiguration().orientation == Configuration.ORIENTATION_LANDSCAPE); int frameBufferWidth = IsLandscape ? SCREEN_HEIGHT : SCREEN_WIDTH; int frameBufferHeight = IsLandscape ? SCREEN_WIDTH : SCREEN_HEIGHT; Bitmap frameBuffer = Bitmap.createBitmap(frameBufferWidth, frameBufferHeight, Config.RGB_565); float scaleX = (float) frameBufferWidth / getWindowManager().getDefaultDisplay().getWidth(); float scaleY = (float) frameBufferHeight / getWindowManager().getDefaultDisplay().getHeight(); runner = new Runner(null, this, frameBuffer); graphics = new MechanicGraphics(getAssets(), frameBuffer); fileIO = new MechanicFileIO(getAssets()); audio = new MechanicAudio(this); input = new MechanicInput(this, runner, scaleX, scaleY); screen = GetStartScreen(); setContentView(runner); PowerManager powerManager = (PowerManager) getSystemService(Context.POWER_SERVICE); wakeLock = powerManager.newWakeLock(PowerManager.FULL_WAKE_LOCK, "Game"); } @Override public Input GetInput() { return input; } @Override public FileIO GetFileIO() { return fileIO; } @Override public Graphics GetGraphics() { return graphics; } @Override public Audio GetAudio() { return audio; } @Override public void SetScreen(Screen screen) { if (screen == null) throw new IllegalArgumentException("Screen null"); this.screen.Pause(); this.screen.Dispose(); screen.Resume(); screen.Update(0); this.screen = screen; } @Override public Screen GetCurrentScreen() { return screen; } @Override public Screen GetStartScreen() { return null; } @Override public void onResume() { super.onResume(); wakeLock.acquire(); screen.Resume(); runner.Resume(); } @Override public void onPause() { super.onPause(); wakeLock.release(); runner.Pause(); screen.Pause(); if(isFinishing()) screen.Dispose(); } } This class has Runner objects, all of our interfaces and classes, and a WakeLock object (needed to prevent the phone from falling asleep when the game is running).
It also has 2 constants - SCREEN_WIDTH and SCREEN_HEIGHT, which are very important!
Devices have a lot of permissions, and it’s almost impossible and pointless for each device to adjust the size of pictures, calculate location, etc. etc.Imagine that we have a window of 80x128 pixels (of the two constants mentioned above). We in this window draw small pictures. But suddenly the screen size of the device does not fit the size of this window. What to do? It's very simple - we take the ratio of the width and length of our window to the width and length of the device and draw all the pictures, taking into account this ratio.
As a result, the application itself stretches the images under the device screen.
This class includes an Activity and it has onCreate, onResume, and onPause methods.
In onCreate, the application first goes into full-screen mode (so that charging and time are not visible at the top). Then it turns out the orientation of the phone - landscape or portrait (which is already written in the .xml file at the beginning of the article). Then a long-awaited buffer is created with the size of this window of 80x128 pixels, the ratio of this window to the size of the device is determined, which is transferred to the MechanicInput constructor, which, in turn, transfers the relation to MechanicTouch. And then - bingo! The resulting touch points on the screen are multiplied by this ratio, so that the coordinates of the press do not depend on the size of the device.
Then we create our interfaces, register Runner and WakeLock.
In the SetScreen method, we release the current Screen and write another Screen.
The remaining methods of interest do not provide.
Is that all?
Yes, gentlemen, the framework is ready!
When it's done.
And how now to connect the framework with the main class, say, with MyGame?
The “main” class looks something like this.
public class MyGame extends Activity { @Override protected void onCreate(Bundle savedInstanceState) { super.onCreate(savedInstanceState); setContentView(R.layout.activity_my_game); } @Override public boolean onCreateOptionsMenu(Menu menu) { // Inflate the menu; this adds items to the action bar if it is present. getMenuInflater().inflate(R.menu.my_game, menu); return true; } } We modify it to this class.
package com.mechanic; import com.mechanic.game.MechanicGame; import com.mechanic.game.Screen; public class MyGame extends MechanicGame { @Override public Screen GetStartScreen() { return new GameScreen(this); } } Java perceives this class as an heir from the Activity, since MechanicGame itself is an heir from the Activity. onCreate is already registered, and the only thing we need to do is to override GetStartScreen (), since this method returns null in MechanicGame, and this throws an error.
Don't forget to implement the GameScreen class :)
package com.mechanic; import com.mechanic.game.Game; import com.mechanic.game.Screen; import com.mechanic.graphics.Graphics; import com.mechanic.graphics.Image; public class GameScreen extends Screen { Graphics g = game.GetGraphics(); Image wikitan; float x = 0.0f; public GameScreen(Game game) { super(game); wikitan = g.NewImage("wikipetan.png"); } @Override public void Update(float deltaTime) { if(game.GetInput().IsTouchDown(0)) x += 1.0f * deltaTime; } @Override public void Present(float deltaTime) { g.Clear(0); g.DrawImage(wikitan, (int)x, 0); } @Override public void Pause() { } @Override public void Resume() { } @Override public void Dispose() { wikitan.Dispose(); } } This is a simple example of the implementation of Screen, which loads the Wikipotent image and moves it by clicking on the screen.
(Image taken from the web resource ru.wikipedia.org)
Result
The variable x is represented as a float, since adding numbers from 0 to 1 yields nothing, rounding is in progress.
Wikipan is drawn with zoom, since the size of our canvas is 80x128 pixels
Questions and answers:
- My picture is incorrectly drawn - rotated 90 degrees!
- This is all because we gave the command in the xml file to work only in landscape mode. To switch the mode, press the key 7 on the right side of the keyboard
- I honestly change x + = 1.0f * deltaTime, but the picture does not move or slowly moves. What to do?
- The emulator is a very slow thing. Check the performance of the application on the device.
Have fun!
Sources:
github.com/Izaron/MechanicFramework
Literature:
developer.alexanderklimov.ru/android
habrahabr.ru/post/109944
The book by Mario Zechner "Programming games for Android"
Source: https://habr.com/ru/post/195830/
All Articles