Cloud from scratch using XenServer
Recently, we have created a small cloud to solve our internal problems and want to share this experience with Habr's readers. Here we describe in detail what equipment was chosen for cloud deployment and how to create the infrastructure of a cloud system based on XenServer from Citrix. In this product, Citrix decided to abandon the standard approach, when the cloud has some central control node, they broke it into several components and offered to place them in the cloud too. Who cares how it all works - welcome under the cut!
In our article, we will focus on such issues as: preparing the hardware, installing XenServer, installing a license, creating a virtual network infrastructure, describing the problems encountered with virtual machines on Ubuntu OS, discussing dynamic load balancing, setting up and access control to the cloud , and, of course, show that we have succeeded.
')
The first task is to choose the basis for any cloud, namely, the choice of servers on which virtualization will be performed. We chose IBM servers and chose IBMx3850 X5.
Each IBM is based on IBM X-Architecture and has:
• 4 Intel® Xeon® CPUE7–8860 processors with a clock frequency of 2.27GHz, which ultimately gives 40 cores per server (80 threads);
• 150GB RAM;
• 2 independent power supplies;
• fiber channel expansion card;
• network card for a 10-gigabit connection;
• 2 500GB hard drives in RAID1 .
Then the question arises: where to store virtual machines? If they are stored on the servers themselves, this reduces the reliability of the system, since when the server fails, we lose all the virtual machines that were on it. Also, this approach greatly complicates the task of load balancing, because the migration of a virtual machine will require moving its disk to another server, and this is quite a long process. Therefore, our stand uses the external storage DELL md3620f, equipped with 4 fiber channel outputs. This storage supports up to 24 hard drives that can be combined into all popular raid types (RAID0, RAID1, RAID5, RAID6, RAID01). In our case, we use 10 1TB hard drives combined in RAID5.
What is required for quick migration? To ensure fast migration between IBMs, a 10-gigabit switch summit x670 was added to the stand, this theoretically should speed up the migration (the longest migration process is transferring data over the network from one server to another) 10 times, but in practice it gave a win 5-6 times. In order for servers and virtual machines to have access to the local network and the Internet, an HP ProCurve switch was added to the booth. Also, traffic to external clients goes through it.
Summing up the hardware, we have a stand that includes:
• 4 IBMx3850 X5 servers
• HP ProCurve switch for connections up to 1000 MB / s
• Summit x670 switch to support 10Gbps connections
• external storage DELL md3620f with 10TB disk array
• and others (APC Smart-UPS 3000VA uninterruptible power supply, transceivers for optical fiber, eight ten-meter fiber-optic cables, 50 meters of twisted pair)
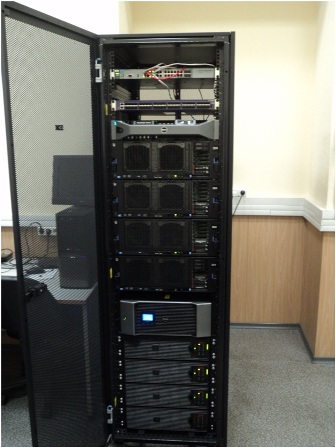
All this looks like it is shown in the picture, at the bottom there are five uninterruptible power supplies, which, in case of failure of the central power supply, will correctly stop everything running on the server and disable the servers themselves.
The logical connection diagram is as follows:

To summarize, we have:
• 160 cores (320 threads);
• 600GB of RAM;
• 14TB of disk space;
• High-speed network infrastructure.
To run virtual machines on the hardware we chose, it was decided to deploy the XenServer Platinum cloud platform.
Brief general information about XenServer, if someone did not come across: XenServer is a standalone operating system based on the Linux kernel. At the heart of everything is the XEN hypervisor, the latest version at the moment — the version of XenServer 6.1 being used — is based on the XEN 4.1 hypervisor. For normal system operation, a processor with virtualization support and 1GB of RAM is required. The guys from Citrix do not like to write their minimum requirements, preferring to write the maximum system requirements, they can be found here . The XenServer family includes several product versions that differ in price and additional features .
XenServer must be installed on all IBM servers. Installing XenServer itself is a completely simple process and is not very different from installing Ubuntu. Much more interesting is the configuration of the system for subsequent convenient operation, which will be discussed further, and the focus will be on the components of the XenServer extension provided by Citrix. After installing XenServer, all hosts must be logged into XenCenter (you can download it by logging into the web-interface installed by XenServer or from the Citrix website). In XenCenter, you need to create a pool and add servers to it.
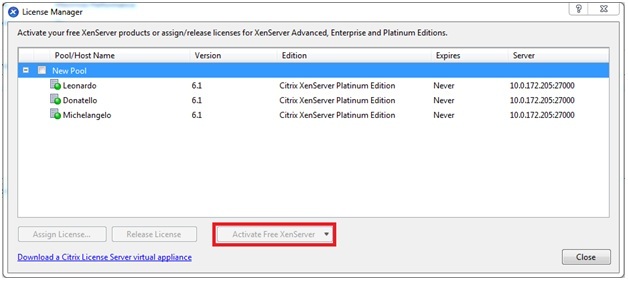
After installing XenServer, the first thing to do is to install licenses on the servers. This is done not by entering license keys, but by installing a certificate obtained in your personal account on the Citrix website. The certificate is a text file with license keys recorded in a special format. It can be obtained at once on several servers. The certificate must be installed in a special licensing center. It is worth noting that if at least one of the certificates is not valid, then all certificates will not be valid.

Citrix offers to install a licensing center either on a separate host or on a virtual machine in your cloud (it consumes almost no CPU resources and requires only 256 MB of RAM). But if you install it as a virtual machine, you can expect trouble. One day you may encounter a problem that we encountered when we disconnected the servers of our booth for their upgrade, and with them the virtual machine with the licensing center turned off, respectively. After switching on, XenServer issued an error "The trial license expired" (the licensing center was not running, after all). It seems there should be no problems: just turn on the licensing center virtual machine with a normal license and accept it. But it was not there: with an expired license, you can not turn on ANY virtual machine. However, after the initial panic, the button “activate the free version” was found in the license acceptance menu, after pressing which we saw the phrase “you have 30 days left of the trial license”. And then you can start a virtual machine with a license.
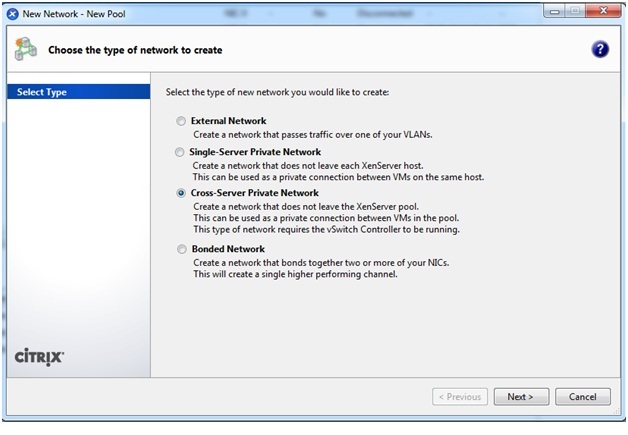
In order to flexibly manage the network settings of virtual machines and so that they are not on the same subnet as the XenServer servers, you need to establish a virtual network infrastructure. For these purposes, Citrix has a Distributed Virtual Switch Controller (DVSC) component. It is also provided as a virtual machine, but it already consumes more resources: 2 VCPUs and 2GB of RAM. DVSC settings are not difficult: you need to specify a free IP address for the virtual machine, and then add a pool to the DVSC. All this is done via the web interface. After these actions, it becomes possible to create virtual networks between virtual machines located on different servers (Cross-Server Private Network), whereas before that it was possible to create virtual networks only within a single server (Single-Server Private Network).
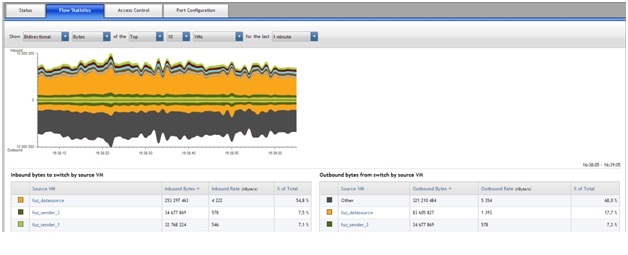
If you go to the DVS web interface, there you can see a lot of useful information about the network infrastructure: a list of created networks, a list of virtual machines connected to a specific network, error messages on the network, graphs of network activity (both for a specific virtual machine and for the entire network as a whole).
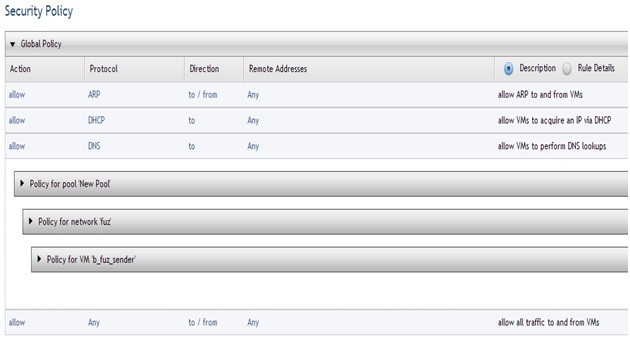
DVSC can also act as a simple firewall, the rules of which can be created in the AccessControl tab. All network security policies are divided into 4 levels: global policies (since several pools can be connected to one DVSC), pool policies, specific network policies, and specific virtual machine policies. The rules describe the type of action (allow or deny), the protocol (you can specify the ports of the recipients and the sender or specify a known protocol) and for whom this rule applies.
The firewall comes into operation immediately after installation, and it immediately records 4 basic global rules:
• allow all ARP messages on the network
• allow virtual machines to obtain an IP address by dhcp
• allow virtual machines to access DNS servers
• allow all network traffic (this rule applies after checking all the rules at other levels)
In general, DVSC is good for everyone, and in terms of functionality, it resembles VmWare vShield Edge, but Edge seems to be more convenient due to various details: the possibility of creating a DHCP server, convenient Nat organization for virtual machines, etc. All this (the lack of a DHCP server and Nat), of course, is solved by creating a separate virtual machine based on Ubuntu, but it’s convenient when everything has been decided in advance.
In general, the creation of virtual machines with Ubuntu for the first time causes shock and incomprehension - how did this get into the release version of the product? The thing is:

After creating a virtual machine from a standard template, it cannot start and writes the error indicated above (Error code: INVALID_SOURCE). The error is related to the boot settings of the virtual machine. You can fight it as follows (the description is taken here and slightly modified to work with a large number of virtual machines):
1. Log in to the XenServer console, which can be done through the XenCenter (Console tab at the server) or via ssh.
2. Find the virtual machine uuid with the command xe vm-listname-label = [VM_NAME]. In our example, it looks like this:

3. Next, you need to set the boot parameters with the following command: xe vm-param-setuuid = [UUID_] HVM-boot-policy = BIOS \ orderHVM-boot-params: order = dc.
4. After these simple manipulations, the virtual machine will start successfully.
But that’s not the end of Ubuntu’s mistakes. When creating our booth, it was decided to create templates of virtual machines with different operating systems so as not to waste time installing the necessary one, but immediately take the ready and install the necessary software there. There are no problems with Windows-based machines, whereas with Ubuntu there is a black screen problem when creating a virtual machine from an image. The solution to this problem turned out to be quite simple, on the one hand, and a bit wrong, on the other. The problem is solved by simply installing xen-tools on a virtual machine. The disadvantage of this solution is that it is impossible to provide a clean operating system, which is sometimes required in the framework of the tasks to be solved.
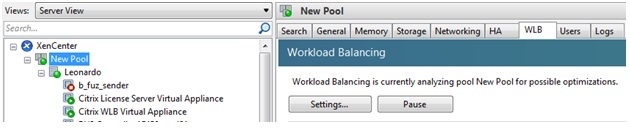
Within the framework of the tasks being solved, dynamic load balancing between servers with XenServer is often needed. For these purposes, Citrix provides a Citrix WLB Virtual Appliance virtual machine, which you also need to add to the cloud, and then perform a simple configuration through its console (when you enter the console, the machine will prompt you for the necessary actions). After that, you need to go to XenCenter and tell the pool that this virtual machine will be responsible for load balancing between servers (this action is performed in the WLB tab).
This virtual machine monitors the load on the servers (number of cores used, amount of RAM used, network activity) and distributes it between servers. This happens both when the virtual machine is turned on (it runs on the most unloaded server), and during its operation (due to migration).
The last task that needs to be solved for normal operation is to provide access to the cloud. And here Citrix, in our opinion, has the biggest problems. Citrix offers two options for accessing the cloud: via XenCenter and via the web interface.
If you connect Active Directory (AD) to the pool, you can create users in XenCenter. Citrix decided to abandon the discretionary access model in XenCenter and implemented the role model. Hence the main problem: ALL users see and have access to ALL virtual machines, only the type of access is regulated, but it is applied to ALL virtual machines at once (that is, if the role is given to start virtual machines, then all of them). It is also worth noting that AD should always be available, because when you restart, AD is not automatically added to the pool, and it must be added manually each time.
For discretionary access, Citrix suggests using web-based access. To configure access via the web interface, you need to install the Citrix XenServer Web Self Service virtual machine. After a simple configuration of a virtual machine through its console (you must specify an ip-address or specify that it is obtained via DHCP), you must perform a number of settings through the web-interface. Here Citrix is beyond praise for an accessible and understandable description: if you are logged in as an administrator, you will immediately be shown a list of steps you need to perform, as well as a detailed description of how to do this.

Citrix XenServer Web Self Service can use the same users as AD, or create new ones. When you first load XenServer Web Self Service, the administrator needs to specify how he wants to act, and this decision cannot be changed later (of course, you can always rearrange the virtual machine, but this will entail a new setting of access rights to virtual machines). After setup, any user can access a specific virtual machine through a browser. And here Citrix is also very happy: any browser can be used for work, and not some limited set, like Microsoft’s cloud (only InternetExplorer) or VmWare (not supported by Opera). In order for the user to gain access to the virtual machine, the administrator must allow access to this virtual machine for this user, which is easily done through the web interface.

The major drawbacks of working through the web interface include the inability to configure the physical parameters of the virtual machine (the number of processors, the number of RAM, the configuration of connected networks and hard drives). So the web-interface is access to the graphical interface of the virtual machine, and not to control its physical parameters. We performed all the necessary actions: we prepared the equipment, set up the licenses, deployed ... And now the cloud is ready for work!
To assess the actual computing power of the servers, we conducted an experiment, the goal of which was to load as much as possible all 80 logical cores on the system. As a basis for the experiment, a program was taken that performs Ray-Tracing a simple scene, without an operating system and using all the cores on all processors in the computer. How this program works and how to get the source code of this program can be found here .
For the experiment, the program was slightly modified: we added motion animation for one of the spheres in the figure, added work speed counting, and added buffering while drawing each frame. To compare the power of the received program, we ran it on several computers of different configurations, including our IBM servers. In the experiment, the scene was rendered from 5 spheres in a resolution of 800x600. The experiment was a success and IBM servers showed impressive performance indicators. For all the experiments, we recorded a video where the green numbers in the upper left corner of the screen indicate the number of frames per second (FPS), the red numbers mean the number of seconds per frame. Here are the results we got:
1. Normal computer: Intel i3-2100, 3.1 GHz, only 2 cores. For each core 800x600 / 2 = 240000 points per frame. As can be seen from the video, the speed was approximately 0.5 FPS (more than 2 seconds were spent on one frame).
2. Computer on a modern powerful processor: Intel i7-4770, 3.4 GHz, a total of 8 cores. For each core 800x600 / 8 = 60000 points per frame. The result is about 2 frames per second, as you can see in the video.
3. IBM server from the rack: Intel Xeon E7-8860 2.3 GHz, on each computer there are 4 processors with 10 physical cores (2 cores on each core) - a total of 80 cores. For each core 800x600 / 80 = 6000 points per frame. The result is 12-14 FPS - significantly more than other systems.
Interestingly, if you start rendering on the IBM server at a resolution of 1280x1024, and allow the processor cores to work without buffering, you can see how the frame is drawn from 80 bars!
That's what we did. We hope that by reading our article, you can easily make the cloud yourself, avoid the problems that we have described here, or successfully deal with them!
In our article, we will focus on such issues as: preparing the hardware, installing XenServer, installing a license, creating a virtual network infrastructure, describing the problems encountered with virtual machines on Ubuntu OS, discussing dynamic load balancing, setting up and access control to the cloud , and, of course, show that we have succeeded.
')
Preparation of the hardware
The first task is to choose the basis for any cloud, namely, the choice of servers on which virtualization will be performed. We chose IBM servers and chose IBMx3850 X5.
Each IBM is based on IBM X-Architecture and has:
• 4 Intel® Xeon® CPUE7–8860 processors with a clock frequency of 2.27GHz, which ultimately gives 40 cores per server (80 threads);
• 150GB RAM;
• 2 independent power supplies;
• fiber channel expansion card;
• network card for a 10-gigabit connection;
• 2 500GB hard drives in RAID1 .
Then the question arises: where to store virtual machines? If they are stored on the servers themselves, this reduces the reliability of the system, since when the server fails, we lose all the virtual machines that were on it. Also, this approach greatly complicates the task of load balancing, because the migration of a virtual machine will require moving its disk to another server, and this is quite a long process. Therefore, our stand uses the external storage DELL md3620f, equipped with 4 fiber channel outputs. This storage supports up to 24 hard drives that can be combined into all popular raid types (RAID0, RAID1, RAID5, RAID6, RAID01). In our case, we use 10 1TB hard drives combined in RAID5.
What is required for quick migration? To ensure fast migration between IBMs, a 10-gigabit switch summit x670 was added to the stand, this theoretically should speed up the migration (the longest migration process is transferring data over the network from one server to another) 10 times, but in practice it gave a win 5-6 times. In order for servers and virtual machines to have access to the local network and the Internet, an HP ProCurve switch was added to the booth. Also, traffic to external clients goes through it.
Summing up the hardware, we have a stand that includes:
• 4 IBMx3850 X5 servers
• HP ProCurve switch for connections up to 1000 MB / s
• Summit x670 switch to support 10Gbps connections
• external storage DELL md3620f with 10TB disk array
• and others (APC Smart-UPS 3000VA uninterruptible power supply, transceivers for optical fiber, eight ten-meter fiber-optic cables, 50 meters of twisted pair)
All this looks like it is shown in the picture, at the bottom there are five uninterruptible power supplies, which, in case of failure of the central power supply, will correctly stop everything running on the server and disable the servers themselves.
The logical connection diagram is as follows:
To summarize, we have:
• 160 cores (320 threads);
• 600GB of RAM;
• 14TB of disk space;
• High-speed network infrastructure.
Installing XenServer
To run virtual machines on the hardware we chose, it was decided to deploy the XenServer Platinum cloud platform.
Brief general information about XenServer, if someone did not come across: XenServer is a standalone operating system based on the Linux kernel. At the heart of everything is the XEN hypervisor, the latest version at the moment — the version of XenServer 6.1 being used — is based on the XEN 4.1 hypervisor. For normal system operation, a processor with virtualization support and 1GB of RAM is required. The guys from Citrix do not like to write their minimum requirements, preferring to write the maximum system requirements, they can be found here . The XenServer family includes several product versions that differ in price and additional features .
XenServer must be installed on all IBM servers. Installing XenServer itself is a completely simple process and is not very different from installing Ubuntu. Much more interesting is the configuration of the system for subsequent convenient operation, which will be discussed further, and the focus will be on the components of the XenServer extension provided by Citrix. After installing XenServer, all hosts must be logged into XenCenter (you can download it by logging into the web-interface installed by XenServer or from the Citrix website). In XenCenter, you need to create a pool and add servers to it.
License installation
After installing XenServer, the first thing to do is to install licenses on the servers. This is done not by entering license keys, but by installing a certificate obtained in your personal account on the Citrix website. The certificate is a text file with license keys recorded in a special format. It can be obtained at once on several servers. The certificate must be installed in a special licensing center. It is worth noting that if at least one of the certificates is not valid, then all certificates will not be valid.
Citrix offers to install a licensing center either on a separate host or on a virtual machine in your cloud (it consumes almost no CPU resources and requires only 256 MB of RAM). But if you install it as a virtual machine, you can expect trouble. One day you may encounter a problem that we encountered when we disconnected the servers of our booth for their upgrade, and with them the virtual machine with the licensing center turned off, respectively. After switching on, XenServer issued an error "The trial license expired" (the licensing center was not running, after all). It seems there should be no problems: just turn on the licensing center virtual machine with a normal license and accept it. But it was not there: with an expired license, you can not turn on ANY virtual machine. However, after the initial panic, the button “activate the free version” was found in the license acceptance menu, after pressing which we saw the phrase “you have 30 days left of the trial license”. And then you can start a virtual machine with a license.
Creating a virtual network infrastructure
In order to flexibly manage the network settings of virtual machines and so that they are not on the same subnet as the XenServer servers, you need to establish a virtual network infrastructure. For these purposes, Citrix has a Distributed Virtual Switch Controller (DVSC) component. It is also provided as a virtual machine, but it already consumes more resources: 2 VCPUs and 2GB of RAM. DVSC settings are not difficult: you need to specify a free IP address for the virtual machine, and then add a pool to the DVSC. All this is done via the web interface. After these actions, it becomes possible to create virtual networks between virtual machines located on different servers (Cross-Server Private Network), whereas before that it was possible to create virtual networks only within a single server (Single-Server Private Network).
If you go to the DVS web interface, there you can see a lot of useful information about the network infrastructure: a list of created networks, a list of virtual machines connected to a specific network, error messages on the network, graphs of network activity (both for a specific virtual machine and for the entire network as a whole).
DVSC can also act as a simple firewall, the rules of which can be created in the AccessControl tab. All network security policies are divided into 4 levels: global policies (since several pools can be connected to one DVSC), pool policies, specific network policies, and specific virtual machine policies. The rules describe the type of action (allow or deny), the protocol (you can specify the ports of the recipients and the sender or specify a known protocol) and for whom this rule applies.
The firewall comes into operation immediately after installation, and it immediately records 4 basic global rules:
• allow all ARP messages on the network
• allow virtual machines to obtain an IP address by dhcp
• allow virtual machines to access DNS servers
• allow all network traffic (this rule applies after checking all the rules at other levels)
In general, DVSC is good for everyone, and in terms of functionality, it resembles VmWare vShield Edge, but Edge seems to be more convenient due to various details: the possibility of creating a DHCP server, convenient Nat organization for virtual machines, etc. All this (the lack of a DHCP server and Nat), of course, is solved by creating a separate virtual machine based on Ubuntu, but it’s convenient when everything has been decided in advance.
The problem with creating a virtual machine with Ubuntu
In general, the creation of virtual machines with Ubuntu for the first time causes shock and incomprehension - how did this get into the release version of the product? The thing is:
After creating a virtual machine from a standard template, it cannot start and writes the error indicated above (Error code: INVALID_SOURCE). The error is related to the boot settings of the virtual machine. You can fight it as follows (the description is taken here and slightly modified to work with a large number of virtual machines):
1. Log in to the XenServer console, which can be done through the XenCenter (Console tab at the server) or via ssh.
2. Find the virtual machine uuid with the command xe vm-listname-label = [VM_NAME]. In our example, it looks like this:
3. Next, you need to set the boot parameters with the following command: xe vm-param-setuuid = [UUID_] HVM-boot-policy = BIOS \ orderHVM-boot-params: order = dc.
4. After these simple manipulations, the virtual machine will start successfully.
But that’s not the end of Ubuntu’s mistakes. When creating our booth, it was decided to create templates of virtual machines with different operating systems so as not to waste time installing the necessary one, but immediately take the ready and install the necessary software there. There are no problems with Windows-based machines, whereas with Ubuntu there is a black screen problem when creating a virtual machine from an image. The solution to this problem turned out to be quite simple, on the one hand, and a bit wrong, on the other. The problem is solved by simply installing xen-tools on a virtual machine. The disadvantage of this solution is that it is impossible to provide a clean operating system, which is sometimes required in the framework of the tasks to be solved.
Dynamic load balancing
Within the framework of the tasks being solved, dynamic load balancing between servers with XenServer is often needed. For these purposes, Citrix provides a Citrix WLB Virtual Appliance virtual machine, which you also need to add to the cloud, and then perform a simple configuration through its console (when you enter the console, the machine will prompt you for the necessary actions). After that, you need to go to XenCenter and tell the pool that this virtual machine will be responsible for load balancing between servers (this action is performed in the WLB tab).
This virtual machine monitors the load on the servers (number of cores used, amount of RAM used, network activity) and distributes it between servers. This happens both when the virtual machine is turned on (it runs on the most unloaded server), and during its operation (due to migration).
Configuring and delineating access to the cloud
The last task that needs to be solved for normal operation is to provide access to the cloud. And here Citrix, in our opinion, has the biggest problems. Citrix offers two options for accessing the cloud: via XenCenter and via the web interface.
Access via XenCenter
If you connect Active Directory (AD) to the pool, you can create users in XenCenter. Citrix decided to abandon the discretionary access model in XenCenter and implemented the role model. Hence the main problem: ALL users see and have access to ALL virtual machines, only the type of access is regulated, but it is applied to ALL virtual machines at once (that is, if the role is given to start virtual machines, then all of them). It is also worth noting that AD should always be available, because when you restart, AD is not automatically added to the pool, and it must be added manually each time.
Access via web-interface
For discretionary access, Citrix suggests using web-based access. To configure access via the web interface, you need to install the Citrix XenServer Web Self Service virtual machine. After a simple configuration of a virtual machine through its console (you must specify an ip-address or specify that it is obtained via DHCP), you must perform a number of settings through the web-interface. Here Citrix is beyond praise for an accessible and understandable description: if you are logged in as an administrator, you will immediately be shown a list of steps you need to perform, as well as a detailed description of how to do this.
Citrix XenServer Web Self Service can use the same users as AD, or create new ones. When you first load XenServer Web Self Service, the administrator needs to specify how he wants to act, and this decision cannot be changed later (of course, you can always rearrange the virtual machine, but this will entail a new setting of access rights to virtual machines). After setup, any user can access a specific virtual machine through a browser. And here Citrix is also very happy: any browser can be used for work, and not some limited set, like Microsoft’s cloud (only InternetExplorer) or VmWare (not supported by Opera). In order for the user to gain access to the virtual machine, the administrator must allow access to this virtual machine for this user, which is easily done through the web interface.
The major drawbacks of working through the web interface include the inability to configure the physical parameters of the virtual machine (the number of processors, the number of RAM, the configuration of connected networks and hard drives). So the web-interface is access to the graphical interface of the virtual machine, and not to control its physical parameters. We performed all the necessary actions: we prepared the equipment, set up the licenses, deployed ... And now the cloud is ready for work!
Our experiment
To assess the actual computing power of the servers, we conducted an experiment, the goal of which was to load as much as possible all 80 logical cores on the system. As a basis for the experiment, a program was taken that performs Ray-Tracing a simple scene, without an operating system and using all the cores on all processors in the computer. How this program works and how to get the source code of this program can be found here .
For the experiment, the program was slightly modified: we added motion animation for one of the spheres in the figure, added work speed counting, and added buffering while drawing each frame. To compare the power of the received program, we ran it on several computers of different configurations, including our IBM servers. In the experiment, the scene was rendered from 5 spheres in a resolution of 800x600. The experiment was a success and IBM servers showed impressive performance indicators. For all the experiments, we recorded a video where the green numbers in the upper left corner of the screen indicate the number of frames per second (FPS), the red numbers mean the number of seconds per frame. Here are the results we got:
1. Normal computer: Intel i3-2100, 3.1 GHz, only 2 cores. For each core 800x600 / 2 = 240000 points per frame. As can be seen from the video, the speed was approximately 0.5 FPS (more than 2 seconds were spent on one frame).
2. Computer on a modern powerful processor: Intel i7-4770, 3.4 GHz, a total of 8 cores. For each core 800x600 / 8 = 60000 points per frame. The result is about 2 frames per second, as you can see in the video.
3. IBM server from the rack: Intel Xeon E7-8860 2.3 GHz, on each computer there are 4 processors with 10 physical cores (2 cores on each core) - a total of 80 cores. For each core 800x600 / 80 = 6000 points per frame. The result is 12-14 FPS - significantly more than other systems.
Interestingly, if you start rendering on the IBM server at a resolution of 1280x1024, and allow the processor cores to work without buffering, you can see how the frame is drawn from 80 bars!
That's what we did. We hope that by reading our article, you can easily make the cloud yourself, avoid the problems that we have described here, or successfully deal with them!
Source: https://habr.com/ru/post/195762/
All Articles