Using Paint as a level editor
I was fond of creating games and didn’t like to do editors and other utilities for all conscious programming activities. My main editor was almost always Paint. But for games in which the level is static and consists of tiles (Mario like and other tanchiki), this is more or less justified, because one pixel from the file created in Paint corresponds to a tile in the game. And what if you want to create a game where there are no tiles, and the game location consists of uneven rocky caves. Or a game in which there are many moving elements (flying platforms, elevators, circular saws rotating in a circle).
I still did not want to create an editor for such purposes. How I solved it using Paint I will describe in this article.
I will not give the names of games and give links to them, because this is not a demonstration or advertising of games, but a description of the method that is used in them.
The first game does not shine with a variety of gameplay: we play for some kind of submarine ship, moving with the help of a jet engine, and dodge rocks and other enemies:
I apologize for the quality of the video, filmed on the phone
The video shows that the location consists of land (which cannot be touched), background, water, spinning hedgehogs (enemies) and emitters that produce these hedgehogs. Yes, there are still fish and algae there, but they are randomly generated and not related to the file level.
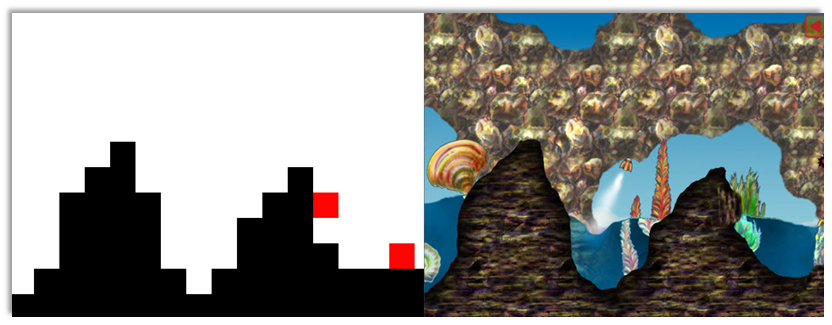
The level of the video is shown on the left (increased 4 times):
')
In the upper left corner you can see the green pixel, this is how the starting position is marked, you should remember this place, because all subsequent illustrations will demonstrate it.
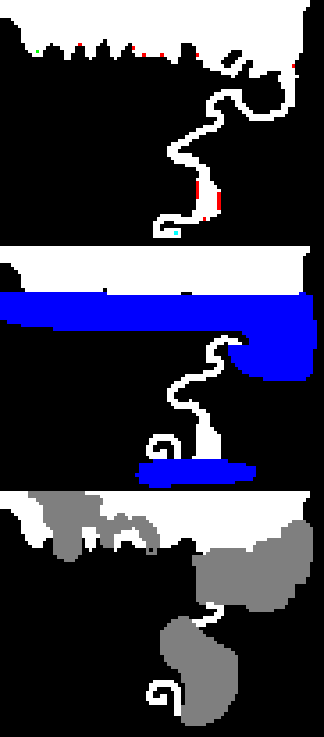
The level file consists of 3 layers:
Water intersects with the earth, the background intersects with the earth and water, so they are divided into 3 layers. Character size is half the size of the pixel in the map file.
If it is now just to take and render (indiscriminately), then the location will consist of giant squares. And the number of such tiles is large enough (61x69 for this card). Therefore, another rendering method (non-file) was used, in which you can display a map in one call (in fact, in three: water separately, background and final gluing). This is due to the fact that the entire level fits into one single texture, let's call it tex_level. And it stretches to a full-screen quad (polygon, the size of the screen). Before this, texture coordinates are set depending on the virtual camera that is tied to the character.

On the left - something like this is the tex_level texture and the coverage of the virtual camera. On the right - the assigned texture coordinates for full-screen quad, i.e. The tex_level texture slice onto the screen.
First, the tex_level texture needs to be prepared. To do this, we will create an array for the pixels of this texture:
where w is the width of the file with the level, h is the height divided by 3 (since there are three layers).
Now, in the cycle, we read each pixel of the source map from each layer and, depending on the color (the same and the type of tile), fill in the corresponding color channels in pixel pix, namely:
Technical feature: in fact, w and h are equal to the nearest in the direction of increasing the power of two for the width and height of the map, the missing pixels are covered in red (ground), and this cycle can be considered pseudo-code.
It can be seen that the same pixel in the array can contain ground, water and background. Based on the pix array, a tex_level texture is created, the pix array itself is still useful.

On the left there is a tex_level ready texture, and on the right it is in the game. Camera in the starting position.
To make it easier to move forward, we will only output the R channel from tex_level, i.e. only earth.
First you need to get rid of these giant squares. To do this, the pix array must be blurred according to Gauss (the blur radius was chosen empirically) before it is transferred to the tex_level texture. Now the same location looks much better already:

Left the ground before the blur, right after.
Technical detail: before blurring, the array pix must be stretched 2 times so that the original pixel would occupy 2x2 pixels in the stretched array.
But the boundary of the land here is very blurred. To understand the process of turning a blurred border into a clear one (let's call this process a clear boundary filter), consider the one-dimensional case, since it is similar. Then the blurred boundary of the earth will look something like this:

Subtract 0.5 from this graph, multiply by some large number (in this project it is 50) and cut (clamp operation) along the border [0; 1], i.e. everything that is less than 0 turns into 0, and everything that is greater than 1 turns into 1:

As a result, the white color does not instantly turn to black (this is important).
Now let's do all these operations with our tex_level texture. Let a sample from this texture be stored in level_color, then the filter looks like this:

Much better, and if you look closely, you can see that there is no aliasing at the interface. But this border is too smooth and smooth, let's add a little noise to it. For this, a Perlin noise texture was generated (the noise parameters were chosen experimentally), let's call it noise. The texture coordinates for sampling noise from the texture are many times more than the texture coordinates for tex_level. This means that while we are only seeing a piece of tex_level texture in the game, the noise texture repeats several times within the screen. Now we simply add samples from the noise texture and from tex_level and only then apply a clear boundary filter:

On the left side is tex_level + noise, on the right side is a clear border filter.
Technical detail: the range of values in the noise texture is from 0 to 1, so you should add (noise - 0.5) * k to the sample of tex_level, where k is the boundary disturbance coefficient (in the project it is 0.3).
Now we just need to apply textures. The texture of the earth is already there (it's just a regular texture), but there is no water yet, you need to prepare it first.
The algorithm is absolutely the same as with the ground, but instead of sampling from the R channel, you should do a sampling from the B channel, since it is there that contains water. Another difference is that instead of the usual noise, animated noise (smoothly changing in time) is used to create waves at the border of water and air. Creating animated noise is beyond the scope of this article. At this stage, we apply the texture of the sky, and the role of water is blue (chosen empirically). All steps of the step of obtaining a layer of water are illustrated below:

From left to right: blurred water boundary, animated noise plus filter, interpolation from blue to sky texture.
The next stage is the rendering of backgruand. This time we sample from tex_level from the G channel. At this stage, there is nothing fundamentally new: we get the background mask and interpolate the texture of the stones (in this case) and the texture of the water from the previous stage. Of course, there are some subtleties: additional filters are superimposed on the underwater part of the background, the same is true for the water itself in order to impart an effect of the water column, but this is beyond the scope of the article. At the same stage, decorative elements are rendered: fish and algae. Finally, the background layer looks like this:

Technical details: to give the effect of "stirring algae" due to undercurrents, the x-component of the texture coordinates was used when rendering the sprite with algae. The magnitude of this offset was read from the same texture with animated noise.
And the last stage is gluing. Having obtained the mask of the earth at the beginning of the article, we apply it to interpolate the texture of the earth and the layer with the background. The final result looks like this:
The development of the idea. What if you want to impose several textures on the ground, then simply add another layer in which the pixels of the earth are colored in 4 different colors (you can do less, but not more). Separate texture mask is created from this layer (4 colors in the layer - 4 color channels in the mask), but then you have to make an additional five texture samples instead of one (one of the mask and 4 of the corresponding ground textures).
If in tile games collisions are determined simply enough: we make a selection from the array of tiles and check, hit / don't hit the impassable tile. Here it will be too rough, because now visually there are no tiles, but there are surfaces at different angles. By the way, the land mask in the code is not available (it is just one of the steps of the calculation on the video card). But we have an array of pix, blurred by Gauss. In the elements of this array only the low byte is interesting, since this is where the land is stored. Visually, this array looks like this (only a fragment of the array that enters the camera is shown, in fact, the array contains the entire map):

This is different from the image with a blurred border, because bilinear filtering was applied there, and here only the raw values of the array after the blur.
The values from this array resemble a height map; it is possible to select a height value that approximately coincides with the visual boundary of the earth (we select it experimentally). For more accurate determination of the height, it is necessary to use bilinear interpolation . And if you calculate three heights in the vicinity of a certain point, then you can quite accurately determine the gradient at this point, and it coincides with the normal to the visual surface of the earth. The normal in this game was used only in one place - for rounding the surface of the jet stream:

So, the first problem posed at the beginning of the article has been solved: no tiles are visible, only uneven rocky landscapes. And what about moving elements? This will show the second game - an analog super meat boy :
There are many moving elements here: circular saws, moving in a straight line or rotating around the center, a moving platform with a thorn and a saw, doors, crumbling tiles. And the saws still have a different size.
The rendering process is completely similar to the first game, so we limit ourselves to considering the format of the map. The map from the video looks like this (increased 5 times):

This map consists of six (!) Layers (there are five different types of layers in the game, all of them are represented here). Unlike the previous game, the number of layers here can be anything. In the upper left corner there is a set of pixels (there are exactly as many as there are layers). They just specify the type of layer (this allows you to not care about the order and number of layers). The first two layers are obvious: the object layer — the interacting elements with the player (earth, thorns, saws, start, exit, crumbling tiles) and the background layer. The fourth layer is also, like the first, a layer of objects (the 4th pixel in the upper left corner is also black). I had to move some objects to this layer, because they intersected with other objects (theoretically, there could be as many layers as possible).
Technical feature: the texture of the tex_level is only zamllya and background (there is no water in this game), and all other objects are read from the level file into the array.
Consider the third layer. Here are the red and blue door with the corresponding keys. So, the doors are also objects, but you cannot put them in the object layer, because the red and blue colors in this layer are already occupied, respectively, under the spikes and under the centers of rotations (which are described below). In general, tile groups are marked in this layer. Tiles from the same group have the same color, and they are all adjacent to each other. There are two types of groups:
In the layer of objects (in this case, in the 4th), rotational centers for rotating groups are marked in blue (here only one center actually fell into a rotating group from the third layer, the rest play the role of a decorative element, since they are also rendered). Two saws also got into the rotating group (yellow color in the 4th layer). They rotate around the center of rotation.
In the fifth layer, the dimensions of the saws in the gradations of red are indicated. If there is no red pixel for the saw from this layer, then its size is taken by default. And in the sixth layer there are trajectories and speeds for moving groups in grayscale, well, and speeds and directions for rotating saws. In some layers there are foreign colors that are not involved in this layer, they are simply ignored when loading the map (for example, almost all layers have black pixels of the earth, they were needed only when drawing up the map to navigate on them).
The development of the idea. Theoretically, using Paint you can create a map for a 3D shooter, the map file will consist of a matrix of layers. The row of this matrix corresponds to the height of the layer in the game, and the columns contain layers of the same type. For example, in the 1st column there will be the geometry of the map (one layer is a slice of the map at a given height), in the 2nd column you can assign textures using key colors of the peint, arrange objects in the 3rd, etc.
Here, perhaps, that's all. Hopefully, the theme "Paint Map Editor" is revealed.
I still did not want to create an editor for such purposes. How I solved it using Paint I will describe in this article.
I will not give the names of games and give links to them, because this is not a demonstration or advertising of games, but a description of the method that is used in them.
Rough map
The first game does not shine with a variety of gameplay: we play for some kind of submarine ship, moving with the help of a jet engine, and dodge rocks and other enemies:
I apologize for the quality of the video, filmed on the phone
The video shows that the location consists of land (which cannot be touched), background, water, spinning hedgehogs (enemies) and emitters that produce these hedgehogs. Yes, there are still fish and algae there, but they are randomly generated and not related to the file level.
The level of the video is shown on the left (increased 4 times):
')
In the upper left corner you can see the green pixel, this is how the starting position is marked, you should remember this place, because all subsequent illustrations will demonstrate it.
The level file consists of 3 layers:
- The layer of objects with which the player interacts: the ground, emitters and hedgehogs, as well as the starting position and exit. The orientation of the emitters (can shoot in one of the four directions) is not specified, it is calculated when loading, based on the adjacent "land" pixels
- The layer of water (this is an arcade, so the law of communicating vessels is not valid here)
- Background Layer
Water intersects with the earth, the background intersects with the earth and water, so they are divided into 3 layers. Character size is half the size of the pixel in the map file.
If it is now just to take and render (indiscriminately), then the location will consist of giant squares. And the number of such tiles is large enough (61x69 for this card). Therefore, another rendering method (non-file) was used, in which you can display a map in one call (in fact, in three: water separately, background and final gluing). This is due to the fact that the entire level fits into one single texture, let's call it tex_level. And it stretches to a full-screen quad (polygon, the size of the screen). Before this, texture coordinates are set depending on the virtual camera that is tied to the character.
On the left - something like this is the tex_level texture and the coverage of the virtual camera. On the right - the assigned texture coordinates for full-screen quad, i.e. The tex_level texture slice onto the screen.
First, the tex_level texture needs to be prepared. To do this, we will create an array for the pixels of this texture:
unsigned int pix[w*h]; where w is the width of the file with the level, h is the height divided by 3 (since there are three layers).
Now, in the cycle, we read each pixel of the source map from each layer and, depending on the color (the same and the type of tile), fill in the corresponding color channels in pixel pix, namely:
for(int i=0;i<w*h;i++) // { int c=GetPixel(i%w,i/w); // 1- if(c==RGB(0,0,0)) pix[i]=0xff; // – (R ) c=GetPixel(i%w,i/w+h); // 2- if(c==RGB(0,0,255)) pix[i]|=0xff0000; // – (B ) c=GetPixel(i%w,i/w+h+h); // 3- if(c==RGB(127,127,127)) pix[i]|=0xff00; // – (G ) } Technical feature: in fact, w and h are equal to the nearest in the direction of increasing the power of two for the width and height of the map, the missing pixels are covered in red (ground), and this cycle can be considered pseudo-code.
It can be seen that the same pixel in the array can contain ground, water and background. Based on the pix array, a tex_level texture is created, the pix array itself is still useful.
On the left there is a tex_level ready texture, and on the right it is in the game. Camera in the starting position.
To make it easier to move forward, we will only output the R channel from tex_level, i.e. only earth.
First you need to get rid of these giant squares. To do this, the pix array must be blurred according to Gauss (the blur radius was chosen empirically) before it is transferred to the tex_level texture. Now the same location looks much better already:
Left the ground before the blur, right after.
Technical detail: before blurring, the array pix must be stretched 2 times so that the original pixel would occupy 2x2 pixels in the stretched array.
But the boundary of the land here is very blurred. To understand the process of turning a blurred border into a clear one (let's call this process a clear boundary filter), consider the one-dimensional case, since it is similar. Then the blurred boundary of the earth will look something like this:
Subtract 0.5 from this graph, multiply by some large number (in this project it is 50) and cut (clamp operation) along the border [0; 1], i.e. everything that is less than 0 turns into 0, and everything that is greater than 1 turns into 1:
As a result, the white color does not instantly turn to black (this is important).
Now let's do all these operations with our tex_level texture. Let a sample from this texture be stored in level_color, then the filter looks like this:
clamp((level_color.r – 0.5) * 50.0, 0.0, 1.0)Much better, and if you look closely, you can see that there is no aliasing at the interface. But this border is too smooth and smooth, let's add a little noise to it. For this, a Perlin noise texture was generated (the noise parameters were chosen experimentally), let's call it noise. The texture coordinates for sampling noise from the texture are many times more than the texture coordinates for tex_level. This means that while we are only seeing a piece of tex_level texture in the game, the noise texture repeats several times within the screen. Now we simply add samples from the noise texture and from tex_level and only then apply a clear boundary filter:
On the left side is tex_level + noise, on the right side is a clear border filter.
Technical detail: the range of values in the noise texture is from 0 to 1, so you should add (noise - 0.5) * k to the sample of tex_level, where k is the boundary disturbance coefficient (in the project it is 0.3).
Now we just need to apply textures. The texture of the earth is already there (it's just a regular texture), but there is no water yet, you need to prepare it first.
The algorithm is absolutely the same as with the ground, but instead of sampling from the R channel, you should do a sampling from the B channel, since it is there that contains water. Another difference is that instead of the usual noise, animated noise (smoothly changing in time) is used to create waves at the border of water and air. Creating animated noise is beyond the scope of this article. At this stage, we apply the texture of the sky, and the role of water is blue (chosen empirically). All steps of the step of obtaining a layer of water are illustrated below:
From left to right: blurred water boundary, animated noise plus filter, interpolation from blue to sky texture.
The next stage is the rendering of backgruand. This time we sample from tex_level from the G channel. At this stage, there is nothing fundamentally new: we get the background mask and interpolate the texture of the stones (in this case) and the texture of the water from the previous stage. Of course, there are some subtleties: additional filters are superimposed on the underwater part of the background, the same is true for the water itself in order to impart an effect of the water column, but this is beyond the scope of the article. At the same stage, decorative elements are rendered: fish and algae. Finally, the background layer looks like this:
Technical details: to give the effect of "stirring algae" due to undercurrents, the x-component of the texture coordinates was used when rendering the sprite with algae. The magnitude of this offset was read from the same texture with animated noise.
And the last stage is gluing. Having obtained the mask of the earth at the beginning of the article, we apply it to interpolate the texture of the earth and the layer with the background. The final result looks like this:
Hidden text
The development of the idea. What if you want to impose several textures on the ground, then simply add another layer in which the pixels of the earth are colored in 4 different colors (you can do less, but not more). Separate texture mask is created from this layer (4 colors in the layer - 4 color channels in the mask), but then you have to make an additional five texture samples instead of one (one of the mask and 4 of the corresponding ground textures).
Collision detection
If in tile games collisions are determined simply enough: we make a selection from the array of tiles and check, hit / don't hit the impassable tile. Here it will be too rough, because now visually there are no tiles, but there are surfaces at different angles. By the way, the land mask in the code is not available (it is just one of the steps of the calculation on the video card). But we have an array of pix, blurred by Gauss. In the elements of this array only the low byte is interesting, since this is where the land is stored. Visually, this array looks like this (only a fragment of the array that enters the camera is shown, in fact, the array contains the entire map):
This is different from the image with a blurred border, because bilinear filtering was applied there, and here only the raw values of the array after the blur.
The values from this array resemble a height map; it is possible to select a height value that approximately coincides with the visual boundary of the earth (we select it experimentally). For more accurate determination of the height, it is necessary to use bilinear interpolation . And if you calculate three heights in the vicinity of a certain point, then you can quite accurately determine the gradient at this point, and it coincides with the normal to the visual surface of the earth. The normal in this game was used only in one place - for rounding the surface of the jet stream:
Dynamic map
So, the first problem posed at the beginning of the article has been solved: no tiles are visible, only uneven rocky landscapes. And what about moving elements? This will show the second game - an analog super meat boy :
There are many moving elements here: circular saws, moving in a straight line or rotating around the center, a moving platform with a thorn and a saw, doors, crumbling tiles. And the saws still have a different size.
The rendering process is completely similar to the first game, so we limit ourselves to considering the format of the map. The map from the video looks like this (increased 5 times):
This map consists of six (!) Layers (there are five different types of layers in the game, all of them are represented here). Unlike the previous game, the number of layers here can be anything. In the upper left corner there is a set of pixels (there are exactly as many as there are layers). They just specify the type of layer (this allows you to not care about the order and number of layers). The first two layers are obvious: the object layer — the interacting elements with the player (earth, thorns, saws, start, exit, crumbling tiles) and the background layer. The fourth layer is also, like the first, a layer of objects (the 4th pixel in the upper left corner is also black). I had to move some objects to this layer, because they intersected with other objects (theoretically, there could be as many layers as possible).
Technical feature: the texture of the tex_level is only zamllya and background (there is no water in this game), and all other objects are read from the level file into the array.
Consider the third layer. Here are the red and blue door with the corresponding keys. So, the doors are also objects, but you cannot put them in the object layer, because the red and blue colors in this layer are already occupied, respectively, under the spikes and under the centers of rotations (which are described below). In general, tile groups are marked in this layer. Tiles from the same group have the same color, and they are all adjacent to each other. There are two types of groups:
- Moving group. All tiles of this group synchronously move (green color). The group contains one main tile (blue-green color), for which the trajectory and speed are assigned in another layer. In this map there is one big group that includes the earth (becomes something like a cart) with a thorn and a saw. And four single - only one saw moves in each of them.
- Rotating group (gray color)
In the layer of objects (in this case, in the 4th), rotational centers for rotating groups are marked in blue (here only one center actually fell into a rotating group from the third layer, the rest play the role of a decorative element, since they are also rendered). Two saws also got into the rotating group (yellow color in the 4th layer). They rotate around the center of rotation.
In the fifth layer, the dimensions of the saws in the gradations of red are indicated. If there is no red pixel for the saw from this layer, then its size is taken by default. And in the sixth layer there are trajectories and speeds for moving groups in grayscale, well, and speeds and directions for rotating saws. In some layers there are foreign colors that are not involved in this layer, they are simply ignored when loading the map (for example, almost all layers have black pixels of the earth, they were needed only when drawing up the map to navigate on them).
The development of the idea. Theoretically, using Paint you can create a map for a 3D shooter, the map file will consist of a matrix of layers. The row of this matrix corresponds to the height of the layer in the game, and the columns contain layers of the same type. For example, in the 1st column there will be the geometry of the map (one layer is a slice of the map at a given height), in the 2nd column you can assign textures using key colors of the peint, arrange objects in the 3rd, etc.
Here, perhaps, that's all. Hopefully, the theme "Paint Map Editor" is revealed.
Source: https://habr.com/ru/post/195338/
All Articles