Organizing multichannel numbers with the help of Komunikator
Once, in very dense times, in our office for receiving calls was enough two ordinary, wired phones. As time went on, the company grew, we needed a second office, respectively, there was a need to organize a mobile multi-channel PBX. The classic (analog) PBX fell away due to the inconvenience of organizing a single telephone connection with the new office, and again expensive and long-term wiring in the new office, installation and programming of a proprietary telephone, and we also had employees at remote work, they needed to transfer the call on a cell number. And what can we say, it is so important to keep the phone number, which has been known to customers for a long time and not to lose it when moving. The solution was obvious - go to the IP PBX. It remained only to pick up the software.
The task to bring the idea to life was assigned to me as an admin. The software requirements for IP PBXs were set as follows: the ability to receive and make calls to landline and international numbers, an unlimited number of internal numbers, call forwarding to both internal numbers and cellular operators, conference calls, low price, easy setup and service.
A brief analysis of existing software solutions clarified two points: most programs for using IP telephony do not have the required set of functions (no international call service, restriction on the number of internal numbers, a mandatory condition: the seller company provides telephony configuration) and the quality of communication as a whole does not match the cost of the proposed solutions. There was even a thought about software Asterisk, but there is a question about the expensive configuration, and the allocation of a separate server for it.
')
But, as they say, the catcher and the beast are running: the familiar IT people suggested that a new solution developed on the Yate platform, Komunikator, appeared on the Russian IP telephony market. Below I have resulted the table with its basic functionality.
The sources of the novelty could be downloaded in open access (read - for free) on the githaba, which I promptly did on our server. Before proceeding with the installation process of IP-PBX, it is necessary to clarify that the installation should be understood as the transfer of the virtual machine image in the virtualization program for placement and subsequent use. The Komunikator virtual machine image is presented as a * .OVA file and has a size of about 770 MB ( download image ).
The minimum system requirements that will be borrowed by the Komunikator running virtual machine:
When testing the Komunikator virtual machine, an Intel Celeron 430 processor (1.8 GHz) was used, which coped well with the task.
Next, I will describe the process of installing Komunikator (4 stages), I did it according to the document "Installation Guide for IP-PBX" ( githab )
As a virtualization program, the Oracle VM VirtualBox program was chosen to review the IP PBX installation process. VirtualBox is freely distributable, which gives the right to free use of this program, without any payments.
1. Specify the virtual machine image file virtualization program:
In the menu "Import configurations ..." select the image file of the virtual machine, then click "Next".

2. Specifying configuration parameters recreated from a virtual machine image file
Select the configuration parameters of the virtual machine. It is recommended to select the default configuration options. And click "Import".
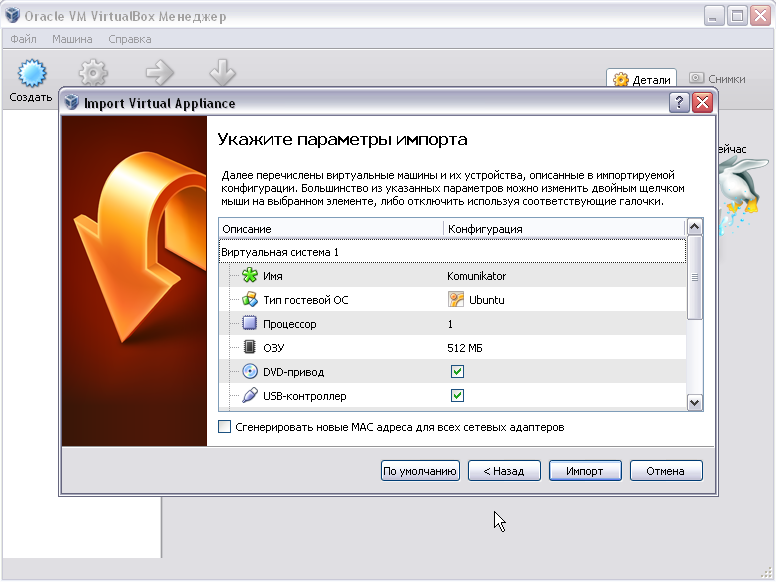
After the reconstruction is completed from the image file of the virtual machine, it (the virtual machine) will be displayed in the list of the virtual machine management window.
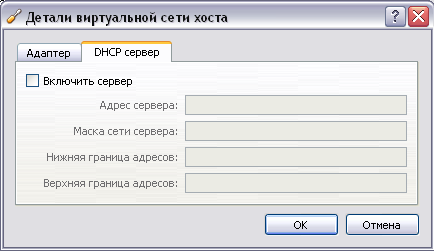
3. Configuring the network connection settings of the VirtualBox virtualization program and the DHCP server used by this program.
In the menu "File" - "Settings ..." select the option "Network" to configure the network connection.

It is recommended that you select the default IP address offered by VirtualBox.

If there is already a DHCP server on the network to connect the computer to the network (on which VirtualBox is installed), then the DHCP server offered by VirtualBox must be disabled. And vice versa, otherwise.
4. Start of the virtual machine (start of IP-PBX). In the context menu, click "Run".
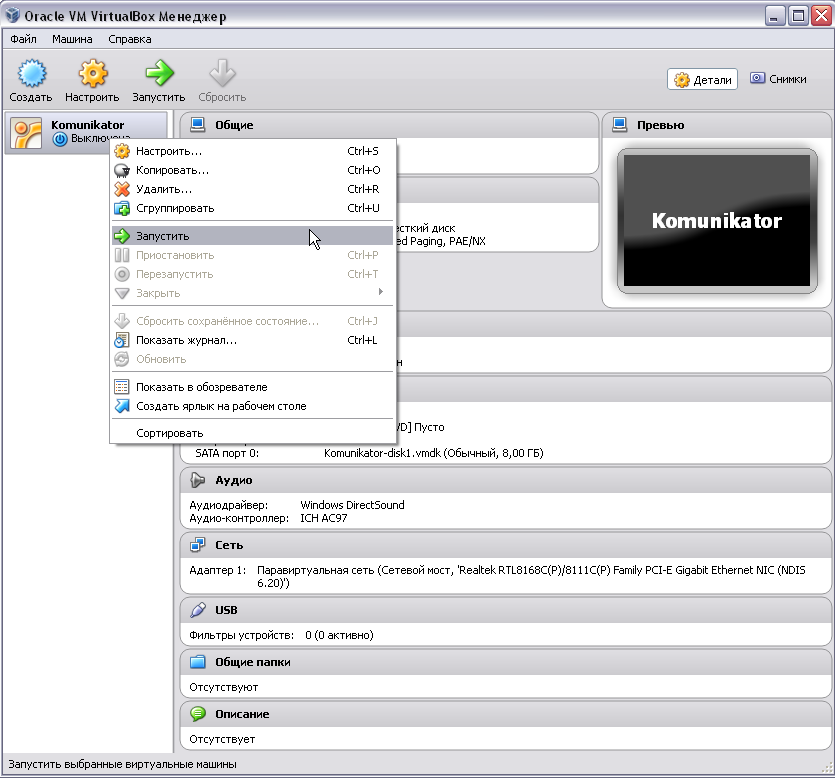
Installation of IP-PBX "Komunikator" is completed. Since “Komunikator” is configured and controlled via a web-interface through a browser, then you need to know the IP address assigned to the virtual machine where this IP PBX is installed.
After starting the virtual machine and booting the OS, you will need to enter the name and password of the account registered on this OS, i.e. OS Administrator.

Interaction with the OS is carried out through the command line interface.
To get the network interface parameters (including IP addresses), the OS provides the command - ifconfig.

Now you can connect to an IP PBX. We launch the browser and in the search bar enter the received IP address of the virtual machine. In the browser window that opens, you need to enter the IP-PBX administrator account information, after which the PBX management interface will launch.
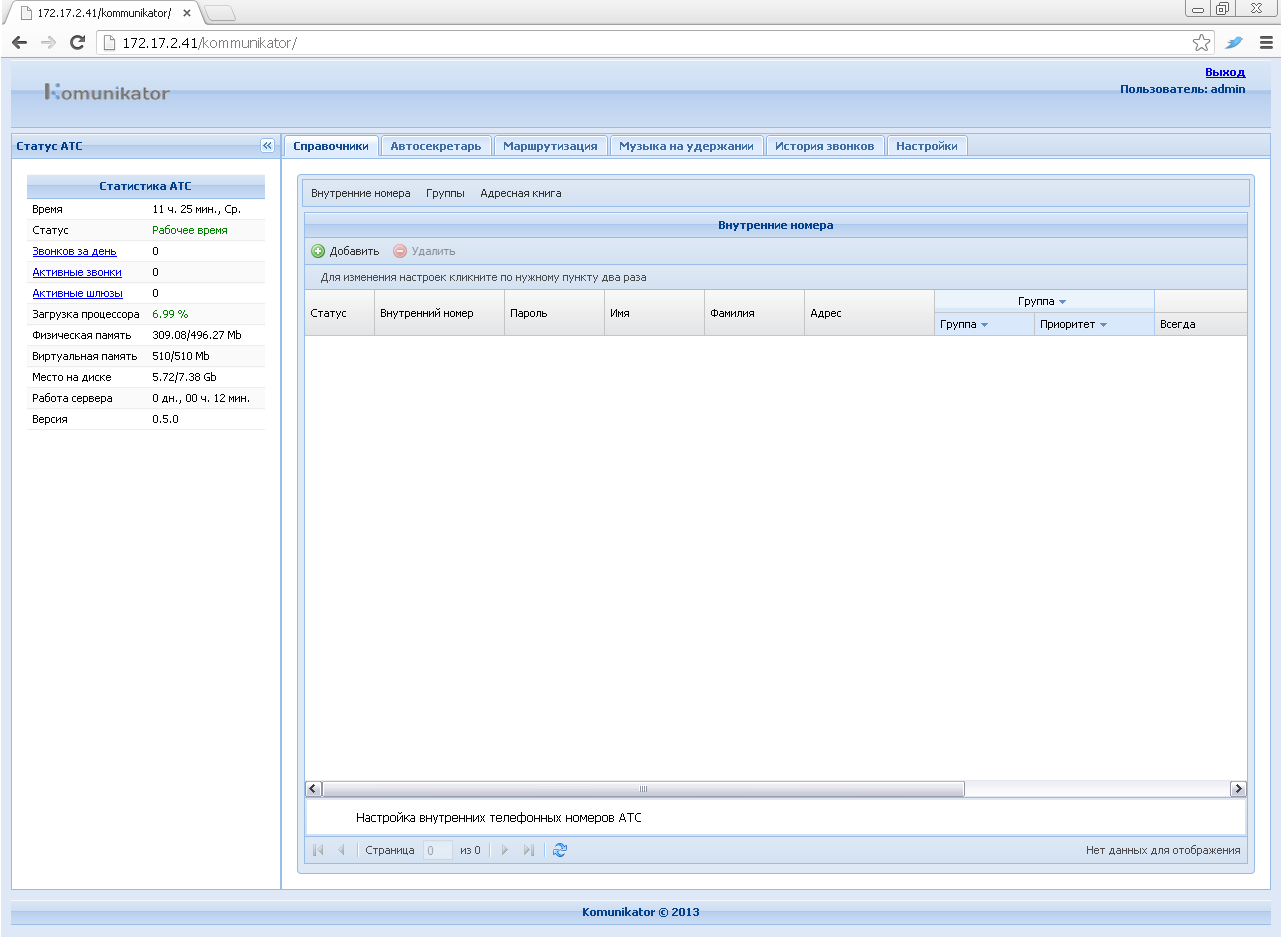
A detailed description of the interface has already been prepared by the developers of Komunikator. I recommend to study, because This will be required when you further configure SIP-clients and SIP-provider. ( githab )
We chose MegaFon as a SIP provider, it came up to us for the cost of the service and is already integrated with Komunikator. After connecting to the MegaFon mobile operator (buying a SIM card), to get a single multi-channel number, it is necessary to activate the MultiFon service. Do not confuse the MultiFon service with the Mobile PBX service.
Activation took place by USSD-team - * 137 #
From the SIP provider we get: username (subscriber number), password (obtained after connecting to the MultiFon service), server IP address, port, protocol, domain.
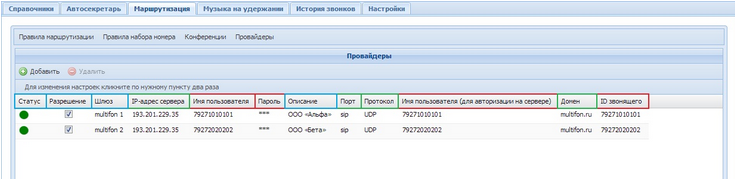
Next, we configure the provider in the Komunikator interface on the Routing tab of the Providers panel. And fill in all the required fields.
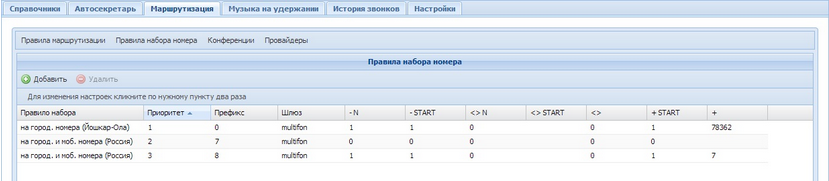
Now we create rules for converting dialed phone numbers for "external" outgoing calls.
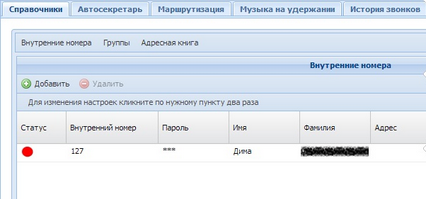
Then we connect internal subscribers (SIP-clients) to IP automatic telephone exchange. This is done in the “References” tab in the “Internal Numbers” panel.
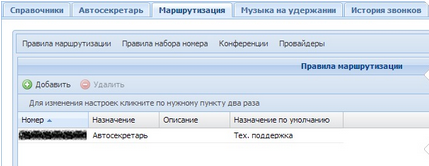
Well, create the rules for receiving "external" incoming phone calls.
For more information about the redirection of "external" incoming phone calls received by the IP-PBX from a SIP-provider, see the manual, in the section "Configuring a SIP-provider" ( github )
That's not at all difficult and in a short time earned a multi-channel number in our office.
At the moment, the following functions are implemented in the product:
Commands for performing functions are described, again, on the githaba .
And that's not all: in the plans of developers to improve the product. For example, among the planned options - the ability to integrate with 1C, chat and calls from the site.
I hope my positive experience with Komunikator will help someone to set up a multi-channel telephone line in his company. Good luck!
The task to bring the idea to life was assigned to me as an admin. The software requirements for IP PBXs were set as follows: the ability to receive and make calls to landline and international numbers, an unlimited number of internal numbers, call forwarding to both internal numbers and cellular operators, conference calls, low price, easy setup and service.
A brief analysis of existing software solutions clarified two points: most programs for using IP telephony do not have the required set of functions (no international call service, restriction on the number of internal numbers, a mandatory condition: the seller company provides telephony configuration) and the quality of communication as a whole does not match the cost of the proposed solutions. There was even a thought about software Asterisk, but there is a question about the expensive configuration, and the allocation of a separate server for it.
')
But, as they say, the catcher and the beast are running: the familiar IT people suggested that a new solution developed on the Yate platform, Komunikator, appeared on the Russian IP telephony market. Below I have resulted the table with its basic functionality.
| Cost of solution | 0 rub. |
| Subscription fee | 0 rub. |
| Connecting external SIP-providers | 0 rub. |
| Support for external SIP providers | unlimited |
| PC client | SIP phone or Softphone |
| Number of employees (internal numbers) | unlimited |
| Active call route patterns | unlimited |
| WEB interface | Yes |
| Multichannel | Yes |
| Call Forwarding | Yes |
| Call transfer to mobile operator number | Yes |
| Conference organization | Yes |
| Call recording | not |
| Call blocking | Yes |
| Call hold | Yes |
| Fax to e-mail | not |
| Auto attendant | Yes |
| Ringing tone | Yes |
| Call History | Yes |
The sources of the novelty could be downloaded in open access (read - for free) on the githaba, which I promptly did on our server. Before proceeding with the installation process of IP-PBX, it is necessary to clarify that the installation should be understood as the transfer of the virtual machine image in the virtualization program for placement and subsequent use. The Komunikator virtual machine image is presented as a * .OVA file and has a size of about 770 MB ( download image ).
The minimum system requirements that will be borrowed by the Komunikator running virtual machine:
- RAM: 512 MB;
- video memory: 12 MB;
- disk space: 2 GB (as needed, the size will increase).
When testing the Komunikator virtual machine, an Intel Celeron 430 processor (1.8 GHz) was used, which coped well with the task.
Next, I will describe the process of installing Komunikator (4 stages), I did it according to the document "Installation Guide for IP-PBX" ( githab )
As a virtualization program, the Oracle VM VirtualBox program was chosen to review the IP PBX installation process. VirtualBox is freely distributable, which gives the right to free use of this program, without any payments.
1. Specify the virtual machine image file virtualization program:
In the menu "Import configurations ..." select the image file of the virtual machine, then click "Next".
2. Specifying configuration parameters recreated from a virtual machine image file
Select the configuration parameters of the virtual machine. It is recommended to select the default configuration options. And click "Import".
After the reconstruction is completed from the image file of the virtual machine, it (the virtual machine) will be displayed in the list of the virtual machine management window.
3. Configuring the network connection settings of the VirtualBox virtualization program and the DHCP server used by this program.
In the menu "File" - "Settings ..." select the option "Network" to configure the network connection.
It is recommended that you select the default IP address offered by VirtualBox.
If there is already a DHCP server on the network to connect the computer to the network (on which VirtualBox is installed), then the DHCP server offered by VirtualBox must be disabled. And vice versa, otherwise.
4. Start of the virtual machine (start of IP-PBX). In the context menu, click "Run".
Installation of IP-PBX "Komunikator" is completed. Since “Komunikator” is configured and controlled via a web-interface through a browser, then you need to know the IP address assigned to the virtual machine where this IP PBX is installed.
After starting the virtual machine and booting the OS, you will need to enter the name and password of the account registered on this OS, i.e. OS Administrator.
Interaction with the OS is carried out through the command line interface.
To get the network interface parameters (including IP addresses), the OS provides the command - ifconfig.
Now you can connect to an IP PBX. We launch the browser and in the search bar enter the received IP address of the virtual machine. In the browser window that opens, you need to enter the IP-PBX administrator account information, after which the PBX management interface will launch.
A detailed description of the interface has already been prepared by the developers of Komunikator. I recommend to study, because This will be required when you further configure SIP-clients and SIP-provider. ( githab )
We chose MegaFon as a SIP provider, it came up to us for the cost of the service and is already integrated with Komunikator. After connecting to the MegaFon mobile operator (buying a SIM card), to get a single multi-channel number, it is necessary to activate the MultiFon service. Do not confuse the MultiFon service with the Mobile PBX service.
Activation took place by USSD-team - * 137 #
From the SIP provider we get: username (subscriber number), password (obtained after connecting to the MultiFon service), server IP address, port, protocol, domain.
Next, we configure the provider in the Komunikator interface on the Routing tab of the Providers panel. And fill in all the required fields.
Now we create rules for converting dialed phone numbers for "external" outgoing calls.
Then we connect internal subscribers (SIP-clients) to IP automatic telephone exchange. This is done in the “References” tab in the “Internal Numbers” panel.
Well, create the rules for receiving "external" incoming phone calls.
For more information about the redirection of "external" incoming phone calls received by the IP-PBX from a SIP-provider, see the manual, in the section "Configuring a SIP-provider" ( github )
That's not at all difficult and in a short time earned a multi-channel number in our office.
At the moment, the following functions are implemented in the product:
- Outgoing and incoming calls for both external and internal communication;
- Conference call;
- Call log;
- Call forwarding from extension to mobile number.
- Transfer a call to an internal number or to the number of an employee’s mobile operator.
- Intercept a call.
Commands for performing functions are described, again, on the githaba .
And that's not all: in the plans of developers to improve the product. For example, among the planned options - the ability to integrate with 1C, chat and calls from the site.
I hope my positive experience with Komunikator will help someone to set up a multi-channel telephone line in his company. Good luck!
Source: https://habr.com/ru/post/195030/
All Articles