Scalable fault tolerant file service based on CTDB, GlusterFS
The article is a step-by-step guide to building a scalable fault-tolerant file storage, which will be accessed using the Samba, NFS protocols. As a file system that will be directly responsible for the preservation and scaling of the file balls, we will use GlusterFS, which was already enough written by the Chabs community. Since GlusterFS is part of Red Hat Storage , the tutorial is written for RH-like systems.

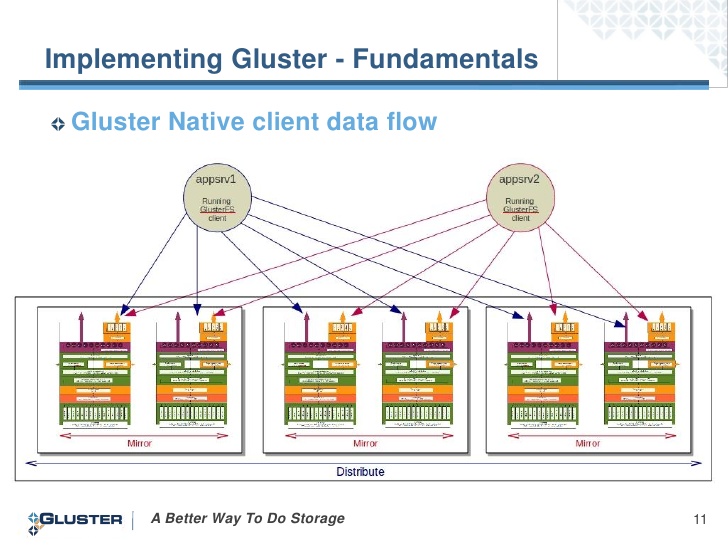
I use version 3.3.1, rpm-ki downloaded from the official site. After creating the volume, the client can access it in several ways:
We will use the first option, since in this case the client establishes connection with all servers and in case of server failure to which we mounted, we receive data from the working servers:
Excellent mechanics work described in this post. I would like to add that the cluster load distribution using LVS is written in the documentation only for the NAT network; therefore, we will use Round Robbin DNS. Available in standard repositories, as well as SMB, NFS:
Suppose we have 2 nodes:
You still need a couple of IPs that will implement fault tolerance - migrate between servers.
RR DNS for the data domain looks like this:
')
In the creation of volume for GlusterFS I will not go deep. I will say that we need a distributed - replication partition (distributed + replicated volume). Call it smb . First, we mount it locally for each node:
Each server uses its own hostname as an option. Do not forget to make an entry in / etc / fstab.
Now we reign Samba configuration (on each server) .
...
# The main parameter is responsible for clustering.
# Communication with the database that stores user requests (see the link for the mechanics of work)
# Folder with configuration files
And there we will add a section of the balls itself:
The folder will turn out for general use, access from the user of smbcli without authorization. Let us create it and assign rights.
Now on one of the servers we create a folder in which we will place some configuration files CTDB
And add the file:
The CTDB configuration file on each server is converted to :
# File that is executed every time when the node of the CTDB cluster changes its status (for example, send a letter)
We specify our public adresses (on each server) :
Specify the nodes of the CTDB cluster (on each server) :
I disable SElinux, IPtables look like this (of course, for each server):
# Instead of the name of the chains, you can simply specify ACCEPT.
Let's return to Samba and the smbcli user (on each server) :
The penultimate strokes:
Now you can watch
The list of public migrating IPs and their accession to servers is obtained by the command
We mount the client using the SMB or NFS protocol with the commands:
From personal experience I will say that I still test network drops, the result is very bearable. Breakage of the connection is almost not noticeable. All explains AndreyKirov
Enjoy your coding!
How do these services interact?
GlusterFS
I use version 3.3.1, rpm-ki downloaded from the official site. After creating the volume, the client can access it in several ways:
# mount.glusterfs# mount -o mountproto=tcp,async -t nfs# mount.cifs
We will use the first option, since in this case the client establishes connection with all servers and in case of server failure to which we mounted, we receive data from the working servers:
CTDB
Excellent mechanics work described in this post. I would like to add that the cluster load distribution using LVS is written in the documentation only for the NAT network; therefore, we will use Round Robbin DNS. Available in standard repositories, as well as SMB, NFS:
# yum install ctdb samba nfs-utils cifs-utilsLet's get started
Suppose we have 2 nodes:
gluster1, 192.168.122.100gluster2, 192.168.122.101You still need a couple of IPs that will implement fault tolerance - migrate between servers.
192.168.122.200192.168.122.201RR DNS for the data domain looks like this:
')
; zone file fragmentdata. 86400 IN A 192.168.122.200data. 86400 IN A 192.168.122.201In the creation of volume for GlusterFS I will not go deep. I will say that we need a distributed - replication partition (distributed + replicated volume). Call it smb . First, we mount it locally for each node:
# mount.glusterfs gluster1:smb /mnt/glustersmbEach server uses its own hostname as an option. Do not forget to make an entry in / etc / fstab.
Now we reign Samba configuration (on each server) .
# vim /etc/samba/smb.conf...
[global]# The main parameter is responsible for clustering.
clustering = yes# Communication with the database that stores user requests (see the link for the mechanics of work)
idmap backend = tdb2# Folder with configuration files
private dir = /mnt/glustersmb/lockAnd there we will add a section of the balls itself:
[pub]path = /mnt/glustersmb/lockbrowseable = YESforce user = smbcliforce group = smbcliwritable = yesguest ok = yesguest account = smbcliguest only = yesThe folder will turn out for general use, access from the user of smbcli without authorization. Let us create it and assign rights.
Now on one of the servers we create a folder in which we will place some configuration files CTDB
# mkdir /mnt/glustersmb/lockAnd add the file:
# touch /mnt/glustersmb/lock/lockfileThe CTDB configuration file on each server is converted to :
# vim /etc/sysconfig/ctdbCTDB_RECOVERY_LOCK=/mnt/glustersmb/lock/lockfileCTDB_PUBLIC_ADDRESSES=/etc/ctdb/public_addressesCTDB_MANAGES_SAMBA=yesCTDB_NODES=/etc/ctdb/nodesCTDB_MANAGES_NFS=yes# File that is executed every time when the node of the CTDB cluster changes its status (for example, send a letter)
CTDB_NOTIFY_SCRIPT=/etc/ctdb/notify.shWe specify our public adresses (on each server) :
# vim /etc/ctdb/public_addesses192.168.122.200/24 eth0192.168.122.201/24 eth0Specify the nodes of the CTDB cluster (on each server) :
# vim /etc/ctdb/nodes192.168.122.100192.168.122.101I disable SElinux, IPtables look like this (of course, for each server):
# vim /etc/sysconfig/iptables-A INPUT -p tcp --dport 4379 -j ctdb-A INPUT -p udp --dport 4379 -j ctdb-A INPUT -p tcp -m multiport --ports 137:139,445 -m comment --comment "SAMBA" -j SMB-A INPUT -p udp -m multiport --ports 137:139,445 -m comment --comment "SAMBA" -j SMB-A INPUT -p tcp -m multiport --ports 111,2049,595:599 -j NFS-A INPUT -p udp -m multiport --ports 111,2049,595:599 -j NFS-A INPUT -p tcp -m tcp --dport 24007:24220 -m comment --comment "Gluster daemon" -j ACCEPT-A INPUT -p tcp -m tcp --dport 38465:38667 -m comment --comment "Gluster daemon(nfs ports)" -j ACCEPT# Instead of the name of the chains, you can simply specify ACCEPT.
Let's return to Samba and the smbcli user (on each server) :
# useradd smbcli# chown -R smbcli.smbcli /mnt/glustersmb/pubThe penultimate strokes:
# chkconfig smbd off# chkconfig ctdb on# service ctdb startNow you can watch
# ctdb statusNumber of nodes:2pnn:0 192.168.122.100 OK (THIS NODE)pnn:1 192.168.122.101 OKGeneration:1112747960Size:2hash:0 lmaster:0hash:1 lmaster:1Recovery mode:NORMAL (0)Recovery master:0The list of public migrating IPs and their accession to servers is obtained by the command
# ctdb ipPublic IPs on node 0192.168.122.200 node[1] active[] available[eth0] configured[eth0]192.168.122.201 node[0] active[eth0] available[eth0] configured[eth0]We mount the client using the SMB or NFS protocol with the commands:
# mount.cifs data:smb /mnt# mount -o mountproto=tcp,async -t nfs data:smb /mntFrom personal experience I will say that I still test network drops, the result is very bearable. Breakage of the connection is almost not noticeable. All explains AndreyKirov
Likbez
The host that took over the IP address of the other knows only what they were about old TCP connections and does not know the “TCP squence number” connections. Accordingly, they can not continue. As well as the client, he knows nothing about the fact that connections are now made with another node.
In order to avoid delays associated with switching the connection, the following method is used. To understand this technique, you need to understand the basic principles of the TCP protocol.
The new node, receiving its ip address, sends the client a packet with the ACK flag and the obviously “s / sequence number” equal to zero. In response, the client, in accordance with the rules of the TCP protocol, sends back an ACK Reply packet with the correct “squence number”. Having received the correct "squence number" node forms a packet with the RST flag and this "squence number". Having received it, the client immediately restarts the connection.
Enjoy your coding!
Source: https://habr.com/ru/post/194970/
All Articles