The coolest PC system unit (DIY)
Good afternoon, habrovchane. Thank you very much for the invite! And although it’s not a good idea to begin with the translation of other people's posts, perhaps this project of home-made products will still seem mega-cool to someone.

This is a translation of the post from the Overclock.net forum. The user of Show4Pro decided to pull out all the insides of his super company and hang everything on the wall. Great idea beautifully implemented. Who cares how it was going and how it works - Wellcome under cat.
')
Hey everyone! I just finished installing water cooling on my wall. All the work took me 4 weeks and 100+ hours, and now I want to share with you a completed project and photos of the installation and the process itself. Enjoy!
Last time I updated my home machine 1.5 years ago. Well, I thought to upgrade the car to i7 (before that was Bloomfield), although in fact, I did not need a more powerful processor. I wanted to buy a new case - the Corsair 900D, to change the 8 year old Super Armor. But I wanted something special, unique. In Battlestations on Reddit, I came across a very simple, but elegant solution - a wall-mounted computer. And the whole project began with this.
Accessories:
Processor: Intel Core i7 950
Motherboard: Asus Rampage III Extreme
Video: 2 x AMD HD7970
RAM: 6 x 2GB Corsair Dominator
SSD drives: 4 x 120GB Corsair Force GT SSD
HDD drives: 2 x 1TB WD Caviar Black
2TB WD Caviar Green
1.5TB WD Caviar Green
Power supply: Corsair AX1200i
Sound: Creative Sound Blaster Zx
Cooling:
CPU cooling:
Radiator for CPU with water cooling EK Supreme HF Full Copper
Pump Swiftech MCP655 / w Speed Control
Himself cooler FrozenQ Liquid Fusion V Series 400 ml Reservoir - Blood Red
Radiator XSPC RX360 Performance Triple 120mm Radiator
GPU cooling
Radiator for video card EK FC7970 - Acetal + EN
Pump and cooler are the same as for the pump.
Swiftech MCP655 / w Speed Control
FrozenQ Liquid Fusion V Series 400 ml Reservoir - Blood Red
Watercool MO-RA3 9x120 LT Radiator
Other:
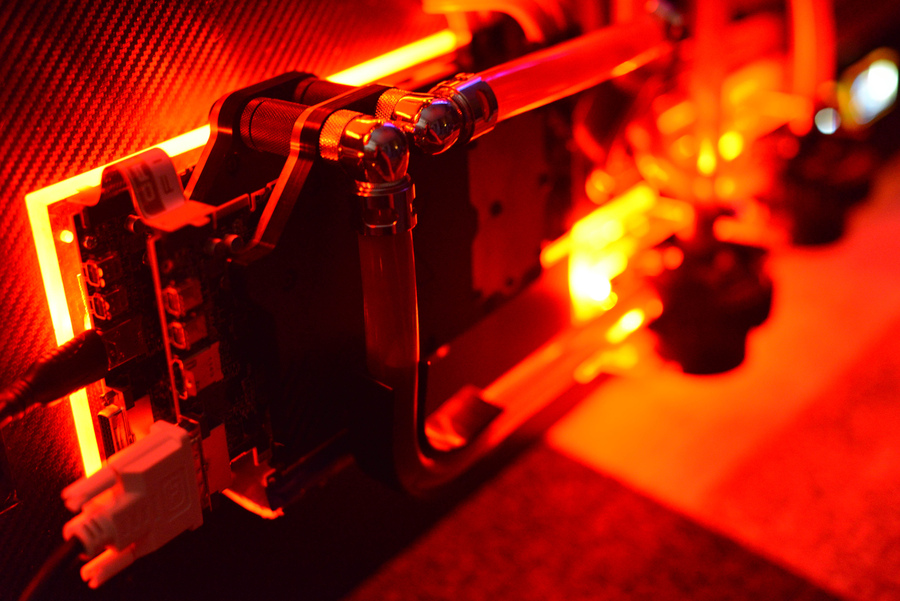
Cooling system connections
Koolance QD4 Quick Discounnect No-Spill Coupling
Bitspower G1 / 4 Silver Triple Rotary 90deg Compression Fittings
Monsoon Free Center Compression Fittings
Phobya Angled Clip Pipe Bending Groove 90 ° Tubing Guide
Holder Phobya Terminal Strip Tubing Clip / Holder
Cooling tubes themselves (red) PrimoChill Advanced LRT Tubing Bloodshed Red
Phosphoric refrigerant, blue EK UV Blue Non-Conductive Fluid
Cables:
Bitfenix Alchemy Premium Sleeved Extensions
Corsair Individually Sleeved Modular Cables
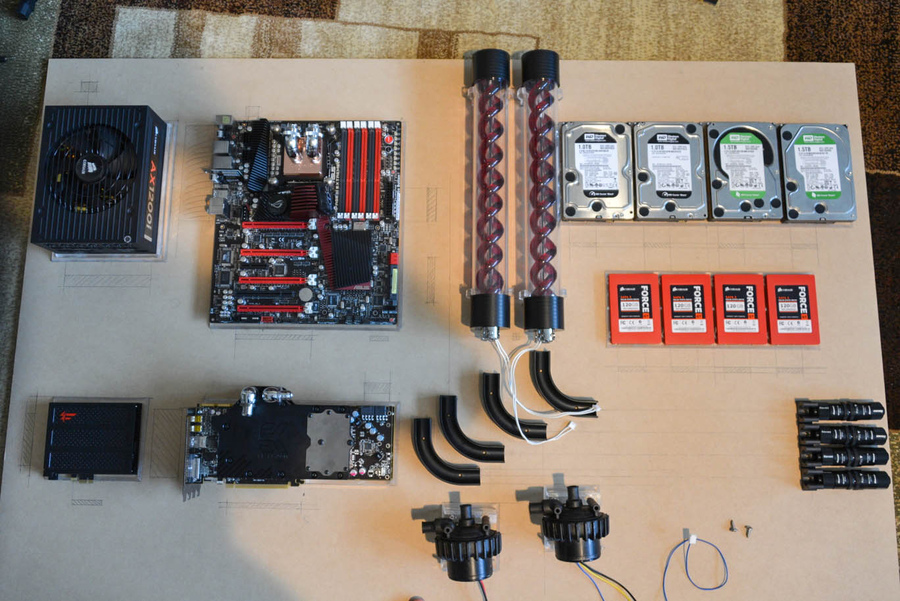
For a start, I took photos of all the components in their real sizes and put it all together in Photoshop. So I was able to move them around the work surface and decide how it would look. Well, it is necessary for wiring the cooling tubes. Here are a couple of layouts:

From this refused, because of the empty space in the lower right corner. A motherboard was on the left, although it should be in the center and attract attention to the entire panel.
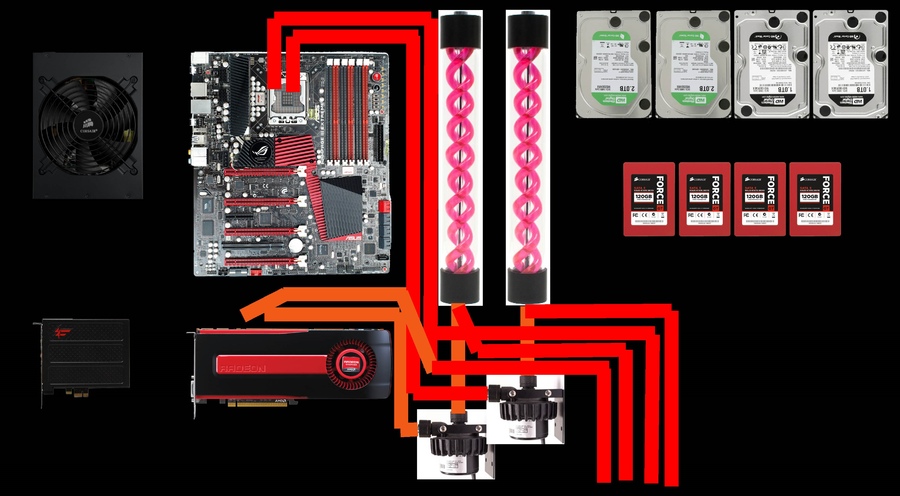
Here, too, a lot of space on the right, although the power supply and the motherboard is closer to the center. In the final version, the cooling tubes stretch along the entire right edge, plus there appeared two thermometers.

I transfer the drawing of the motherboard to an acrylic sheet.

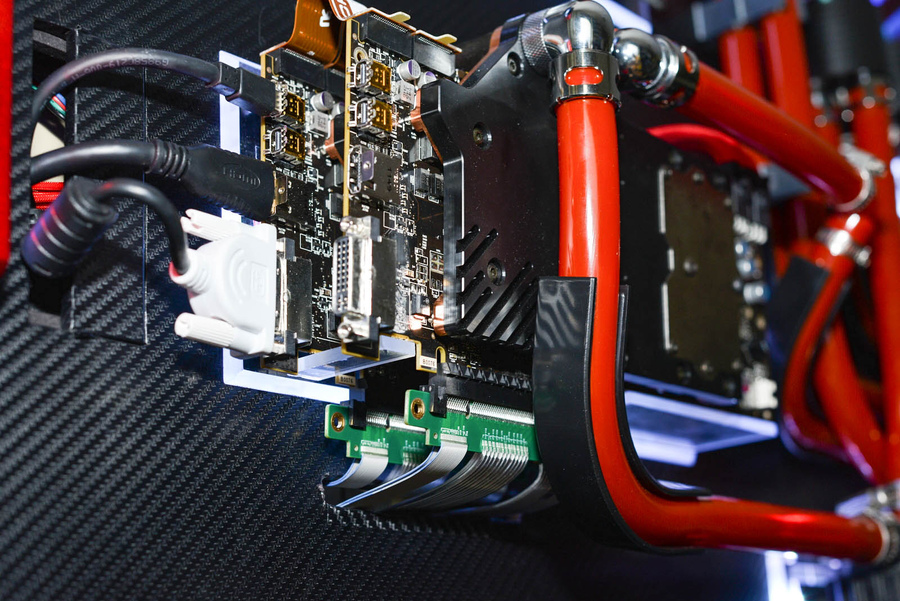
Since the video adapters will be far away from the motherboard, I ordered extension cords for the PCIe slot for each of the cards on eBay. This is how I test how they work. True, then I had huge problems with the cross operation of the cards due to cheap unshielded wires. They were on top of each other and created serious interference. The system hung on loading Bios. It managed to run with only one card. In the end, I had to fork out for very expensive cables with good protection. But more about that later.
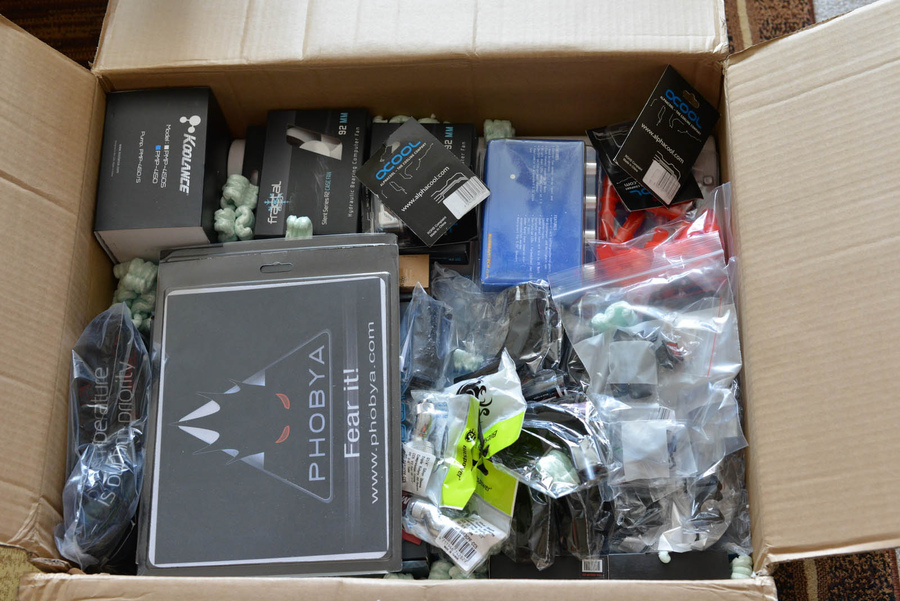
Item arrived!

Most of the water cooling is from Performance-PC. They even gave me a T-shirt and two whole mouse pads!
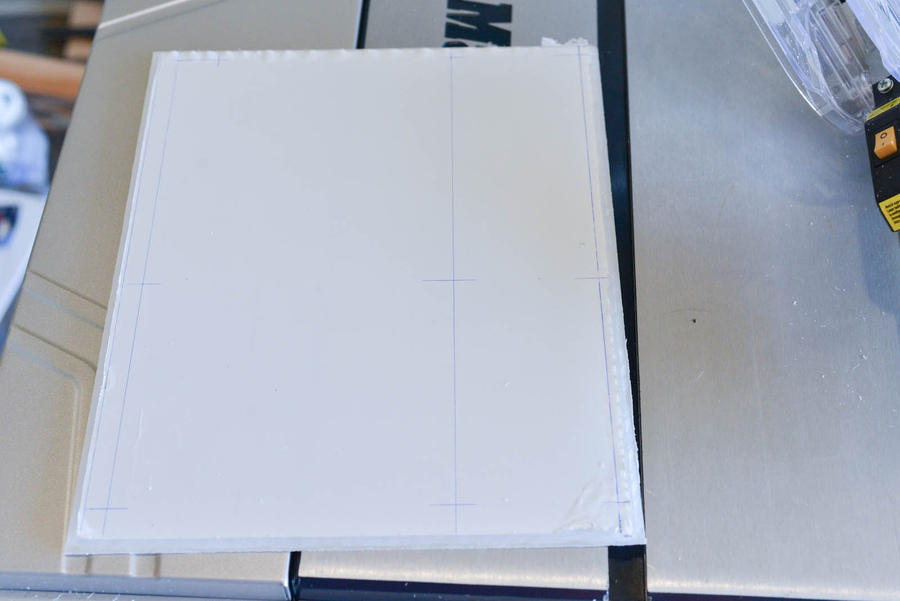
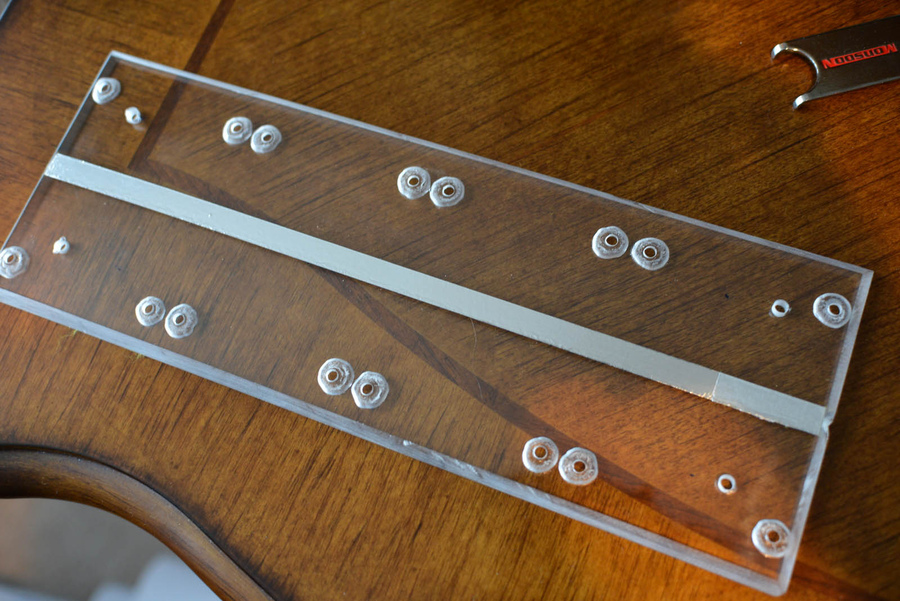
Acrylic substrate for the motherboard.
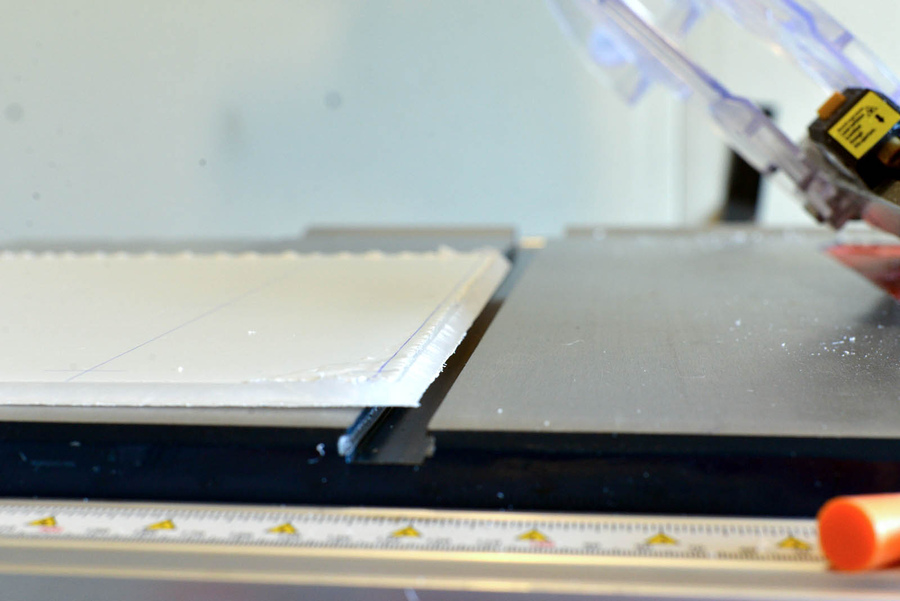
All acrylic panels are cut to 45 ° to achieve a glow effect.
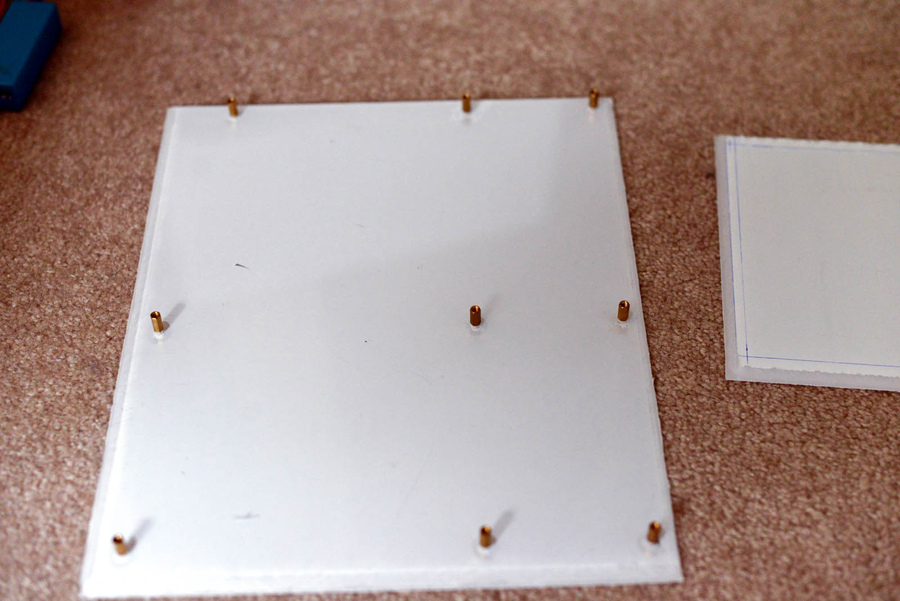
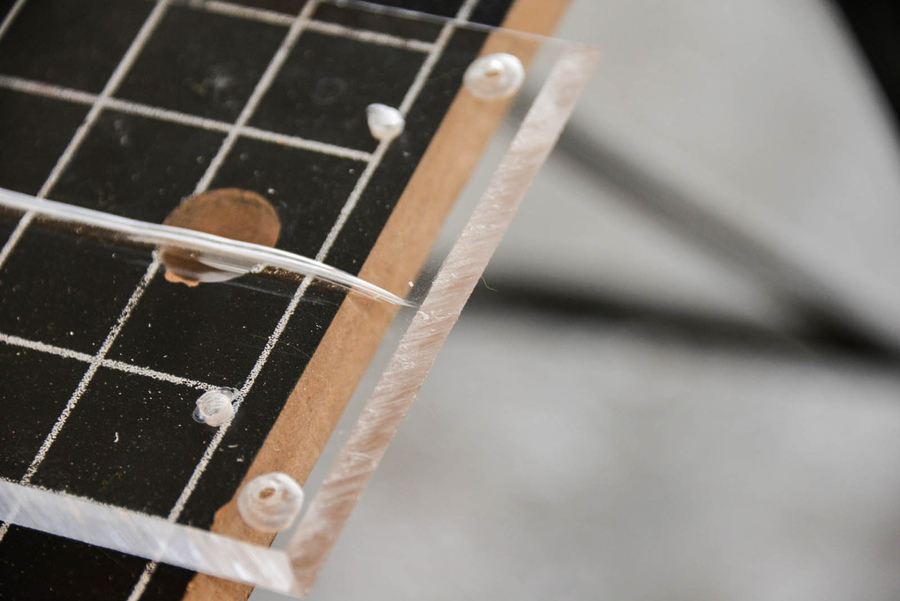
Holes drilled, mounts installed.
TA-dah!!! It turns out that Rampage III Extreme's mom is eATX format. And this is for the ATX form factor.
I made the right eATX background later.

It's time to gut my old dusty case.
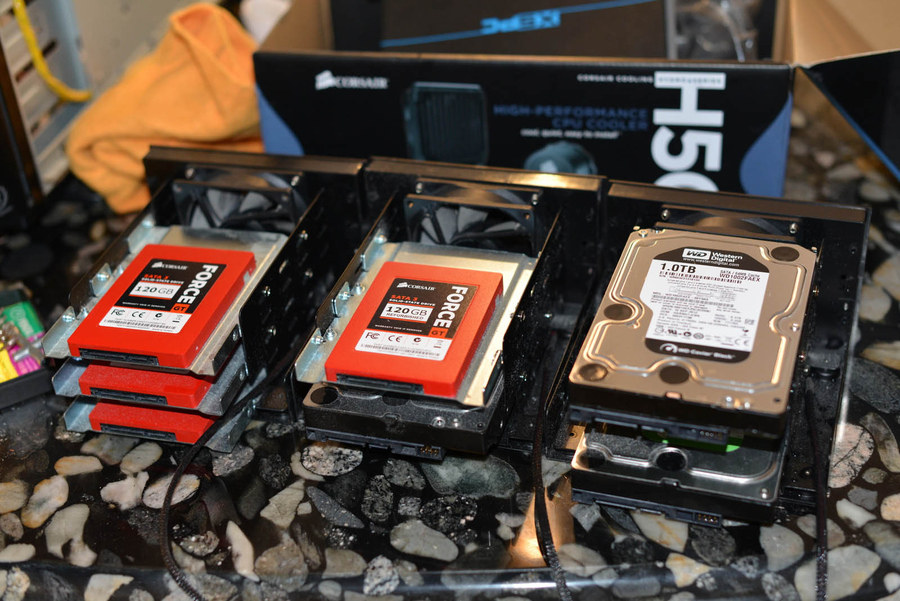
In the old computer, the disks are inserted into the Vantec HDCS boxes, which make 2 HDD boxes out of 2 5.25 "s.
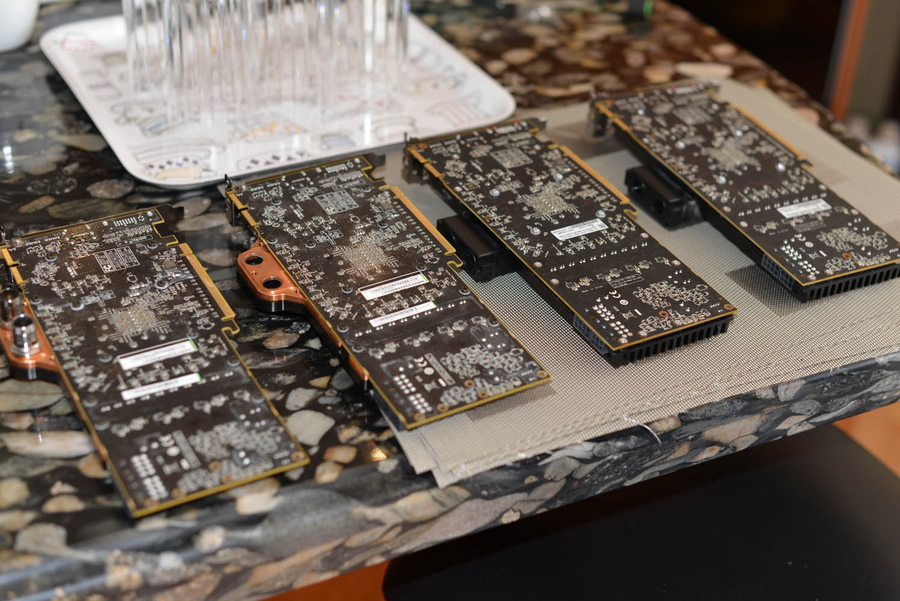


Videocards.
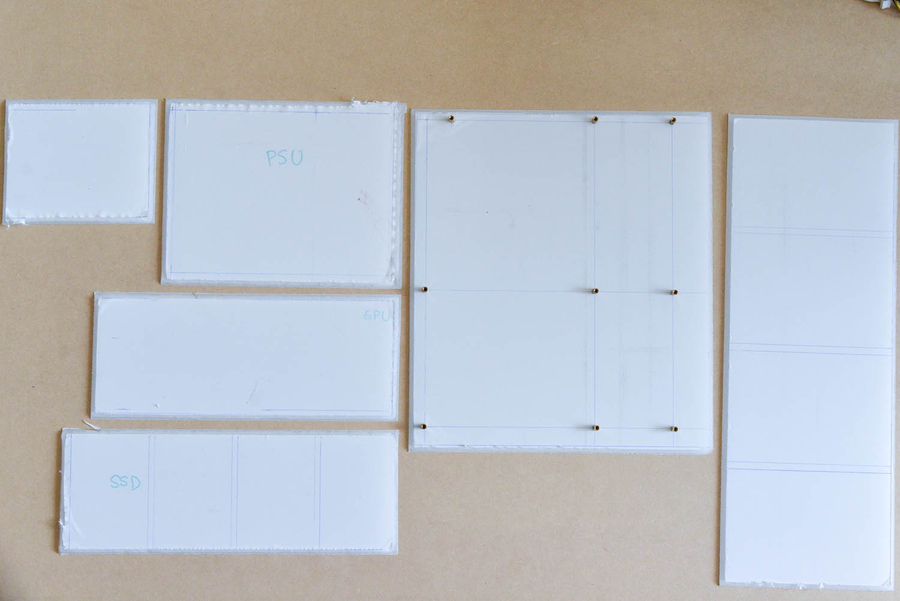
Substrates for all components.

Custom mounts for acrylic pump.
Close-up of a rough finish made with a table saw. Later they will need to be polished.
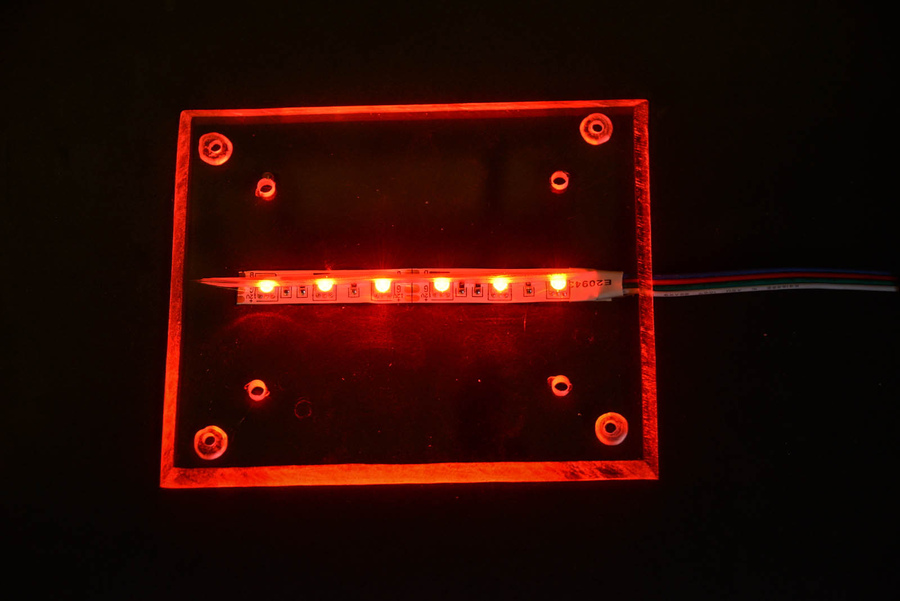
In the center of each plate there is a triangular cut. It will reflect light that is projected perpendicularly inside the plate at the edges. Without a cut, the edges barely glow.

Test with the included light on the panel with zvukovuha.
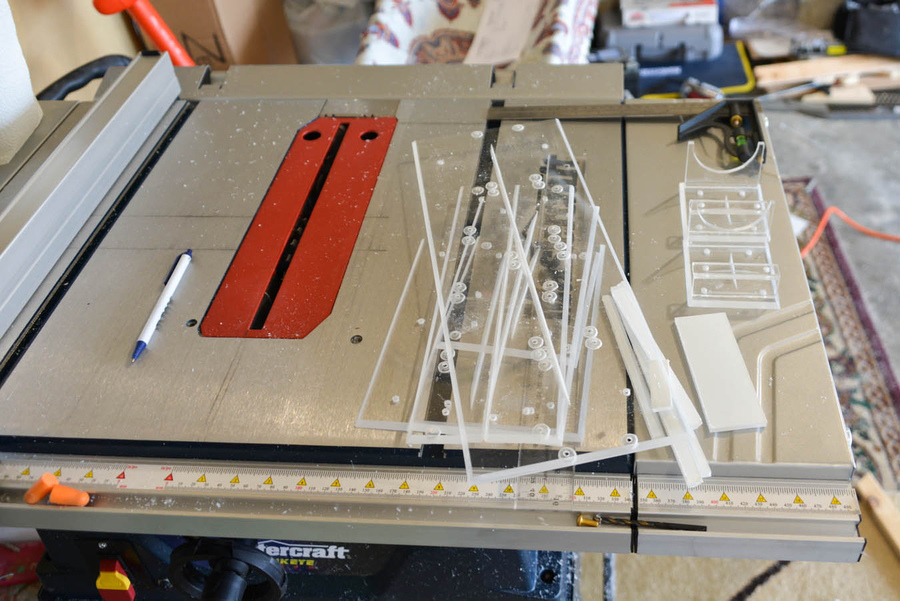
All panels are polished with a wet sandpaper at 120.
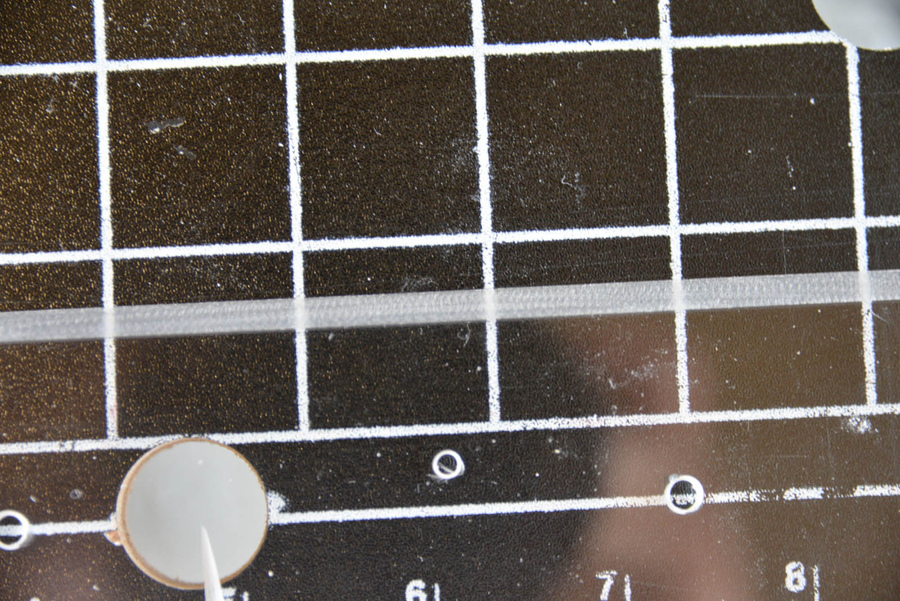
Close-up grinding.
All rear panels with pre-holes.
Acrylic snow under the table.

Preparation for painting in red.
Surprisingly, Corsair made thermal pads on the petals, although they do not heat up at all.
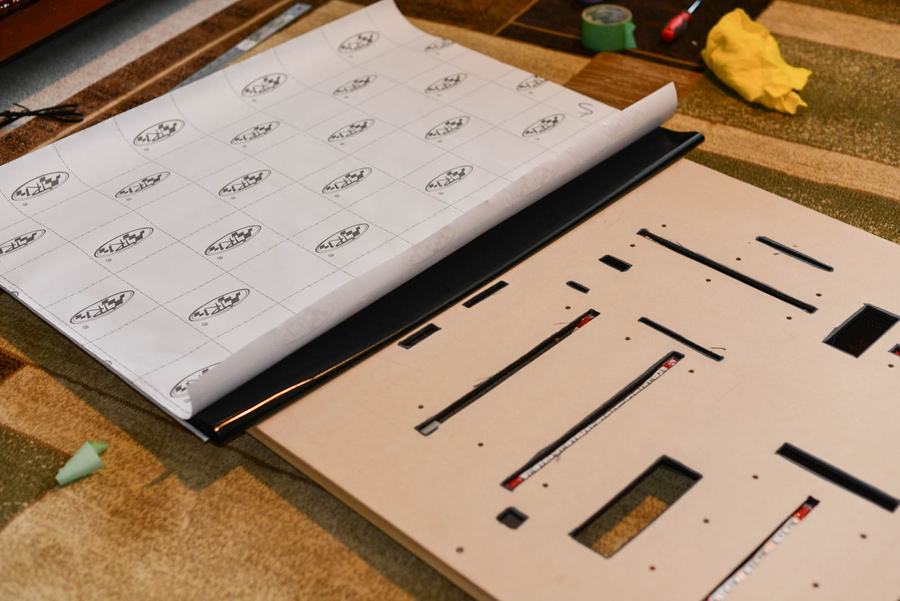
The layout of all components on the main board to mark the various slots and holes. Board - 1/4 "48 x 30 fiberboard.
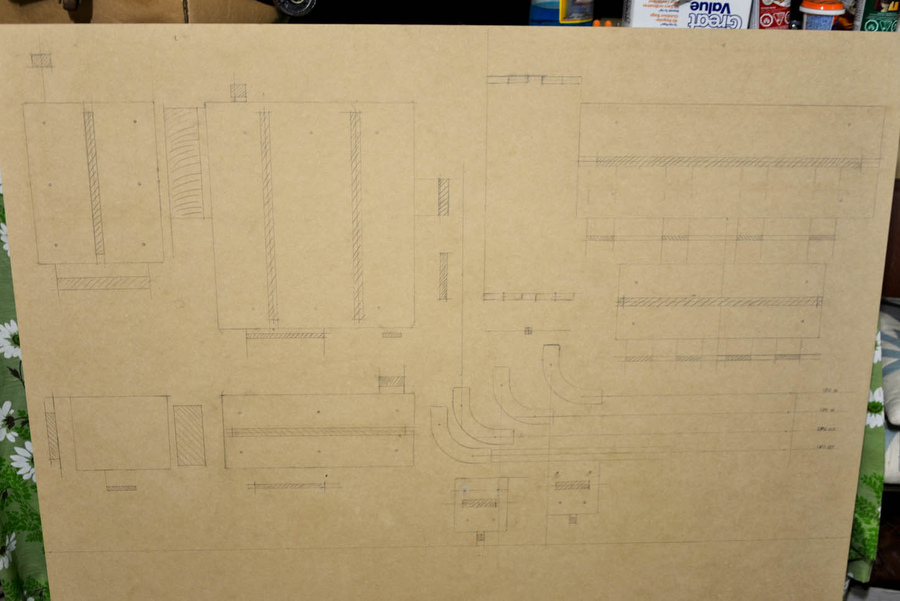
All slots and holes are marked in their places.

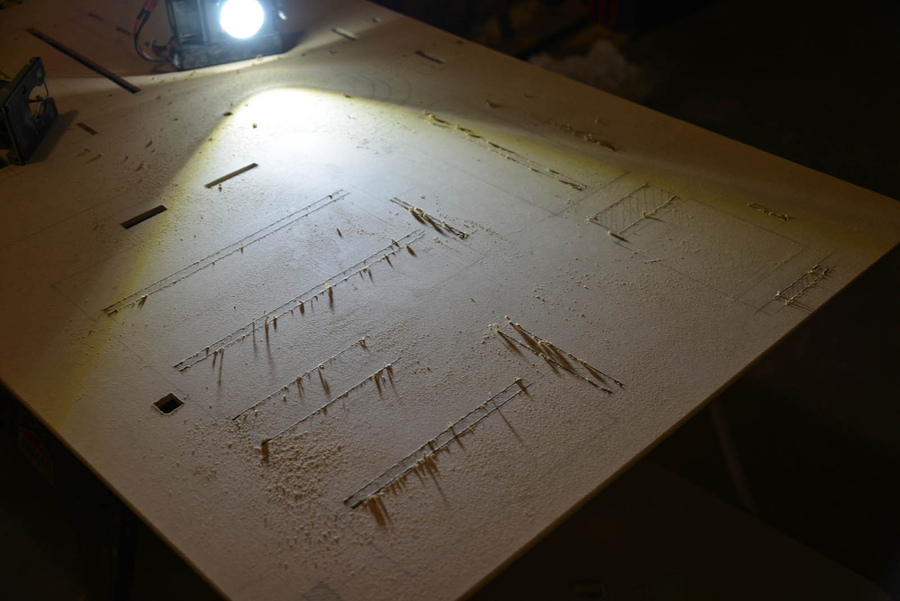
I'm getting ready to cut slots with a jigsaw.


I attach the frame.


I paint the inner edges in black - the color of the carbon film.

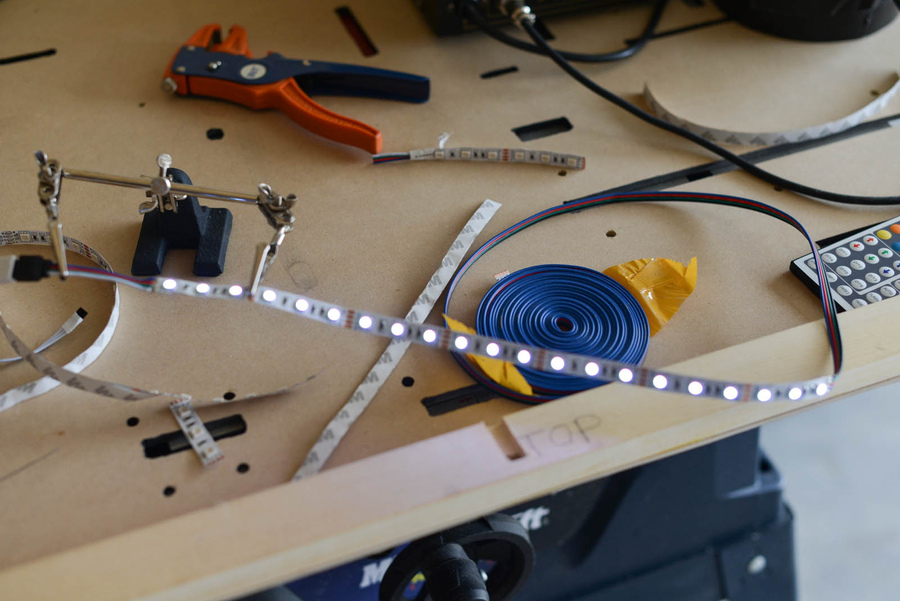
LED strip soldering.
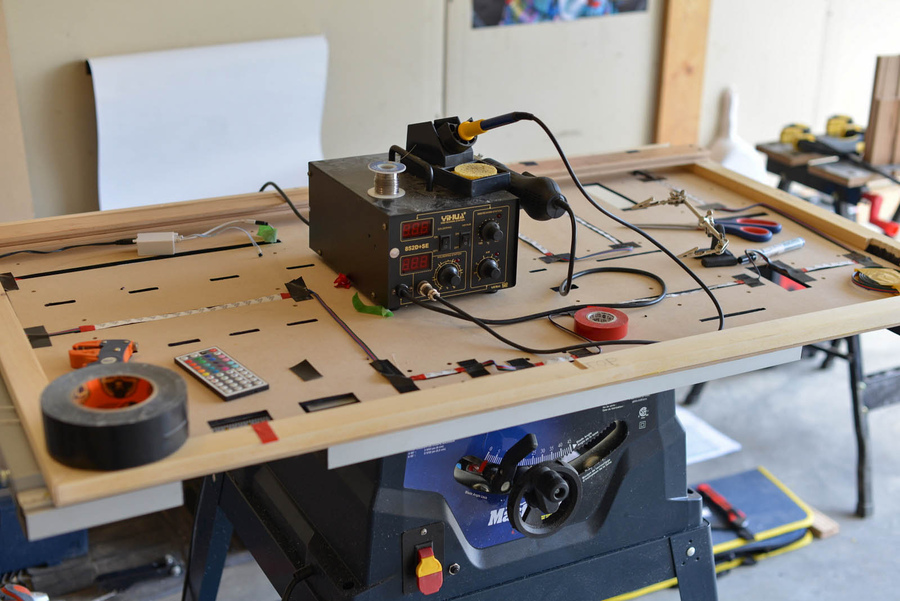
Workplace.


LED tapes. Temporary mount.
Clay giant vinyl wrap. It was the most cruel part. I almost got a heart attack. How to stick a film on the phone screen, only x1000 more.
No bubbles!


I use aluminum tape to hide the LED on the front side of the hard disk drive panel, in between.
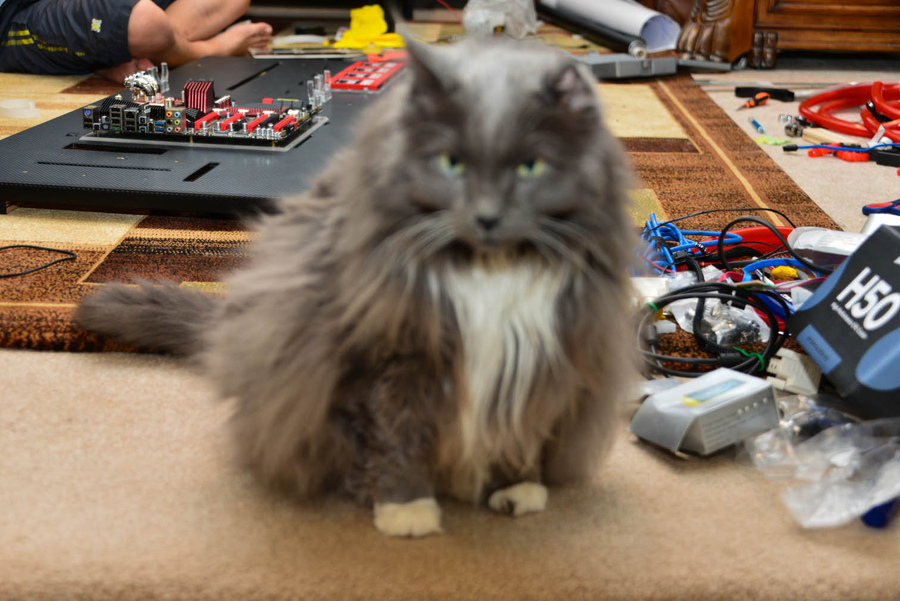
My assistant is Tommy.
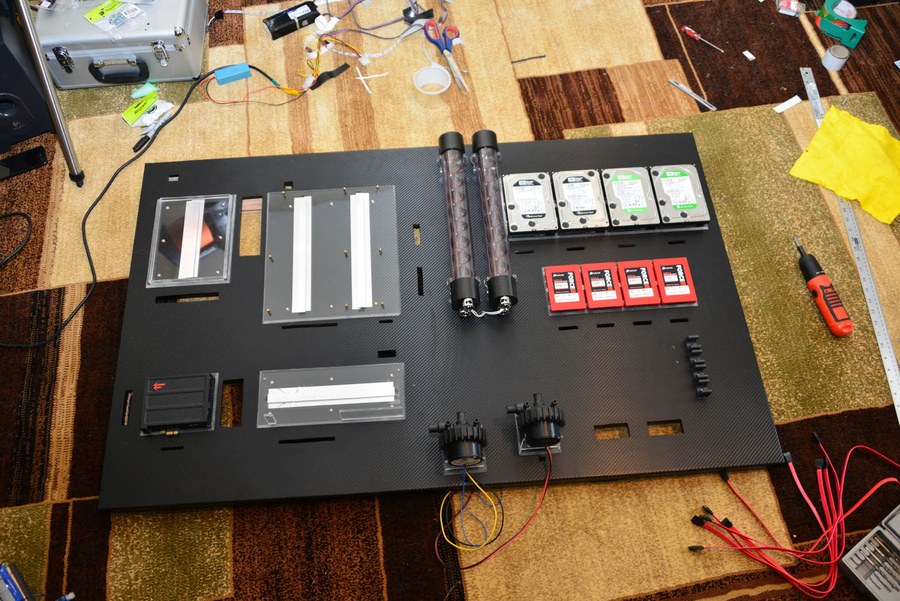
All substrates are installed in their places on the common board on screws №10. They are screwed into pre-prepared holes.

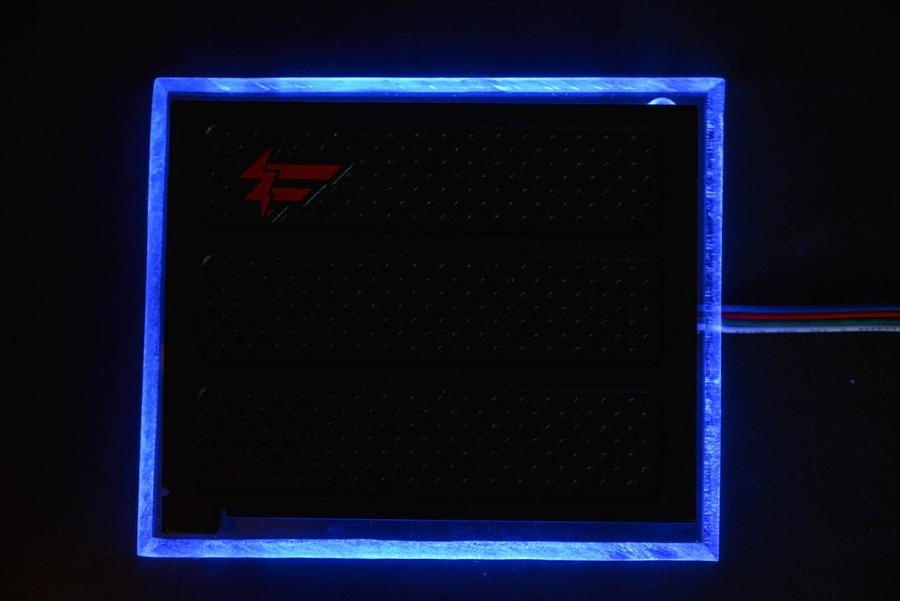
Check the light.
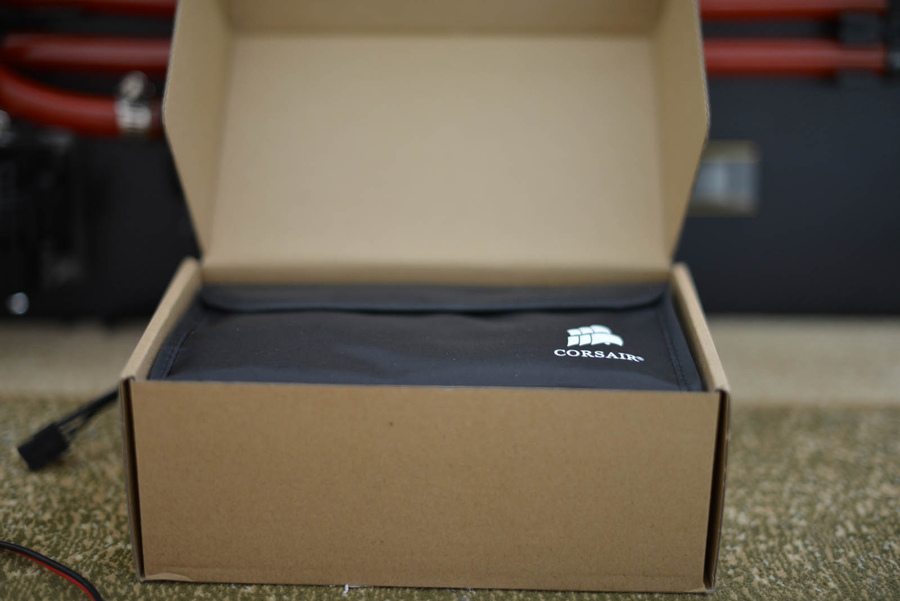
Coolant and cables arrived. I used Bitfenix for the components and Corsair for the power supply.
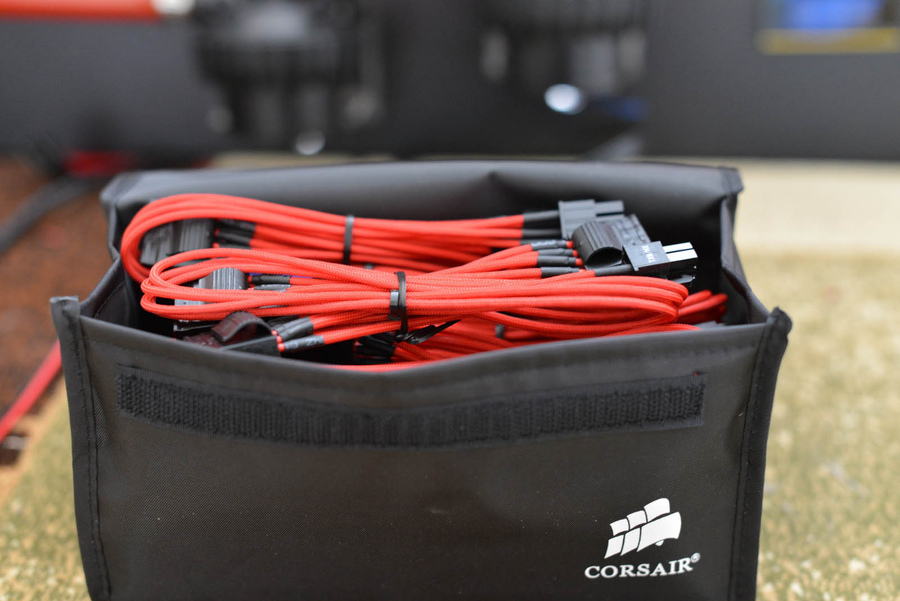
On the left - Bitfenix, on the right - Corsair. Bitfenix has no black shrink at the ends, so the Corsair looks cooler.

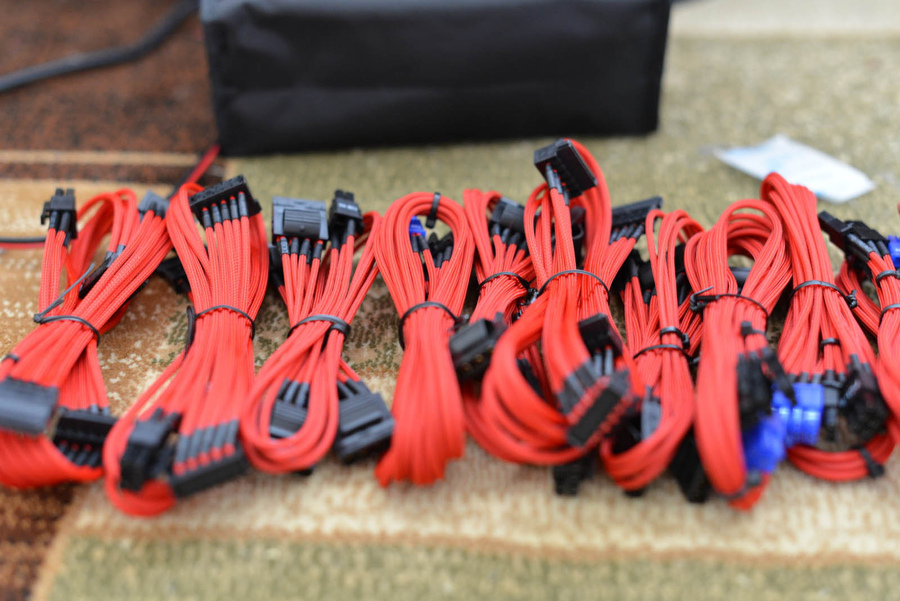
Red ties to tighten trailing wires.
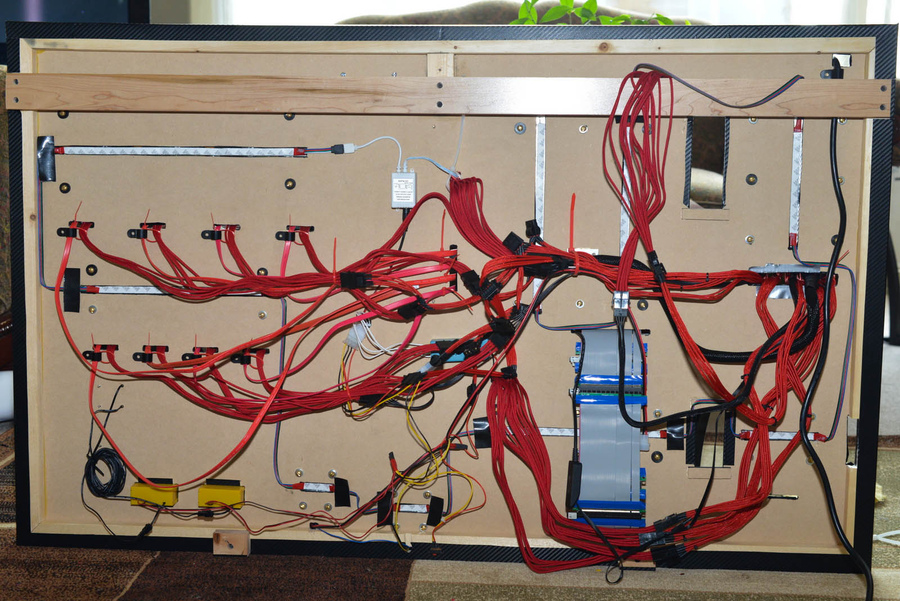
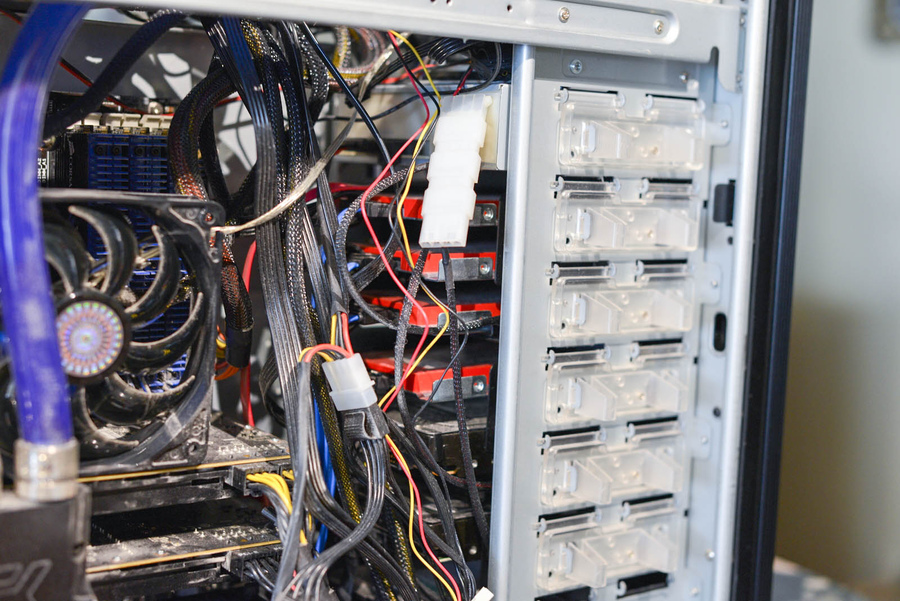
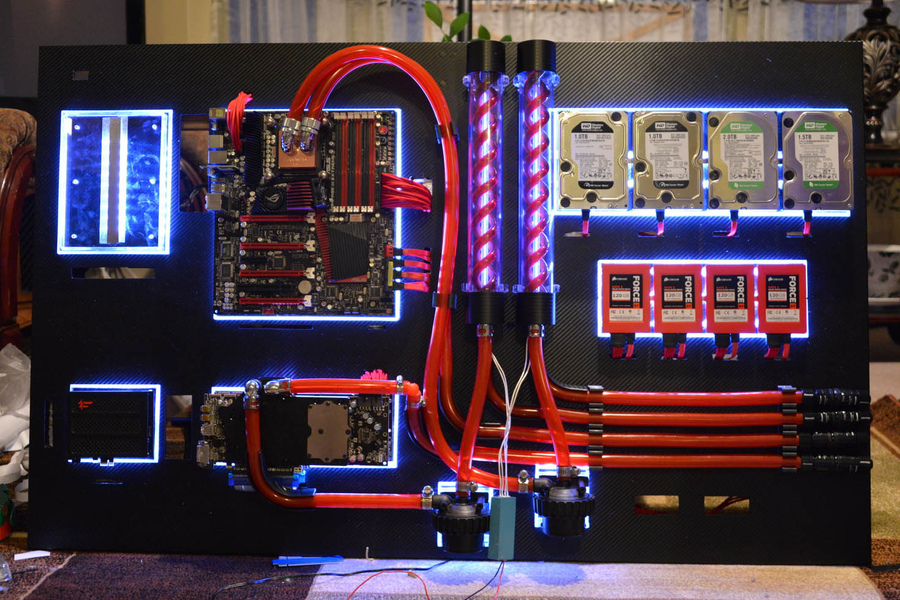
Backside. All cables are connected.

We test for tightness while the whole system is on the floor - it’s easier to fix problems.
Not loaded. I connected via iROG USB to my laptop to see the download log. It turned out - the system is stuck on the VGA BIOS. Disconnected one of the video cards - it all worked. I tried to connect another - it also works. Both cards are not. I did a little research and found that unshielded PCIe extension cables with ribbon cables are very susceptible to electromagnetic interference. I tried to screen them, wrapped in several layers of aluminum foil.
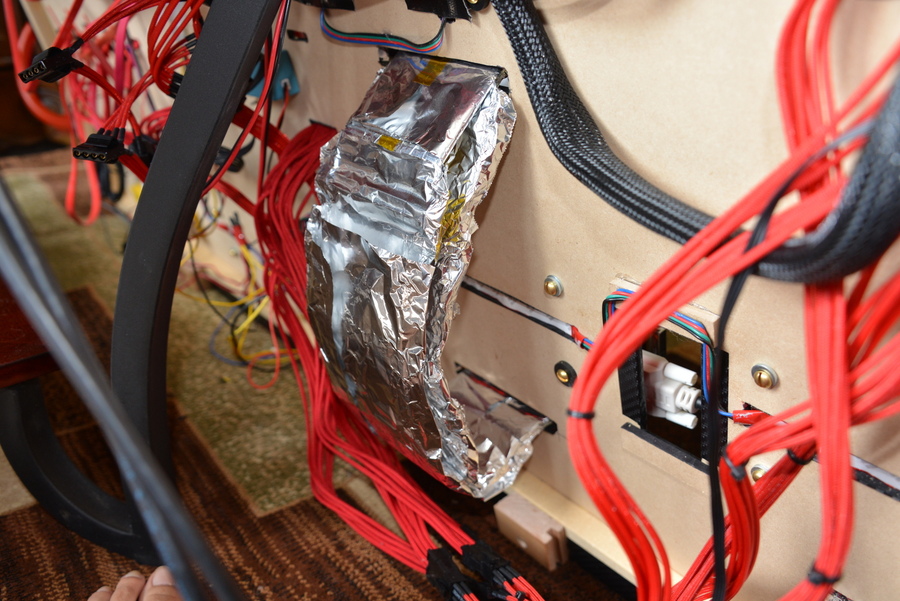

After 4 layers of foil I managed to launch both cards. But the car immediately hung as soon as it launched any game or any 3D editor. Moreover, my Soundblaster is also cascaded connected to a 3 x1 PCIe slot, and this also greatly hampered the work of the video and hung up the system.
As a result, with pain in my heart, I had to order expensive protected extenders for 3M PCIe slots (about $ 100 each)
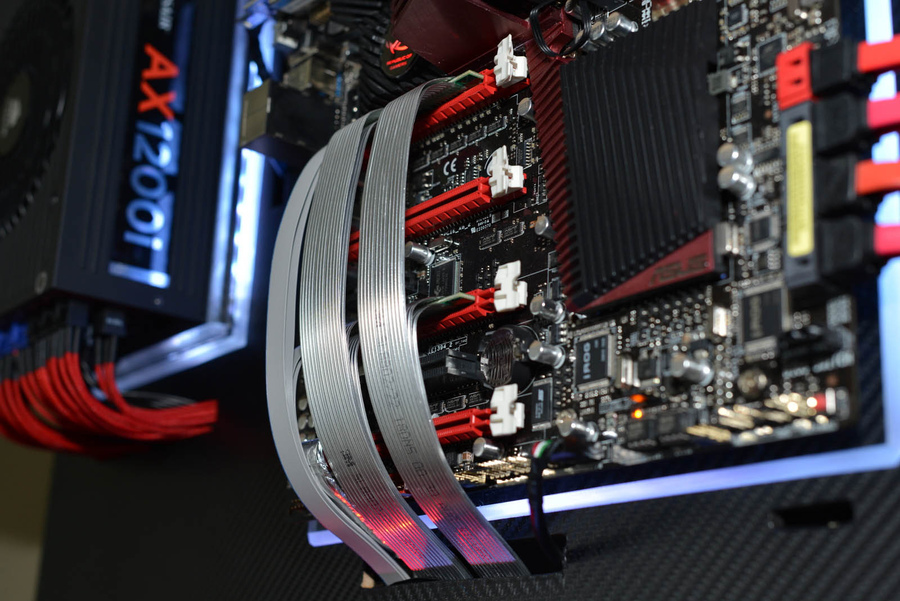
3M shielded extension cords in place. They turned out to be longer than the previous ones and now both video cards have reached PCIe x16.
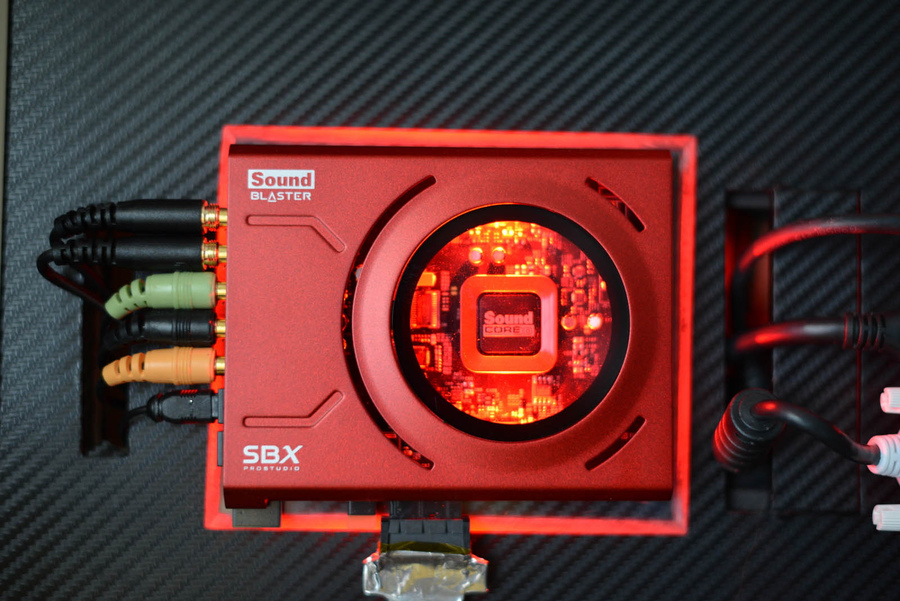
Changed the previous sound on the SoundBlaster Zx. This one looks amazing!

At the moment everything is running smoothly. The installation has only 2 fans. At the BP, it barely moves, and I put another one on the chipset - very quiet. The pump runs at the lowest power, so the computer is pretty quiet. The only thing that is annoying is that it turned out that the work of some components is heard outside the case. In my case, this is the buzz of vidyuh and 1TV hard drive.
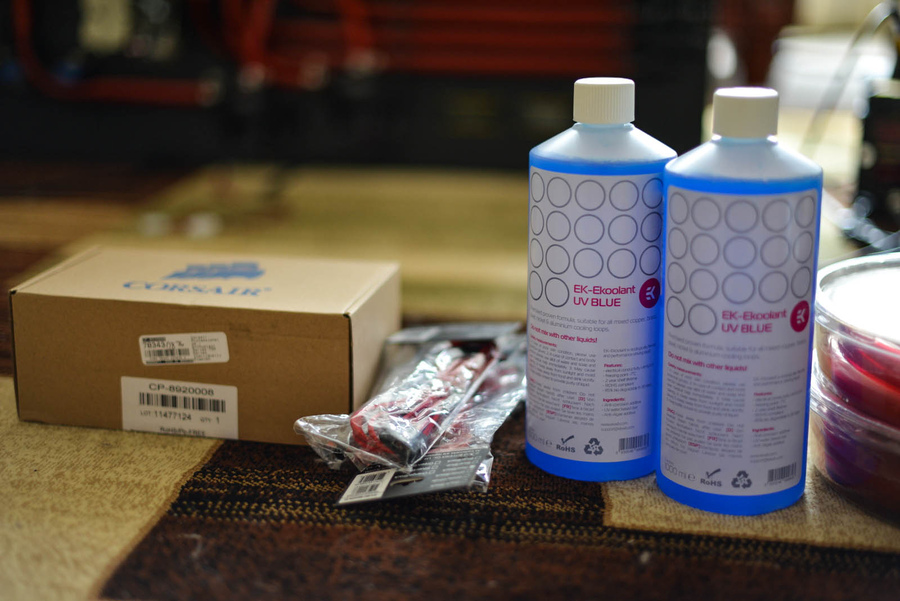
EK UV refrigerant is very sensitive to ultraviolet. I know that you cannot mix coolants in order to preserve their properties, but what the hell if I used it undiluted I would not be able to see the spirals in the tank. For both circuits, I took about 1/8 of the can, the rest is distilled water.
I do not pretend to at least any authorship of this incredible project. I just - a journalist, with the formation of an electronics engineer, and to do such things is my dream. And honestly, I would have made a table, not a wall. So I decided, all of a sudden, not all Habrovcans are sitting on www.overclock.net
Here is a link to the original in English: tyts
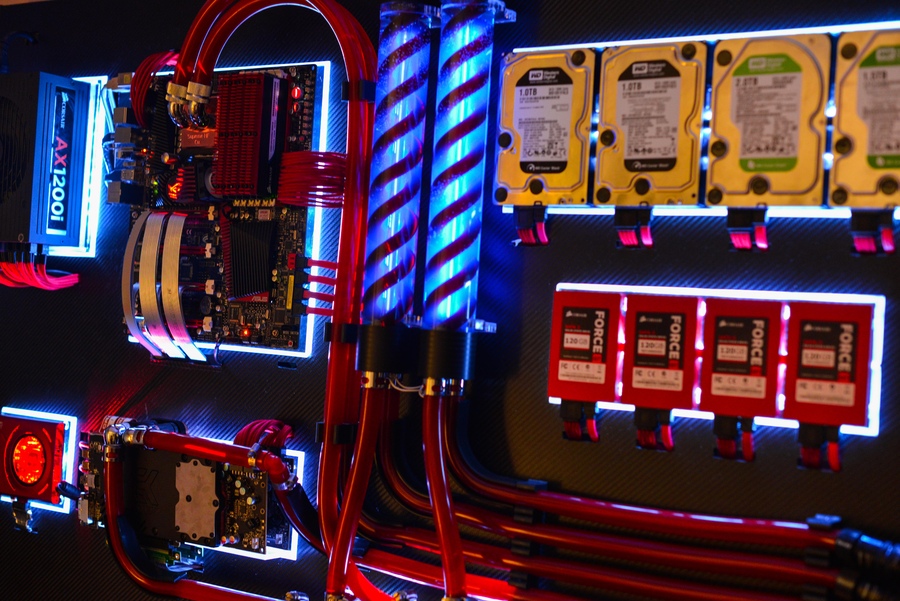
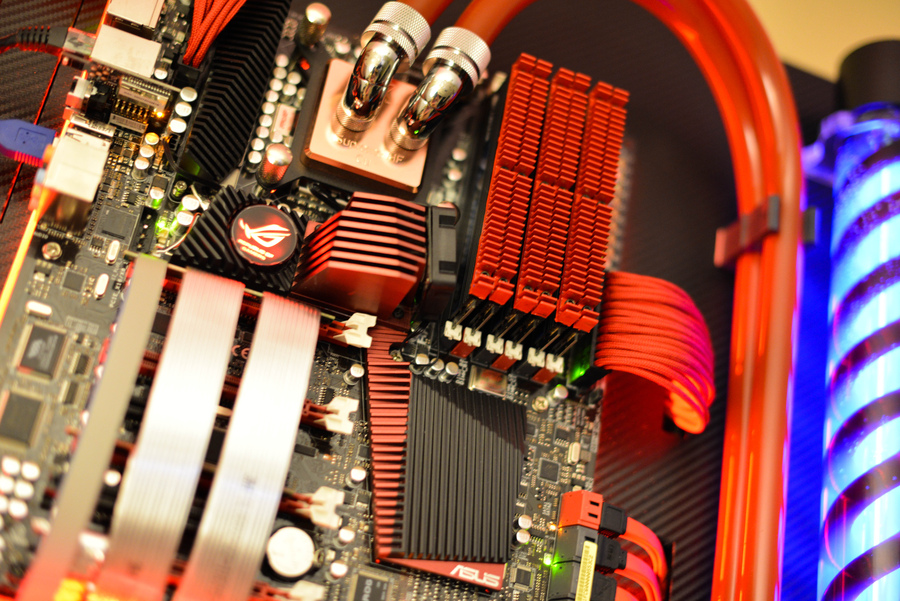
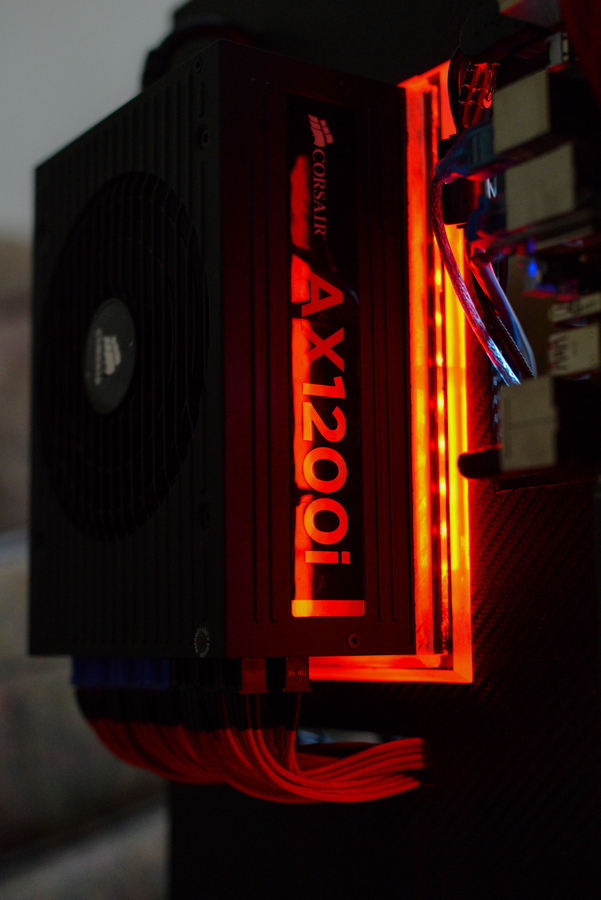
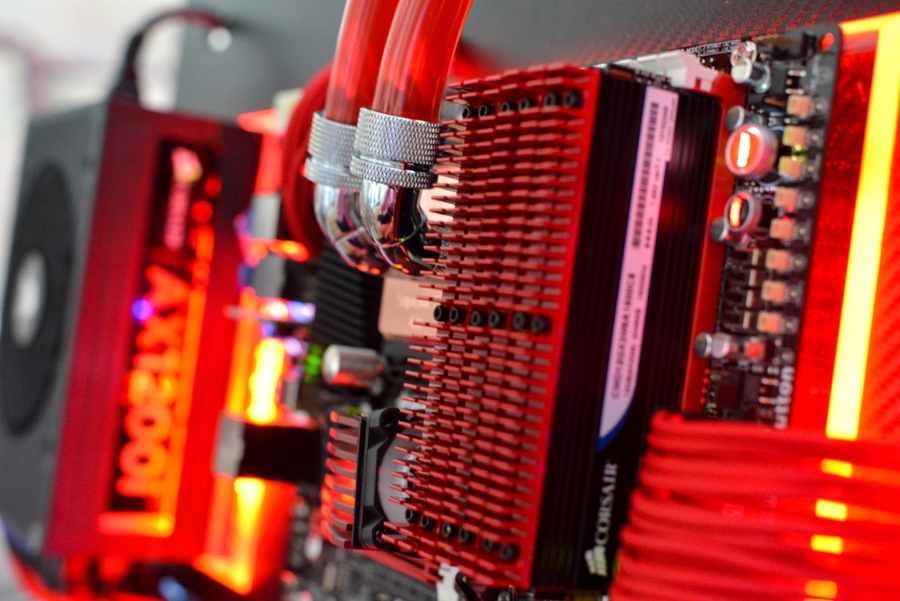
Here are some more photos:


This is a translation of the post from the Overclock.net forum. The user of Show4Pro decided to pull out all the insides of his super company and hang everything on the wall. Great idea beautifully implemented. Who cares how it was going and how it works - Wellcome under cat.
')
Introduction
Hey everyone! I just finished installing water cooling on my wall. All the work took me 4 weeks and 100+ hours, and now I want to share with you a completed project and photos of the installation and the process itself. Enjoy!
Last time I updated my home machine 1.5 years ago. Well, I thought to upgrade the car to i7 (before that was Bloomfield), although in fact, I did not need a more powerful processor. I wanted to buy a new case - the Corsair 900D, to change the 8 year old Super Armor. But I wanted something special, unique. In Battlestations on Reddit, I came across a very simple, but elegant solution - a wall-mounted computer. And the whole project began with this.
Accessories:
Processor: Intel Core i7 950
Motherboard: Asus Rampage III Extreme
Video: 2 x AMD HD7970
RAM: 6 x 2GB Corsair Dominator
SSD drives: 4 x 120GB Corsair Force GT SSD
HDD drives: 2 x 1TB WD Caviar Black
2TB WD Caviar Green
1.5TB WD Caviar Green
Power supply: Corsair AX1200i
Sound: Creative Sound Blaster Zx
Cooling:
CPU cooling:
Radiator for CPU with water cooling EK Supreme HF Full Copper
Pump Swiftech MCP655 / w Speed Control
Himself cooler FrozenQ Liquid Fusion V Series 400 ml Reservoir - Blood Red
Radiator XSPC RX360 Performance Triple 120mm Radiator
GPU cooling
Radiator for video card EK FC7970 - Acetal + EN
Pump and cooler are the same as for the pump.
Swiftech MCP655 / w Speed Control
FrozenQ Liquid Fusion V Series 400 ml Reservoir - Blood Red
Watercool MO-RA3 9x120 LT Radiator
Other:
Cooling system connections
Koolance QD4 Quick Discounnect No-Spill Coupling
Bitspower G1 / 4 Silver Triple Rotary 90deg Compression Fittings
Monsoon Free Center Compression Fittings
Phobya Angled Clip Pipe Bending Groove 90 ° Tubing Guide
Holder Phobya Terminal Strip Tubing Clip / Holder
Cooling tubes themselves (red) PrimoChill Advanced LRT Tubing Bloodshed Red
Phosphoric refrigerant, blue EK UV Blue Non-Conductive Fluid
Cables:
Bitfenix Alchemy Premium Sleeved Extensions
Corsair Individually Sleeved Modular Cables
Creature.
For a start, I took photos of all the components in their real sizes and put it all together in Photoshop. So I was able to move them around the work surface and decide how it would look. Well, it is necessary for wiring the cooling tubes. Here are a couple of layouts:
From this refused, because of the empty space in the lower right corner. A motherboard was on the left, although it should be in the center and attract attention to the entire panel.
Here, too, a lot of space on the right, although the power supply and the motherboard is closer to the center. In the final version, the cooling tubes stretch along the entire right edge, plus there appeared two thermometers.
I transfer the drawing of the motherboard to an acrylic sheet.
Since the video adapters will be far away from the motherboard, I ordered extension cords for the PCIe slot for each of the cards on eBay. This is how I test how they work. True, then I had huge problems with the cross operation of the cards due to cheap unshielded wires. They were on top of each other and created serious interference. The system hung on loading Bios. It managed to run with only one card. In the end, I had to fork out for very expensive cables with good protection. But more about that later.
Item arrived!
Most of the water cooling is from Performance-PC. They even gave me a T-shirt and two whole mouse pads!
Acrylic substrate for the motherboard.
All acrylic panels are cut to 45 ° to achieve a glow effect.
Holes drilled, mounts installed.
TA-dah!!! It turns out that Rampage III Extreme's mom is eATX format. And this is for the ATX form factor.
I made the right eATX background later.
It's time to gut my old dusty case.
In the old computer, the disks are inserted into the Vantec HDCS boxes, which make 2 HDD boxes out of 2 5.25 "s.
Videocards.
Substrates for all components.
Custom mounts for acrylic pump.
Close-up of a rough finish made with a table saw. Later they will need to be polished.
In the center of each plate there is a triangular cut. It will reflect light that is projected perpendicularly inside the plate at the edges. Without a cut, the edges barely glow.
Test with the included light on the panel with zvukovuha.
All panels are polished with a wet sandpaper at 120.
Close-up grinding.
All rear panels with pre-holes.
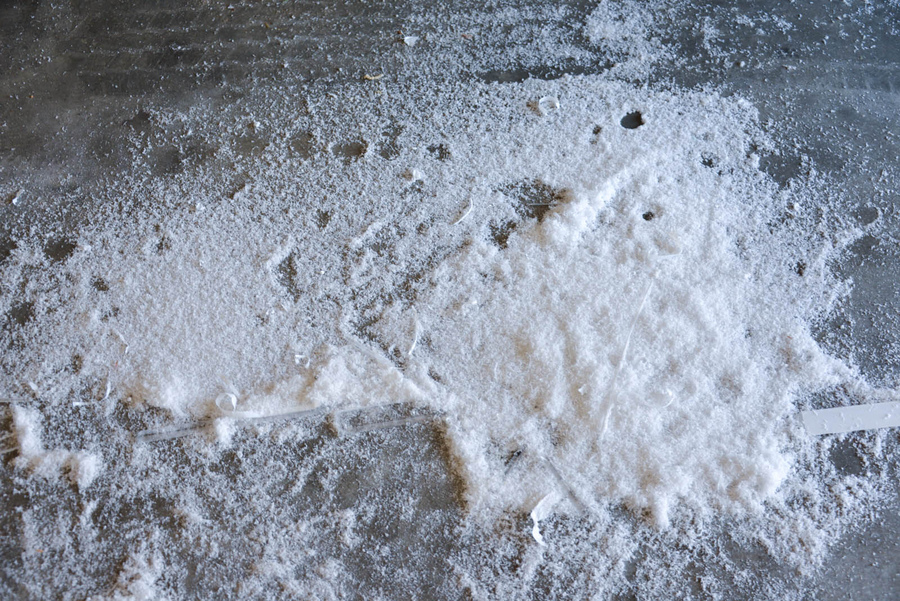
Acrylic snow under the table.
Preparation for painting in red.
Surprisingly, Corsair made thermal pads on the petals, although they do not heat up at all.
The layout of all components on the main board to mark the various slots and holes. Board - 1/4 "48 x 30 fiberboard.
All slots and holes are marked in their places.
I'm getting ready to cut slots with a jigsaw.
I attach the frame.
I paint the inner edges in black - the color of the carbon film.
LED strip soldering.
Workplace.
LED tapes. Temporary mount.
Clay giant vinyl wrap. It was the most cruel part. I almost got a heart attack. How to stick a film on the phone screen, only x1000 more.
No bubbles!
I use aluminum tape to hide the LED on the front side of the hard disk drive panel, in between.
My assistant is Tommy.
All substrates are installed in their places on the common board on screws №10. They are screwed into pre-prepared holes.
Check the light.
Coolant and cables arrived. I used Bitfenix for the components and Corsair for the power supply.
On the left - Bitfenix, on the right - Corsair. Bitfenix has no black shrink at the ends, so the Corsair looks cooler.
Red ties to tighten trailing wires.
Backside. All cables are connected.
We test for tightness while the whole system is on the floor - it’s easier to fix problems.
First start.
Not loaded. I connected via iROG USB to my laptop to see the download log. It turned out - the system is stuck on the VGA BIOS. Disconnected one of the video cards - it all worked. I tried to connect another - it also works. Both cards are not. I did a little research and found that unshielded PCIe extension cables with ribbon cables are very susceptible to electromagnetic interference. I tried to screen them, wrapped in several layers of aluminum foil.
After 4 layers of foil I managed to launch both cards. But the car immediately hung as soon as it launched any game or any 3D editor. Moreover, my Soundblaster is also cascaded connected to a 3 x1 PCIe slot, and this also greatly hampered the work of the video and hung up the system.
As a result, with pain in my heart, I had to order expensive protected extenders for 3M PCIe slots (about $ 100 each)
3M shielded extension cords in place. They turned out to be longer than the previous ones and now both video cards have reached PCIe x16.
Changed the previous sound on the SoundBlaster Zx. This one looks amazing!
And finally
At the moment everything is running smoothly. The installation has only 2 fans. At the BP, it barely moves, and I put another one on the chipset - very quiet. The pump runs at the lowest power, so the computer is pretty quiet. The only thing that is annoying is that it turned out that the work of some components is heard outside the case. In my case, this is the buzz of vidyuh and 1TV hard drive.
EK UV refrigerant is very sensitive to ultraviolet. I know that you cannot mix coolants in order to preserve their properties, but what the hell if I used it undiluted I would not be able to see the spirals in the tank. For both circuits, I took about 1/8 of the can, the rest is distilled water.
From translator
I do not pretend to at least any authorship of this incredible project. I just - a journalist, with the formation of an electronics engineer, and to do such things is my dream. And honestly, I would have made a table, not a wall. So I decided, all of a sudden, not all Habrovcans are sitting on www.overclock.net
Here is a link to the original in English: tyts
Here are some more photos:
Source: https://habr.com/ru/post/194774/
All Articles