Align the horizon in gfranq.com photo service
The photo service gfranq.com has the opportunity to align the photos at an arbitrary angle! This angle is calculated automatically, but if necessary, it can be easily changed manually. The horizon line can be drawn with the right mouse button, and the photo being processed can be rectangular, unlike an instagram. Moreover, there is an option to keep the original image size or to cover the maximum area in the rotated image.

Anyone wishing to learn how the automatic leveling method works with us, and what algorithms were used, welcome under cat.
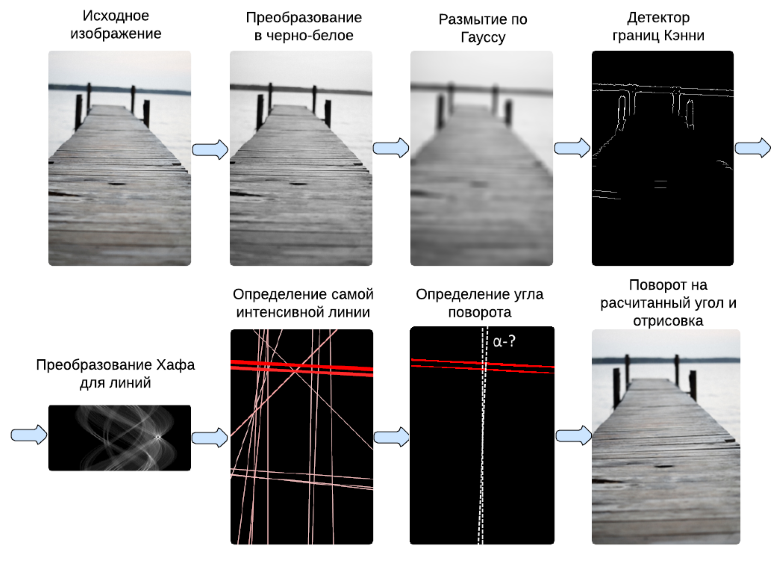
In order for the automatic alignment of the horizon to work at an acceptable level for most of the photos, it was decided to divide this task into the following steps:
')
Further, these steps will be discussed in detail.
To determine the boundaries, it was decided to use the detector of Kenny's boundaries, based on subjective and objective considerations (which can be read in Wikipedia ).
The Kenny algorithm consists of the following steps:
After the borders on the image have been found (abrupt changes in brightness or other inhomogeneities), an algorithm for selecting straight lines can be applied to it, because the horizon line usually looks like a straight or almost straight line (possibly with noise). The Hough transform was chosen as this algorithm. However, this transformation can return a very large number of lines, in addition, it returns an image (matrix), in which the corners of the lines are horizontally counted, and the distance from the center to the line is vertically, which is inconvenient for further steps. To solve these problems, the function of converting lines from polar to rectangular coordinates was written:
The function of calculating the angle between perpendiculars passing through the center of the image with dimensions of width and height and a line with coordinates x1, y1, x2, y2 and a horizontal line (in other words, the angle to which the image is rotated to the horizon x1, y1, x2, y2 turned out to be aligned horizontally):
It is worth noting that if the calculated angle exceeds a certain specified rotation value (in our case it is 45 °), then automatic rotation will not be performed.
After the angle to rotate the image is calculated, it is necessary to calculate the dimensions of the maximum rectangle inscribed in the rotated image. It should be noted that this rectangle can be either proportional (in this case, the original image size is preserved, that is, part of the inscribed image is stretched to its original size), and disproportionate, covering the entire maximum area in the rotated image.
To solve this problem, the corresponding question on stackoverflow was found and one of the answers was modified in the following code: link to stackoverflow .
For a better understanding of the above steps, I prepared a graphic illustration of the process:

Our project is designed in such a way that the code of certain modules is written in C #, which is compiled both under .NET and under JavaScript, which was described in a previous article . Accordingly, the code and this module was also written in C #. For this, we had to use one-dimensional arrays instead of two-dimensional, and also take into account some other limitations of Script # .
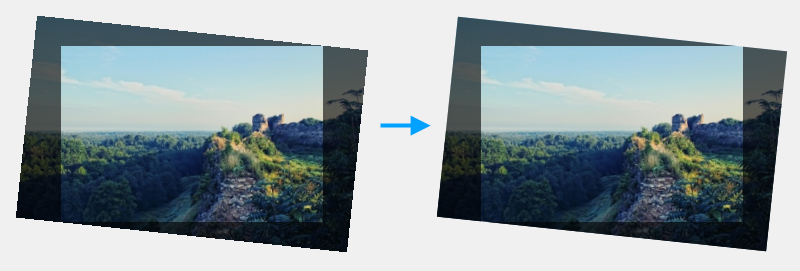
Unfortunately, there is a bug in Google Chrome, which consists in the lack of smoothing of images on borders during transformations (for example, turns), which is clearly shown in the figure below on the left, while the images themselves are correctly interpolated. In other modern versions of browsers (IE, Firefox, Safari, Opera), this bug was noticed. Therefore, a way to avoid this was invented: you can simply draw a transparent border around the image (i.e., the image will be 2 pixels smaller) with the following code:
Thus, it was possible to achieve a smoothing effect in all browsers (figure below on the right).

By varying the coefficients in the algorithm for determining the boundaries and the Hough transform, it was possible to achieve acceptable quality and speed of automatic alignment, which was tested on several examples of images. And on those images where the method works incorrectly, the angle can be easily corrected manually in two ways, as you can see on our photo service gfranq.com by adding a new one or editing an existing photo.
On mobile platforms ( iOS and Android ), the photo alignment feature will appear in the near future.

Anyone wishing to learn how the automatic leveling method works with us, and what algorithms were used, welcome under cat.
Auto Horizon Leveling Method
In order for the automatic alignment of the horizon to work at an acceptable level for most of the photos, it was decided to divide this task into the following steps:
')
- Defining boundaries.
- Definitions of straight lines.
- Calculate the most intense line.
- The calculation of the angle between the line found and the center of the image.
- Rotate the image at the calculated angle.
- Calculation of the maximum rectangle inscribed in the rotated image.
Further, these steps will be discussed in detail.
Determination of boundaries (Cany operator).
To determine the boundaries, it was decided to use the detector of Kenny's boundaries, based on subjective and objective considerations (which can be read in Wikipedia ).
The Kenny algorithm consists of the following steps:
- Convert the image to black and white.
- Blur image according to Gauss.
- Search gradients.
- Suppression of non-maximums and ambiguity tracing.
Definition of straight lines (Hough transform).
After the borders on the image have been found (abrupt changes in brightness or other inhomogeneities), an algorithm for selecting straight lines can be applied to it, because the horizon line usually looks like a straight or almost straight line (possibly with noise). The Hough transform was chosen as this algorithm. However, this transformation can return a very large number of lines, in addition, it returns an image (matrix), in which the corners of the lines are horizontally counted, and the distance from the center to the line is vertically, which is inconvenient for further steps. To solve these problems, the function of converting lines from polar to rectangular coordinates was written:
Transformation of straight lines in polar coordinates into segments in rectangular coordinates
private static WeightedLine HoughLineToTwoPointLine(double theta, short radius, double intensity, int width, int height) { int r = radius; double t = theta; if (r < 0) { t += 180; r = -r; } t = (t / 180) * Math.PI; int w2 = width / 2; int h2 = height / 2; double x0 = 0, x1 = 0, y0 = 0, y1 = 0; if (theta != 0) { x0 = -w2; x1 = w2; double sint = Math.Sin(t); double cost = Math.Cos(t); y0 = (-cost * x0 + r) / sint; y1 = (-cost * x1 + r) / sint; } else { x0 = radius; x1 = radius; y0 = h2; y1 = -h2; } return new WeightedLine(x0 + w2, h2 - y0, x1 + w2, h2 - y1, intensity); } Calculating the resulting angle
The function of calculating the angle between perpendiculars passing through the center of the image with dimensions of width and height and a line with coordinates x1, y1, x2, y2 and a horizontal line (in other words, the angle to which the image is rotated to the horizon x1, y1, x2, y2 turned out to be aligned horizontally):
The code for calculating the resulting angle
public static double CalculateAngle(int width, int height, double x1, double y1, double x2, double y2) { double dx = x2 - x1; double dy = y2 - y1; double x3 = width / 2; double y3 = height / 2; double r = dx * dx + dy * dy; double nx = (dx * (x3 * dx - dy * y1) + dy * (dx * y3 + x1 * dy)) / r - x3; double ny = (dx * (y1 * dx - x1 * dy) + dy * (dx * x3 + dy * y3)) / r - y3; double result = Math.Atan2(ny, nx) + Math.PI / 2; if (result > Math.PI) result = result - Math.PI * 2; return result; } It is worth noting that if the calculated angle exceeds a certain specified rotation value (in our case it is 45 °), then automatic rotation will not be performed.
Calculating the resulting inscribed rectangle
After the angle to rotate the image is calculated, it is necessary to calculate the dimensions of the maximum rectangle inscribed in the rotated image. It should be noted that this rectangle can be either proportional (in this case, the original image size is preserved, that is, part of the inscribed image is stretched to its original size), and disproportionate, covering the entire maximum area in the rotated image.
To solve this problem, the corresponding question on stackoverflow was found and one of the answers was modified in the following code: link to stackoverflow .
For a better understanding of the above steps, I prepared a graphic illustration of the process:

Technical details
Our project is designed in such a way that the code of certain modules is written in C #, which is compiled both under .NET and under JavaScript, which was described in a previous article . Accordingly, the code and this module was also written in C #. For this, we had to use one-dimensional arrays instead of two-dimensional, and also take into account some other limitations of Script # .
Rotate images in Google Chrome
Unfortunately, there is a bug in Google Chrome, which consists in the lack of smoothing of images on borders during transformations (for example, turns), which is clearly shown in the figure below on the left, while the images themselves are correctly interpolated. In other modern versions of browsers (IE, Firefox, Safari, Opera), this bug was noticed. Therefore, a way to avoid this was invented: you can simply draw a transparent border around the image (i.e., the image will be 2 pixels smaller) with the following code:
context.draw(image, 1, 1, decImageWidth - 2, decImageHeight - 2); Thus, it was possible to achieve a smoothing effect in all browsers (figure below on the right).

Conclusion
By varying the coefficients in the algorithm for determining the boundaries and the Hough transform, it was possible to achieve acceptable quality and speed of automatic alignment, which was tested on several examples of images. And on those images where the method works incorrectly, the angle can be easily corrected manually in two ways, as you can see on our photo service gfranq.com by adding a new one or editing an existing photo.
On mobile platforms ( iOS and Android ), the photo alignment feature will appear in the near future.
Source: https://habr.com/ru/post/194580/
All Articles