Backing up from the cloud: instructions for use
It is no secret that backing up data and storing backups in a safe place protects against the sudden loss of important information. Automatic backup configuration will help minimize the risk of data loss. After all, it is easier to prevent a problem than to try to fix it.
Automatic backup is the copying of databases, which occurs in accordance with a specific schedule and without additional intervention from the user. The advantage of using it is obvious - unlike manual backup, this process can be run even during peak hours (when data access can be difficult due to increased server load). At the same time, the influence of external factors on the copying process is minimized.
Having backups on hand, you can easily restore data after such problems as:
')
• Malfunction of the carrier on which information was stored;
• User errors (for example, deleting a table);
• Technical failures (for example, damage to the disk or loss of connection to the server);
• Natural disasters.
In addition, backups are also useful for routine administrative purposes, for example, when transferring a database from one server to another or mirroring the database.
The instructions below explain how to set up automatic backup of databases in Jelastic using the Cron task scheduler.
Creating the environment
1. Log in to Jelastic and click the "Create Environment" button on the control panel.

2. In the environment settings window, select MySQL as the database. After that, specify the limits of resource use and the name of the environment, then click the "Create" button.

Literally in a minute the environment will be created.

3. Check your email - it should receive an email from REG.RU with a login and password for your database.
Backup Creation
1. Click on the “Configuration” button next to the database.

2. In the tab that opens, go to the Cron folder and open the MySQL file.

3. This file contains three sample Cron configuration parameters:
• To back up multiple databases (if they are created through the database management panel):
• To back up individual database tables:
• To back up all databases:
4. Select one of the configurations and specify:
• Script call frequency;
• Path to a standard or custom script (you can add your own script to the “Scripts” folder);
• Database name and password to access it (they come in by email after creating the environment). If you need to create backups of several databases or separate tables, enter their names separated by commas.
For example, if you need to create backup copies every 10 minutes, the line should look like this:

5. Do not forget to save the settings!
Check backups
1. Wait until the set copy time is appropriate;
2. Go to the "Settings" tab and open the folder with backups.
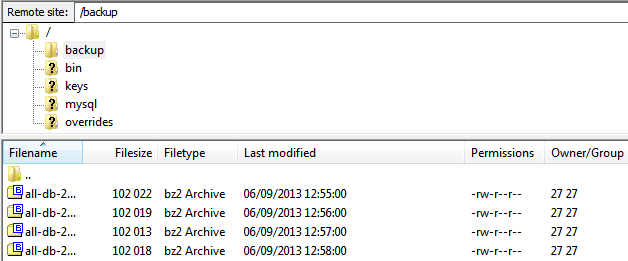
All backups in .bz2 format will be stored here.

Download backups
1. Install FTP for the database (detailed instructions can be found here ).

2. Connect to the MySQL / MariaDB database using any FTP client (for example, FileZilla) and upload the backup (.bz2 file).
Database recovery
1. Access phpMyAdmin using the data obtained after adding the DB node.
2. Click the Import tab and view the .bz2 file . Click "Next" .

3. After the import of files is completed, you will see the database with successfully recovered data.

That's all! Now you can enjoy all the benefits of automatic backup and always be sure that important data can be restored at any time.
You can get more detailed information about Jelastic cloud hosting on REG.RU website . By the way, now Jelastic has a 50% discount . Connect;)
Automatic backup is the copying of databases, which occurs in accordance with a specific schedule and without additional intervention from the user. The advantage of using it is obvious - unlike manual backup, this process can be run even during peak hours (when data access can be difficult due to increased server load). At the same time, the influence of external factors on the copying process is minimized.
Having backups on hand, you can easily restore data after such problems as:
')
• Malfunction of the carrier on which information was stored;
• User errors (for example, deleting a table);
• Technical failures (for example, damage to the disk or loss of connection to the server);
• Natural disasters.
In addition, backups are also useful for routine administrative purposes, for example, when transferring a database from one server to another or mirroring the database.
The instructions below explain how to set up automatic backup of databases in Jelastic using the Cron task scheduler.
Creating the environment
1. Log in to Jelastic and click the "Create Environment" button on the control panel.
2. In the environment settings window, select MySQL as the database. After that, specify the limits of resource use and the name of the environment, then click the "Create" button.
Literally in a minute the environment will be created.
3. Check your email - it should receive an email from REG.RU with a login and password for your database.
Backup Creation
1. Click on the “Configuration” button next to the database.
2. In the tab that opens, go to the Cron folder and open the MySQL file.
3. This file contains three sample Cron configuration parameters:
• To back up multiple databases (if they are created through the database management panel):
#0 1 * * * /var/lib/jelastic/bin/backup_script.sh -m dump -u USER -p PASSWORD -d db1[,db2,db3....]• To back up individual database tables:
#0 2 * * * /var/lib/jelastic/bin/backup_script.sh -m dump -u USER -p PASSWORD -d db -t table1[,table2,table3....]• To back up all databases:
#0 3 * * * /var/lib/jelastic/bin/backup_script.sh -m dumpall -u USER -p PASSWORD4. Select one of the configurations and specify:
• Script call frequency;
• Path to a standard or custom script (you can add your own script to the “Scripts” folder);
• Database name and password to access it (they come in by email after creating the environment). If you need to create backups of several databases or separate tables, enter their names separated by commas.
For example, if you need to create backup copies every 10 minutes, the line should look like this:
*/10 * * * * /var/lib/jelastic/bin/backup_script.sh -m dumpall -u root -p GGddHYJ5. Do not forget to save the settings!
Check backups
1. Wait until the set copy time is appropriate;
2. Go to the "Settings" tab and open the folder with backups.
All backups in .bz2 format will be stored here.
Download backups
1. Install FTP for the database (detailed instructions can be found here ).
2. Connect to the MySQL / MariaDB database using any FTP client (for example, FileZilla) and upload the backup (.bz2 file).
Database recovery
1. Access phpMyAdmin using the data obtained after adding the DB node.
2. Click the Import tab and view the .bz2 file . Click "Next" .
3. After the import of files is completed, you will see the database with successfully recovered data.
That's all! Now you can enjoy all the benefits of automatic backup and always be sure that important data can be restored at any time.
You can get more detailed information about Jelastic cloud hosting on REG.RU website . By the way, now Jelastic has a 50% discount . Connect;)
Source: https://habr.com/ru/post/194574/
All Articles